
【Python】通过python代码实现demo_test环境的登录,通过csv/txt/excel文件批量添加课程并开启课程操作--(刚开始 项目 页面 模块 元素这种鸟 被称作pageobject 等这些搞完 然后把你的定位器、数据 和脚本在分离 就是传说中那个叫数据驱动 的鸟)
一、
1.通过csv文件批量导入数据

 1 from selenium import webdriver

 from time import ctime,sleep

 import csv

 #循环读取每一行每一个字段csv

 bid_info = csv.DictReader(open('E:\\script\\python-script\\demo_test_courses.csv','r'))

 dict_data = []

 for lines in bid_info:

         if bid_info.line_num == 1:

             continue

         else:

             dict_data.append(lines)

 row_num = len(dict_data)#计算csv文件行数,从而得出i的循环限制数

 # print('this is all the data---' + str(dict))

 i = 0#初始化循环次数值

 while(i < row_num):

     #print('this is'+str(i)+'row----'+ str(dict_data[i]))

     #print(dict_data[i])

     print((dict_data[i])['first_name'])

     print((dict_data[i])['last_name'])

     #创建课程

     driver = webdriver.Chrome()

     driver.get("http://demo.pingnanlearning.com/test/login/index.php")

     driver.find_element_by_id("username").send_keys("grace")

     driver.find_element_by_id("password").send_keys("")

     driver.find_element_by_id("loginbtn").click()

     driver.find_element_by_link_text(u"系统管理").click()

     driver.find_element_by_link_text(u"添加课程").click()

     driver.find_element_by_id("").click()

     driver.find_element_by_class_name("kc_btn_next").click()

     driver.find_element_by_name("fullname").send_keys((dict_data[i])['first_name'])

     driver.find_element_by_id("idnumber").send_keys((dict_data[i])['last_name'])

     sleep(5)

     driver.find_element_by_xpath("//*[@id=\"course2\"]/div[2]/input[2]").click()

     sleep(5)

     driver.find_element_by_xpath("//*[@id=\"course3\"]/div[3]/input[2]").click()

     sleep(5)

     #课程开启操作

     driver.find_element_by_xpath("//*[@id=\"course4\"]/div[2]/input[3]").click()

     # a=driver.find_element_by_class_name("btn_switch").value

     # a=1

     #创建课程后将课程由默认状态“禁用”变更为“启用”

     driver.find_element_by_css_selector("#tip_s2>label").click()

     i += 1
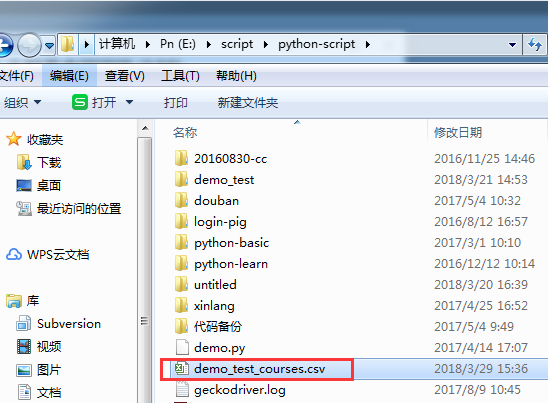
对应csv文件所在位置设定如下图:
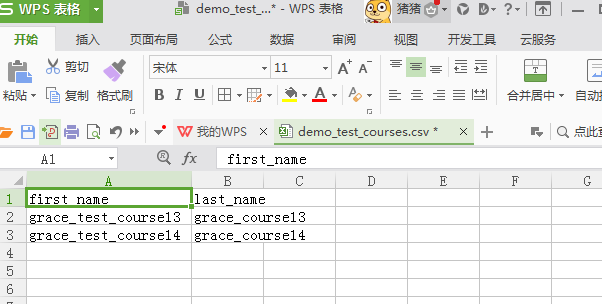
csv中文件内容如下:
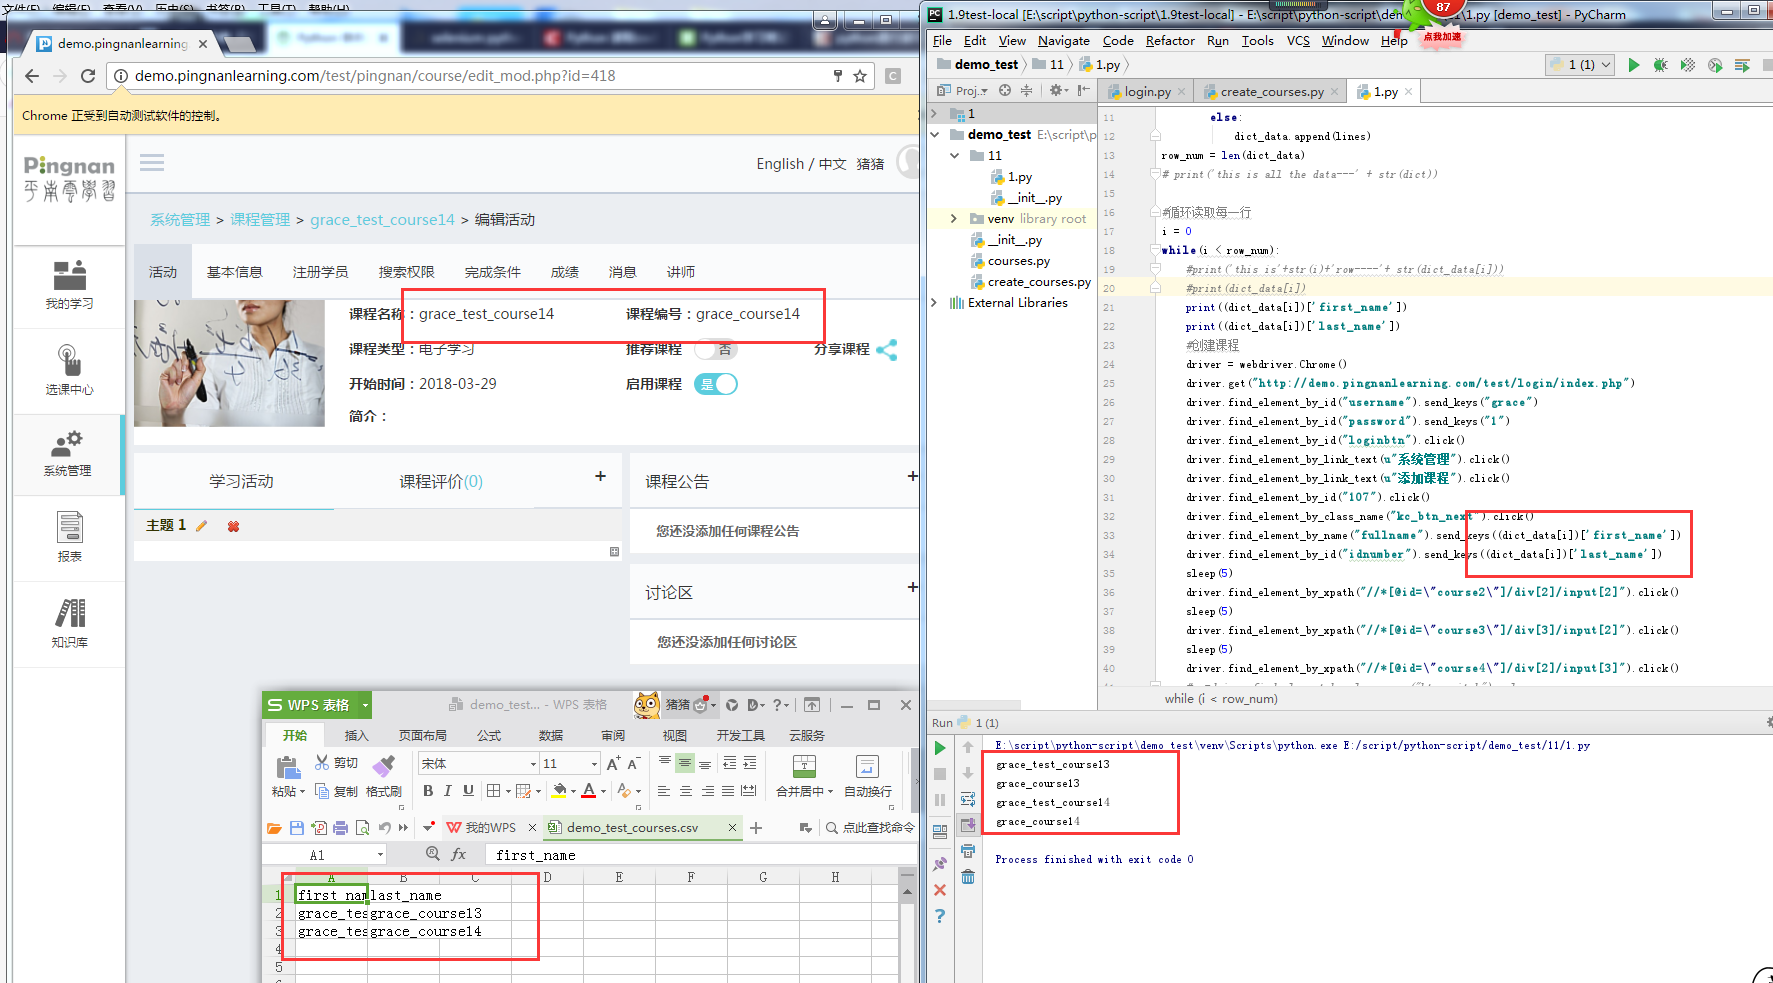
运行成功截图:
2.将上方读取的csv文件内容写入到已经创建好的csv文件中。
 #读取csv文件再讲读取的数据写入csv文件

 csvfile2 = open('E:\\script\\python-script\\demo_test_courses-w.csv','w',newline='')

 writer=csv.writer(csvfile2)

 i=0

 writer.writerow(('first_name','last_name'))

 while(i<row_num):

     print((dict_data[i])['first_name'],(dict_data[i])['last_name'])

     writer.writerow(((dict_data[i])['first_name'],(dict_data[i])['last_name']))

     i += 1

 csvfile2.close()
——————————————————————————————————————————
零散思路记录:
with open("E:\\script\\python-script\\demo_test_courses.csv","r") as csvfile:
reader=[each for each in csv.DictReader(csvfile)]
for row in reader:
print(row['first_name'],row['last_name'])
'''
reader = csv.reader(csvfile)
for i,rows in enumerate(csvfile):
if i==3:
row=rows
print(row)
'''
'''
rows=[row for row in reader]
print(rows)
row=csvfile.readline()
for row in reader:
for row in reader:
print(reader.line_num,row[0])
print(len(csvfile))
'''
二、通过txt文件批量导入数据,读取fullname和idnumber
 txtfile=open("E:\\script\\python-script\\demo_test_a\\demo_test_courses.txt","r")#引用的txt文件

 un = txtfile.readline()#读取一行数据

 i = 0

 new = []#将读取的每一行数据以小数组subject为单元存放在一个大数组new中。

 while(i <2):#此处的2随着txt文件中行数的变化去自定义输入

     un=un.strip('\n')#去掉读取末尾的回车

     subject=un.split(',')#以逗号为分隔符读取数据

     new.append(subject)

     #print(new[i])

     print(subject[0])#fullname读取

     print(subject[1])#idnumber读取

     un=txtfile.readline()

     i+=1

 txtfile.close()
放到场景中的代码记录:
 from selenium import webdriver

 from time import ctime,sleep

 #import csv

 import unittest,os,time

 #通过txt文件参数化课程名和课程编号

 txtfile = open("E:\\script\\python-script\\demo_test_a\\demo_test_courses.txt", "r")  # 用户名文件

 new = []

 un = txtfile.readline()  # 读取一行数据

 #un = txtfile.readline()

 #循环读取每一行

 i = 0

 while(i <2):

     un = un.strip('\n')  # 去掉读取末尾的回车

     subject = un.split(',')  # 以逗号为分隔符读取数据

     new.append(subject)

     #创建课程

     driver = webdriver.Chrome()

     driver.get("http://demo.pingnanlearning.com/test/login/index.php")

     driver.find_element_by_id("username").send_keys("grace")

     driver.find_element_by_id("password").send_keys("")

     driver.find_element_by_id("loginbtn").click()

     driver.find_element_by_link_text(u"系统管理").click()

     driver.find_element_by_link_text(u"添加课程").click()

     driver.find_element_by_id("").click()

     driver.find_element_by_class_name("kc_btn_next").click()

     driver.find_element_by_name("fullname").send_keys(subject[0])

     driver.find_element_by_id("idnumber").send_keys(subject[1])

     print(subject[0])

     print(subject[1])

     sleep(5)

     driver.find_element_by_xpath("//*[@id=\"course2\"]/div[2]/input[2]").click()

     sleep(5)

     driver.find_element_by_xpath("//*[@id=\"course3\"]/div[3]/input[2]").click()

     sleep(5)

     driver.find_element_by_xpath("//*[@id=\"course4\"]/div[2]/input[3]").click()

     # a=driver.find_element_by_class_name("btn_switch").value

     # a=1

     #创建课程后将课程由默认状态“禁用”变更为“启用”

     driver.find_element_by_css_selector("#tip_s2>label").click()

     un = txtfile.readline()#读取txt文件中的下一行数据

     i += 1#控制循环次数+1

 txtfile.close()
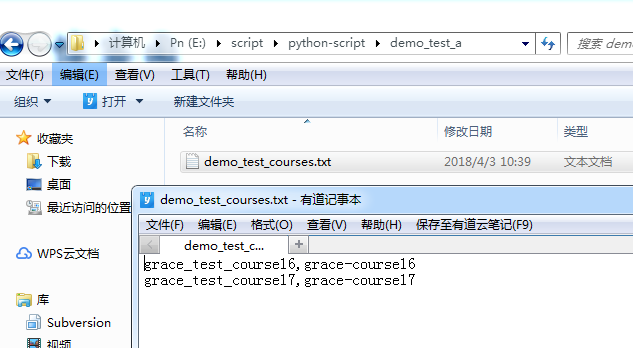
文件在电脑上的位置及文件基本内容:
三、通过excel文件批量导入数据,读取fullname和idnumber
举例说明excel读取相关知识点:
 from selenium import webdriver

 from time import ctime,sleep

 import xlrd

 #通过xls文件参数化课程名和课程编号

 xlsfile=r"E:\script\python-script\demo_test_a\demo_test_courses_xls.xls"#打开指定路径中的xls文件

 book=xlrd.open_workbook(xlsfile)#得到Excel文件的book对象,实例化对象

 sheet0 = book.sheet_by_index(0) # 通过sheet索引获得sheet对象

 print("1、",sheet0)

 sheet_name = book.sheet_names()[0]# 获得指定索引的sheet表名字

 print ("2、",sheet_name)

 sheet1 = book.sheet_by_name(sheet_name)# 通过sheet名字来获取,当然如果知道sheet名字就可以直接指定

 nrows = sheet0.nrows    # 获取行总数

 print ("3、",nrows)

 #循环打印每一行的内容

 for i in range(nrows):

     print( sheet1.row_values(i))

 ncols = sheet0.ncols    #获取列总数

 print("4、",ncols)

 row_data = sheet0.row_values(0)     # 获得第1行的数据列表

 print (row_data)

 col_data = sheet0.col_values(0)     # 获得第1列的数据列表

 print("5、",col_data)

 # 通过坐标读取表格中的数据

 cell_value1 = sheet0.cell_value(0, 0)

 print("6、",cell_value1)

 cell_value2 = sheet0.cell_value(0, 1)

 print ("7、",cell_value2)
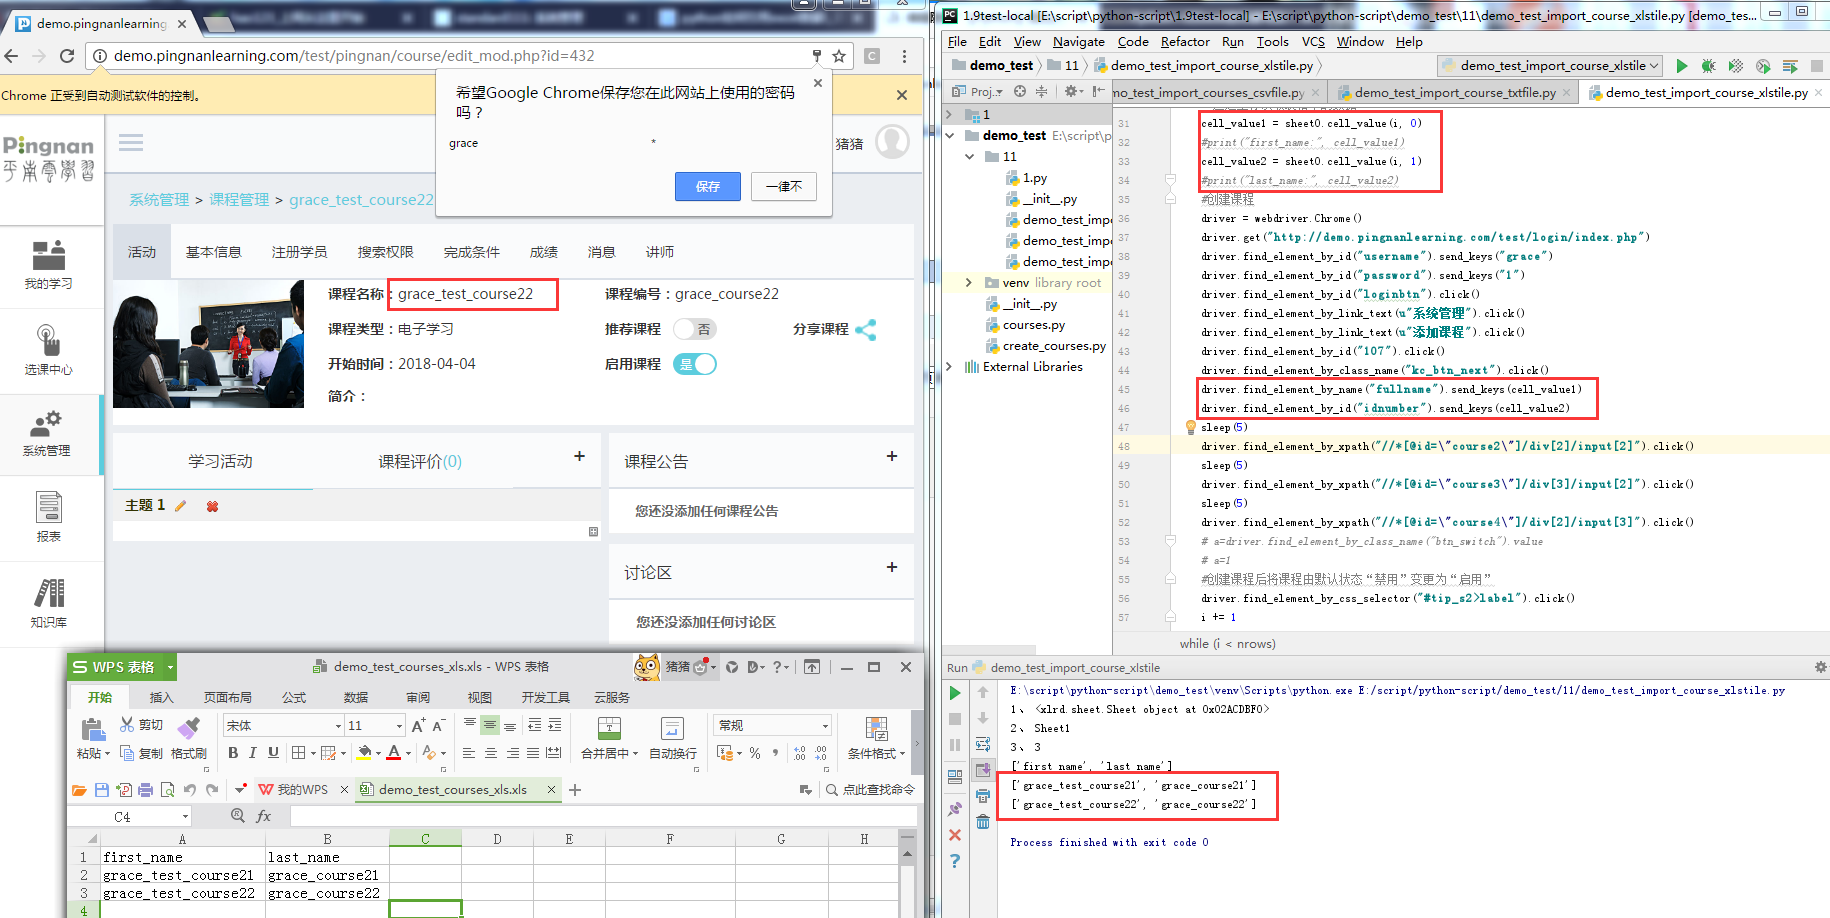
对应成功图图和文件夹位置及文件内容:

demo环境通过excel批量创建课程代码及截图展示:
 from selenium import webdriver

 from time import ctime,sleep

 import xlrd

 #通过xls文件参数化课程名和课程编号

 xlsfile=r"E:\script\python-script\demo_test_a\demo_test_courses_xls.xls"#打开指定路径中的xls文件

 book=xlrd.open_workbook(xlsfile)#得到Excel文件的book对象,实例化对象

 sheet0 = book.sheet_by_index(0) # 通过sheet索引获得sheet对象

 print("1、",sheet0)

 sheet_name = book.sheet_names()[0]#aaaaa 获得指定索引的sheet表名字

 print ("2、",sheet_name)

 sheet1 = book.sheet_by_name(sheet_name)# 通过sheet名字来获取,当然如果知道sheet名字就可以直接指定

 nrows = sheet0.nrows    # 获取行总数

 print ("3、",nrows)

 #循环打印每一行的内容

 for i in range(nrows):

     print( sheet1.row_values(i))

 '''

 ncols = sheet0.ncols    #获取列总数

 print("4、",ncols)

 row_data = sheet0.row_values(0)     # 获得第1行的数据列表

 print (row_data)

 col_data = sheet0.col_values(0)     # 获得第1列的数据列表

 print("5、",col_data)

 '''

 #循环读取每一行

 i = 1

 while(i < nrows):

     # 通过坐标读取表格中的数据

     cell_value1 = sheet0.cell_value(i, 0)

     #print("first_name:", cell_value1)

     cell_value2 = sheet0.cell_value(i, 1)

     #print("last_name:", cell_value2)

     #创建课程

     driver = webdriver.Chrome()

     driver.get("http://demo.pingnanlearning.com/test/login/index.php")

     driver.find_element_by_id("username").send_keys("grace")

     driver.find_element_by_id("password").send_keys("")

     driver.find_element_by_id("loginbtn").click()

     driver.find_element_by_link_text(u"系统管理").click()

     driver.find_element_by_link_text(u"添加课程").click()

     driver.find_element_by_id("").click()

     driver.find_element_by_class_name("kc_btn_next").click()

     driver.find_element_by_name("fullname").send_keys(cell_value1)

     driver.find_element_by_id("idnumber").send_keys(cell_value2)

     sleep(5)

     driver.find_element_by_xpath("//*[@id=\"course2\"]/div[2]/input[2]").click()

     sleep(5)

     driver.find_element_by_xpath("//*[@id=\"course3\"]/div[3]/input[2]").click()

     sleep(5)

     driver.find_element_by_xpath("//*[@id=\"course4\"]/div[2]/input[3]").click()

     # a=driver.find_element_by_class_name("btn_switch").value

     # a=1

     #创建课程后将课程由默认状态“禁用”变更为“启用”

     driver.find_element_by_css_selector("#tip_s2>label").click()

     i += 1
对应文件位置及内容截图:
【Python】通过python代码实现demo_test环境的登录,通过csv/txt/excel文件批量添加课程并开启课程操作--(刚开始 项目 页面 模块 元素这种鸟 被称作pageobject 等这些搞完 然后把你的定位器、数据 和脚本在分离 就是传说中那个叫数据驱动 的鸟)的更多相关文章
- python读取与写入csv,txt格式文件
python读取与写入csv,txt格式文件 在数据分析中经常需要从csv格式的文件中存取数据以及将数据写书到csv文件中.将csv文件中的数据直接读取为dict类型和DataFrame是非常方便也很 ...
- 「Python实用秘技04」为pdf文件批量添加文字水印
本文完整示例代码及文件已上传至我的Github仓库https://github.com/CNFeffery/PythonPracticalSkills 这是我的系列文章「Python实用秘技」的第4期 ...
- 第15.25节 PyQt(Python+Qt)入门学习:Model/View开发实战--使用QTableView展示Excel文件内容
老猿Python博文目录 专栏:使用PyQt开发图形界面Python应用 老猿Python博客地址 一.概述 在前面的订阅专栏<第十九章.Model/View开发:QTableView的功能及属 ...
- python操作csv和excel文件
1.操作csv文件 1).读取文件 import csv f=open("test.csv",'r') t_text=csv.reader(f) for t,i in t_text ...
- Python json数据写入csv json excel文件
一.写入 写入csv和json, 可以使用csv这个包写, 我这里没有使用, 并且把写csv和json的写到一起了 具体的代码就不解释了 def write_file(file_name, items ...
- centos7 lvm合并分区脚本初探-linux性能测试 -centos7修改网卡名字-jdk环境安装脚本-关键字查询文件-批量添加用户
1.#!/bin/bash lvmdiskscan | grep centos > /root/a.txt a=`sed -n '1p' /root/a.txt` b=`sed -n '2p' ...
- python读取txt、csv和excel文件
一.python读取txt文件:(思路:先打开文件,读取文件,最后用for循环输出内容) fp = open('test.txt','r') lines = fp.readlines() fp.clo ...
- python基础===Python性能优化的20条建议
优化算法时间复杂度 算法的时间复杂度对程序的执行效率影响最大,在Python中可以通过选择合适的数据结构来优化时间复杂度,如list和set查找某一个元素的时间复杂度分别是O(n)和O(1).不同的场 ...
- Linux程序写入oralce数据库中文显示为问号??? 代码实现设置环境变量!
Linux程序写入oralce数据库中文显示为问号??? 1.问题介绍 根本原因是字符集的问题,是数据库的字符集和写入程序的linux系统的字符集不一致导致: 但是用export NLS_LANG=& ...
随机推荐
- 解决 openpyxl 垂直分页符和水平分页符同时添加的问题
前言 十天前知乎上有人提问 python:openpyxl模块怎么给表格添加分页符?实现分页打印功能?,看到问题之后,我很快的给他了一个如何添加垂直分页符或水平分页符的示例,你以为问题就结束了?我是这 ...
- url传参错误的痛
今天用一下方法给后台传参数: var url = 'patrolpoint!totalHistoryPage.action' + '?patrolPoint.batchOnTime=' ...
- JAVA程序员应该看的15本书的电子版
转载▼ 转载自:http://blog.sina.com.cn/s/blog_8297f0d00100v5ew.html 作为Java程序员来说,最痛苦的事情莫过于可以选择的范围太广,可以读的书太多, ...
- How to Setup Cordova for Windows 7
Setup Cordova Text Editor / IDE You may need to prepare an IDE or Editor for working. Here for examp ...
- MySQL<添加、更新与删除数据>
添加.更新与删除数据 添加数据 为表中所有字段添加数据 INSERT INTO 表名(字段名1,字段名2,……) VALUES(值1,值2,……); insert into 表名 values(值1, ...
- RMQ LAC 入门
RMQ RMQ (Range Minimum/Maximum Query)问题是指:对于长度为n的数列A,回答若干询问RMQ(A,i,j)(i,j<=n),返回数列A中下标在i,j里的最小(大) ...
- vuex的简单使用
使用vuex进行组件间数据的管理 npm i vuex -S main.js import Vue from 'vue' import App from './App.vue' import stor ...
- Android开发之--常用颜色值
<?xml version="1.0" encoding="utf-8" ?> <resources> <color name=& ...
- jQuery 选择器实例
语法 描述 $(this) 当前 HTML 元素 $("p") 所有 <p> 元素 $("p.intro") 所有 class="intr ...
- list中的比较
一说到list的的确不知道写些什么.....我觉得别人总结的比我写的还要好很多. 我擅长记录自己的误区. |--List:元素是有序的(怎么存的就怎么取出来,顺序不会乱),元素可以重复(角标1上有个3 ...