
iOS 新浪微博-3.0 新特性
每个程序在第一次启动的时候,都会显示新特性。效果如下:

思路:
- 添加一个ViewController,里面放两个View,一个是UISrollView,另一个pageControl
- 往UISrollView添加四个UIImageView,并在最后一个添加分享和开始微博按钮
- 实现UISrollViewDelegate,在滚动的时候,监听页数,设置pageControl页数显示
- 设置启动时,window显示的是新特性Controller,并判断版本号
代码实现
1,2,3实现代码在同一个控制器里
NewfeatureViewController.h
#import <UIKit/UIKit.h>

@interface NewfeatureViewController : UIViewController

@end
NewfeatureViewController.m
//
// NewfeatureViewController.m
//
// Created by jiangys on 15/10/11.
// Copyright © 2015年 Jiangys. All rights reserved.
// #import "NewfeatureViewController.h"
#import "TabBarViewController.h" // 新特性图片总数
#define NewfeatureCount 4 @interface NewfeatureViewController ()<UIScrollViewDelegate> /** 滑动图片 分页 */
@property (nonatomic, strong) UIPageControl *pageControl; @end @implementation NewfeatureViewController - (void)viewDidLoad {
[super viewDidLoad]; // 1.添加UISrollView
[self setupScrollView]; // 2.添加pageControl
[self setupPageControl];
}
/**
* 添加UISrollView
*/
- (void)setupScrollView
{
UIScrollView *scrollView=[[UIScrollView alloc] init];
scrollView.frame=self.view.bounds;
scrollView.delegate=self;
[self.view addSubview:scrollView]; CGFloat scrollW=scrollView.width;
CGFloat scrollH=scrollView.height;
for (int i=; i < NewfeatureCount;i++) {
UIImageView *imageView=[[UIImageView alloc] init];
imageView.width=scrollW;
imageView.height=scrollH;
imageView.y=;
imageView.x=i*scrollW;
// 显示图片
NSString *name=[NSString stringWithFormat:@"new_feature_%d",i+];
// if (FourInch) { // 4inch 需要手动去加载4inch对应的-568h图片
// name = [name stringByAppendingString:@"-568h"];
// }
imageView.image=[UIImage imageNamed:name];
if (i==(NewfeatureCount-)) {
[self setupLastImageView:imageView];
} [scrollView addSubview:imageView];
} // 3.设置scrollView的其他属性
// 如果想要某个方向上不能滚动,那么这个方向对应的尺寸数值传0即可
scrollView.contentSize = CGSizeMake(NewfeatureCount * scrollW, );
scrollView.bounces = NO; // 去除弹簧效果
scrollView.pagingEnabled = YES;
scrollView.showsHorizontalScrollIndicator = NO;
} /**
* 添加pageControl
*/
- (void)setupPageControl
{
UIPageControl *pageControl=[[UIPageControl alloc] init];
pageControl.numberOfPages=NewfeatureCount;
pageControl.currentPageIndicatorTintColor=YSColor(, , );
pageControl.pageIndicatorTintColor=YSColor(, , );
pageControl.centerX=self.view.width * 0.5;
pageControl.centerY=self.view.height-; [self.view addSubview:pageControl];
self.pageControl=pageControl;
} /**
* 初始化最后一个imageView
*
* @param imageView 最后一个imageView
*/
- (void)setupLastImageView:(UIImageView *)imageView
{
// 开启交互
imageView.userInteractionEnabled=YES; // 添加分享复选框
UIButton *shareBtn=[[UIButton alloc] init];
[shareBtn setImage:[UIImage imageNamed:@"new_feature_share_false"] forState:UIControlStateNormal];
[shareBtn setImage:[UIImage imageNamed:@"new_feature_share_true"] forState:UIControlStateSelected];
[shareBtn setTitle:@"分享给大家" forState:UIControlStateNormal];
[shareBtn setTitleColor:[UIColor blackColor] forState:UIControlStateNormal];
shareBtn.titleLabel.font=[UIFont systemFontOfSize:];
// titleEdgeInsets:只影响按钮内部的titleLabel
shareBtn.titleEdgeInsets = UIEdgeInsetsMake(, , , );
shareBtn.width=;
shareBtn.height=;
shareBtn.centerX=imageView.width*0.5;
shareBtn.centerY=imageView.height*0.7;
[shareBtn addTarget:self action:@selector(shareClick:) forControlEvents:UIControlEventTouchUpInside];
[imageView addSubview:shareBtn]; // 开始微博
UIButton *startBtn=[[UIButton alloc] init];
[startBtn setBackgroundImage:[UIImage imageNamed:@"new_feature_finish_button"] forState:UIControlStateNormal];
[startBtn setBackgroundImage:[UIImage imageNamed:@"new_feature_finish_button_highlighted"] forState:UIControlStateHighlighted];
[startBtn setTitle:@"开始微博" forState:UIControlStateNormal];
startBtn.size=startBtn.currentBackgroundImage.size;
startBtn.centerX=imageView.width*0.5;
startBtn.centerY=imageView.height*0.78;
[startBtn addTarget:self action:@selector(startClick) forControlEvents:UIControlEventTouchUpInside];
[imageView addSubview:startBtn];
} /**
* 分享给大家
*/
- (void)shareClick:(UIButton *)shareBtn
{
shareBtn.selected=!shareBtn.isSelected;
} /**
* 开始微博
*/
- (void)startClick
{
// 切换到TabBarController
/*
切换控制器的手段
1.push:依赖于UINavigationController,控制器的切换是可逆的,比如A切换到B,B又可以回到A
2.modal:控制器的切换是可逆的,比如A切换到B,B又可以回到A
3.切换window的rootViewController
*/
UIWindow *window = [UIApplication sharedApplication].keyWindow;
window.rootViewController = [[TabBarViewController alloc] init];
} #pragma ScrollView 代理
-(void)scrollViewDidScroll:(UIScrollView *)scrollView
{
// 获取页码
CGFloat doublePage=scrollView.contentOffset.x/scrollView.width;
int intPage=(int)(doublePage+0.5); // 设置页码
self.pageControl.currentPage=intPage;
} @end
设置启动时,window显示的是新特性Controller,并判断版本号
新建一个分类来处理,以后其它地方也可以使用
UIWindow+Extension.h
#import <UIKit/UIKit.h>

@interface UIWindow (Extension)

- (void)switchRootViewController;

@end
UIWindow+Extension.m
#import "UIWindow+Extension.h"

#import "TabBarViewController.h"

#import "NewfeatureViewController.h"

@implementation UIWindow (Extension)

- (void)switchRootViewController

{

    NSString *key = @"CFBundleVersion";

    // 上一次的使用版本(存储在沙盒中的版本号)

    NSString *lastVersion = [[NSUserDefaults standardUserDefaults] objectForKey:key];

    // 当前软件的版本号(从Info.plist中获得)

    NSString *currentVersion = [NSBundle mainBundle].infoDictionary[key];

    if ([currentVersion isEqualToString:lastVersion]) { // 版本号相同:这次打开和上次打开的是同一个版本

        self.rootViewController = [[TabBarViewController alloc] init];

    } else { // 这次打开的版本和上一次不一样,显示新特性

        self.rootViewController = [[NewfeatureViewController alloc] init];

        // 将当前的版本号存进沙盒

        [[NSUserDefaults standardUserDefaults] setObject:currentVersion forKey:key];

        [[NSUserDefaults standardUserDefaults] synchronize];

    }

}

@end
接下来,在AppDelegate里调用就很简单了,只需要一行代码即可。
- (BOOL)application:(UIApplication *)application didFinishLaunchingWithOptions:(NSDictionary *)launchOptions {

    self.window=[[UIWindow alloc]init];

    self.window.frame=[UIScreen mainScreen].bounds;

    [self.window switchRootViewController];  // 只需要添加这一行代码

    [self.window makeKeyAndVisible];

    return YES;

}
隐藏导航栏
// 隐藏状态栏

- (BOOL)prefersStatusBarHidden

{

    return YES;

}
显示新特性图片设置
在设置新特性的时候,由于图片是全屏的,因而,不同的手机屏幕尺寸需要不同的图片。实际上,4s 使用的是2x,5s使用的是ratain 2x,6 和6s使用的是3x
第一步:选择iPhone
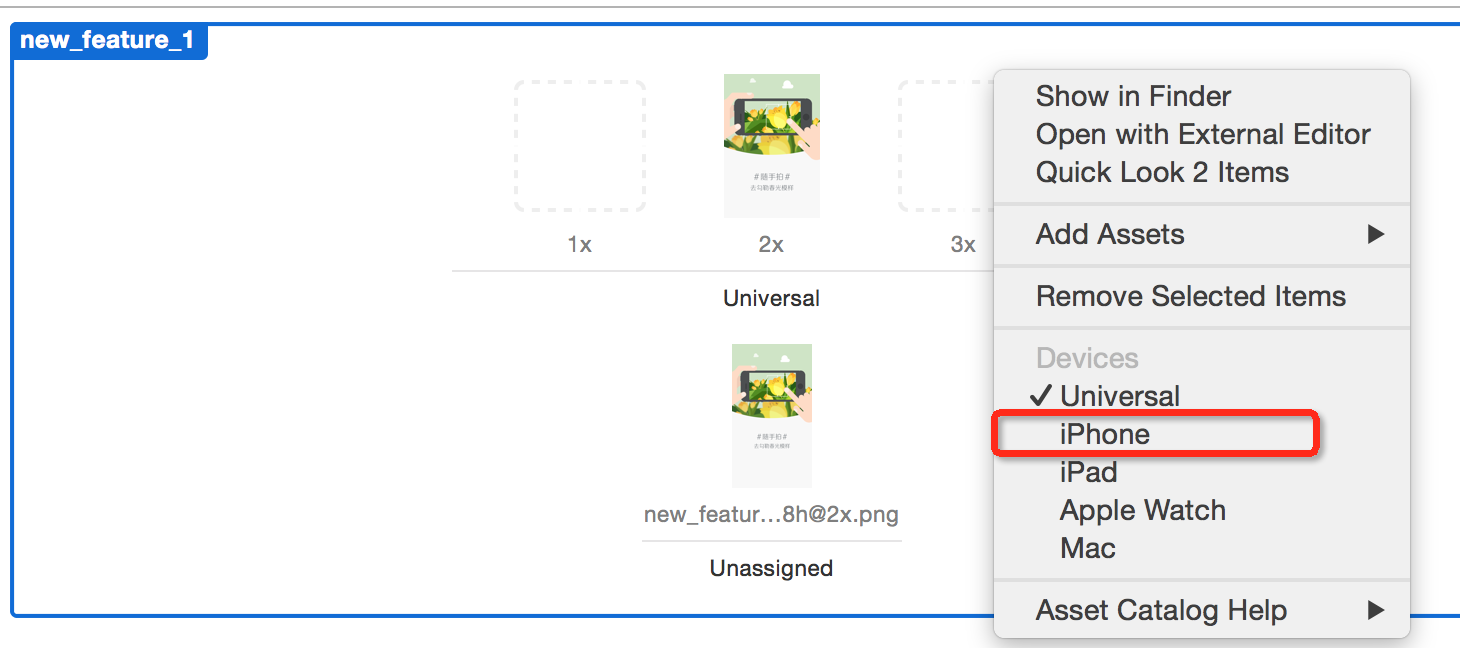
第二步:调整显示格式如下
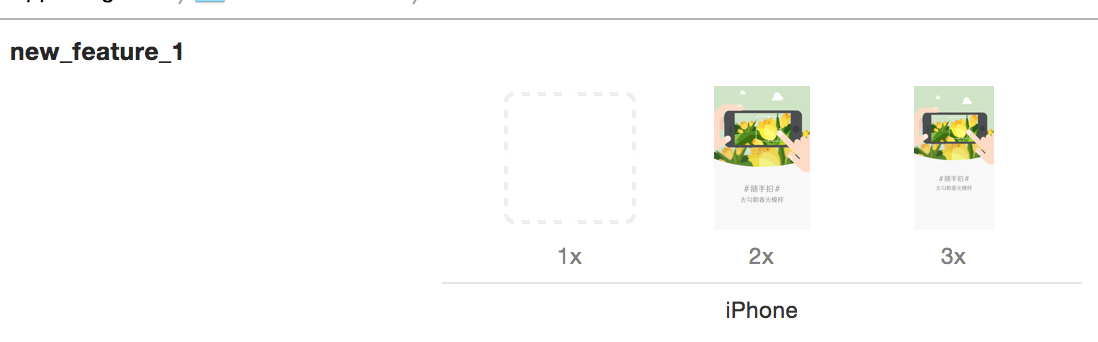
第三步:打开目录,点击Contents.json,添加Retina4 图片尺寸(和x3是一样的)。

最终显示效果:

实际,也可以通过另一种方式来实现,那就是定义一个宏,如果屏幕尺寸大于568,则使用568的图片。
宏定义:
// 是否为4inch以上

#define FourInch ([UIScreen mainScreen].bounds.size.height >= 568.0)
界面调整:
        // 显示图片

       NSString *name=[NSString stringWithFormat:@"new_feature_%d",i+];

       if (FourInch) { // 4inch  需要手动去加载4inch对应的-568h图片

           name = [name stringByAppendingString:@"-568h"];

       }
章节源代码下载:http://pan.baidu.com/s/1dDi8XiD
新浪微博Github:https://github.com/jiangys/Weibo
iOS 新浪微博-3.0 新特性的更多相关文章
- iOS开发——新特性OC篇&Swift 2.0新特性
Swift 2.0新特性 转眼间,Swift已经一岁多了,这门新鲜.语法时尚.类型安全.执行速度更快的语言已经渐渐的深入广大开发者的心.我同样也是非常喜爱这门新的编程语言. 今年6月,一年一度 ...
- AFNetworking 2.0 新特性讲解之AFHTTPSessionManager
AFNetworking 2.0 新特性讲解之AFHTTPSessionManager (2014-02-17 11:56:24) 转载▼ AFNetworking 2.0 相比1.0 API ...
- 浅谈Tuple之C#4.0新特性那些事儿你还记得多少?
来源:微信公众号CodeL 今天给大家分享的内容基于前几天收到的一条留言信息,留言内容是这样的: 看了这位网友的留言相信有不少刚接触开发的童鞋们也会有同样的困惑,除了用新建类作为桥梁之外还有什么好的办 ...
- Java基础和JDK5.0新特性
Java基础 JDK5.0新特性 PS: JDK:Java Development KitsJRE: Java Runtime EvironmentJRE = JVM + ClassLibary JV ...
- Visual Studio 2015速递(1)——C#6.0新特性怎么用
系列文章 Visual Studio 2015速递(1)——C#6.0新特性怎么用 Visual Studio 2015速递(2)——提升效率和质量(VS2015核心竞争力) Visual Studi ...
- atitit.Servlet2.5 Servlet 3.0 新特性 jsp2.0 jsp2.1 jsp2.2新特性
atitit.Servlet2.5 Servlet 3.0 新特性 jsp2.0 jsp2.1 jsp2.2新特性 1.1. Servlet和JSP规范版本对应关系:1 1.2. Servlet2 ...
- 背水一战 Windows 10 (1) - C# 6.0 新特性
[源码下载] 背水一战 Windows 10 (1) - C# 6.0 新特性 作者:webabcd 介绍背水一战 Windows 10 之 C# 6.0 新特性 介绍 C# 6.0 的新特性 示例1 ...
- C# 7.0 新特性2: 本地方法
本文参考Roslyn项目中的Issue:#259. 1. C# 7.0 新特性1: 基于Tuple的“多”返回值方法 2. C# 7.0 新特性2: 本地方法 3. C# 7.0 新特性3: 模式匹配 ...
- C# 7.0 新特性1: 基于Tuple的“多”返回值方法
本文基于Roslyn项目中的Issue:#347 展开讨论. 1. C# 7.0 新特性1: 基于Tuple的“多”返回值方法 2. C# 7.0 新特性2: 本地方法 3. C# 7.0 新特性3: ...
随机推荐
- tensorflow的tile使用
当你需要按照矩阵维度复制数据时候,可以使用tensorflow的tile函数 a1 = tf.tile(a, [2, 2]) 表示把a的第一个维度复制两次,第二个维度复制2次.注意使用tf.nn.so ...
- PHP 正则表达式---匹配模式
1.PHP 正则表达式 正则表达式贪婪匹配,非贪婪匹配. 默认是贪婪匹配, 例如 ①.贪婪匹配, $str = ' 香肠 月饼 '; preg_match('/ (.)</td>/',$s ...
- saltstack---自动化运维平台
https://github.com/ixrjog/adminset[自动化运维平台:CMDB.CD.DevOps.资产管理.任务编排.持续交付.系统监控.运维管理.配置管理 ] https://ww ...
- prometheus: celery, redis-export
https://github.com/nlighten/tomcat_exporter https://github.com/prometheus/jmx_exporter https://vexxh ...
- [性能优化] perf
运行时性能分析工具 wiki:https://en.wikipedia.org/wiki/Perf_(Linux) linux wiki:https://perf.wiki.kernel.org/in ...
- [daily][qemu][kvm] qemu增加减少CPUID
做 DPDK 大页内存测试, 发现KVM模拟出来的CPU不支持 1GB 的大页 可以使用如下命令是否支持: [root@dpdk ~]# cat /proc/cpuinfo |grep pdpe1gb ...
- [CentOS7][ssh][publickey][troubleshoot] 通过密钥登录ssh故障排查
通常情况下,我会使用非对称加密的方式来进行ssh的登录. 做法: 将公钥添加到 $HOME/.ssh/authorized_keys 文件中. 但是通常,会遇见各种各样的问题,导致失败.汇总如下: 0 ...
- mysql学习【第1篇】:初识MySQL
狂神声明 : 文章均为自己的学习笔记 , 转载一定注明出处 ; 编辑不易 , 防君子不防小人~共勉 ! mysql学习[第1篇]:初识MySQL 只会写代码的是码农:学好数据库,基本能混口饭吃:在此基 ...
- 转:JVM 内存初学 (堆(heap)、栈(stack)和方法区(method) )
原文地址:JVM 内存初学 (堆(heap).栈(stack)和方法区(method) ) 博主推荐 深入浅出JVM 这本书 先了解具体的概念:JAVA的JVM的内存可分为3个区:堆(heap).栈( ...
- omitting directory何意
使用cp命令拷贝目录时,若该目录下有子目录 需加参数 cp -r 加目标目录到路径下