
Spring学习笔记--Spring IOC
沿着我们上一篇的学习笔记,我们继续通过代码学习IOC这一设计思想.
6.Hello类
第一步:首先创建一个类Hello
package cn.sxt.bean;

public class Hello {

    private String name;

    public void setName(String name) {

		this.name = name;

	}

    public void show(){

    	System.out.println("hello,"+name);

    }

}
第二步:创建配置文件beans.xml
<?xml version="1.0" encoding="UTF-8"?>

<beans xmlns="http://www.springframework.org/schema/beans"

    xmlns:xsi="http://www.w3.org/2001/XMLSchema-instance"

    xsi:schemaLocation="http://www.springframework.org/schema/beans

        http://www.springframework.org/schema/beans/spring-beans.xsd">

    <!-- bean就是java对象,由spring容器来创建和管理 -->

    <bean name="hello" class="cn.sxt.bean.Hello">

        <property name="name" value="张三"></property>

    </bean>

</beans>
第三步:编写测试类Test
package cn.sxt.test;

import org.springframework.context.ApplicationContext;

import org.springframework.context.support.ClassPathXmlApplicationContext;

import cn.sxt.bean.Hello;

public class Test {

	public static void main(String[] args) {

		//解析beans.xml文件生成管理相应的bean对象

		ApplicationContext context=new ClassPathXmlApplicationContext("beans.xml");

		Hello hello=(Hello)context.getBean("hello");

		hello.show();

	}

}
我们需要导入相关Jar包(在上一篇笔记Spring主要内容中显示的那些核心jar包)
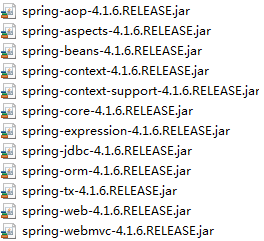
此时运行Test程序,会触发异常:Exception in thread "main" java.lang.NoClassDefFoundError: org/apache/commons/logging/LogFactory
我们需要添加commons-logging.jar文件
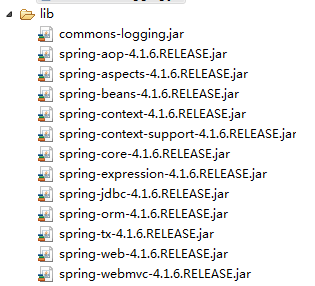
步骤总结:
1)导入相关jar包
2)编写spring配置文件(名称可以自定义)
思考?
Hello对象是谁创建的?
我们在Hello类中添加一个构造函数,可以确定Hello对象确定被创建:
package cn.sxt.bean;

public class Hello {

	public Hello() {

		System.out.println("hello 被创建");

	}

    private String name;

    public void setName(String name) {

		this.name = name;

	}

    public void show(){

    	System.out.println("hello,"+name);

    }

}
运行Test测试类结果显示:
hello 被创建

hello,张三
由此可以得知,Hello对象是由spring容器来创建的:bean工厂,可以包含多个bean,创建不同类的对象
<bean name="hello" class="cn.sxt.bean.Hello">

        <property name="name" value="张三"></property>

    </bean>
Hello对象的属性是怎样设置的?
Hello对象的属性是由spring容器来设置的;
这个过程就叫做控制反转:
控制的内容:指的是谁来控制对象的创建;传统的应用程序,对象的创建是由程序本身来控制,使用Spring以后是由spring来创建对象的。
反转:有反转就有正转,正转指程序来创建对象,反转指程序本身不去创建对象,而变为被动的接收容器给我们创建的对象
总结:以前对象是由程序本身来创建,使用spring后,程序变为了被动接收spring创建好的对象;
控制反转有一个别名--依赖注入(DI-dependency injection)
DI:比如在我们的Hello类中,我们的类Hello就依赖于name属性,以来的这个name属性是由spring容器来设置的,name值的设置过程就叫做依赖注入(通过setName方法进行的依赖注入)
Ioc--是一种编程思想,由主动编程变为别动接收;
Ioc的实现是通过Ioc容器(Bean工厂)来实现的。Ioc容器--BeanFactory
在第一篇学习笔记中的UserDao和UserDaoService的例子,我们在这里就可以使用spring配置文件的方式来管理对象的生命周期以及依赖对象的注入;
beanx.xml修改如下:
<?xml version="1.0" encoding="UTF-8"?>

<beans xmlns="http://www.springframework.org/schema/beans"

    xmlns:xsi="http://www.w3.org/2001/XMLSchema-instance"

    xsi:schemaLocation="http://www.springframework.org/schema/beans

        http://www.springframework.org/schema/beans/spring-beans.xsd">

    <!-- bean就是java对象,由spring容器来创建和管理 -->

    <bean id="mysqlDao" class="cn.sxt.dao.impl.UserDaoMySqlImpl"></bean>

    <bean id="oracleDao" class="cn.sxt.dao.impl.UserDaoOracleImpl"></bean>

    <bean id="service" class="cn.sxt.service.impl.UserServiceImpl">

        <!-- ref引用对象(对象是由spring来创建的) -->

        <property name="userDao" ref="mysqlDao"></property>

    </bean>

    <!-- property如何设置:name="setUserDao(去除set,并将剩余的UserDao首字母小写)" -->

</beans>
当我们需要替换具体的实现时,就可以直接在配置文件中进行修改,例如将ref="mysqlDao"修改为ref="oracleDao";
在测试类中我们就可以这样来组织代码:
package cn.sxt.test;

import org.springframework.context.ApplicationContext;

import org.springframework.context.support.ClassPathXmlApplicationContext;

import cn.sxt.service.UserService;

public class Test {

	public static void main(String[] args) {

		ApplicationContext ac=new ClassPathXmlApplicationContext("beans.xml");

		UserService us=(UserService)ac.getBean("service");

		us.getUser();

	}

}
使用IOC来创建对象的方式:3种方式
1)通过无参的构造方法来创建;
User.java:
package cn.sxt.vo;

public class User {

	public User(){

		System.out.println("user的无参构造方法");

	}

	private String name;

	public void setName(String name) {

		this.name = name;

	}

	public void show(){

		System.out.println("name="+name);

	}

}
beans.xml:
<?xml version="1.0" encoding="UTF-8"?>

<beans xmlns="http://www.springframework.org/schema/beans"

    xmlns:xsi="http://www.w3.org/2001/XMLSchema-instance"

    xsi:schemaLocation="http://www.springframework.org/schema/beans

        http://www.springframework.org/schema/beans/spring-beans.xsd">

   <bean id="user" class="cn.sxt.vo.User">

           <property name="name" value="张三"></property>

   </bean>

</beans>
Test:
package cn.sxt.test;

import org.springframework.context.ApplicationContext;

import org.springframework.context.support.ClassPathXmlApplicationContext;

import cn.sxt.vo.User;

public class Test {

	public static void main(String[] args) {

		ApplicationContext ac=new ClassPathXmlApplicationContext("beans.xml");

		User user=(User)ac.getBean("user");

		user.show();

	}

}
2)通过有参构造方法来创建;
User.java:
package cn.sxt.vo;

public class User {

	private String name;

	public User(String name) {

		super();

		this.name = name;

	}

	public void show(){

		System.out.println("name="+name);

	}

}
beans.xml配置(有三种情况):
第一种:根据参数的下标(index)来设置;
<?xml version="1.0" encoding="UTF-8"?>

<beans xmlns="http://www.springframework.org/schema/beans"

    xmlns:xsi="http://www.w3.org/2001/XMLSchema-instance"

    xsi:schemaLocation="http://www.springframework.org/schema/beans

        http://www.springframework.org/schema/beans/spring-beans.xsd">

   <bean id="user" class="cn.sxt.vo.User">

           <!-- index指的是构造方法参数下标,从0开始 -->

           <constructor-arg index="0" value="李四"></constructor-arg>

   </bean>

</beans>
第二种:根据参数名称(name)来设置;
<bean id="user" class="cn.sxt.vo.User">

           <!-- name指的是属性值 -->

           <constructor-arg name="name" value="王五"></constructor-arg>

   </bean>
第三种:根据参数类型(type)来设置;
 <bean id="user" class="cn.sxt.vo.User">

           <constructor-arg type="java.lang.String" value="徐六"></constructor-arg>

   </bean>
3)通过工厂方法来创建对象(有两种);
第一种:静态工厂来创建;
UserFactory.java:
package cn.sxt.factory;

import cn.sxt.vo.User;

public class UserFactory {

	public static User newInstance(String name){

		return new User(name);

	}

}
beans.xml配置:
<bean id="user" class="cn.sxt.factory.UserFactory" factory-method="newInstance">

           <constructor-arg index="0" value="任七"></constructor-arg>

   </bean>
第二种:动态工厂来创建
UserDynamicFacory.java:
package cn.sxt.factory;

import cn.sxt.vo.User;

public class UserDynamicFactory {

	public  User newInstance(String name){

		return new User(name);

	}

}
beans.xml:
<bean id="userFacotry" class="cn.sxt.factory.UserDynamicFactory"/>

    <bean id="user" factory-bean="userFacotry" factory-method="newInstance">

        <constructor-arg index="0" value="王五"/>

    </bean>
Spring学习笔记--Spring IOC的更多相关文章
- Spring学习笔记--spring+mybatis集成
前言: 技术的发展, 真的是日新月异. 作为javaer, 都不约而同地抛弃裸写jdbc代码, 而用各种持久化框架. 从hibernate, Spring的JDBCTemplate, 到ibatis, ...
- Spring学习笔记--Spring配置文件和依赖注入
Spring配置文件 1.alias:设置别名,为bean设置别名,并且可以设置多个别名; <!-- 设置别名 --> <alias name="user" al ...
- Spring学习笔记—Spring之旅
1.Spring简介 Spring是一个开源框架,最早由Rod Johnson创建,并在<Expert One-on-One:J2EE Design and Development> ...
- Spring学习笔记1——IOC: 尽量使用注解以及java代码(转)
在实战中学习Spring,本系列的最终目的是完成一个实现用户注册登录功能的项目. 预想的基本流程如下: 1.用户网站注册,填写用户名.密码.email.手机号信息,后台存入数据库后返回ok.(学习IO ...
- Spring学习笔记1——IOC: 尽量使用注解以及java代码
在实战中学习Spring,本系列的最终目的是完成一个实现用户注册登录功能的项目. 预想的基本流程如下: 1.用户网站注册,填写用户名.密码.email.手机号信息,后台存入数据库后返回ok.(学习IO ...
- spring学习笔记之---IOC和DI
IOC和DI (一)IOC (1) 概念 IOC (Inverse of Control) 反转控制,就是将原本在程序中手动创建对象的控制权,交给spring框架管理.简单的说,就是创建对象控制权被反 ...
- Spring学习笔记——Spring中的BeanFactory与FactoryBean
BeanFactory BeanFactory是Spring的org.springframework.beans.factory下的一个接口,是Spring IOC所遵守的基本编程规范.他的实现类有D ...
- Spring学习笔记--Spring简介
1.spring:给软件行业带来了春天; 2.spring的理念:spring框架的初衷是使的现有的更加实用,spring不是创造轮子(技术或框架),而是使现有的轮子更好的运转;spring本身是一个 ...
- Spring学习笔记——Spring中lazy-init与abstract具体解释
Spring的懒载入的作用是为了避免无谓的性能开销,就是当真正须要数据的时候才去运行数据的载入操作.不只在Spring中.我们在实际的编码过程中也应该借鉴这种思想,来提高我们程序的效率. 首先我们看一 ...
随机推荐
- Redis 常用监控信息命令总结
查看启动到当前处理命令总数: # redis-cli info stats | grep total_commands total_commands_processed:23693286991 查看每 ...
- Chrome网页性能分析工具
performance-analyser https://chrome.google.com/webstore/detail/performance-analyser/djgfmlohefpomchf ...
- 使用JDBC在MySQL数据库中快速批量插入数据
使用JDBC连接MySQL数据库进行数据插入的时候,特别是大批量数据连续插入(10W+),如何提高效率呢? 在JDBC编程接口中Statement 有两个方法特别值得注意: void addBatch ...
- 【转】《iOS7 by Tutorials》系列:iOS7的设计精髓(上)
简介: 本文翻译自<iOS7 by Tutorials>一书的第一章“Designing for iOS 7”,主要从程序员角度介绍了iOS7的新设计理念,堪称神作!本文翻译仅作学习交流之 ...
- Zuul路由转发规则
定制的路由规则的主要功能: 1.路由表中包含源路径,微服务名称,目标路径 2.Endpoint粒度配置支持 3.路由支持1对1精确路由 4.源路径可以前缀/**格式来模糊路由 5.目标路径可以使用前缀 ...
- 有关Linux下request.getRealPath("/")获取路径的问题
request.getRealPath("/") 在window获取的是服务器的根目录,结尾包含分隔符, 如E:\apache-tomcat-6.0.29-bak\apache-t ...
- 【工具】我的Git学习日志
使用github一段时间,一直使用的是可视化工具,配合公司转用git,提前联系下git的命令. 安装 windows上安装git 从git for windows下载安装包,我下的是Git-2.13. ...
- --save与--save-dev的区别
--save安装的包会在生产和开发环境中都使用: --save-dev的包只在开发环境中使用,在生产环境中就不需要这个包了,不再打包:
- ①Android NuPlayer播放框架
[时间:2016-09] [状态:Open] [关键词:android,nuplayer,开源播放器,播放框架,nuplayerdriver] 0 NuPlayer简介 Android2.3时引入流媒 ...
- oracle结合mybatis批量插入数据
先上代码: controller: result = service.insertTRbXdhjLendYdData(params); service: List<TRbXdhjLendDTO& ...