ACE - Reactor模式源码剖析及具体实现(大量源码慎入)
原文出自http://www.cnblogs.com/binchen-china,禁止转载。
在之前的文章中提到过Reactor模式和Preactor模式,现在利用ACE的Reactor来实现一个基于Reactor框架的服务器。
首先回顾下Reactor模式和Preactor模式。
Reactor模式:
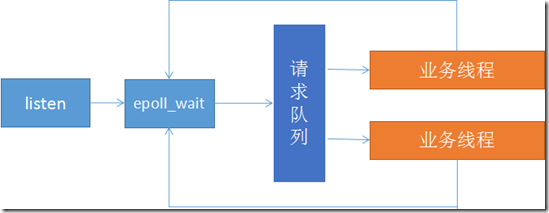
Reactor模式实现非常简单,使用同步IO模型,即业务线程处理数据需要主动等待或询问,主要特点是利用epoll监听listen描述符是否有响应,及时将客户连接信息放于一个队列,epoll和队列都是在主进程/线程中,由子进程/线程来接管描述符传输的数据,对描述符进行下一步操作,包括connect和数据读写。主程读写就绪事件。整个过程都需要先获取描述符状态,在状态允许下再执行任务。
大致流程图如下:
Preactor模式:
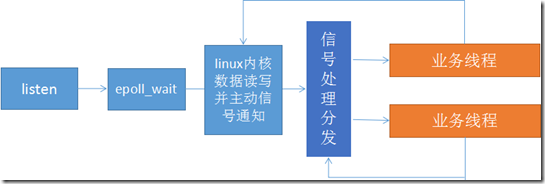
Preactor模式完全将IO处理和业务分离,使用异步IO模型,即内核完成数据处理后主动通知给应用处理,主进程/线程不仅要完成listen任务,还需要完成内核数据缓冲区的映射,直接将数据buff传递给业务线程,业务线程只需要处理业务逻辑即可。整个过程直接推送任务,描述符状态是否允许执行任务由内核去调度处理。
大致流程如下:
ACE的Reactor模式
所有服务器都可以归纳为以下三层:
- I/O:处理底层IO事件
- Dispatch:事件消息派发
- Service:业务处理
ACE的Reactor处于I/O和Dispatch层。提供了I/O监控和消息Dispatch。其中I/O需要用户以handle的形式提供到ACE_Reactor内。
Dispatch需要以ACE_Event_Handler为载体,也就是说要实现一个完整的Reactor只依赖ACE_Reactor类是无法完成的。
上篇博文利用ACE的Socket可以看出一个ACE_SOCK_Acceptor和ACE_SOCK_Stream就可以完成服务器代码。现在要做的是,
1.引入Reactor,把Acceptor和Stream两个I/O分别放在两个继承于ACE_Event_Handler的类中注册给ACE_Reactor。
2.主函数注册包含ACE_SOCK_Acceptor的类到ACE_Reactor中,当ACE_SOCK_Acceptor收到数据即有客户端连接后再给对应的客户端创建一个ACE_SOCK_Stream通道并注册到ACE_Reactor中。
使用ACE_Reactor实现的Server代码:
 #include <ace/INET_Addr.h>

 #include <ace/SOCK_Acceptor.h>

 #include <ace/SOCK_Stream.h>

 #include <ace/Reactor.h>

 #include <ace/Log_Msg.h>

 #include <list>

 #define MAX_BUFF_SIZE     1024

 #define LISTEN_PORT     5010

 #define SERVER_IP        ACE_LOCALHOST

 class ServerStream : public ACE_Event_Handler

 {

 public:

     ServerStream();

     ~ServerStream();

     ACE_SOCK_Stream& GetStream(){return Svr_stream;}    //给accept提供接口绑定数据通道

     virtual int handle_input(ACE_HANDLE fd);    //I/O触发事件后调用

     void close();

     virtual ACE_HANDLE get_handle(void) const {return Svr_stream.get_handle();}    //不重载需要手动将handle传入ACE_Reactor

 private:

     ACE_INET_Addr Cli_addr;

     ACE_SOCK_Stream Svr_stream;

 };

 ServerStream::ServerStream()

 {

 }

 ServerStream::~ServerStream()

 {

     close();

 }

 int ServerStream::handle_input(ACE_HANDLE fd)

 {

     char strBuffer[MAX_BUFF_SIZE];

     int byte = Svr_stream.recv(strBuffer,MAX_BUFF_SIZE); //可读数据

     if (- == byte)

     {

         ACE_DEBUG((LM_INFO, ACE_TEXT("receive data failed\n")));

     }

     else if( == byte)

     {

         close();

         ACE_DEBUG((LM_INFO, ACE_TEXT("client closed!\n")));

     }

     else

     {

         ACE_DEBUG((LM_INFO, ACE_TEXT("receive from client: %s\n"),strBuffer));

     }

 }

 void ServerStream::close()

 {

     Svr_stream.close();

     ACE_Reactor::instance()->remove_handler(this,ACE_Event_Handler::READ_MASK | ACE_Event_Handler::DONT_CALL);

     //delete this;

 }

 class ServerAcceptor : public ACE_Event_Handler

 {

 public:

     ServerAcceptor(int port,char* ip);

     ~ServerAcceptor();

     bool open();

     virtual int handle_input(ACE_HANDLE fd);  //有client连接

     void close();

     virtual ACE_HANDLE get_handle(void) const {return Svr_aceept.get_handle();}

 private:

     ACE_INET_Addr Svr_addr;

     ACE_SOCK_Acceptor Svr_aceept;

     std::list<ServerStream*> m_streamPool;  //stream pool

 };

 ServerAcceptor::ServerAcceptor(int port,char* ip):Svr_addr(port,ip)

 {

     if (!open())    //open listen port

     {

         ACE_DEBUG((LM_INFO, ACE_TEXT("open failed!\n")));

     }

     else

     {

         ACE_DEBUG((LM_INFO, ACE_TEXT("open success!\n")));

     }

 }

 ServerAcceptor::~ServerAcceptor()

 {

     close();

     std::list<ServerStream*>::iterator it;

     for (it = m_streamPool.begin();it != m_streamPool.end();++it)

     {

         if (NULL != (*it))

         {

             (*it)->close();

             delete (*it);

         }

     }

 }

 bool ServerAcceptor::open()

 {

     if (- == Svr_aceept.open(Svr_addr,))

     {

         ACE_DEBUG((LM_ERROR,ACE_TEXT("failed to accept\n")));

         Svr_aceept.close();

         return false;

     }

     return true;

 }

 int ServerAcceptor::handle_input(ACE_HANDLE fd )

 {

     ServerStream *stream = new ServerStream();    //产生新通道

     if (NULL != stream)

     {

         m_streamPool.push_back(stream);

     }

     if (Svr_aceept.accept(stream->GetStream()) == -)  //绑定通道

     {

         printf("accept client fail\n");

         return -;

     }

     ACE_Reactor::instance()->register_handler(stream,ACE_Event_Handler::READ_MASK);  //通道注册到ACE_Reactor

     ACE_DEBUG((LM_ERROR,ACE_TEXT("User connect success!\n")));

 }

 void ServerAcceptor::close()

 {

     ACE_Reactor::instance()->remove_handler(this,ACE_Event_Handler::ACCEPT_MASK);

     Svr_aceept.close();

 }

 int ACE_TMAIN()

 {

     ServerAcceptor server(LISTEN_PORT,(char *)SERVER_IP);

     ACE_Reactor::instance()->register_handler(&server,ACE_Event_Handler::ACCEPT_MASK);    //listen port注册到ACE_Reactor

     ACE_Reactor::instance()->run_reactor_event_loop();  //进入消息循环,有I/O事件回调handle_input

     return ;

 }
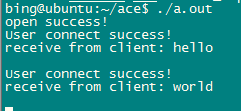
测试结果:
终端1:
终端2:
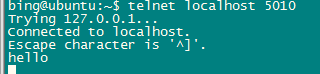
终端3:

ACE_Reactor内部已经帮我们实现了IO复用。
有了Reactor的demo后,下面一步步查看ACE_Reactor内部是如何运作的:
ACE_Reactor注册EVENT,重载了一个register_handler:
 int

 ACE_Reactor::register_handler (ACE_Event_Handler *event_handler,

                                ACE_Reactor_Mask mask)

 {

   // Remember the old reactor.

   ACE_Reactor *old_reactor = event_handler->reactor ();

   // Assign *this* <Reactor> to the <Event_Handler>.

   event_handler->reactor (this);

   int result = this->implementation ()->register_handler (event_handler, mask);

   if (result == -)

     // Reset the old reactor in case of failures.

     event_handler->reactor (old_reactor);

   return result;

 }
第11行实际是ACE_Reactor_Impl *implementation (void) const;在做实际功能。进一步查看implementation 是如何注册的。
 template <class ACE_SELECT_REACTOR_TOKEN> int

 ACE_Select_Reactor_T<ACE_SELECT_REACTOR_TOKEN>::register_handler

   (ACE_Event_Handler *handler,

    ACE_Reactor_Mask mask)

 {

   ACE_TRACE ("ACE_Select_Reactor_T::register_handler");

   ACE_MT (ACE_GUARD_RETURN (ACE_SELECT_REACTOR_TOKEN, ace_mon, this->token_, -));

   return this->register_handler_i (handler->get_handle (), handler, mask);

 }
这里开始大量使用模板,这里重载了两个在最后调用register_handler_i,在第8行,可以看到调用了get_handle,也就是我们重载的那个函数,所以我们不需要传入ACE_Reactor,它在这一步调用了我们重新的虚函数,获得了handle,当然也可以不做重写,手动传入handle。这个handle就是我们要处理的I/O,而handler则是我们继承ACE_Event_Handler的类。
 template <class ACE_SELECT_REACTOR_TOKEN> int

 ACE_Select_Reactor_T<ACE_SELECT_REACTOR_TOKEN>::register_handler_i

   (ACE_HANDLE handle,

    ACE_Event_Handler *event_handler,

    ACE_Reactor_Mask mask)

 {

   ACE_TRACE ("ACE_Select_Reactor_T::register_handler_i");

   // Insert the <handle, event_handle> tuple into the Handler

   // Repository.

   return this->handler_rep_.bind (handle, event_handler, mask);

 }
到这里,我们看到代码handler_rep_将hande和event_handler绑定了起来,handler_rep_在Select_Reactor_Base.h内为ACE_Select_Reactor_Impl的成员变量。下面我们继续看bind实际是在做什么操作。
 // Bind the <ACE_Event_Handler *> to the <ACE_HANDLE>.

 int

 ACE_Select_Reactor_Handler_Repository::bind (ACE_HANDLE handle,

                                              ACE_Event_Handler *event_handler,

                                              ACE_Reactor_Mask mask)

 {

   ACE_TRACE ("ACE_Select_Reactor_Handler_Repository::bind");

   if (event_handler == )

     return -;

   if (handle == ACE_INVALID_HANDLE)

     handle = event_handler->get_handle ();

   if (this->invalid_handle (handle))

     return -;

   // Is this handle already in the Reactor?

   bool existing_handle = false;

 #if defined (ACE_WIN32)

   map_type::ENTRY * entry = ;

   int const result =

     this->event_handlers_.bind (handle, event_handler, entry);

   if (result == -)

     {

       return -;

     }

   else if (result == )  // Entry already exists.

     {

       // Cannot use a different handler for an existing handle.

       if (event_handler != entry->item ())

         {

           return -;

         }

       else

         {

           // Remember that this handle is already registered in the

           // Reactor.

           existing_handle = true;

         }

     }

 #else

   // Check if this handle is already registered.

   ACE_Event_Handler * const current_handler =

     this->event_handlers_[handle];

   if (current_handler)

     {

       // Cannot use a different handler for an existing handle.

       if (current_handler != event_handler)

         return -;

       // Remember that this handle is already registered in the

       // Reactor.

       existing_handle = true;

     }

   this->event_handlers_[handle] = event_handler;

   if (this->max_handlep1_ < handle + )

     this->max_handlep1_ = handle + ;

 #endif /* ACE_WIN32 */

   if (this->select_reactor_.is_suspended_i (handle))

     {

       this->select_reactor_.bit_ops (handle,

                                      mask,

                                      this->select_reactor_.suspend_set_,

                                      ACE_Reactor::ADD_MASK);

     }

   else

     {

       this->select_reactor_.bit_ops (handle,

                                      mask,

                                      this->select_reactor_.wait_set_,

                                      ACE_Reactor::ADD_MASK);

       // Note the fact that we've changed the state of the <wait_set_>,

       // which is used by the dispatching loop to determine whether it can

       // keep going or if it needs to reconsult select().

       // this->select_reactor_.state_changed_ = 1;

     }

   // If new entry, call add_reference() if needed.

   if (!existing_handle)

     event_handler->add_reference ();

   return ;

 }
这里非常关键,第50行,event_handlers_实则是一个容器,handle和event_hander以index的方式绑定了起来,存储在了一个容器内,第80行还有一行关键代码,ADD_MASK形式的操作加入到了wait_set_成员内。
注册的代码到这里为止,ACE_Reactor实际上调用了几层N个文件,其实就是把handle,即I/O和handler,即继承ACE_Event_Handler的类绑定在了一个容器里。下面看ACE_Reactor是如何进行消息循环的。
 int

 ACE_Reactor::run_reactor_event_loop (REACTOR_EVENT_HOOK eh)

 {

   ACE_TRACE ("ACE_Reactor::run_reactor_event_loop");

   if (this->reactor_event_loop_done ())

     return ;

   while ()

     {

       int const result = this->implementation_->handle_events ();

       if (eh !=  && (*eh)(this))

         continue;

       else if (result == - && this->implementation_->deactivated ())

         return ;

       else if (result == -)

         return -;

     }

   ACE_NOTREACHED (return ;)

 }
同样,将loop交给了ACE_Reactor_Impl *implementation (void) const;操作。
继续跟踪
 template <class ACE_SELECT_REACTOR_TOKEN> int

 ACE_Select_Reactor_T<ACE_SELECT_REACTOR_TOKEN>::handle_events

   (ACE_Time_Value &max_wait_time)

 {

   ACE_TRACE ("ACE_Select_Reactor_T::handle_events");

   return this->handle_events (&max_wait_time);

 }
再次到了模板,调用handle_events,下面到了关键代码
 template <class ACE_SELECT_REACTOR_TOKEN> int

 ACE_Select_Reactor_T<ACE_SELECT_REACTOR_TOKEN>::handle_events_i

   (ACE_Time_Value *max_wait_time)

 {

   int result = -;

   ACE_SEH_TRY

     {

       // We use the data member dispatch_set_ as the current dispatch

       // set.

       // We need to start from a clean dispatch_set

       this->dispatch_set_.rd_mask_.reset ();

       this->dispatch_set_.wr_mask_.reset ();

       this->dispatch_set_.ex_mask_.reset ();

       int number_of_active_handles =

         this->wait_for_multiple_events (this->dispatch_set_,

                                         max_wait_time);

       result =

         this->dispatch (number_of_active_handles,

                         this->dispatch_set_);

     }

   ACE_SEH_EXCEPT (this->release_token ())

     {

       // As it stands now, we catch and then rethrow all Win32

       // structured exceptions so that we can make sure to release the

       // <token_> lock correctly.

     }

   return result;

 }
第18行wait_for_multiple_events和第22行dispatch。分别做了两件非常关键的事。
 // Must be called with lock held.

 template <class ACE_SELECT_REACTOR_TOKEN> int

 ACE_Select_Reactor_T<ACE_SELECT_REACTOR_TOKEN>::wait_for_multiple_events

   (ACE_Select_Reactor_Handle_Set &dispatch_set,

    ACE_Time_Value *max_wait_time)

 {

   ACE_TRACE ("ACE_Select_Reactor_T::wait_for_multiple_events");

   ACE_Time_Value timer_buf ();

   ACE_Time_Value *this_timeout = ;

   int number_of_active_handles = this->any_ready (dispatch_set);

   // If there are any bits enabled in the <ready_set_> then we'll

   // handle those first, otherwise we'll block in <select>.

   if (number_of_active_handles == )

     {

       do

         {

           if (this->timer_queue_ == )

             return ;

           this_timeout =

             this->timer_queue_->calculate_timeout (max_wait_time,

                                                    &timer_buf);

 #ifdef ACE_WIN32

           // This arg is ignored on Windows and causes pointer

           // truncation warnings on 64-bit compiles.

           int const width = ;

 #else

           int const width = this->handler_rep_.max_handlep1 ();

 #endif  /* ACE_WIN32 */

           dispatch_set.rd_mask_ = this->wait_set_.rd_mask_;

           dispatch_set.wr_mask_ = this->wait_set_.wr_mask_;

           dispatch_set.ex_mask_ = this->wait_set_.ex_mask_;

           number_of_active_handles = ACE_OS::select (width,

                                                      dispatch_set.rd_mask_,

                                                      dispatch_set.wr_mask_,

                                                      dispatch_set.ex_mask_,

                                                      this_timeout);

         }

       while (number_of_active_handles == - && this->handle_error () > );

       if (number_of_active_handles > )

         {

 #if !defined (ACE_WIN32)

           // Resynchronize the fd_sets so their "max" is set properly.

           dispatch_set.rd_mask_.sync (this->handler_rep_.max_handlep1 ());

           dispatch_set.wr_mask_.sync (this->handler_rep_.max_handlep1 ());

           dispatch_set.ex_mask_.sync (this->handler_rep_.max_handlep1 ());

 #endif /* ACE_WIN32 */

         }

       else if (number_of_active_handles == -)

         {

           // Normally, select() will reset the bits in dispatch_set

           // so that only those filed descriptors that are ready will

           // have bits set.  However, when an error occurs, the bit

           // set remains as it was when the select call was first made.

           // Thus, we now have a dispatch_set that has every file

           // descriptor that was originally waited for, which is not

           // correct.  We must clear all the bit sets because we

           // have no idea if any of the file descriptors is ready.

           //

           // NOTE: We dont have a test case to reproduce this

           // problem. But pleae dont ignore this and remove it off.

           dispatch_set.rd_mask_.reset ();

           dispatch_set.wr_mask_.reset ();

           dispatch_set.ex_mask_.reset ();

         }

     }

   // Return the number of events to dispatch.

   return number_of_active_handles;

 }
第35行熟悉的变量wait_set_和第38行函数select,到这里发现,Reactor的I/O监控,就是利用select函数监控之前注册进去且ADD到wait_set_的handle,即I/O。
当有I/O事件,即返回值的number_of_active_handles不为0时,将进行dispatch。
 template <class ACE_SELECT_REACTOR_TOKEN> int

 ACE_Select_Reactor_T<ACE_SELECT_REACTOR_TOKEN>::dispatch

   (int active_handle_count,

    ACE_Select_Reactor_Handle_Set &dispatch_set)

 {

   ACE_TRACE ("ACE_Select_Reactor_T::dispatch");

   int io_handlers_dispatched = ;

   int other_handlers_dispatched = ;

   int signal_occurred = ;

   // The following do/while loop keeps dispatching as long as there

   // are still active handles.  Note that the only way we should ever

   // iterate more than once through this loop is if signals occur

   // while we're dispatching other handlers.

   do

     {

       // We expect that the loop will decrease the number of active

       // handles in each iteration.  If it does not, then something is

       // inconsistent in the state of the Reactor and we should avoid

       // the loop.  Please read the comments on bug 2540 for more

       // details.

       int initial_handle_count = active_handle_count;

       // Note that we keep track of changes to our state.  If any of

       // the dispatch_*() methods below return -1 it means that the

       // <wait_set_> state has changed as the result of an

       // <ACE_Event_Handler> being dispatched.  This means that we

       // need to bail out and rerun the select() loop since our

       // existing notion of handles in <dispatch_set> may no longer be

       // correct.

       //

       // In the beginning, our state starts out unchanged.  After

       // every iteration (i.e., due to signals), our state starts out

       // unchanged again.

       this->state_changed_ = false;

       // Perform the Template Method for dispatching all the handlers.

       // First check for interrupts.

       if (active_handle_count == -)

         {

           // Bail out -- we got here since <select> was interrupted.

           if (ACE_Sig_Handler::sig_pending () != )

             {

               ACE_Sig_Handler::sig_pending ();

               // If any HANDLES in the <ready_set_> are activated as a

               // result of signals they should be dispatched since

               // they may be time critical...

               active_handle_count = this->any_ready (dispatch_set);

               // Record the fact that the Reactor has dispatched a

               // handle_signal() method.  We need this to return the

               // appropriate count below.

               signal_occurred = ;

             }

           else

             return -;

         }

       // Handle timers early since they may have higher latency

       // constraints than I/O handlers.  Ideally, the order of

       // dispatching should be a strategy...

       else if (this->dispatch_timer_handlers (other_handlers_dispatched) == -)

         // State has changed or timer queue has failed, exit loop.

         break;

       // Check to see if there are no more I/O handles left to

       // dispatch AFTER we've handled the timers...

       else if (active_handle_count == )

         return io_handlers_dispatched

           + other_handlers_dispatched

           + signal_occurred;

       // Next dispatch the notification handlers (if there are any to

       // dispatch).  These are required to handle multi-threads that

       // are trying to update the <Reactor>.

       else if (this->dispatch_notification_handlers

                (dispatch_set,

                 active_handle_count,

                 other_handlers_dispatched) == -)

         // State has changed or a serious failure has occured, so exit

         // loop.

         break;

       // Finally, dispatch the I/O handlers.

       else if (this->dispatch_io_handlers

                (dispatch_set,

                 active_handle_count,

                 io_handlers_dispatched) == -)

         // State has changed, so exit loop.

         break;

       // if state changed, we need to re-eval active_handle_count,

       // so we will not end with an endless loop

       if (initial_handle_count == active_handle_count

           || this->state_changed_)

       {

         active_handle_count = this->any_ready (dispatch_set);

       }

     }

   while (active_handle_count > );

   return io_handlers_dispatched + other_handlers_dispatched + signal_occurred;

 }
这里一步步按顺序进行判断分发,进入dispatch_notification_handlers,调用到Select_Reactor_Base.cpp的dispatch_notifications,到这里终于看到熟悉的函数。
 // Handles pending threads (if any) that are waiting to unblock the

 // Select_Reactor.

 int

 ACE_Select_Reactor_Notify::dispatch_notifications (int &number_of_active_handles,

                                                    ACE_Handle_Set &rd_mask)

 {

   ACE_TRACE ("ACE_Select_Reactor_Notify::dispatch_notifications");

   ACE_HANDLE const read_handle =

     this->notification_pipe_.read_handle ();

   if (read_handle != ACE_INVALID_HANDLE

       && rd_mask.is_set (read_handle))

     {

       --number_of_active_handles;

       rd_mask.clr_bit (read_handle);

       return this->handle_input (read_handle);

     }

   else

     return ;

 }
第18行,调用了自己的handle_input,还不是最开始外部重载的handle_input,查看最后这个函数。
 int

 ACE_Select_Reactor_Notify::handle_input (ACE_HANDLE handle)

 {

   ACE_TRACE ("ACE_Select_Reactor_Notify::handle_input");

   // Precondition: this->select_reactor_.token_.current_owner () ==

   // ACE_Thread::self ();

   int number_dispatched = ;

   int result = ;

   ACE_Notification_Buffer buffer;

   // If there is only one buffer in the pipe, this will loop and call

   // read_notify_pipe() twice.  The first time will read the buffer, and

   // the second will read the fact that the pipe is empty.

   while ((result = this->read_notify_pipe (handle, buffer)) > )

     {

       // Dispatch the buffer

       // NOTE: We count only if we made any dispatches ie. upcalls.

       if (this->dispatch_notify (buffer) > )

         ++number_dispatched;

       // Bail out if we've reached the <notify_threshold_>.  Note that

       // by default <notify_threshold_> is -1, so we'll loop until all

       // the notifications in the pipe have been dispatched.

       if (number_dispatched == this->max_notify_iterations_)

         break;

     }

   // Reassign number_dispatched to -1 if things have gone seriously

   // wrong.

   if (result < )

     number_dispatched = -;

   // Enqueue ourselves into the list of waiting threads.  When we

   // reacquire the token we'll be off and running again with ownership

   // of the token.  The postcondition of this call is that

   // <select_reactor_.token_.current_owner> == <ACE_Thread::self>.

   this->select_reactor_->renew ();

   return number_dispatched;

 }
第15行,取数据,第19行dispatch_notify
 int

 ACE_Select_Reactor_Notify::dispatch_notify (ACE_Notification_Buffer &buffer)

 {

   int result = ;

 #if defined (ACE_HAS_REACTOR_NOTIFICATION_QUEUE)

   // Dispatch one message from the notify queue, and put another in

   // the pipe if one is available.  Remember, the idea is to keep

   // exactly one message in the pipe at a time.

   bool more_messages_queued = false;

   ACE_Notification_Buffer next;

   result = notification_queue_.pop_next_notification(buffer,

                                                      more_messages_queued,

                                                      next);

   if (result ==  || result == -)

     {

       return result;

     }

   if(more_messages_queued)

     {

       (void) ACE::send(this->notification_pipe_.write_handle(),

             (char *)&next, sizeof(ACE_Notification_Buffer));

     }

 #endif /* ACE_HAS_REACTOR_NOTIFICATION_QUEUE */

   // If eh == 0 then another thread is unblocking the

   // <ACE_Select_Reactor> to update the <ACE_Select_Reactor>'s

   // internal structures.  Otherwise, we need to dispatch the

   // appropriate handle_* method on the <ACE_Event_Handler> pointer

   // we've been passed.

   if (buffer.eh_ != )

     {

       ACE_Event_Handler *event_handler = buffer.eh_;

       bool const requires_reference_counting =

         event_handler->reference_counting_policy ().value () ==

         ACE_Event_Handler::Reference_Counting_Policy::ENABLED;

       switch (buffer.mask_)

         {

         case ACE_Event_Handler::READ_MASK:

         case ACE_Event_Handler::ACCEPT_MASK:

           result = event_handler->handle_input (ACE_INVALID_HANDLE);

           break;

         case ACE_Event_Handler::WRITE_MASK:

           result = event_handler->handle_output (ACE_INVALID_HANDLE);

           break;

         case ACE_Event_Handler::EXCEPT_MASK:

           result = event_handler->handle_exception (ACE_INVALID_HANDLE);

           break;

         case ACE_Event_Handler::QOS_MASK:

           result = event_handler->handle_qos (ACE_INVALID_HANDLE);

           break;

         case ACE_Event_Handler::GROUP_QOS_MASK:

           result = event_handler->handle_group_qos (ACE_INVALID_HANDLE);

           break;

         default:

           // Should we bail out if we get an invalid mask?

           ACE_ERROR ((LM_ERROR,

                       ACE_TEXT ("invalid mask = %d\n"),

                       buffer.mask_));

         }

       if (result == -)

         event_handler->handle_close (ACE_INVALID_HANDLE,

                                      ACE_Event_Handler::EXCEPT_MASK);

       if (requires_reference_counting)

         {

           event_handler->remove_reference ();

         }

     }

   return ;

 }
到这里,终于看到调用到我们最开始继承ACE_Event_Handler重写的那个回调handle_input()了。
至此,ACE_Reactor内部源码的执行过程全部结束,其实ACE并没有做非常特别的事,注册利用一个容器进行I/O和回调方法的绑定,I/O复用利用select,最后发生I/O事件找到对应的event函数handle_input执行。
怪不得网上有人抱怨ACE代码臃肿了,这些我们关心“简单”过程的代码就这么多的复杂用法和调用,更不用说我们还没用上的了,但是ACE提供的Reactor框架确实方便了我们使用,也提供了可靠的移植性和性能。
ACE - Reactor模式源码剖析及具体实现(大量源码慎入)的更多相关文章
- Spring源码剖析9:Spring事务源码剖析
转自:http://www.linkedkeeper.com/detail/blog.action?bid=1045 声明式事务使用 Spring事务是我们日常工作中经常使用的一项技术,Spring提 ...
- Apache Spark源码剖析
Apache Spark源码剖析(全面系统介绍Spark源码,提供分析源码的实用技巧和合理的阅读顺序,充分了解Spark的设计思想和运行机理) 许鹏 著 ISBN 978-7-121-25420- ...
- Django Rest Framework源码剖析(五)-----解析器
一.简介 解析器顾名思义就是对请求体进行解析.为什么要有解析器?原因很简单,当后台和前端进行交互的时候数据类型不一定都是表单数据或者json,当然也有其他类型的数据格式,比如xml,所以需要解析这类数 ...
- Java ArrayList源码剖析
转自: Java ArrayList源码剖析 总体介绍 ArrayList实现了List接口,是顺序容器,即元素存放的数据与放进去的顺序相同,允许放入null元素,底层通过数组实现.除该类未实现同步外 ...
- Java HashSet和HashMap源码剖析
转自: Java HashSet和HashMap源码剖析 总体介绍 之所以把HashSet和HashMap放在一起讲解,是因为二者在Java里有着相同的实现,前者仅仅是对后者做了一层包装,也就是说Ha ...
- drf源码剖析系列(系列目录)
drf源码剖析系列(系列目录) 01 drf源码剖析之restful规范 02 drf源码剖析之快速了解drf 03 drf源码剖析之视图 04 drf源码剖析之版本 05 drf源码剖析之认证 06 ...
- muduo库源码剖析(一) reactor模式
一. Reactor模式简介 Reactor释义“反应堆”,是一种事件驱动机制.和普通函数调用的不同之处在于:应用程序不是主动的调用某个API完成处理,而是恰恰相反,Reactor逆置了事件处理流程, ...
- ACE - ACE_Task源码剖析及线程池实现
原文出自http://www.cnblogs.com/binchen-china,禁止转载. 上篇提到用Reactor模式,利用I/O复用,获得Socket数据并且实现I/O层单线程并发,和dispa ...
- 设计模式(二十二)——状态模式(APP抽奖活动+借贷平台源码剖析)
24.1 APP 抽奖活动问题 请编写程序完成 APP 抽奖活动 具体要求如下: 1) 假如每参加一次这个活动要扣除用户 50 积分,中奖概率是 10% 2) 奖品数量固定,抽完就不能抽奖 3) 活动 ...
随机推荐
- iOS 枚举的巧用
前言 在之前的一篇文章中简单的提到了这个问题, 但是自己写的不详细, 并且自己深入了解的也不是特别多, 在开发中也没怎么用到,所以经过阅读者的反馈对这个问题很是疑惑! 本篇文章会分析之前的不足之处, ...
- latex 异或
用\lxor \(\lxor\) 用\veebar \(\veebar\) 用\oplus \(\oplus\) ... 怎么不是我想象的那样... 算了.
- Spring MVC 线程安全问题的思考
Spring MVC 线程安全问题的思考 在读一些博文的时候发现有些文章对SpringMVC的Controller线程安全的验证并不正确,比如没有探究controller线程不安全的具体原因,比如将请 ...
- C# 从CIL代码了解委托,匿名方法,Lambda 表达式和闭包本质
前言 C# 3.0 引入了 Lambda 表达式,程序员们很快就开始习惯并爱上这种简洁并极具表达力的函数式编程特性. 本着知其然,还要知其所以然的学习态度,笔者不禁想到了几个问题. (1)匿名函数(匿 ...
- 在代码中调用gdb
转载:http://blog.csdn.net/hanchaoman/article/details/5583457 在SIGSEGV的handler中调用gdb, 命令gdb [exec file] ...
- 《BI那点儿事》数据流转换——百分比抽样、行抽样
百分比抽样和行抽样可以从数据源中随机选择一组数据.这两种task都可以产生两组输出,一组是随机选择的,另一组是没有被选择的.可以将这些选择出的数据发送到开发或者测试服务器上.这个Task的最合适的应用 ...
- 配置spring事务管理的几种方式(声明式事务)
Spring配置文件中关于事务配置总是由三个组成部分,分别是DataSource.TransactionManager和代理机制这三部分,无论哪种配置方式,一般变化的只是代理机制这部分. DataSo ...
- zabbix3.0.4 部署之二 (Centos6.5系统准备)
1.安装Centos6.5 2.6.32-642.4.2.el6.x86_64 升级所有软件至最新: yum update 2.同步时间.安装ntpd yum install ntpddate n ...
- python核心编程第六章练习6-9
6-9.转换.为练习5-13写一个姊妹函数,接受分钟数,返回小时数和分钟数.总时间不变,并且要求小时尽可能大.[答案]代码如下: #!/usr/bin/env python # translate m ...
- bootstrap笔记-栅格布局
1. .clearfix 这个类可以在栅格布局中起到一个不占空间的clear的作用,如下:可以尝试带.clearfix和不带它的区别 <div class="container-f ...