IOS绘图详解(http://blog.163.com/wkyuyang_001/blog/static/10802122820133190545227/)
14.1 Quartz概述
Quartz是Mac OS X的Darwin核心之上的绘图层,有时候也认为是CoreGraphics。共有两种部分组成Quartz:
Quartz Compositor,合成视窗系统,管理和合成幕后视窗影像来建立Mac OS X使用者接口。
Quartz 2D,是iOS和Mac OS X环境下的二维绘图引擎。
涉及内容包括:基于路径的绘图,透明度绘图,遮盖,阴影,透明层,颜色管理,防锯齿渲染,生成PDF,以及PDF元数据相关处理。
14.2 绘制基本几何图形
视图绘制
在iOS上,所有的绘制,无论是否采用OpenGL、Quartz、UIKit、或者 Core Animation—都发生在UIView对象的区域内。
视图定义绘制发生的屏幕区域。如果您使用系统提供的视图,绘制工作会自动得到处理。然而,如果您定义自己的定制视图,则必须自行提供绘制代码。
对于使用OpenGL进行绘制的应用程序,一旦建立了渲染表面,就必须使用OpenGL指定的绘制模型。
视图绘制周期
描绘系统会调用UIView对象的drawRect:方法,并向它传入一个包含需要重画的视图区域的矩形。触发视图更新的动作有如下几种:
对遮挡您的视图的其它视图进行移动或删除操作。
将视图的hidden属性声明设置为NO,使其从隐藏状态变为可见。
将视图滚出屏幕,然后再重新回到屏幕上。
显式调用视图的setNeedsDisplay或者setNeedsDisplayInRect:方法。
setNeedsDisplay是更新整个视图,
setNeedsDisplayInRect是更新视图的部分区域。
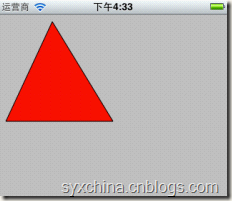
视图绘制实例FirstQuartz2D
自定义视图的h文件
@interface MyView : UIView {

}

@end
自定义视图的m文件

@implementation MyView

- (void)drawRect:(CGRect)rect {

    CGContextRef context = UIGraphicsGetCurrentContext();

    CGContextMoveToPoint (context, 75, 10);

    CGContextAddLineToPoint (context, 10, 150);

    CGContextAddLineToPoint (context, 160, 150);

    // Closing the path connects the current point to the start of the current path.

    CGContextClosePath(context);

    // And stroke the path

    [[UIColor blackColor] setStroke];

    //CGContextStrokePath(context);

    [[UIColor redColor] setFill];

    CGContextDrawPath(context, kCGPathFillStroke);

    //kCGPathFillStroke,kCGPathFill,kCGPathStroke

}

@end
CGContextRef context = UIGraphicsGetCurrentContext();可以获得图形上下文。
CGContextMoveToPoint、CGContextAddLineToPoint两个函数是构建描绘路径。
CGContextClosePath(context);函数是闭合描绘路径。
CGContextStrokePath函数是为闭合路径描边。
[[UIColor blackColor] setStroke]设置描边的颜色。
[[UIColor redColor] setFill]设置要填充颜色。
CGContextDrawPath(context, kCGPathFillStroke);设置描绘路径方式。常用的还有:
kCGPathFill和kCGPathStroke
图形上下文
在调用您提供的drawRect:方法之前,视图对象会自动配置其绘制环境,使您的代码可以立即进行绘制。作为这些
配置的一部分,UIView对象会为当前绘制环境创建一个图形上下文(对应于CGContextRef封装类型)。
该图形上下文包含绘制系统执行后续绘制命令所需要的信息,定义了各种基本的绘制属性,比如绘制使用的颜色、
裁剪区域、线的宽度及风格信息、字体信息、合成选项、以及几个其它信息。
绘制路径
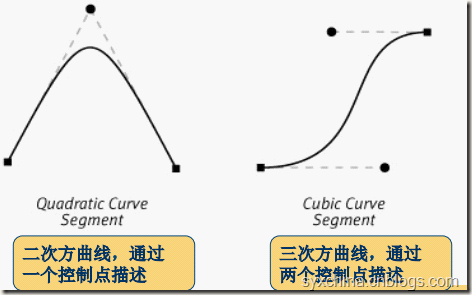
路径用于描述由一序列线和Bézier曲线构成的2D几何形状。Core Graphics中也有一些用于创建简单路径(比如矩形和椭圆形)的便利函数。对于更为复杂的路径,必须用Core Graphics框架提供的函数自行创建。
Bézier曲线是法国数学家“贝塞尔”在工作中发现,任何一条曲线都可以通过与它相切的控制线两端的点的位置来定义。
Bézier曲线
Bézier曲线实例BezierCurve
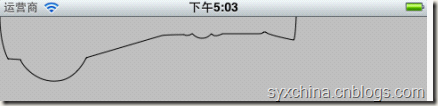
- (void)drawRect:(CGRect)rect {

    CGContextRef cgContext = UIGraphicsGetCurrentContext();

    //CGContextBeginPath(cgContext);

    CGContextMoveToPoint(cgContext, 333, 0);

    CGContextAddCurveToPoint(cgContext, 333, 0, 332, 26, 330, 26);

    CGContextAddCurveToPoint(cgContext, 330, 26, 299, 20, 299, 17);

    CGContextAddLineToPoint(cgContext, 296, 17);

    CGContextAddCurveToPoint(cgContext, 296, 17, 296, 19, 291, 19);

    CGContextAddLineToPoint(cgContext, 250, 19);

    CGContextAddCurveToPoint(cgContext, 250, 19, 241, 24, 238, 19);

    CGContextAddCurveToPoint(cgContext, 236, 20, 234, 24, 227, 24);

    CGContextAddCurveToPoint(cgContext, 220, 24, 217, 19, 216, 19);

    CGContextAddCurveToPoint(cgContext, 214, 20, 211, 22, 207, 20);

    CGContextAddCurveToPoint(cgContext, 207, 20, 187, 20, 182, 21);

    CGContextAddLineToPoint(cgContext, 100, 45);

    CGContextAddLineToPoint(cgContext, 97, 46);

    CGContextAddCurveToPoint(cgContext, 97, 46, 86, 71, 64, 72);

    CGContextAddCurveToPoint(cgContext, 42, 74, 26, 56, 23, 48);

    CGContextAddLineToPoint(cgContext, 9, 47);

    CGContextAddCurveToPoint(cgContext, 9, 47, 0, 31, 0, 0);

    CGContextStrokePath(cgContext);

}
14.3 绘制图像和文本
UIImages的-drawRect:方法绘制图像:
- [UIImage drawAtPoint:(CGPoint)point]
- [UIImage drawInRect:(CGRect)rect]
- [UIImage drawAsPatternInRect:(CGRect)rect]
NSString的-drawRect:方法绘制文本:
- [NSString drawAtPoint:(CGPoint)point withFont:(UIFont *)font]
实例DrawImage

#import "MyView.h"

@implementation MyView

- (void)drawRect:(CGRect)rect {

    NSString* imagePath = [[NSBundle mainBundle] pathForResource:@"dog" ofType:@"png"];

    UIImage* myImageObj = [[UIImage alloc] initWithContentsOfFile:imagePath];

    //[myImageObj drawAtPoint:CGPointMake(0, 0)];

    [myImageObj drawInRect:CGRectMake(0, 0, 320, 480)];

    NSString *s = @"我的小狗";

    [s drawAtPoint:CGPointMake(100, 0) withFont:[UIFont systemFontOfSize:34.0]];

}

@end
写字实例Draw
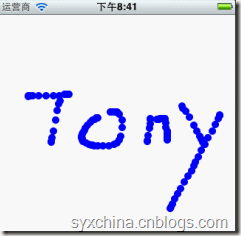
Dot对象
//--h

@interface Dot : NSObject {

  CGFloat x;

  CGFloat y;

}

@property(assign) CGFloat x;

@property(assign) CGFloat y;

@end

//--m

#import "Dot.h"

@implementation Dot

@synthesize x;

@synthesize y;

@end
DrawView.h
#import <UIKit/UIKit.h>

@interface DrawView : UIView {

  NSMutableArray *dots;

}

@property(nonatomic, retain) NSMutableArray *dots;

@end
DrawView.m
#import "DrawView.h"

#import "Dot.h"

@implementation DrawView

@synthesize dots;

- (NSMutableArray *)dots {

    if(nil == dots) {

        self.dots = [NSMutableArray array];

    }

    return dots;

}

//START:code.DrawView.drawRect

- (void)drawRect:(CGRect)rect {

    CGContextRef ctx = UIGraphicsGetCurrentContext();

    CGContextSetFillColorWithColor(ctx, [[UIColor blueColor] CGColor]);

    for(Dot *dot in self.dots) {

        CGContextAddArc(ctx, dot.x, dot.y, 5.0f, 0.0f, 2.0f * M_PI, YES);

        CGContextFillPath(ctx);

    }

}

//END:code.DrawView.drawRect

- (void)dealloc {

    self.dots = nil;

    [super dealloc];

}
drawRect方法中将dots集合中的Dot对象取出,一个一个在屏幕上面画出来。
CGContextAddArc(ctx, dot.x, dot.y, 5.0f, 0.0f, 2.0f * M_PI, YES);函数是绘制弧形。
CGContextFillPath(ctx);填充路径。
//START:code.DrawView.touchesBegan

- (void)touchesBegan:(NSSet *)touches withEvent:(UIEvent *)event {

    UITouch *touch = [touches anyObject];

    CGPoint location = [touch locationInView:self];

    Dot *dot = [[[Dot alloc] init] autorelease];

    dot.x = location.x;

    dot.y = location.y;

    //[self.dots removeAllObjects];

    [self.dots addObject:dot];

    [self setNeedsDisplay];

}

//END:code.DrawView.touchesBegan

//START:code.DrawView.touchesMoved

- (void)touchesMoved:(NSSet *)touches withEvent:(UIEvent *)event {

    UITouch *touch = [touches anyObject];

    CGPoint location = [touch locationInView:self];

    Dot *dot = [[[Dot alloc] init] autorelease];

    dot.x = location.x;

    dot.y = location.y;

    [self.dots addObject:dot];

    [self setNeedsDisplay];

}

//END:code.DrawView.touchesMoved
14.4 坐标
Quartz坐标
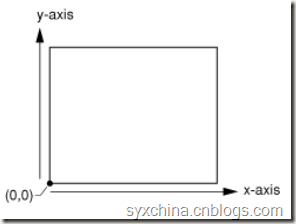
Quartz技术最开始为Mac OS X系统设计的图形技术,它的坐标原点位于左下角。
UIKit坐标
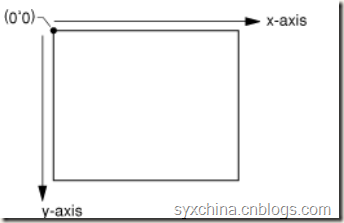
UIKit坐标与Quartz不同,原点位于右上角。在iOS中的UIView等控件都是基于此坐标,由于在UIView使用了Quartz坐标有时候需要转换。
坐标变换实例
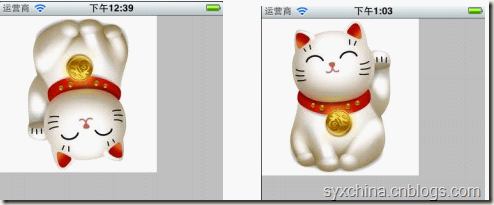
MyView.m文件
#import "MyView.h"

@implementation MyView

- (void)drawRect:(CGRect)rect {

    NSString *path = [[NSBundle mainBundle] pathForResource:@"cat" ofType:@"jpg"];

    UIImage *img = [UIImage imageWithContentsOfFile:path];

    CGImageRef image = img.CGImage;

    CGContextRef context = UIGraphicsGetCurrentContext();

    CGContextSaveGState(context);

    CGRect touchRect = CGRectMake(0, 0, img.size.width, img.size.height);

    CGContextDrawImage(context, touchRect, image);

    CGContextRestoreGState(context);

}

@end
CGContextSaveGState是将当前图形状态要入到图形堆栈。
CGContextDrawImage(context, touchRect, image)在上下文中绘制图形。 CGContextRestoreGState回复当前图形状态。
14.5 变换
运用变换
变换(transformation)修改了图形上下文中绘制图形的方式。可以通过移动、旋转或缩放实现变换。
Quartz提供了多种形式的变换,其中主要:CTM(当前变换矩阵)变换和仿射(affine)变换。
CTM(current transformation matrix)变换,这种变换比较简单,函数有:
CGContextRotateCTM,旋转坐标
CGContextScaleCTM,缩放坐标
CGContextTranslateCTM,移动原点
移动变换
CGContextTranslateCTM (myContext, 100, 50)
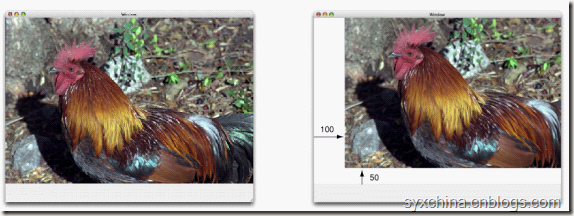
从对象角度沿着x轴正向移动100单位,沿着y轴正向移动50单位。
旋转变换
static inline double radians (double degrees) {return degrees * M_PI/180;}
CGContextRotateCTM (myContext, radians(–45.));
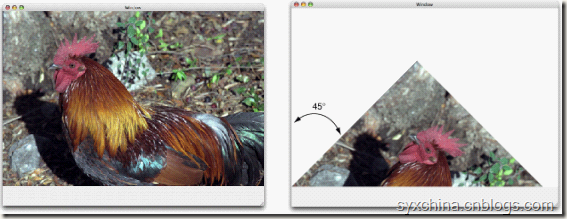
从对象角度:
在Quartz坐标下正数为逆时针旋转,负数为顺时针旋转。
在UIKit坐标下正数为顺时针旋转,负数为逆时针旋转。
缩放变换
CGContextScaleCTM (myContext, .5, .75);
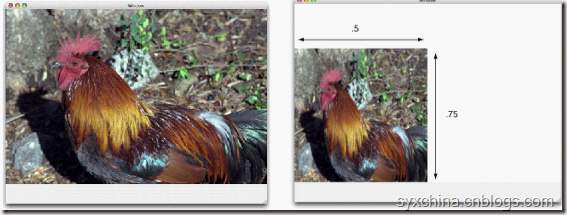
从对象角度:所有x坐标缩小0.5,所有y坐标缩小0.75。
修改MyView.m文件
#import "MyView.h"

@implementation MyView

- (void)drawRect:(CGRect)rect {

    NSString *path = [[NSBundle mainBundle] pathForResource:@"cat" ofType:@"jpg"];

    UIImage *img = [UIImage imageWithContentsOfFile:path];

    CGImageRef image = img.CGImage;

    CGContextRef context = UIGraphicsGetCurrentContext();

    CGContextSaveGState(context);

    CGContextRotateCTM(context, M_PI);

    CGContextTranslateCTM(context, -img.size.width, -img.size.height);

    CGRect touchRect = CGRectMake(0, 0, img.size.width, img.size.height);

    CGContextDrawImage(context, touchRect, image);

    CGContextRestoreGState(context);

}

@end
仿射(affine)变换
仿射(affine)变换也是一种直角坐标变换,重
用变换,经过多次变换(多次的矩阵相乘),
每一种变换都可以用矩阵表示,通过多次矩阵
相乘得到最后结果。仿射变换函数:
CGAffineMakeRotation,创建旋转矩阵仿射对象
CGAffineMakeScale,创建缩放矩阵仿射对象
CGAffineMakeTranslation,创建移动矩阵仿射对象
CGAffineTransformRotate,旋转矩阵仿射对象
CGAffineTransformScale,缩放矩阵仿射对象
CGAffineTransformTranslate,移动矩阵仿射对象
CGContextConcatCTM,连接到CTM变换
使用仿射变换MyView.m
#import "MyView.h"

@implementation MyView

- (void)drawRect:(CGRect)rect {

    NSString *path = [[NSBundle mainBundle] pathForResource:@"cat" ofType:@"jpg"];

    UIImage *img = [UIImage imageWithContentsOfFile:path];

    CGImageRef image = img.CGImage;

    CGContextRef context = UIGraphicsGetCurrentContext();

    CGContextSaveGState(context);

    CGAffineTransform myAffine = CGAffineTransformMakeRotation(M_PI);

    myAffine = CGAffineTransformTranslate(myAffine, -img.size.width, -img.size.height);

    CGContextConcatCTM(context, myAffine);

    CGContextRotateCTM(context, M_PI);

    CGContextTranslateCTM(context, -img.size.width, -img.size.height);

    CGRect touchRect = CGRectMake(0, 0, img.size.width, img.size.height);

    CGContextDrawImage(context, touchRect, image);

    CGContextRestoreGState(context);

}

@end
14.6 图像拾取器
图像拾取器(Image Picker)是可以帮助你从图片库中选取图片,也可以捕获照相机图片。

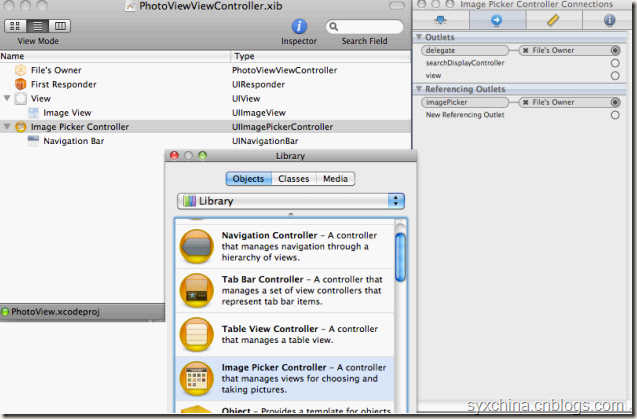
PhotoViewViewController.h
//START:code.PhotoViewController.h

@interface PhotoViewViewController : UIViewController

<UIImagePickerControllerDelegate> {

    UIImageView *imageView;

    UIImagePickerController *imagePicker;

}

@property(nonatomic, retain) IBOutlet UIImageView *imageView;

@property(nonatomic, retain) IBOutlet UIImagePickerController *imagePicker;

@end

//END:code.PhotoViewController.h
需要实现UIImagePickerControllerDelegate协议。
需要定义UIImagePickerController控制器成员变量。
PhotoViewViewController.m
#import "PhotoViewViewController.h"

@implementation PhotoViewViewController

@synthesize imageView;

@synthesize imagePicker;

//START:code.PhotoViewController.touchesEnded:withEvent:

- (void)touchesEnded:(NSSet *)touches withEvent:(UIEvent *)event {

    if([[touches anyObject] tapCount] > 1) {

        // bring up image grabber

        if([UIImagePickerController isSourceTypeAvailable:

            UIImagePickerControllerSourceTypeCamera]) {

            self.imagePicker.sourceType = UIImagePickerControllerSourceTypeCamera;

        } else {

            self.imagePicker.sourceType =

            UIImagePickerControllerSourceTypePhotoLibrary;

        }

        //self.imagePicker.allowsImageEditing = YES; //iOS 3之前

        self.imagePicker.allowsEditing = YES;

        [self presentModalViewController:self.imagePicker animated:YES];

    }

}

//END:code.PhotoViewController.touchesEnded:withEvent:
图像选取器的sourceType属性有:
UIImagePickerControllerSourceTypePhotoLibrary,图片来源于“相簿”
UIImagePickerControllerSourceTypeCamera,来源于相机
UIImagePickerControllerSourceTypeSavedPhotosAlbum,来源于“相机胶卷”。
PhotoViewViewController.m
//START:code.PhotoViewController.didFinish

- (void)imagePickerController:(UIImagePickerController *)picker

didFinishPickingMediaWithInfo:(NSDictionary *)info {

    imageView.image = [info objectForKey:UIImagePickerControllerEditedImage];

    [self dismissModalViewControllerAnimated:YES];

}

//END:code.PhotoViewController.didFinish

//START:code.PhotoViewController.didCancel

- (void)imagePickerControllerDidCancel:(UIImagePickerController *)picker {

    [self.imagePicker dismissModalViewControllerAnimated:YES];

}

//END:code.PhotoViewController.didCancel

- (void)dealloc {

    self.imageView = nil;

    self.imagePicker = nil;

    [super dealloc];

}
imagePickerController:didFinishPickingMediaWithInfo:委托实现方法,当选择完成时候调用。
imageView.image = [info objectForKey:UIImagePickerControllerEditedImage];语句可以从图片拾取器中获得一个Image对象。
imagePickerControllerDidCancel:是委托实现方法当点击取消时候调用。
IOS绘图详解(http://blog.163.com/wkyuyang_001/blog/static/10802122820133190545227/)的更多相关文章
- IOS绘图详解
http://blog.163.com/wkyuyang_001/blog/static/10802122820133190545227/
- iOS 2D绘图详解(Quartz 2D)之路径(点,直线,虚线,曲线,圆弧,椭圆,矩形)
前言:一个路径可以包含由一个或者多个shape以及子路径subpath,quartz提供了很多方便的shape可以直接调用.例如:point,line,Arc(圆弧),Curves(曲线),Ellip ...
- 【转】IOS AutoLayout详解(三)用代码实现(附Demo下载)
转载自:blog.csdn.net/hello_hwc IOS SDK详解 前言: 在开发的过程中,有时候创建View没办法通过Storyboard来进行,又需要AutoLayout,这时候用代码创建 ...
- IOS SDK详解
来源:http://blog.csdn.net/column/details/huangwenchen-ios-sdk.html?page=1#42803301 博客专栏>移动开发专栏>I ...
- 【转】Android Canvas绘图详解(图文)
转自:http://www.jcodecraeer.com/a/anzhuokaifa/androidkaifa/2012/1212/703.html Android Canvas绘图详解(图文) 泡 ...
- iOS路由详解
本文如题,路由详解,注定是一篇详细解释iOS路由原理及使用的文章,由于此时正在外地出差,无法详细一一写出,只能不定时的补充. 一.什么是iOS路由 路由一词来源于路由器,可以实现层级之间消息转发的功能 ...
- http://blog.163.com/zhangmihuo_2007/blog/static/27011075201392685751232/
http://blog.163.com/zhangmihuo_2007/blog/static/27011075201392685751232/
- IOS 手势详解
在IOS中手势可以让用户有很好的体验,因此我们有必要去了解一下手势. (在设置手势是有很多值得注意的地方) *是需要设置为Yes的点击无法响应* *要把手势添加到所需点击的View,否则无法响应* 手 ...
- IOS SizeClasses 详解
SizeClasses 详解 iOS 8在应用界面的可视化设计上添加了一个新的特性-Size Classes.对于任何设备来说,界面的宽度和高度都只分为三种描述:紧凑,任意和宽松.这样开发者便可以无视 ...
随机推荐
- (62)通信协议之一protobuf
Protobuf协议特点分析 KingKa.吴永聪 1.protobuf是什么? protobuf(Google Protocol Buffers)是Google提供的一个具有高效的协议数据交换格式 ...
- 使用Jacoco获取 Java 程序的代码执行覆盖率
Jacoco是Java Code Coverage的缩写,顾名思义,它是获取Java代码执行覆盖率的一个工具,通常用它来获取单元测试覆盖率.它通过分析Java字节码来得到代码执行覆盖率,因此它还可以分 ...
- 源码阅读-SwiftyJSON
最后更新:2018-03-19 一.说在前面的话: SwiftyJSON 作为一个 swift 的解析库, 在 Swift4 之前备受欢迎, 目前(2018.3.19) 已经有 1.6w+ Star ...
- 安装浏览器的vue插件
安装浏览器的vue插件步骤: 1.在浏览器中打开 https://github.com/vuejs/vue-devtools Clone or download vue-devtools. 2.解压 ...
- yii2.0 curd操作数据写法
一.执行原生sql查询,创建yii\db\Command insert(),update(),delete()直接构建,相应的sql语句 查: 1.查询一条 \Yii::$app-&g ...
- spring session 加载的时候一些配置问题
启动springboot时候的错误信息: An attempt was made to call the method org.springframework.boot.autoconfigure.s ...
- SVN appears to be part of a Subversion 问题心得
昨天更新了下项目,但同时又增加了一个Java工程,我就在本地单独导出到workspace同目录下:结果第二天提交代码的时候,提示如下错误 svn: E155021: The path 'xxx' ap ...
- zabbix 监控安装部署
今天尝试一下部署zabbix 官方文档包括多个版本,此处选择4.0版本 https://www.zabbix.com/documentation/4.0/manual 1.安装环境选择 zabbix4 ...
- JS实现数组排序:升序和降序
如果指明了 compareFunction ,那么数组会按照调用该函数的返回值排序.即 a 和 b 是两个将要被比较的元素: 如果 compareFunction(a, b) 小于 0 ,那么 a 会 ...
- url的匹配问题
1.例如我当前访问的路径是 127.0.0.1:8000/app01/customer/ 此时我需要在这个界面跳转另外一个界面127.0.0.1:8000/app02/books/,于是我定义一个a标 ...