Learning OSG programing---osgAnimation(3)
接下来是用createModel函数创建模型:
 osg::ref_ptr<osg::Group> createModel(bool overlay, osgSim::OverlayNode::OverlayTechnique technique)

 {

     osg::Vec3 center(0.0f,0.0f,0.0f);

     float radius = 100.0f;

     osg::ref_ptr<osg::Group> root = new osg::Group;

     float baseHeight = center.z()-radius*0.5;

     osg::ref_ptr<osg::Node> baseModel = createBase(osg::Vec3(center.x(), center.y(), baseHeight),radius);

     osg::ref_ptr<osg::Node> movingModel = createMovingModel(center,radius*0.8f);

     if (overlay)

     {

         osgSim::OverlayNode* overlayNode = new osgSim::OverlayNode(technique);

         overlayNode->setContinuousUpdate(true);

         overlayNode->setOverlaySubgraph(movingModel);

         overlayNode->setOverlayBaseHeight(baseHeight-0.01);

         overlayNode->addChild(baseModel);

         root->addChild(overlayNode);

     }

     else

     {

         root->addChild(baseModel);

     }

     root->addChild(movingModel);

     return root;

 }
这个函数首先根据前面定义的函数,创建方格地板和运动模型。根据函数的参数overlay决定是否建立重叠效果。
若指定创建重叠效果,则根据函数的参数technique创建重叠节点,并将运动模型movingModel设为其重叠的模型。将方格地板加入到重叠节点,并将重叠节点加入到根节点中。
如未指定创建重叠模式,则直接将方格地板和运动模型添加到根节点返回。
最后是主函数代码:
 int main( int argc, char **argv )

 {

     bool overlay = false;

     osg::ArgumentParser arguments(&argc,argv);

     while (arguments.read("--overlay")) overlay = true;

     osgSim::OverlayNode::OverlayTechnique technique = osgSim::OverlayNode::OBJECT_DEPENDENT_WITH_ORTHOGRAPHIC_OVERLAY;

     while (arguments.read("--object")) { technique = osgSim::OverlayNode::OBJECT_DEPENDENT_WITH_ORTHOGRAPHIC_OVERLAY; overlay=true; }

     while (arguments.read("--ortho") || arguments.read("--orthographic")) { technique = osgSim::OverlayNode::VIEW_DEPENDENT_WITH_ORTHOGRAPHIC_OVERLAY; overlay=true; }

     while (arguments.read("--persp") || arguments.read("--perspective")) { technique = osgSim::OverlayNode::VIEW_DEPENDENT_WITH_PERSPECTIVE_OVERLAY; overlay=true; }

     // initialize the viewer.

     osgViewer::Viewer viewer;

     // load the nodes from the commandline arguments.

     osg::ref_ptr<osg::Group> model = createModel(overlay, technique);

     if (!model)

     {

         return ;

     }

     // tilt the scene so the default eye position is looking down on the model.

     osg::ref_ptr<osg::MatrixTransform> rootnode = new osg::MatrixTransform;

     rootnode->setMatrix(osg::Matrix::rotate(osg::inDegrees(30.0f),1.0f,0.0f,0.0f));

     rootnode->addChild(model);

     // run optimization over the scene graph

     osgUtil::Optimizer optimzer;

     optimzer.optimize(rootnode);

     std::string filename;

     if (arguments.read("-o",filename))

     {

         osgDB::writeNodeFile(*rootnode, filename);

         return ;

     }

     // set the scene to render

     viewer.setSceneData(rootnode);

     viewer.setCameraManipulator(new osgGA::TrackballManipulator());

     // viewer.setUpViewOnSingleScreen(1);

 #if 0

     // use of custom simulation time.

     viewer.realize();

     double simulationTime = 0.0;

     while (!viewer.done())

     {

         viewer.frame(simulationTime);

         simulationTime += 0.001;

     }

     return ;

 #else

     // normal viewer usage.

     return viewer.run();

 #endif

 }
主函数中,根据运行程序时指定的命令行参数,用createModel函数创建不同的节点对象。最后对生成的节点进行选转,优化等操作。在运行程序时,若在命令行中输入 -o选项,并在其后指定文件名,则程序可将生成的模型保存在指定的文件中。
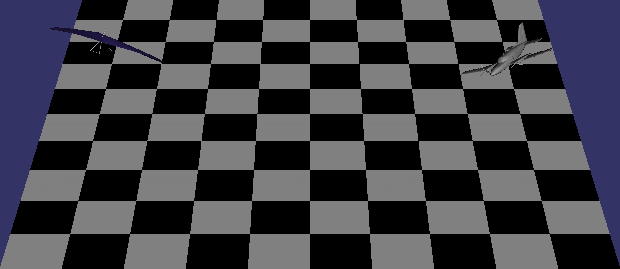
运行程序,分别指定和不指定overlay选项时,产生不同的效果。
overlay
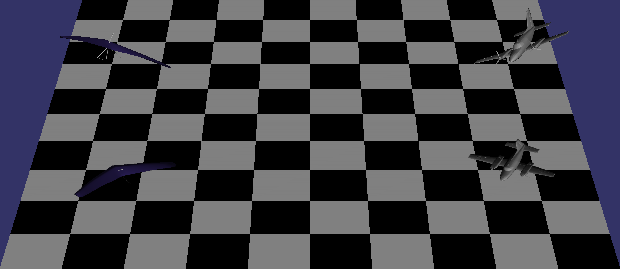
可以看到地板上会有模型的投影。
nonOverlay
Enjoy!
Learning OSG programing---osgAnimation(3)的更多相关文章
- Deep Learning论文笔记之(四)CNN卷积神经网络推导和实现(转)
Deep Learning论文笔记之(四)CNN卷积神经网络推导和实现 zouxy09@qq.com http://blog.csdn.net/zouxy09 自己平时看了一些论文, ...
- Deep Learning论文笔记之(八)Deep Learning最新综述
Deep Learning论文笔记之(八)Deep Learning最新综述 zouxy09@qq.com http://blog.csdn.net/zouxy09 自己平时看了一些论文,但老感觉看完 ...
- Deep Learning论文笔记之(六)Multi-Stage多级架构分析
Deep Learning论文笔记之(六)Multi-Stage多级架构分析 zouxy09@qq.com http://blog.csdn.net/zouxy09 自己平时看了一些 ...
- Learning Cocos2d-x for WP8(2)——深入刨析Hello World
原文:Learning Cocos2d-x for WP8(2)--深入刨析Hello World cocos2d-x框架 在兄弟篇Learning Cocos2d-x for XNA(1)——小窥c ...
- Learning Cocos2d-x for WP8(1)——创建首个项目
原文:Learning Cocos2d-x for WP8(1)--创建首个项目 Cocos2d-x for WP8开发语言是C++,系列文章将参考兄弟篇Learning Cocos2d-x for ...
- Learning Cocos2d-x for WP8(9)——Sprite到哪,我做主
原文:Learning Cocos2d-x for WP8(9)--Sprite到哪,我做主 工程文件TouchesTest.h和TouchesTest.cpp 相关素材文件 事件驱动同样适用于coc ...
- Learning Cocos2d-x for WP8(8)——动作Action
原文:Learning Cocos2d-x for WP8(8)--动作Action 游戏很大程度上是由动作画面支撑起来的. 动作分为两大类:瞬间动作和延时动作. 瞬间动作基本等同于设置节点的属性,延 ...
- Learning Cocos2d-x for WP8(7)——让Sprite动起来
原文:Learning Cocos2d-x for WP8(7)--让Sprite动起来 C#(wp7)兄弟篇Learning Cocos2d-x for XNA(7)——让Sprite动起来 本讲将 ...
- Learning Cocos2d-x for WP8(6)——场景切换和场景过渡效果
原文:Learning Cocos2d-x for WP8(6)--场景切换和场景过渡效果 C#(wp7)兄弟篇 Learning Cocos2d-x for XNA(6)——场景切换和场景过渡效果 ...
- Learning Cocos2d-x for WP8(5)——详解Menu菜单
原文:Learning Cocos2d-x for WP8(5)--详解Menu菜单 C#(wp7)兄弟篇Learning Cocos2d-x for XNA(5)——详解Menu菜单 菜单是游戏必不 ...
随机推荐
- HTML5中的Web Worker
什么是 Web Worker? 当在 HTML 页面中执行脚本时,页面是不可响应的,直到脚本已完成. Web worker 是运行在后台的 JavaScript,独立于其他脚本,不会影响页面的性能.您 ...
- vue.js(19)--vue中子组件调用父组件的方法
子组件是不能直接使用父组件中的方法的,需要进行事件绑定(v-on:自定义方法名="父组件方法名"),然后在子组件中再定义一个方法,使用this.$emit('自定义方法名')语句完 ...
- Hibernate Validation与Spring整合各注解的用法Demo
转自:https://www.aliyun.com/jiaocheng/1315650.html <dependency> <groupId>org.hibernate< ...
- pppd - 点对点协议守护进程
总览 SYNOPSIS pppd [ tty_name ] [ speed ] [ options ] 描述 点对点协议 (PPP) 提供一种在点对点串列线路上传输资料流 (datagrams)的方法 ...
- ASPOSE的示例下载地址
ftp://112.124.7.170/ASPOSE/Aspose.Words_16.3.0.zip http://blog.163.com/haolongqin@126/blog/static/10 ...
- 动态规划—triangle
题目: Given a triangle, find the minimum path sum from top to bottom. Each step you may move to adjace ...
- GNU linker script,ld script,GNU链接脚本
https://blog.csdn.net/itxiebo/article/details/50937412 https://blog.csdn.net/itxiebo/article/details ...
- alert(1) to win 11
- 为啥HashMap的默认容量是16
集合是Java开发日常开发中经常会使用到的,而作为一种典型的K-V结构的数据结构,HashMap对于Java开发者一定不陌生. 在日常开发中,我们经常会像如下方式以下创建一个HashMap: Map& ...
- MySQL JOIN 多表连接
除了常用的两个表连接之外,SQL(MySQL) JOIN 语法还支持多表连接.多表连接基本语法如下: 1 ... FROM table1 INNER|LEFT|RIGHT JOIN table2 ON ...