使用Java来开发物联网应用
这是Hello, Lithosphere Tutorials系列教程中的其中一篇。
感觉介绍用C/C++,用Python来开发物联网应用的文章比较多,用Java来做物联网的文章比较少。
这篇文章,介绍如何使用Java技术来开发一个物联网的简单例子。我们从手机App上,遥控硬件板上的LED灯亮灯、熄灯、闪灯。
我们学习如何将树莓派硬件板连接到服务器,并使用Java代码来控制硬件板的GPIO。
当一切连通,我们通过手机App来遥控硬件板LED灯。
我们使用100%的纯Java代码来完成这一切。
以下,为教程的具体内容。
Hello, Actuator!!!
欢迎进入IoT的世界!!!让我们来学习如何让硬件板上的LED灯闪起来
在这第一篇教程中,让我们使用一块树莓派硬件板,通过GPIO连接LED灯。
然后,我们使用Lithosphere IoT平台提供的Actuator插件,只需要做简单的开发,我们就可以用App遥控IoT硬件板设备来让LED闪灯了。
1 前置条件:
Java = 8(树莓派端)
Java >= 11(服务器端)
Granite Lite IoT XMPP Server
点击这里下载Granite Lite IoT XMPP Server
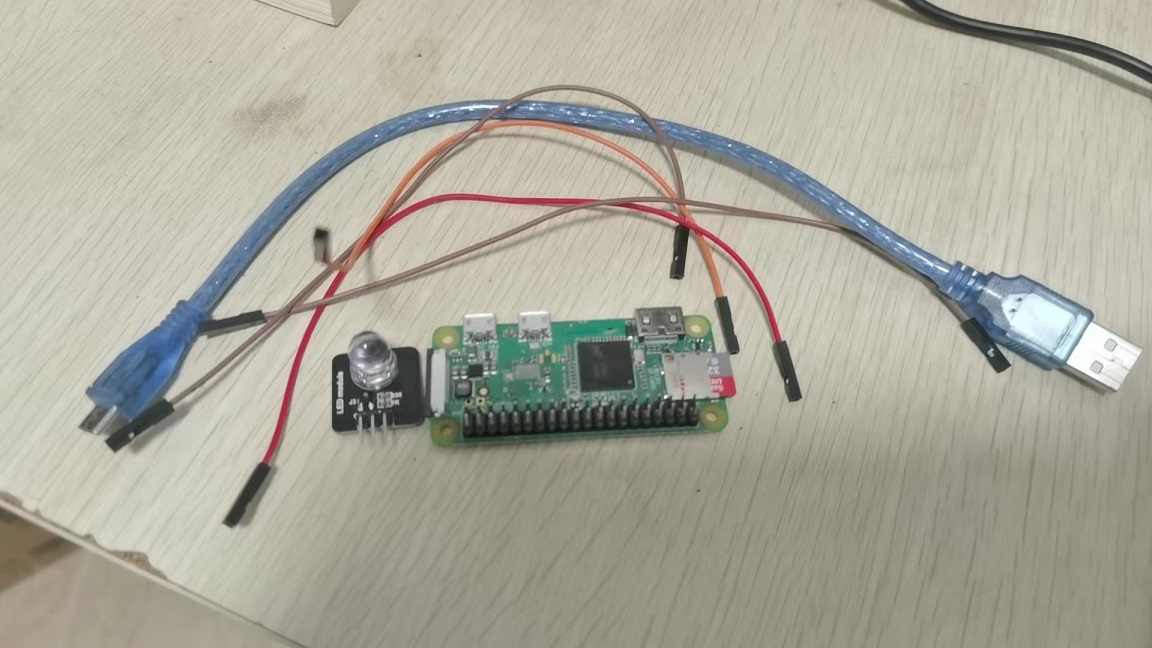
Raspberry Pi Zero W硬件板
LED模块
几颗杜邦线
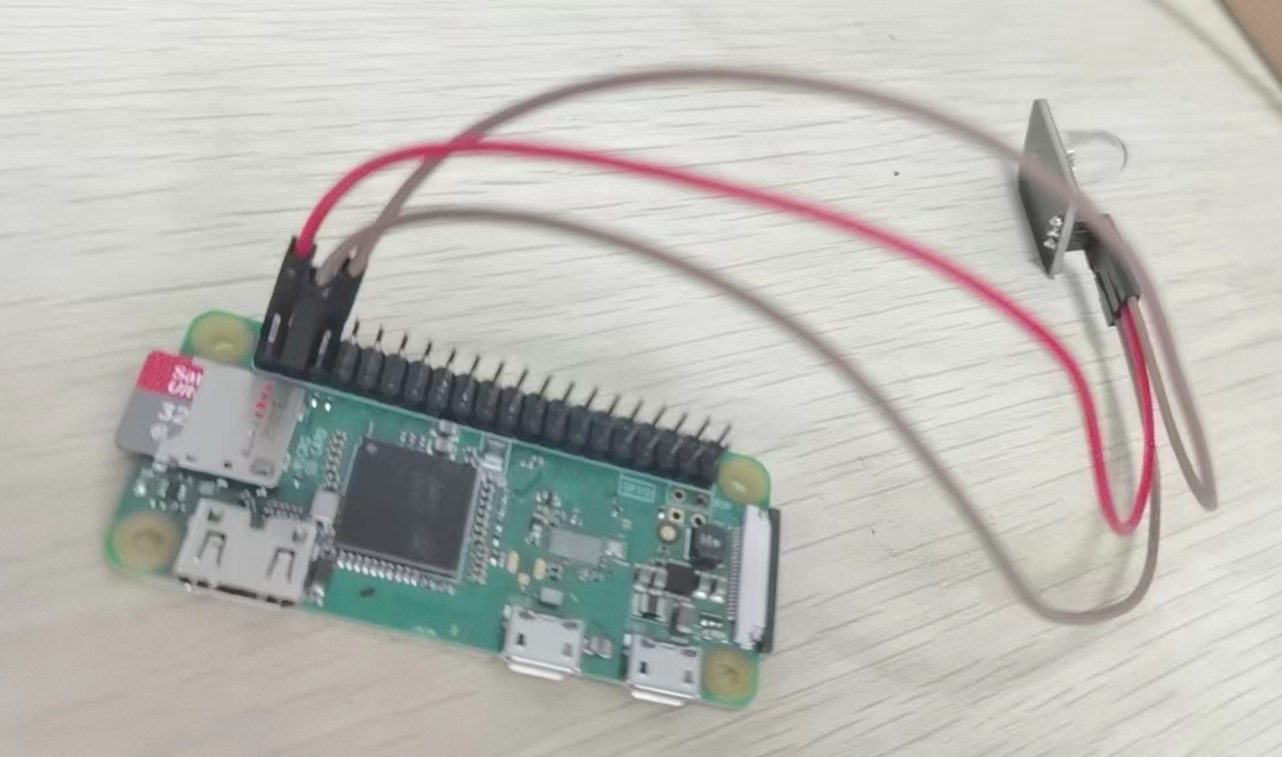
下图是这个教程中使用到的硬件。
2 概念
这篇教程,会涉及到IoT设备的硬件控制接口,以及IoT终端设备的分发部署。简单介绍相关概念如下。
2.1 GPIO
GPIO是英文General-Purpose Input/Output的缩写。
简单来说,GPIO就是硬件板上一组引针,这些引针可以用来控制电信号输入输出。
由于这些引针是可以编程来控制的,从而可以实现和外部的电路模块板通讯。
下图是Raspberry Pi Zero W上的GPIO接口。
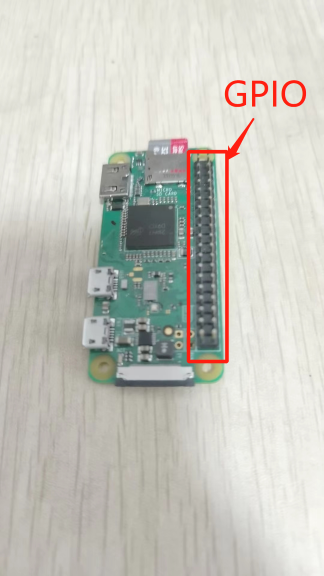
在本教程中,我们使用GPIO来连接外部的LED模块,从而实现LED小灯的程序控制。
2.2 设备注册
在真实的IoT应用中,当一个IoT设备从库房中拿出来时,它并不能接通电源后立马就开始工作。
基于安全性和利于管理的考虑,IoT设备要能够开始工作,需要经过一个“设备注册”的步骤。
在这个“设备注册”的过程中,应用一般会:
- 检查设备的合法性
- 检查设备是否在此时被允许进入网络
- 登记设备相关信息到系统中
- 配置设备 - 例如对设备进行网络配置;发放安全token等。
在不同的应用和不同标准中,“设备注册”可能会有不同的术语和叫法。
例如,在LoRaWAN标准中,“设备注册”被叫做"End Device Activation"。官方文档里,这样描述End Device Activation:
All end devices that participate in a LoRaWAN network must be activated. There are two methods of activation you can choose: over-the-air activation (OTAA) or activation by personalization (ABP).
Lithosphere IoT Platform基于XMPP通讯协议。在标准XMPP协议扩展XEP-0077 (In-Band Registration)里,定义了如何实现IM用户在线注册的功能。
遵从XMPP的习惯,Lithosphere IoT平台里的“设备注册”,被称为IBTR(In-Band Thing Registration),即智能物件在线注册。
Lithosphere IoT平台,已经内置实现了IBTR功能。基于服务器端和客户端的IBTR插件,可以快速开发及灵活定制“设备注册”功能。
在本篇教程中,我们会看到相关的内容。
3 安装和配置Raspberry Pi
树莓派Zero W,我在淘宝上买153元RMB,记住要买一个SD卡来插上。
我们需要做的第一件事,是给树莓派装上系统。
在没有监视器和键盘的情况下,给树莓派装上OS。在Raspberry Pi的官方的文档里,把这叫做Headless Setting Up。可以参考下面的链接,了解如何做Headless Setting Up。
官方Headless Setting Up文档
如果你不想阅读英文,可以看XDongger这篇关于树莓派安装和配置的文章。
安装和配置树莓派
4 连接硬件
我们先来看看LED模块长啥样。
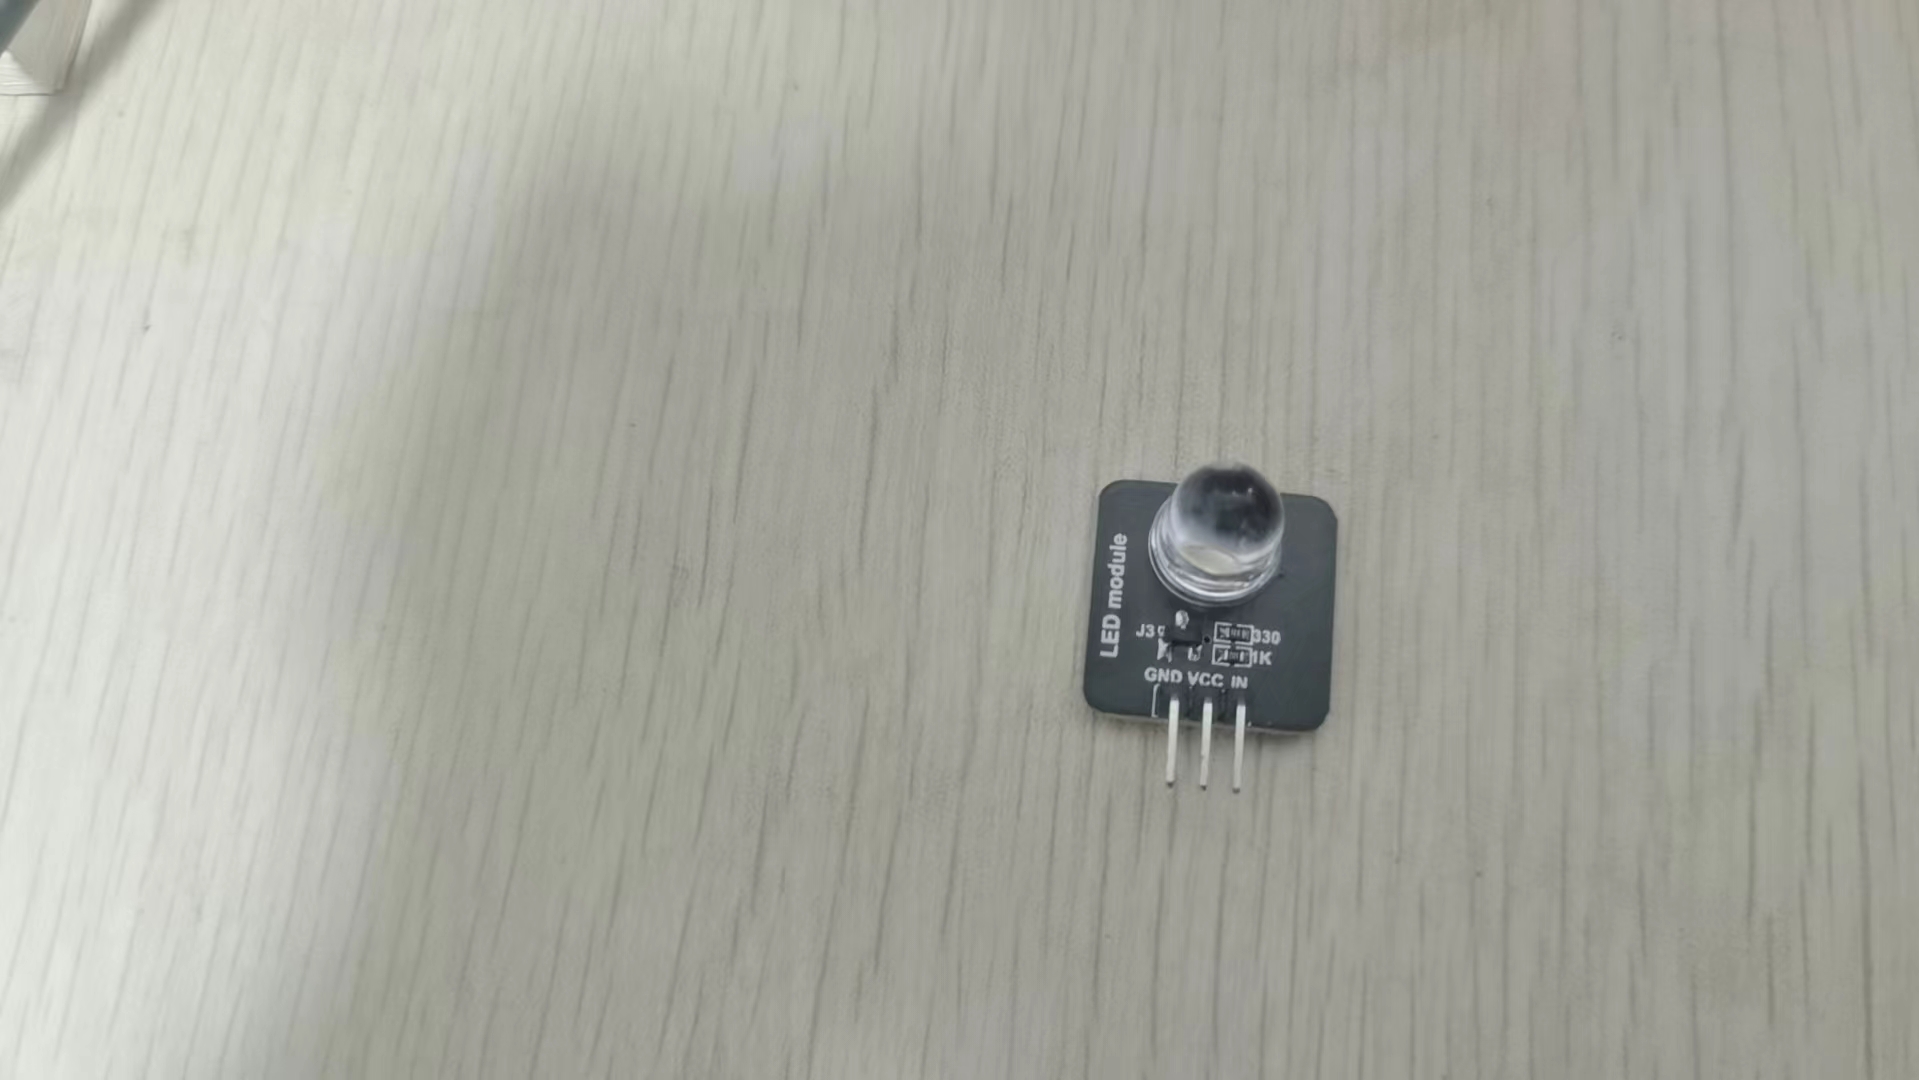
这个LED模块在淘宝上买,5块钱一个。
我们可以看到,它有3个引脚:
| 引脚名 | 作用 |
|---|---|
| GND | 地线 |
| VCC | 5V电源 |
| IN | LED控制 |
我们需要将LED模块,通过树莓派硬件板上的GPIO接口,连接到硬件板上。
如何对接呢?让我们我们来看看树莓派的GPIO接口。
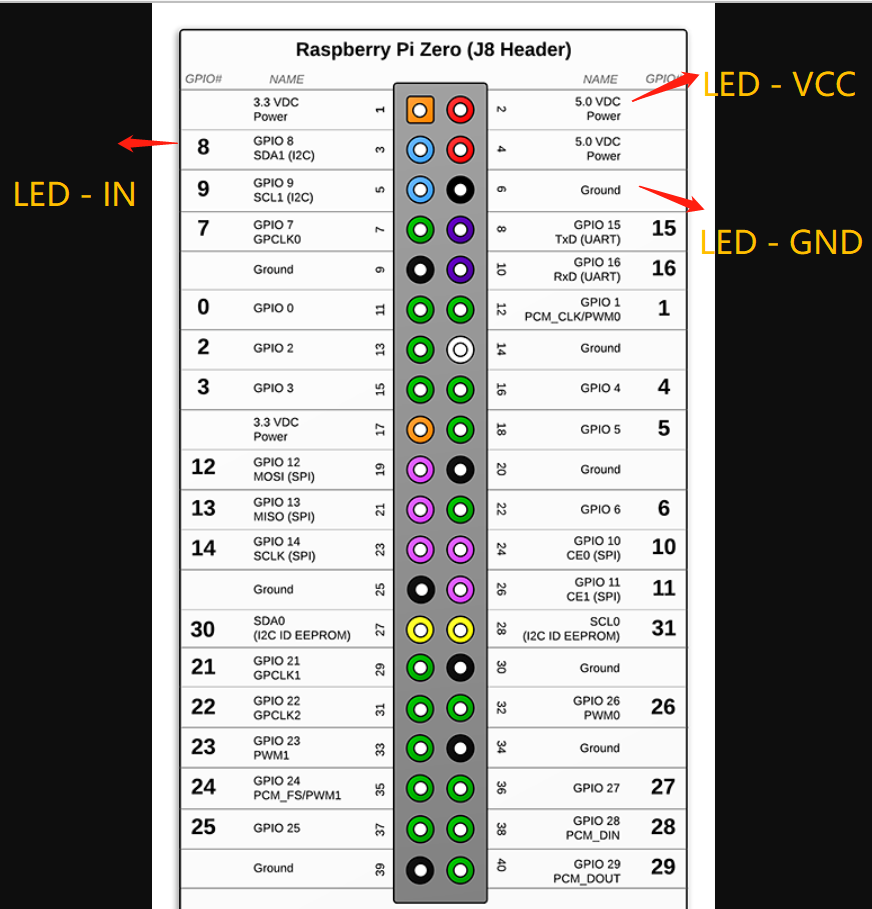
我们将LED的VCC接口,接在GPIO的5V Powerd引脚上。
我们将LED的GND接口,接在GPIO的Ground引脚上。
我们将LED的IN接口,接在GPIO 8引脚上。
接好后,看上去是这样的。
5 配置硬件板基础软件环境
在2 安装和配置Raspberry Pi步骤中,我们只是得到了一个初始化版本的RaspBerry Pi OS操作系统。要想在上面能运行Lithosphere IoT平台的终端程序,还得做以下的配置。
5.1 安装OpenJDK
登录到树莓派硬件板。
ssh pi@192.168.1.180
注:
- 192.168.1.180是树莓派板的网络地址。请改为你配置树莓派板时,指定的静态IP地址。
- pi为树莓派用户。请改为你配置树莓派时,初始化创建的用户名。
执行以下指令安装OpenJDK 8。
sudo apt-get install openjdk-8-jdk
注:
- 为何要安装OpenJDK 8版本?
Raspberry Pi OS默认自带的OpenJDK版本是OpenJDK 11。这意味着,如果你执行以下指令。系统会默认安装OpenJDK 11。
sudo apt-get install default-jdk
这个默认版本的JDK,在Raspberry Pi Zero W上不能正常工作。原因是因为Raspberry Zero W使用ARMv6版本CPU。而Raspberry Pi OS默认带的OPenJDK 11,仅适用于ARMv7和ARMv8版本的CPU。
当然,有一些其它办法可以在Raspberry Pi Zero W上来安装OpenJDK 11。
在这篇教程里,我选择改装OpenJDK 8的解决方案。看上去,这是一个简单有效的解决方案。
5.2 安装WiringPi
我们在后续开发中,会使用Pi4J库V1.3版本来控制GPIO。Pi4J是一个开源Java库,它使用JNI来调用C程序编写的WiringPi库来控制GPIO。
所以,我们需要安装WiringPi。
Raspberry Pi OS并没有自带WiringPi软件包。我们通过以下指令安装WiringPi。
wget https://github.com/WiringPi/WiringPi/releases/download/2.61-1/wiringpi-2.61-1-armhf.deb

sudo dpkg -i wiringpi-2.61-1-armhf.deb
6 开发协议包
为何我们需要单独开发一个包含协议对象的协议包?
这是因为我们使用叫OXM(Object-XMPP Mapping)的技术。简单来说,我们希望在开发中,能够屏蔽掉XMPP协议实现的细节,简化开发过程。
关于OXM,可以参考概念文档中的OXM章节
使用OXM,我们会定义的协议对象,这些协议对象,在客户端和服务器端,都会被使用。协议对象是可复用的。
所以,我们最好开发一个单独的协议包,已便于在后面客户端和服务器端复用这些协议对象。
6.1 创建协议工程
创建hello-actuator-protocol工程,pom.xml如下:
<?xml version="1.0" encoding="UTF-8"?>

<project xmlns:xsi="http://www.w3.org/2001/XMLSchema-instance"

	xmlns="http://maven.apache.org/POM/4.0.0"

	xsi:schemaLocation="http://maven.apache.org/POM/4.0.0 http://maven.apache.org/maven-v4_0_0.xsd">

	<modelVersion>4.0.0</modelVersion>

	<parent>

		<groupId>com.thefirstlineofcode.basalt</groupId>

		<artifactId>com.thefirstlineofcode.basalt</artifactId>

		<version>1.1.0-RELEASE</version>

	</parent>

	<groupId>com.thefirstlineofcode.lithosphere.tutorials.helloactuator</groupId>

	<artifactId>hello-actuator-protocol</artifactId>

	<name>Hello actuator protocol</name>

	<version>0.0.1-RELEASE</version>

	<dependencies>

		<dependency>

			<groupId>com.thefirstlineofcode.basalt</groupId>

			<artifactId>basalt-oxm</artifactId>

		</dependency>

	</dependencies>

	<repositories>

		<repository>

			<id>com.thefirstlineofcode.releases</id>

			<name>TheFirstLineOfCode Repository - Releases</name>

			<url>http://120.25.166.188:9090/repository/maven-releases/</url>

		</repository>

	</repositories>

</project>
代码说明
- 指定parent为com.thefirstlineofcode.basalt:com.thefirstlineofcode.basalt,这样可以直接引用basalt parent pom的依赖管理配置。
- 因为要使用OXM(Object-XMPP Mapping),所以依赖basalt-oxm库。
- 目前,Lithosphere的开源库,仅被部署在TheFirstLineOfCode的私有的maven服务器上。为了构建时能够正确找到开源依赖库,需要配置com.thefirstlineofcode.releases的repository。
<repositories>

	<repository>

	<id>com.thefirstlineofcode.releases</id>

	<name>TheFirstLineOfCode Repository - Releases</name>

	<url>http://120.25.166.188:9090/repository/maven-releases</url>

	</repository>

</repositories>
6.2 定义协议对象
在Hello,Actuator例子里,我们想用App来遥控IoT设备上的LED灯。我们希望可以遥控LED执行:亮灯、熄灯、闪灯。
为此,我们使用以下3个协议对象:
TurnOn
@ProtocolObject(namespace="urn:leps:things:simple-light", localName="turn-on")

public class TurnOn {

	public static final Protocol PROTOCOL = new Protocol("urn:leps:things:simple-light", "turn-on");

}
TurnOff
@ProtocolObject(namespace="urn:leps:things:simple-light", localName="turn-off")

public class TurnOff {

	public static final Protocol PROTOCOL = new Protocol("urn:leps:things:simple-light", "turn-off");

}
Flash
@ProtocolObject(namespace="urn:leps:things:simple-light", localName="flash")

public class Flash {

	public static final Protocol PROTOCOL = new Protocol("urn:leps:things:simple-light", "flash");

	private int repeat;

	public Flash() {

		this(1);

	}

	public Flash(int repeat) {

		setRepeat(repeat);

	}

	public int getRepeat() {

		return repeat;

	}

	public void setRepeat(int repeat) {

		if (repeat < 1)

			throw new IllegalArgumentException("Attribute repeat must be a non-zero positive integer.");

		this.repeat = repeat;

	}

	@Override

	public String toString() {

		return String.format("Flash[repeat=%d]", repeat);

	}

}
代码说明
- OXM框架会帮我们将Project Object转换成XMPP协议文档。当Flash对象的repeat属性值设置成5时,会生成下面的XMPP协议文档:
<flash xmlns="urn:leps:things:simple-light" repeat=5/>
- 不需要担心"urn:leps:things:simple-light"字符串太长了,会带来传输效率的低下。在Lithosphere IoT平台下,如果使用BXMPP技术,ProtocolObject(namespace="urn:leps:things:simple-light", localName="flash")这段协议头信息,会被转化成3字节长度的二进制协议信息。
- TurnOn和TurnOff,表达一个不带任何参数的指令,所以它们被设计成不带任何实例属性的空对象。
6.3 定义Model Descriptor
让我们来给要控制的IoT设备,定义一个Model Descriptor。
为何需要定义Model Descriptor?
这是因为Lithosphere完全基于插件架构。在插件架构下,系统功能并不是写死固化的。当一个插件被部署时,它为系统提供了一组应用功能。当这个插件被卸载掉后,它所提供的功能就消失了。
正是因为这种插件架构的特性,默认系统是不认识任何IoT设备的,也不能识别任何IoT控制/数据协议。
当我们基于插件技术,使用XMPP扩展协议,开发了某种IoT设备的一组应用功能。我们需要使用平台提供的扩展点,将插件提供的应用功能注册到系统中。我们需要明确的告知系统:现在,我们有这些功能了,相关功能由XXX插件提供。
最好是能有一个从设备维度专门描述IoT设备的对象,能够便利我们将相关信息提供给系统。
这个事说起来啰嗦,实操起来其实比较简单。我们需要在协议包里,定义一个Model Descriptor类。
public class HatModelDescriptor extends SimpleThingModelDescriptor {

	public static final String MODEL_NAME = "HAT";

	public static final String DESCRIPTION = "Hello Acuator Thing";

	public HatModelDescriptor() {

		super(MODEL_NAME, DESCRIPTION, false, null, null, createSupportedActions());

	}

	private static Map<Protocol, Class<?>> createSupportedActions() {

		Map<Protocol, Class<?>> supportedActions = new HashMap<>();

		supportedActions.put(Flash.PROTOCOL, Flash.class);

		supportedActions.put(TurnOn.PROTOCOL, TurnOn.class);

		supportedActions.put(TurnOff.PROTOCOL, TurnOff.class);

		return supportedActions;

	}

}
代码说明
- 继承SimpleThingModelDescriptor,这个基类实现了IThingModelDescriptor接口,提供了一些复用代码,可以让我们编写Model Descriptor时更省事。
- IoT设备的型号名。在这里,我们把这个被遥控闪灯的IoT设备型号叫做HAT,Hello Actuator Thing的缩写。
- 这个IoT设备是一个Actuator(执行器)设备,它接受Action指令,然后执行指令对应的操作。它不是Sensor,不需要上报数据。它也不触发事件,不需要事件通知功能。所以构造器里的参数都是false,null。只有最后一个构造器参数,我们用createSupportedActions(),将这个Actuator设备支持的Action都登记到Model Descriptor中。当然,在这个例子里,IoT设备只支持3个指令,TurnOn,TurnOff,Flash。
6.4 构建安装协议包
因为需要在后续开发客户端和服务器端插件包时,引用协议包,所以我们在hello-actuator-protocol工程里,执行构建安装指令,把协议包安装到本地maven仓库。
cd hello-actuator-protocol

mvn clean install
协议包已经开发完成,你可以参考官方开源仓库代码hello-actuator-protocol协议包工程源码
7 开发服务器端插件
7.1 服务器端插件工程
创建hello-actuator-server目录,添加pom.xml文件。
<?xml version="1.0" encoding="UTF-8"?>

<project xmlns:xsi="http://www.w3.org/2001/XMLSchema-instance"

	xmlns="http://maven.apache.org/POM/4.0.0"

	xsi:schemaLocation="http://maven.apache.org/POM/4.0.0 http://maven.apache.org/maven-v4_0_0.xsd">

	<modelVersion>4.0.0</modelVersion>

	<parent>

		<groupId>com.thefirstlineofcode.sand</groupId>

		<artifactId>sand-server</artifactId>

		<version>1.0.0-BETA3</version>

	</parent>

	<groupId>com.thefirstlineofcode.lithosphere.tutorials.helloactuator</groupId>

	<artifactId>hello-actuator-server</artifactId>

	<version>0.0.1-RELEASE</version>

	<name>Hello actuator server plugin</name>

	<dependencies>

		<dependency>

			<groupId>com.thefirstlineofcode.sand.server</groupId>

			<artifactId>sand-server-things</artifactId>

		</dependency>

		<dependency>

			<groupId>com.thefirstlineofcode.lithosphere.tutorials.helloactuator</groupId>

			<artifactId>hello-actuator-protocol</artifactId>

			<version>0.0.1-RELEASE</version>

		</dependency>

	</dependencies>

	<repositories>

		<repository>

			<id>com.thefirstlineofcode.releases</id>

			<name>TheFirstLineOfCode Repository - Releases</name>

			<url>http://120.25.166.188:9090/repository/maven-releases/</url>

		</repository>

	</repositories>

</project>
代码说明
- parent设置为com.thefirstlineofcode.sand:sand-server,可引用parent POM里的以来配置管理。
- 依赖com.thefirstlineofcode.sand.server:sand-server-things库,因为我们要使用这个库里的接口IThingProvider和IThingRegistrationCustomizer来实现相关功能。
- 依赖hello-actuator-protocol协议包。
7.2 实现IThingProvider
@Extension

public class ThingModelsProvider implements IThingModelsProvider {

	@Override

	public IThingModelDescriptor[] provide() {

		return new IThingModelDescriptor[] {

			new HatModelDescriptor()

		};

	}

}
代码说明
- 实现IThingProvider接口,在接口方法里,我们将前面开发的HatModelDescripotor登记到服务器中。
- 请注意@Extension标注,它申明了这个类是PF4J的插件扩展。
7.3 实现IThingRegistrationCustomizer
在这篇教程的前面章节,我们提到了“设备注册”。在Lithosphere平台里,“设备注册”被实现为IBTR(In-Band Thing Registration)协议。
Lithosphere IoT平台,提供一个IThingRegistrationCustomizer的接口,来允许开发人员定制设备注册的过程。
下面,我们来看看怎么使用IThingRegistrationCustomizer。
@Extension

public class ThingRegistrationCustomizer extends ThingRegistrationCustomizerAdapter {

	private static final String HARD_CODED_REGISTRATION_CODE = "abcdefghijkl";

	@Override

	public boolean isUnregisteredThing(String thingId, String registrationCode) {

		if (!super.isUnregisteredThing(thingId, registrationCode))

			return false;

		return HARD_CODED_REGISTRATION_CODE.equals(registrationCode);

	}

	@Override

	public boolean isAuthorizationRequired() {

		return false;

	}

}
代码说明
- 继承ThingRegistrationCustomizerAdapter,这个类提供了IThingRegistrationCustomizer接口的默认实现。
- 重载了isUnregisteredThing方法,这个方法检查IoT设备的 Thing ID和Registration Code的合法性。我们看到,实现检查一个硬编码写死的Registration Code。
- isAuthorizationRequired(),返回false。我们在这个例子中,只检查Thing ID和Registration Code的合法性。不做人工的设备注册授权。所以我们关掉Authorization功能。
- @Extension标注申明这个类是PF4J的插件扩展。
7.4 编写插件配置文件
在src/main/resources目录下,创建plugin.properties。
plugin.id=hello-actuator-server

plugin.provider=TheFirstLineOfCode

plugin.version=0.0.1-RELEASE

plugin.dependencies=sand-server-things

non-plugin.dependencies=hello-actuator-protocol
代码说明
- plugin.dependencies,依赖sand-server-things插件。
- non-plugin.dependencies,依赖hello-actuator-protocol协议包(非插件格式jar)。
7.5 构建部署服务器端插件
构建hello-actuator-server插件包
cd hello-actuator-server

mvn clean package
将hello-actuator-server插件包和它依赖的hello-actuator-protocol包,把这两个jar包,copy到服务器的plugins目录下。
cp hello-actuator-protocol/target/hello-actuator-protocol-0.0.1-RELEASE.jar granite-lite-iot-1.0.4-RELEASE/plugins

cp hello-actuator-server/target/hello-actuator-server-0.0.1-RELEASE.jar granite-lite-iot-1.0.4-RELEASE/plugins
服务器端插件已经开发完成,你可以参考官方开源仓库代码hello-actuator-server服务器端插件包工程源码
7.6 检查Granite Lite XMPP Server状态
启动Granite Lite XMPP Server
cd granite-lite-iot-1.0.4

java -jar granite-server-1.0.4-RELEASE.jar -console
带-console参数启动Granite Lite XMPP Server之后,能够看到Granite Server Console的界面。
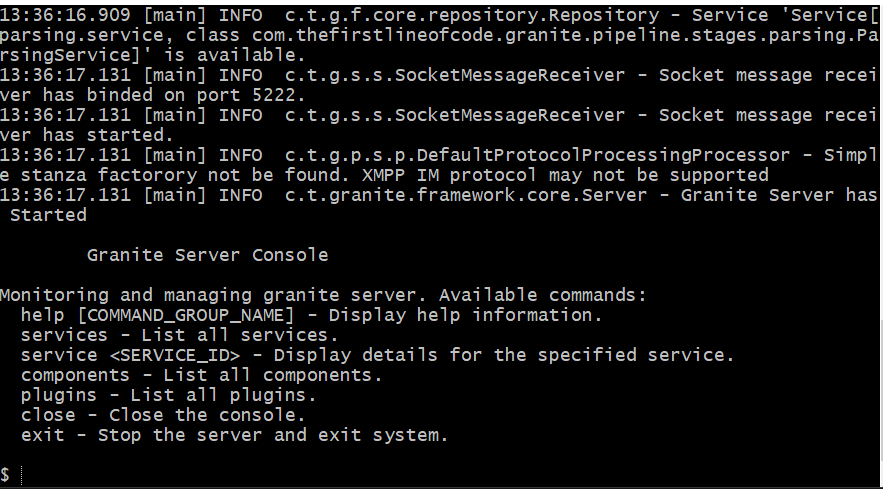
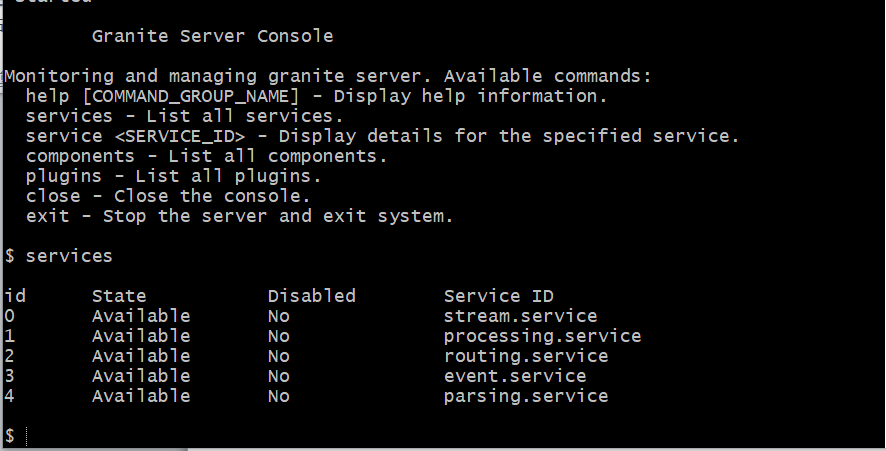
我们可以在Console输入services命令来检查Granite XMPP Server的状态。
$services
如果能看到所有的services的状态都是available,说明granite lite server已经被正常的启动了。
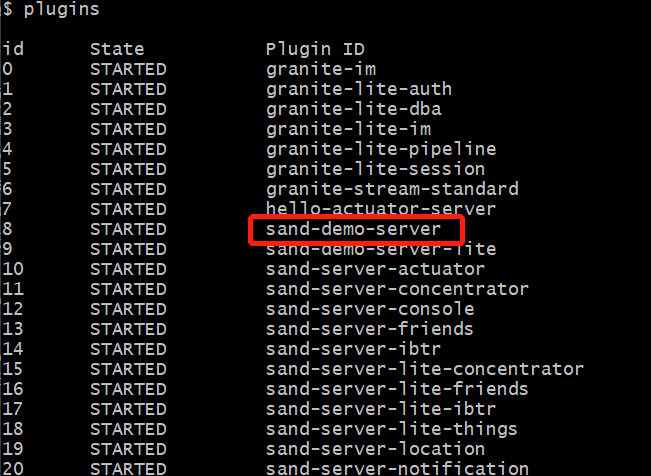
可以用plugins命令,来检查可用的plugins。
$plugins
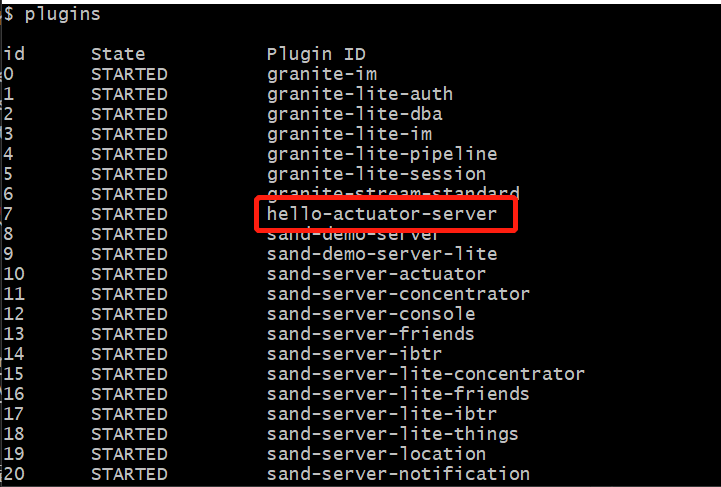
我们可以看到,hello-actuator-server插件已经被部署。
7.7 创建测试用户
在这里,我们还需要解决一个问题。
我们想使用手机App来遥控IoT设备闪灯,我们使用XMPP技术来做这件事情。
在XMPP标准里,要在XMPP网络里进行通讯,你需要一个XMPP账户。无论你是人还是物,你都需要一个账户。你是人,需要一个User账户。你是物,你需要一个Thing(IoT)账户。
我们需要一个User账户,这样,我们才能够从手机App,连接到XMPP网络中,这才有可能通过XMPP网络去遥控IoT设备。
有一个简单的办法,可以创建User用户。
我们在Granite Lite IoT XMPP Server里,默认部署了sand-demo-server插件。这个插件用来支撑完整的sand-demo演示程序。使用plugins指令,可以看到Granite Lite IoT XMPP Server部署了sand-demo-server插件。
sand-demo-server插件,在Granite Server Console里提供了一个创建测试用户的指令,我们可以用它来创建测试用户。在Granite Server Console里,我们执行以下指令。
sand-demo create-test-users
我们会看到,测试用户已经被创建。

我们在这个教程后面,会使用测试用户sand-demo来登录手机App,进行遥控闪灯操作。
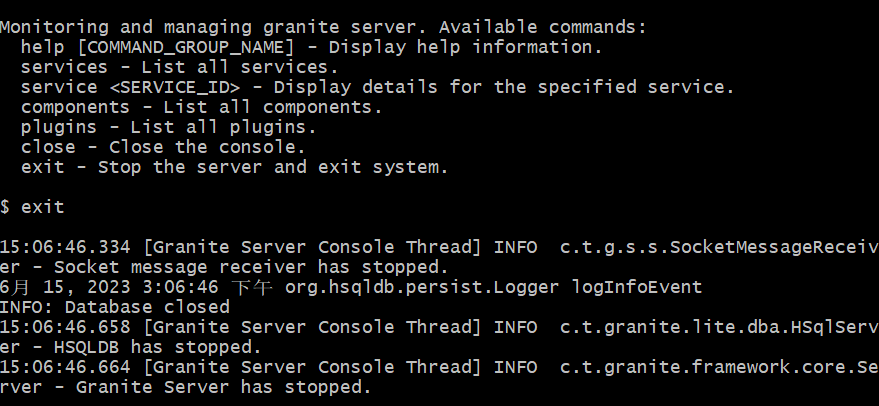
使用exit指令,可以退出Granite Server Console,并关闭Granite XMPP Server。
$exit
8 开发设备端程序
8.1 设备端工程
创建hello-actuator-thing目录,添加pom.xml文件。
<?xml version="1.0" encoding="UTF-8"?>

<project xmlns:xsi="http://www.w3.org/2001/XMLSchema-instance"

	xmlns="http://maven.apache.org/POM/4.0.0"

	xsi:schemaLocation="http://maven.apache.org/POM/4.0.0 http://maven.apache.org/maven-v4_0_0.xsd">

	<modelVersion>4.0.0</modelVersion>

	<parent>

		<groupId>com.thefirstlineofcode.sand</groupId>

		<artifactId>sand-client</artifactId>

		<version>1.0.0-BETA3</version>

	</parent>

	<groupId>com.thefirstlineofcode.lithosphere.tutorials.helloactuator</groupId>

	<artifactId>hello-actuator-thing</artifactId>

	<version>0.0.1-RELEASE</version>

	<name>Hello actuator thing</name>

	<dependencies>

		<dependency>

			<groupId>com.thefirstlineofcode.sand.client</groupId>

			<artifactId>sand-client-edge</artifactId>

		</dependency>

		<dependency>

			<groupId>com.pi4j</groupId>

			<artifactId>pi4j-core</artifactId>

			<version>1.3</version>

		</dependency>

		<dependency>

			<groupId>com.thefirstlineofcode.lithosphere.tutorials.helloactuator</groupId>

			<artifactId>hello-actuator-protocol</artifactId>

			<version>0.0.1-RELEASE</version>

		</dependency>

	</dependencies>

	<build>

		<plugins>

			<plugin>

				<groupId>org.apache.maven.plugins</groupId>

				<artifactId>maven-jar-plugin</artifactId>

				<version>2.4</version>

				<configuration>

					<archive>

						<manifest>

							<addClasspath>true</addClasspath>

							<classpathPrefix>libs/</classpathPrefix>

							<mainClass>com.thefirstlineofcode.lithosphere.tutorials.helloactuator.thing.Main</mainClass>

						</manifest>

					</archive>

				</configuration>

			</plugin>

			<plugin>

				<artifactId>maven-assembly-plugin</artifactId>

				<version>3.0.0</version>

				<configuration>

					<appendAssemblyId>false</appendAssemblyId>

					<descriptors>

						<descriptor>src/assembly/descriptor.xml</descriptor>

					</descriptors>

				</configuration>

				<executions>

					<execution>

						<id>make-assembly</id>

						<phase>package</phase>

						<goals>

							<goal>single</goal>

						</goals>

					</execution>

				</executions>

			</plugin>

		</plugins>

	</build>

	<repositories>

		<repository>

			<id>com.thefirstlineofcode.releases</id>

			<name>TheFirstLineOfCode Repository - Releases</name>

			<url>http://120.25.166.188:9090/repository/maven-releases/</url>

		</repository>

	</repositories>

</project>
代码说明
- POM继承com.thefirstlineofcode.sand:sand-client,以便复用父POM里的依赖配置管理。
- hello-actuator-thing是一个独立运行的Java程序。我们使用maven-assembly-plugin和maven-jar-plugin来打包和配置可这个可运行程序。
- 依赖com.thefirstlineofcode.sand.client:sand-client-edge库,我们使用Edge库来帮助终端设备进行设备注册和连接服务器。
<dependency>

	<groupId>com.thefirstlineofcode.sand.client</groupId>

	<artifactId>sand-client-edge</artifactId>

</dependency>
- 依赖pi4j-core库。我们用Pi4J库来访问控制硬件板的GPIO接口。
<dependency>

	<groupId>com.pi4j</groupId>

	<artifactId>pi4j-core</artifactId>

	<version>1.3</version>

</dependency>
注:我们使用1.3版本Pi4J。因为Pi4J v1.4和Pi4J v2.x需要JDK 11。而我们在树莓派Zero W上,只安装了JDK 8。所以,我们使用Pi4J v1.3。
- 依赖hello-actautor-protocol协议包。
<dependency>

	<groupId>com.thefirstlineofcode.lithosphere.tutorials.helloactuator</groupId>

	<artifactId>hello-actuator-protocol</artifactId>

	<version>0.0.1-RELEASE</version>

</dependency>
8.2 硬件控制
程序设计一个重要原则,责任原则。简单来说,我们将不同的责任划分到不同的接口和实现中,让它们各行其事。
在这里,我们也来划分责任。
我们先来关注硬件控制部分,我们想要控制IoT设备做亮灯、熄灯、闪灯。
Ok,先不管其它,我们来定义这个IoT设备的硬件控制的接口。
public interface ISimpleLight {

	void turnOn();

	void turnOff();

	void flash(int repeat) throws ExecutionException;

}
注:
这种控制硬件的接口,在概念里,我们把它叫做Thing Controller,智能物件控制器。
hello-actuator-thing的核心类HelloActuatorThing,我们让它实现ISimpleLight接口。
public class HelloActuatorThing implements ISimpleLight {

	private GpioController gpio;

	private GpioPinDigitalOutput ledPin;

	public HelloActuatorThing() {

		configureGpio();

	}

	private void configureGpio() {

		gpio = GpioFactory.getInstance();

		ledPin = gpio.provisionDigitalOutputPin(RaspiPin.GPIO_08, "MyLED", PinState.LOW);

		ledPin.setShutdownOptions(true, PinState.LOW);

	}

	@Override

	public void turnOn() {

		ledPin.high();

	}

	@Override

	public void turnOff() {

		ledPin.low();

	}

	@Override

	public void flash(int repeat) throws ExecutionException {

		if (repeat <= 0 || repeat > 8)

			throw new ExecutionException(-1);

		for (int i = 0; i < repeat; i++) {

			flash();

			try {

				Thread.sleep(500);

			} catch (InterruptedException e) {

				throw new ExecutionException(-2);

			}

		}

	}

	private void flash() throws ExecutionException {

		turnOn();

		try {

			Thread.sleep(200);

		} catch (InterruptedException e) {

			throw new ExecutionException(-2);

		}

		turnOff();

	}

}
**代码说明
- 在configureGpio()方法里,我们使用Pi4J库对GPIO进行配置。我们配置使用ledPin变量来对LED灯的IN接口进行控制。
- 在turnOn方法中,我们调用ledPin.high(),拉高GPIO引针电压,这会让LED灯亮灯。对应的,在turnOff方法中,我们调用ledPin.low()来让LED灯熄灯。
Ok,现在,我们已经实现硬件控制了。
8.3 IoT通讯
让我们来给IoT设备添加通讯能力。
我们使用sand-client-edge库,可以简化设备端程序的编写。
让HelloActuatorThing继承AbstractEdgeThing。
public class HelloActuatorThing extends AbstractEdgeThing implements ISimpleLight {

	public static final String THING_MODEL = HatModelDescriptor.MODEL_NAME;

	public static final String SOFTWARE_VERSION = "0.0.1-RELEASE";

	private IActuator actuator;

	private GpioController gpio;

	private GpioPinDigitalOutput ledPin;

	public HelloActuatorThing() {

		super(THING_MODEL, streamConfig, true);

		configureGpio();

	}

	@Override

	public String getSoftwareVersion() {

		return SOFTWARE_VERSION;

	}

	@Override

	protected void registerIotPlugins() {

		chatClient.register(ActuatorPlugin.class);

	}

	@Override

	protected void startIotComponents() {

		startActuator();

	}

	private void configureGpio() {

		... ...

	}

	private void startActuator() {

		if (actuator == null) {

			actuator = chatClient.createApi(IActuator.class);

			registerExecutors(actuator);

		}

		actuator.start();

	}

	private void registerExecutors(IActuator actuator) {

		actuator.registerExecutor(TurnOn.class, TurnOnExecutor.class, this);

		actuator.registerExecutor(TurnOff.class, TurnOffExecutor.class, this);

		actuator.registerExecutorFactory(createFlashExecutorFactory());

	}

	private IExecutorFactory<?> createFlashExecutorFactory() {

		return new IExecutorFactory<Flash>() {

			@Override

			public Protocol getProtocol() {

				return Flash.PROTOCOL;

			}

			@Override

			public Class<Flash> getActionType() {

				return Flash.class;

			}

			@Override

			public IExecutor<Flash> create() {

				return new FlashExecutor(HelloActuatorThing.this);

			}

		};

	}

	@Override

	protected void stopIotComponents() {

		if (actuator != null) {

			actuator.stop();

			actuator = null;

		}

	}

	@Override

	public void turnOn() {

		... ...

	}

	@Override

	public void turnOff() {

		... ...

	}

	@Override

	public void flash(int repeat) throws ExecutionException {

		... ...

	}

	private void flash() throws ExecutionException {

		... ...

	}

	@Override

	protected String loadThingId() {

		return THING_MODEL + "-" + ThingsUtils.generateRandomId(8);

	}

	@Override

	protected String loadRegistrationCode() {

		return "abcdefghijkl";

	}

}
代码说明
- AbstractEdgeThing留下了一些抽象方法给子类来实现。这些抽象方法名字很直白,我们遵从方法名给出对应实现细节即可。
- registerIotPlugins()方法,在这里登记我们要使用的插件。因为这个IoT设备是一个可执行指令的Actuator。所以我们只需要注册ActuatorPlugin插件。
protected void registerIotPlugins() {

	chatClient.register(ActuatorPlugin.class);

}
- startIotComponents()方法,Edge Thing连接到服务器后,会调用这个方法来启动设备。在这里,我们需要把Actuator组件启动起来,Actuator组件来自ActuatorPlugin。
我们在startActuator()方法里,创建IActuator实例,并注册Executors,最后调用Actuator的start()方法。protected void startIotComponents() {
startActuator();
} private void startActuator() {
if (actuator == null) {
actuator = chatClient.createApi(IActuator.class);
registerExecutors(actuator);
} actuator.start();
}
- 在registerExecutors()方法里,我们给TurnOn,TurnOff,Flash指令,注册它们对应的执行器。
有两种注册执行器的API。第一种API,我们直接将Action指令类,和Executor指令类,登记到Actuator。
注:
这里registerExecutor()方法的最后一个参数,是Thing Controller。
依据设计原则中的责任原则,Thing Controller负责直接控制IoT设备的硬件接口。在这里,Thing Controller是ISimpleLigh。
HelloActuatorThing实现了这个接口(ISimpleLight),提供控制硬件的turnOn(),TurnOff(),flash()方法。
我们把HelloActuatorThing当做第三个参数传给Actuator,Thing Controller会被注入给Executor使用。actuator.registerExecutor(TurnOn.class, TurnOnExecutor.class, this);
actuator.registerExecutor(TurnOff.class, TurnOffExecutor.class, this);
- 第二种API,我们注册一个Executor Factory,由这个Factory来提供相关信息以及创建Executor,这样可以更灵活的处理Executor的创建。我们使用这种API来创建FlashExecutor。
... ...

	actuator.registerExecutorFactory(createFlashExecutorFactory());

... ...

private IExecutorFactory<?> createFlashExecutorFactory() {

	return new IExecutorFactory<Flash>() {

		@Override

		public Protocol getProtocol() {

			return Flash.PROTOCOL;

		}

		@Override

		public Class<Flash> getActionType() {

			return Flash.class;

		}

		@Override

		public IExecutor<Flash> create() {

			return new FlashExecutor(HelloActuatorThing.this);

		}

	};

}
- 我们来处理一下设备注册的对应逻辑。还记得吗,我们在服务器端的Registration Customizer里,在检查Registration Code合法性时,使用的是一个硬编码的Registration Code。
所以,在IoT设备端,我们需要使用这个硬编码的Registration Code去注册。
我们重载loadRegistrationCode()方法,用写死的"abcdefghijkl"作为Registration Code去进行注册。protected String loadRegistrationCode() {
return "abcdefghijkl";
}
8.4 主程序
我们编写一个主程序来启动hello-actuator-thing。
public class Main {

	private HelloActuatorThing simpleLight;

	public static void main(String[] args) {

		new Main().run(args);

	}

	private void run(String[] args) {

		if (args.length == 1 && args[0].equals("--help")) {

			printUsage();

			return;

		}

		... ...

		try {

			simpleLight = new HelloActuatorThing();

		} catch (IllegalArgumentException e) {

			e.printStackTrace();

			printUsage();

			return;

		}

		... ...

		simpleLight.start();

	}

	... ...

}
代码说明
- 很简单直白的代码,重要的是调用HelloActuatorThing的start()方法,将Edge Thing启动起来。
设备端程序已经开发完成,你可以参考官方开源仓库代码hello-actuator-thing设备端程序工程源码
8.5 构建部署hello-actuator-thing
用maven构建hello-actuator-thing
cd hello-actuator-thing

mvn clean package
将构建成功的设备端程序,copy到树莓派硬件板上。
scp target/hello-actuator-thing-0.0.1-RELEASE.tar.gz pi@192.168.1.180:/home/pi
注:
请将pi用户名,和树莓派网络ip 192.168.1.180,改为你自己环境的配置值。
8.6 启动thing程序
登录到树莓派上
ssh pi@192.168.1.180
运行thing程序
tar -xzvf hello-actuator-thing-0.0.1-RELEASE.tar.gz
cd hello-actuator-thing-0.0.1-RELEASE
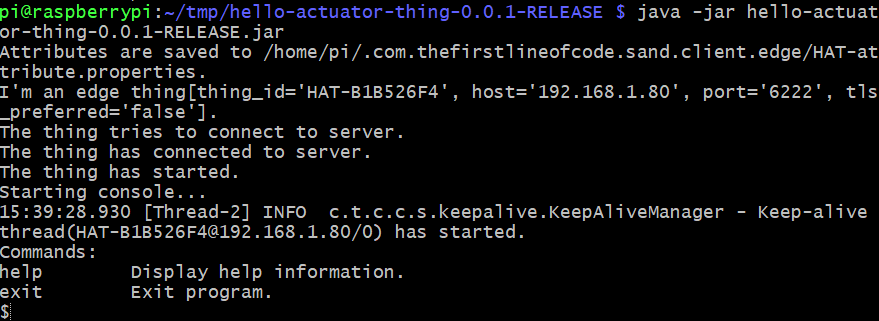
java -jar hello-actuator-thing-0.0.1-RELEASE.jar --host=192.168.1.80
说明
- 启动thing程序之前,记得要先启动Granite XMPP Server。
- 第一次运行thing程序时,需要使用--host参数指定服务器地址。AbstractEdgeThing会记住程序启动参数,后续再启动thing程序,不需要再指定host。
- 程序启动后,会连接到服务器进行设备注册,注册成功后,登录到服务器
一切就绪后,可以看到Thing thing has started的提示。
可以使用exit命令来退出hello-actuator-thing程序。
9 使用手机App遥控IoT设备
从头开发一个手机App比较繁琐,我们可以直接用Lithosphere平台提供的sand-demo App来遥控我们的IoT小灯。
你可以自己来构建sand-demo App,这是一个标准的Andriod工程,请用Andriod Studio来打开它。sand-demo App源码位于sand工程的demo/app-android子目录下。
你可以直接下载构建好的sand-demo App安装使用。
sand-demo App里大部分是常规的Android开发。创建菜单,画界面... ...
和IoT通讯相关的部分,是App使用Chalk的remoting插件来遥控IoT设备。
remoting插件的功能,是可以在远程设备上执行action指令。
remoting插件的使用较简单,以下代码,来自sand-demo App源码。
... ...

	public void turnOn(JabberId target) {

		logger.info("Turn on light {}.", target);

		controlThing(target, new TurnOn(), "Turn on");

	}

... ...

	private void controlThing(JabberId target, Object action, String actionDescription) {

		IChatClient chatClient = ChatClientSingleton.get(this);

		IRemoting remoting = chatClient.createApi(IRemoting.class);

		remoting.execute(target, action, new RemotingCallback(this, actionDescription));

	}

... ...

private static class RemotingCallback implements IRemoting.Callback {

		private final Activity activity;

		private final String actionDescription;

		public RemotingCallback(Activity activity, String actionDescription) {

			this.activity = activity;

			this.actionDescription = actionDescription;

		}

		@Override

		public void executed(Object xep) {

			activity.runOnUiThread(() -> Toast.makeText(activity,

					actionDescription + " executed.",

					Toast.LENGTH_LONG).show());

		}

		@Override

		public void occurred(StanzaError error) {

			String errorText = actionDescription + " execution error: " +

					(error.getText() == null ? error.toString() : error.getText().getText());

			remotingErrorOccurred(activity, error, errorText);

		}

		@Override

		public void timeout() {

			activity.runOnUiThread(() -> Toast.makeText(activity,

					actionDescription + " execution timeout.",

					Toast.LENGTH_LONG).show());

		}

	}

... ...
代码说明
- 用chatClient创建IRemoting实例,然后调用IRemoting的execute()方法。方法3个参数,第一个参数是远程设备的地址;第二个参数是要执行的action对象(Protocol Object);第三个参数,是RemotingCallback,我们用这个回调接口来处理远程指令执行结果。
IChatClient chatClient = ChatClientSingleton.get(this);

IRemoting remoting = chatClient.createApi(IRemoting.class);

remoting.execute(target, action, new RemotingCallback(this, actionDescription));
- 在RemotingCallback里,如果远程指令正常执行,会回调executed()方法;远程指令执行出错,会回调occurred()方法;远程指令执行超时(执行端未返回响应,不能确认指令是否执行成功),会调用timeout()方法。我们在这些回调方法里,做对应的处理。
... ...

@Override

public void executed(Object xep) {

	activity.runOnUiThread(() -> Toast.makeText(activity,

			actionDescription + " executed.",

			Toast.LENGTH_LONG).show());

}

@Override

public void occurred(StanzaError error) {

	String errorText = actionDescription + " execution error: " +

			(error.getText() == null ? error.toString() error.getText().getText());

	remotingErrorOccurred(activity, error, errorText);

}

@Override

public void timeout() {

	activity.runOnUiThread(() -> Toast.makeText(activity,

			actionDescription + " execution timeout.",

			Toast.LENGTH_LONG).show());

}

... ...
如果想了解sand-demo App更多细节,请参考开源仓库里的sand-demo App程序源码
将构建好或直接下载的sand-demo App安装到安卓手机上。
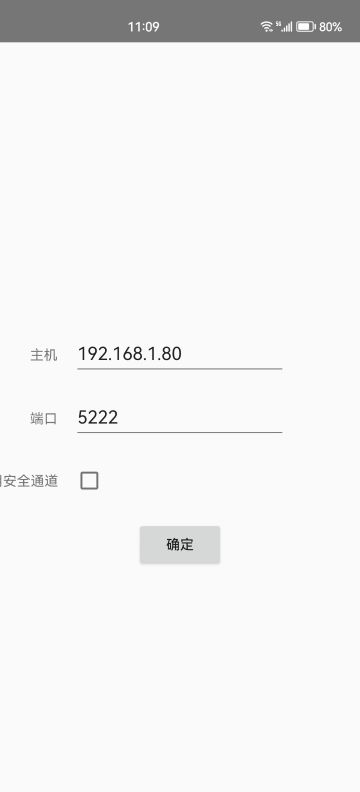
启动sand-demo App。点击配置传输通道链接,进入stream配置页面。
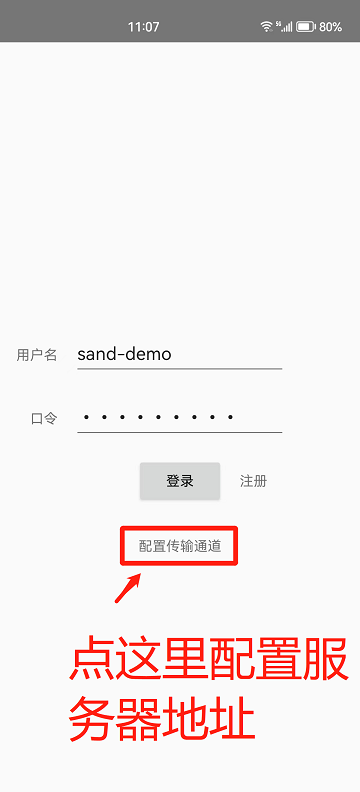
在传输通道配置页里,填写Granite XMPP Server的正确地址。
配置好传输通道后,回到登录页,使用sand-demo用户名来登录App。用户密码也是"sand-demo"。
登录后,可以看到注册成功后hello-actuator-thing。点击“控制这个智能物件”,会看到下拉菜单里,有Flash,Turn On,Turn Off三个子菜单。
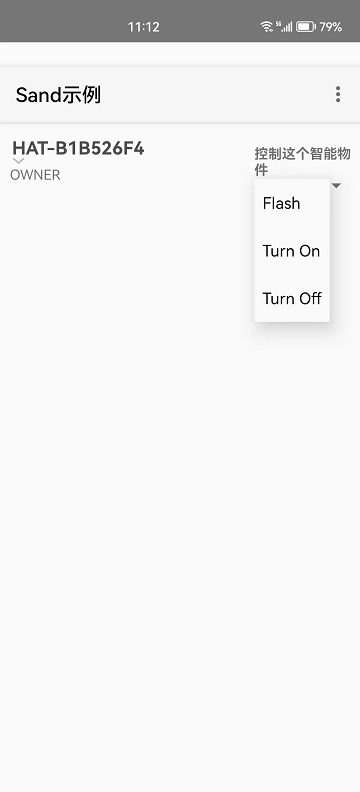
现在可以用手机App来控制hello-actuator-thing了。
10 总结
通过这篇教程,我们可以了解到以下的内容:
- 我们可以通过IoT硬件板上的GPIO接口,来控制IoT设备的外接硬件模块。
- 开源的Pi4J库,可以帮助我们使用Java语言来访问树莓派上的GPIO接口。
- 在IoT的世界里,有不同的通讯协议可以选择。在互联网端,XMPP协议是一个很好的选择。
- 如果使用Lithosphere,基于OXM(Object/XMPP Mapping)技术,我们不需要去处理XML,也不需要了解XMPP协议的细节。我们简单的创建Protocol Object来表达通讯指令。
- Lithosphere基于插件架构,我们可以通过创建服务器端插件,将我们要管理的IoT设备注册到系统中。我们还可以定制设备注册过程,以应对真实项目的需求。
- 在IoT设备端,我们开发Thing程序。使用Sand的sand-client-edge库,可以简化设备注册,服务器连接过程。我们只要注册需要使用的插件,编写Thing端处理逻辑。
- 对于Actuator(执行器)类型的IoT设备,我们使用actuator插件来简化开发。我们登记设备可执行的指令,并且注册指令所对应的Executor(执行器)。
- 我们在手机App端,使用remoting插件来远程执行指令,遥控IoT设备。
- 这篇教程里的内容,全部基于Java平台,只有Java,不涉及其它编程语言。
使用Java来开发物联网应用的更多相关文章
- 是的 你没看错!!!用JAVA为MCU开发物联网程序?
是的 你没看错!!!用JAVA为MCU开发物联网程序? 一直以来,物联网设备这种嵌入式硬件,对于Java软件开发者来说,就是Black Magic Box,什么中断.寄存器,什么 ...
- Java技术开发程序员如果在2019年立足
2019年的互联网环境相对以往来说要更复杂一些,互联网领域也正在经历从消费互联网向产业互联网转型的阵痛期.其实不少公司从2018年开始已经在陆续进行结构化调整,这些调整中的重要内容就是岗位调整,而岗位 ...
- 5款强大的Java Web开发工具
1.WebBuilder这是一款开源的可视化Web应用开发和运行平台.基于浏览器的集成开发环境,采用可视化的设计模式,支持控件的拖拽操作,能轻松完成前后台应用开发:高效.稳定和可扩展的特点,适合复杂企 ...
- Mac OS X上IntelliJ IDEA 13与Tomcat 8的Java Web开发环境搭建
这标题实在有点拗口,不知道怎么写好,但看了标题也就明白文本的内容.最近几天在折腾这些玩意儿,所以写写总结.除了环境搭建,本文还是一篇入门级的上手教程. 去下载一些东西 JDK安装 Tomcat安装 T ...
- 用Spring Boot颠覆Java应用开发
Java开发概述: 使用Java做Web应用开发已经有近20年的历史了,从最初的Servlet1.0一步步演化到现在如此多的框架,库以及整个生态系统.经过这么长时间的发展,Java作为一个成熟的语言, ...
- Java多线程开发系列之番外篇:事件派发线程---EventDispatchThread
事件派发线程是java Swing开发中重要的知识点,在安卓app开发中,也是非常重要的一点.今天我们在多线程开发中,穿插进来这个线程.分别从线程的来由.原理和使用方法三个方面来学习事件派发线程. 一 ...
- Java Web开发中MVC设计模式简介
一.有关Java Web与MVC设计模式 学习过基本Java Web开发的人都已经了解了如何编写基本的Servlet,如何编写jsp及如何更新浏览器中显示的内容.但是我们之前自己编写的应用一般存在无条 ...
- 【转】 java web开发之安全事项
从事java web开发也有几年了,可是开发中的安全问题却越来越不以为然.直到不久遇到一黑软,瞬间sql注入,少时攻破网站数据库.还好,我还没有用root级的用户连接数据库.不过也没有什么用了,因为我 ...
- [刘阳Java]_避开环境配置快速的使用Java的开发工具_第5讲
我们一般学习Java都应该遵循通过系统的命令工具来编译Java程序,然后对编译好Java程序进行运行,这个是非常好的习惯.但是随着后期学习Java技术的深入我们也得像Java的IDE工具屈服.所以,可 ...
- Java多线程开发技巧
很多开发者谈到Java多线程开发,仅仅停留在new Thread(...).start()或直接使用Executor框架这个层面,对于线程的管理和控制却不够深入,通过读<Java并发编程实践&g ...
随机推荐
- Alist云盘视频加密助手:支持云盘视频文件加密与在线播放,不用再担心视频文件被和谐了!
在当前娱乐资源丰富的时代,人们每天都在接触各种视频资源.然而,网盘限速.版权审核.视频分级.少儿不宜等问题经常让人感到困扰.如何在保护隐私的前提下,让视频存储和分享变得更加便捷.安全呢?分享一款实用的 ...
- Java网络编程----通过实现简易聊天工具来聊聊BIO
IO模型即输入输出模型,我们今天主要来聊的是java网络编程中的IO模型---BIO模型.BIO即阻塞式IO,Blocking IOblocking [ˈblɒkɪŋ] v. 堵塞; 阻塞; 堵住(某 ...
- Golang 协程/线程/进程 区别以及 GMP 详解
Golang 协程/线程/进程 区别详解 转载请注明来源:https://janrs.com/mffp 概念 进程 每个进程都有自己的独立内存空间,拥有自己独立的地址空间.独立的堆和栈,既不共享堆,亦 ...
- STM32F429 Discovery开发板应用:实现SPI-SD Card文件写入(搭载FatFS文件系统)
MCU:STM32F429ZIT6 开发环境:STM32CubeMX+MDK5 外购了一个SPI接口的SD Card模块,想要实现SD卡存储数据的功能. 首先需要打开STM32CubeMX工具.输入开 ...
- String和new String的那点事
String a= "test"; 此语句含义是:在常量池中创建test字符串对象,变量aa是对常量池中此对象的引用 String aa = new String("te ...
- 3. @RequestMapping注解
1. @RequestMapping 注解的功能 @RequestMapping 注解的作用就是将请求和处理请求的控制器方法关联起来,建立映射关系. SpringMVC 接收到指定的请求 , ...
- Java 网络编程 —— 安全网络通信
SSL 简介 SSL(Secure Socket Layer,安全套接字层)是一种保证网络上的两个节点进行安全通信的协议.IETF(Interet Engineering Task Force)国际组 ...
- PostgreSQL 12 文档: 系统表
第 51 章 系统目录 目录 51.1. 概述 51.2. pg_aggregate 51.3. pg_am 51.4. pg_amop 51.5. pg_amproc 51.6. pg_attrde ...
- Unity的Console的控制类LogEntries:深入解析与实用案例
使用Unity Console窗口的LogEntries私有类实现自定义日志系统 在Unity开发过程中,我们经常需要使用Console窗口来查看程序运行时的日志信息.Unity内置的日志系统提供了基 ...
- kbuild系统中最简单的目标 -- help(三)
当你学完help目标后你会发现它与我们的代码基本没有什么直接的关系,仅仅是用来生成kbuild的简短使用说明,但是用它来作为学习掌握kbuild编译系统的开篇,不管是从难度还是学习感受上真的是再适合不 ...