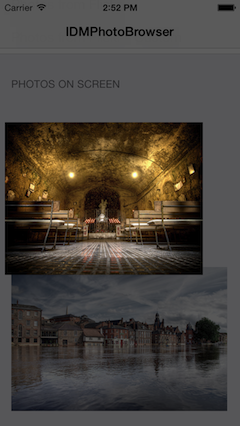
[翻译] IDMPhotoBrowser
IDMPhotoBrowser

IDMPhotoBrowser is a new implementation based on MWPhotoBrowser.
IDMPhotoBrowser实现了图片浏览器的功能,基于MWPhotoBrowser.
We've added both user experience and technical features inspired by Facebook's and Tweetbot's photo browsers.
我把Facebook与Tweetbot's的图片浏览器效果整合在一起了.


New features:
- Uses ARC 使用ARC
- Uses AFNetworking for image loading 使用AFNetworking作为图片加载器
- Image progress shown 显示图片加载进度
- Minimalistic Facebook-like interface, swipe up/down to dismiss 模仿Facebook样式的用户体验,向上/下轻轻滑动而消失
- Ability to add custom actions on the action sheet 你可以添加自定义的动作到动作清单上去
Features
- Can display one or more images by providing either
UIImageobjects, file paths to images on the device, or URLs to images online - Handles the downloading and caching of photos from the web seamlessly
- Photos can be zoomed and panned, and optional captions can be displayed
- 可以显示一张或者多张图片,格式支持UIImage对象,文件路径,或者是来自网络的图片
- 下载并缓存图片没有丝毫停顿,非常流畅
- 图片可以缩放以及拖拽,也可以让可有可无的文案显示出来
Usage
See the code snippet below for an example of how to implement the photo browser.
看一下代码片段,你就会知道怎么使用了.
First create a photos array containing IDMPhoto objects:
首先,你需要创建一个图片数组,包含了所有的IDMPhoto对象.
// URLs array

NSArray *photosURL = @[[NSURL URLWithString:@"http://farm4.static.flickr.com/3567/3523321514_371d9ac42f_b.jpg"],

[NSURL URLWithString:@"http://farm4.static.flickr.com/3629/3339128908_7aecabc34b_b.jpg"],

[NSURL URLWithString:@"http://farm4.static.flickr.com/3364/3338617424_7ff836d55f_b.jpg"],

[NSURL URLWithString:@"http://farm4.static.flickr.com/3590/3329114220_5fbc5bc92b_b.jpg"]];

// Create an array to store IDMPhoto objects

NSMutableArray *photos = [NSMutableArray new];

for (NSURL *url in photosURL) {

    IDMPhoto *photo = [IDMPhoto photoWithURL:url];

    [photos addObject:photo];

}

// Or use this constructor to receive an NSArray of IDMPhoto objects from your NSURL objects

NSArray *photos = [IDMPhoto photosWithURLs:photosURL];
There are two main ways to presente the photoBrowser, with a fade on screen or with a zooming effect from an existing view.
有两种方式用来显示出photoBrowser,第一种是从屏幕渐变出来,第二种则是从已有的view中缩放出来.
Using a simple fade transition:
使用简单的渐变效果示例:
IDMPhotoBrowser *browser = [[IDMPhotoBrowser alloc] initWithPhotos:photos];
Zooming effect from a view:
使用缩放效果示例:
IDMPhotoBrowser *browser = [[IDMPhotoBrowser alloc] initWithPhotos:photos animatedFromView:sender];
When using this animation you can set the scaleImage property, in case the image from the view is not the same as the one that will be shown on the browser, so it will dynamically scale it:
动力使用动画效果时,你可以设置scaleImage属性,这是缩放参数,设置了后,图片就不会按照原样显示出来.
browser.scaleImage = buttonSender.currentImage;
Presenting using a modal view controller:
用一种modal view的方式来显示出来:
[self presentViewController:browser animated:YES completion:nil];
Customization
Toolbar
You can customize the toolbar. There are three boolean properties you can set: displayActionButton (default is YES), displayArrowButton (default is YES) and displayCounterLabel (default is NO). If you dont want the toolbar at all, you can set displayToolbar = NO.
你可以定制toolbar.有3个属性你可以设置:displayActionButton(默认值是YES),displayArrowButton(默认值是YES)以及displayCounterLabel(默认值是NO).如果你不想让toolbar显示出来,你可以将displayToolbar设置成NO.
Toolbar setup example:
Toolbar设置示例:
browser.displayActionButton = NO;

browser.displayArrowButton = YES;

browser.displayCounterLabel = YES;
It is possible to use your own image on the toolbar arrows:
你也可以用你自己的图片来替换成toolbar的箭头:
browser.leftArrowImage = [UIImage imageNamed:@"IDMPhotoBrowser_customArrowLeft.png"];

browser.rightArrowImage = [UIImage imageNamed:@"IDMPhotoBrowser_customArrowRight.png"];

browser.leftArrowSelectedImage = [UIImage imageNamed:@"IDMPhotoBrowser_customArrowLeftSelected.png"];

browser.rightArrowSelectedImage = [UIImage imageNamed:@"IDMPhotoBrowser_customArrowRightSelected.png"];
If you want to use custom actions, set the actionButtonTitles array with the titles for the actionSheet. Then, implement the photoBrowser:didDismissActionSheetWithButtonIndex:photoIndex: method, from the IDMPhotoBrowser delegate
如果你想用自定义的actions,设置actionButtonTitles数组,然后实现photoBrowser:didDismissActionSheetWithButtonIndex:photoIndex:代理方法.
browser.actionButtonTitles = @[@"Option 1", @"Option 2", @"Option 3", @"Option 4"];
Others
Others customizations you can make are: use white background color, don't display the done button and change the done button background image:
其他的一些可以定制的有:使用白色的背景色,不要显示出done按钮以及修改done按钮的背景图:
browser.useWhiteBackgroundColor = YES;

browser.displayDoneButton = NO;

browser.doneBackgroundImage = [UIImage imageNamed:@"IDMPhotoBrowser_customDoneButton.png"];
Photo Captions
Photo captions can be displayed simply by setting the caption property on specific photos:
你可以通过设置标题属性来显示图片标题:
IDMPhoto *photo = [IDMPhoto photoWithFilePath:[[NSBundle mainBundle] pathForResource:@"photo2l" ofType:@"jpg"]];

photo.caption = @"Campervan";
No caption will be displayed if the caption property is not set.
如果标题属性没有设置,那么这个标题是不会显示出来的.
Custom Captions
By default, the caption is a simple black transparent view with a label displaying the photo's caption in white. If you want to implement your own caption view, follow these steps:
默认情况下,标题其实是一个半透明的view上面添加了一个label,用来显示图片的标题.如果你想实现你自己的标题view,遵循以下几步:
- Optionally use a subclass of
IDMPhotofor your photos so you can store more data than a simple caption string. 可以使用IDMPhoto类来作为你图片的容器,因为他可以显示更多的内容 - Subclass
IDMCaptionViewand override-setupCaptionand-sizeThatFits:(and any other UIView methods you see fit) to layout your own view and set it's size. More information on this can be found inIDMCaptionView.h 继承IDMCaptionView然后重写-setupCaption与-sizeThatFits:方法 - Implement the
-photoBrowser:captionViewForPhotoAtIndex:IDMPhotoBrowser delegate method (shown below). 实现-photoBrowser:captionViewForPhotoAtIndex:代理方法
Example delegate method for custom caption view:
以下是实现代理方法的地方:
- (IDMCaptionView *)photoBrowser:(IDMPhotoBrowser *)photoBrowser captionViewForPhotoAtIndex:(NSUInteger)index {

    IDMPhoto *photo = [self.photos objectAtIndex:index];

    MyIDMCaptionViewSubclass *captionView = [[MyIDMCaptionViewSubclass alloc] initWithPhoto:photo];

    return captionView;

}
Adding to your project
Using CocoaPods
Just add pod 'IDMPhotoBrowser' to your Podfile.
在Podfile中添加'IDMPhotoBrowser'即可.
Including Source Directly Into Your Project
Simply add the files inside IDMPhotoBrowser/Classes to your Xcode project, copying them to your project's directory if required. And also any library inside IDMPhotoBrowser/ExternalLibraries needed.
你也可以直接将IDMPhotoBrowser/Classes类拖到你的项目当中,记得要选中copying选项.
Opensource libraries used
[翻译] IDMPhotoBrowser的更多相关文章
- 《Django By Example》第五章 中文 翻译 (个人学习,渣翻)
书籍出处:https://www.packtpub.com/web-development/django-example 原作者:Antonio Melé (译者@ucag注:大家好,我是新来的翻译, ...
- 《Django By Example》第四章 中文 翻译 (个人学习,渣翻)
书籍出处:https://www.packtpub.com/web-development/django-example 原作者:Antonio Melé (译者注:祝大家新年快乐,这次带来<D ...
- [翻译]开发文档:android Bitmap的高效使用
内容概述 本文内容来自开发文档"Traning > Displaying Bitmaps Efficiently",包括大尺寸Bitmap的高效加载,图片的异步加载和数据缓存 ...
- 【探索】机器指令翻译成 JavaScript
前言 前些时候研究脚本混淆时,打算先学一些「程序流程」相关的概念.为了不因太枯燥而放弃,决定想一个有趣的案例,可以边探索边学. 于是想了一个话题:尝试将机器指令 1:1 翻译 成 JavaScript ...
- 《Django By Example》第三章 中文 翻译 (个人学习,渣翻)
书籍出处:https://www.packtpub.com/web-development/django-example 原作者:Antonio Melé (译者注:第三章滚烫出炉,大家请不要吐槽文中 ...
- 《Django By Example》第二章 中文 翻译 (个人学习,渣翻)
书籍出处:https://www.packtpub.com/web-development/django-example 原作者:Antonio Melé (译者注:翻译完第一章后,发现翻译第二章的速 ...
- 《Django By Example》第一章 中文 翻译 (个人学习,渣翻)
书籍出处:https://www.packtpub.com/web-development/django-example 原作者:Antonio Melé (译者注:本人目前在杭州某家互联网公司工作, ...
- 【翻译】Awesome R资源大全中文版来了,全球最火的R工具包一网打尽,超过300+工具,还在等什么?
0.前言 虽然很早就知道R被微软收购,也很早知道R在统计分析处理方面很强大,开始一直没有行动过...直到 直到12月初在微软技术大会,看到我软的工程师演示R的使用,我就震惊了,然后最近在网上到处了解和 ...
- ASP.NET MVC with Entity Framework and CSS一书翻译系列文章之第一章:创建基本的MVC Web站点
在这一章中,我们将学习如何使用基架快速搭建和运行一个简单的Microsoft ASP.NET MVC Web站点.在我们马上投入学习和编码之前,我们首先了解一些有关ASP.NET MVC和Entity ...
随机推荐
- R语言常用包分类总结
常用包: ——数据处理:lubridata ,plyr ,reshape2,stringr,formatR,mcmc: ——机器学习:nnet,rpart,tree,party,lars,boost, ...
- php中session的简单使用
两个页面之间共享session,或者通过session来传递参数(其实session只是一个域而已,一个会话) 1. a.php中 <?php session_start();//开启sessi ...
- Integer.parseInt() 和 valueOf()
parseInt("1")返回的是int类型,所以如果想要将一个String类型的数字串转为原始类型int ,建议使用这个方法, 而不是使用 valueOf("1&quo ...
- Error : Weblogic Maven Plugin deployment WebLogic 12c
Error : Weblogic Maven Plugin deployment i want to use weblogic-maven-plugin in my maven project in ...
- Linux 文件内容查看工具介绍-cat,less,more,tail,head
Linux 文件内容查看工具介绍 作者:北南南北来自:LinuxSir.Org摘要: 本文讲述几种常用文件内容的查看工具,比如cat.more.less.head.tail等,把这些工具最常用的参数. ...
- antlr提取代码注释
1. 来由 为什么要写提取注释呢,起因是工作需要.弄这么个不太重要的功能点来讲,旨在抛砖引玉. 一般而言,大家使用antlr解析源代码的时候,不会关心注释和空格之类内容,默认会过滤掉,不会放到语法树里 ...
- RabbitMQ上手记录–part 6-Shovel
上一part<RabbitMQ上手记录–part 5-节点集群高可用(多服务器)>讲到了通过多个服务器来搭建RabbitMQ的节点集群,示例当中提到的服务器都是在同一个局域网中的(实际上是 ...
- hadoop学习笔记(六):HDFS文件的读写流程
一.HDFS读取文件流程: 详解读取流程: Client调用FileSystem.open()方法: 1 FileSystem通过RPC与NN通信,NN返回该文件的部分或全部block列表(含有blo ...
- Jsp&Servlet入门级项目全程实录第6讲
惯例广告一发,对于初学真,真的很有用www.java1234.com,去试试吧! 1.建立数据表及数据(略) 2.创建student model package com.java1234.model; ...
- EF6 CodeFirst代码迁移笔记
由于EF7只支持codefirst only.朕无奈被微软逼上了梁山学一下codefirst,就算是为明年做准备吧.写的这些网上大致都有,基本没啥 新内容, 迁移 使用自动迁移 Enable- ...