
Hibernate通过createSQLQuery( )方法实现增删改查
一、项目结构
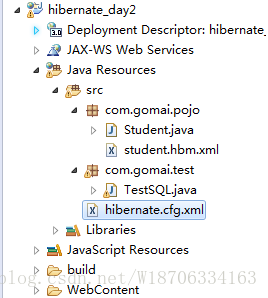
二、hibernate核心配置文件: hibernate.cfg.xm
<?xml version="1.0" encoding="UTF-8"?>

<!DOCTYPE hibernate-configuration PUBLIC

	"-//Hibernate/Hibernate Configuration DTD 3.0//EN"

	"http://www.hibernate.org/dtd/hibernate-configuration-3.0.dtd">

	<!-- 配置hibernate核心配置文件 -->

	<hibernate-configuration>

		<!-- 配置hibernate数据源连接 -->

		<session-factory>

			<property name="hibernate.connection.driver_class">oracle.jdbc.driver.OracleDriver</property>

			<property name="hibernate.connection.url">jdbc:oracle:thin:@localhost:1521:orcl</property>

			<property name="hibernate.connection.username">wzf</property>

			<property name="hibernate.connection.password">1234</property>

			<!-- 配置数据库方言 -->

			<property name="hibernate.dialect">org.hibernate.dialect.Oracle10gDialect</property>

			<!-- 配置sql打印、格式化 -->

			<property name="hibernate.show_sql">true</property>

			<property name="hibernate.format_sql">true</property>

			<!-- 配置hibernate映射文件位置 -->

			<mapping resource="com/gomai/pojo/student.hbm.xml"/>

		</session-factory>

	</hibernate-configuration>
三、hrbernate的映射文件
<?xml version="1.0" encoding="UTF-8"?>

<!DOCTYPE hibernate-mapping PUBLIC

    "-//Hibernate/Hibernate Mapping DTD 3.0//EN"

    "http://www.hibernate.org/dtd/hibernate-mapping-3.0.dtd">

    <!-- 配置hibernate映射文件 -->

    <hibernate-mapping>

    	<class name="com.gomai.pojo.Student" table="student">

    		<!-- 配置主键生成策略 -->

    		<id name="student_id" column="STUID">

    			<generator class="sequence">

    				<param name="sequence">SQ_STUDENT</param>

    			</generator>

    		</id>

    		<!-- 配置表与属性 -->

    		<property name="student_name" column="stuname"></property>

    		<property name="student_age" column="stuage"></property>

    		<property name="student_sex" column="stusex"></property>

    		<property name="student_no" column="stuno"></property>

    	</class>

    </hibernate-mapping>
四、测试类(该类包括增删改查四个方法的实现,下面依次介绍)
新增:
	/**

	 * 添加:通过序列生成主键自增

         */

	@Test

	public void insertStu(){

		Configuration configure = new Configuration().configure("hibernate.cfg.xml");

		SessionFactory sessionFactory = configure.buildSessionFactory();

		Session session = sessionFactory.openSession();

		//开启事务

		Transaction tr = session.beginTransaction();

		int i = session.createSQLQuery("insert into student values(SQ_STUDENT.nextval,?,?,?,?)")

			.setParameter(0, 2)

			.setParameter(1, "露娜")

			.setParameter(2, 23)

			.setParameter(3, "女")

			.setParameter(4, 1003)

			.executeUpdate();

		System.out.println(i);

		try {

			tr.commit();

		} catch (HibernateException e) {

			tr.rollback();

			e.printStackTrace();

		}finally{

			session.close();

		}

	}
删除:
/**

	 * 删除

	 */

	@Test

	public void deleteStu(){

		Configuration configure = new Configuration().configure("hibernate.cfg.xml");

		SessionFactory sessionFactory = configure.buildSessionFactory();

		Session session = sessionFactory.openSession();

		//开启事务

		Transaction tr = session.beginTransaction();

		int i = session.createSQLQuery("delete from student where stuid = ?")

				.setParameter(0, 100)

				.executeUpdate();

		System.out.println("TestSQL.deleteStu()" + i);

		//事务回滚、关流

		try {

			tr.commit();

		} catch (Exception e) {

			tr.rollback();

			e.printStackTrace();

		}finally{

			session.close();

		}

	}
更新:
	/**

	 * 更新

	 */

	@Test

	public void updateStu(){

		Configuration configure = new Configuration().configure("hibernate.cfg.xml");

		SessionFactory sessionFactory = configure.buildSessionFactory();

		Session session = sessionFactory.openSession();

		Transaction tr = session.beginTransaction();

		int i = session.createSQLQuery("update student set stuname = ?,stusex = ? where stuid = ? ")

			.setParameter(0, "公孙离")

			.setParameter(1, "女")

			.setParameter(2, 9)

			.executeUpdate();

		System.out.println(i);

		//事务回滚、关流

		try {

			tr.commit();

		} catch (Exception e) {

			tr.rollback();

			e.printStackTrace();

		}finally{

			session.close();

		}

	}
查询:
/**

	 * 查询

	 */

	@Test

	public void searchStu(){

		Configuration configure = new Configuration().configure("hibernate.cfg.xml");

		SessionFactory sessionFactory = configure.buildSessionFactory();

		Session session = sessionFactory.openSession();

		List<Student> list = session.createSQLQuery("select * from student")

				.addEntity(Student.class)

				.list();

		for (Student student : list) {

			System.out.println(student);

		}

		session.close();

	}
原文出处:
小白农, Hibernate通过createSQLQuery( )方法实现增删改查, https://blog.csdn.net/w18706334163/article/details/79923466
Hibernate通过createSQLQuery( )方法实现增删改查的更多相关文章
- HibernateTemplate、HibernateDaoSupport两种方法实现增删改查Good(转)
Spring+Hibernate两种方法实现增删改查 首先,定义一个Customer的bean类,设置好Customer.hbm.xml文件.再定义好一个Dao接口.准备好一个jdbc.propert ...
- get,post,put,delete四种基础方法对应增删改查
PUT,DELETE,POST,GET四种基础方法对应增删改查 1.GET请求会向数据库发索取数据的请求,从而来获取信息,该请求就像数据库的select操作一样,只是用来查询一下数据,不会修改.增加数 ...
- hibernate对单表的增删改查
ORM: 对象关系映射(英语:Object Relational Mapping,简称ORM,或O/RM,或O/R mapping) 实现对单表的增删改查 向区域表中增加数据: 第一步: 新建一个Da ...
- Hibernate3回顾-5-简单介绍Hibernate session对数据的增删改查
5. Hibernate对数据的增删改查 5.1Hibernate加载数据 两种:get().load() 一. Session.get(Class arg0, Serializable arg1)方 ...
- 2、hibernate七步走完成增删改查
一.hibernate框架介绍如下 1.框架=模板 2.Hibernate是对象模型与关系数据库模型之间的桥梁 3.hibernate持久化概念 什么是ORM ORM是对象关系映射,是一种数据持久化操 ...
- Hibernate之API初识及增删改查实现
声明:关于hibernate的学习.非常大一部分东西都是概念性的. 大家最好手里都有一份学习资料,在我的博文中.我不会把书本上的概念一类的东西搬过来.那没有不论什么意义.关于hibernate的学习, ...
- hibernate基本配置与简单增删改查
ORM(Object Relation Mapping)是对象关系映射,是一个思想,它的作用是在关系数据库与对象之间做一个自动映射,将数据库中的表格映射到一个类,也就是持久化类,数据表中每行映射为对象 ...
- VS连接Access数据库--连接字符串及执行查询语句的方法(增删改查,用户名查重,根据用户获取密码查询)
ACCESS数据的连接及语句执行操作,不难,久不用会生疏,每次都要找资料,干脆自己整理下,记录下来,需要的时候,直接查看,提高效率.也供初学者参考 1.连接字符串 public static stri ...
- hibernate与struts框架实现增删改查
这里配置hibernate与struts不再过多赘述,配置搭建前文已经详细讲解,配置如下: hibernate.hbm.xml配置: <?xml version="1.0" ...
随机推荐
- win10系统优化
1.服务:关闭 windows update\ windows search \ windows 备份 2.系统:高级系统设置->性能最优,同事修改虚拟内存如下 3.任务管理器:关闭多余的启动项 ...
- NPOI Excel同一个单元格 多种字体
public static void CreateFont() { IWorkbook workbook = new HSSFWorkbook(); workbook.CreateSheet(&quo ...
- 安装oracle时出现的问题
数据库引擎和几个功能安装失败后 ,重新再装还是一样,好不容易全部功能装完成后结果发现登录不了oracle!!!!!!!!!!!!! 气死人,搞了一上午才发现原来是微软账号在搞事,登录本地管理员账户就 ...
- 【翻译】Tusdotnet中文文档(2)事件
tusdotnet-----一个tus文件上传协议的实现之事件 本章接上篇来继续翻译Tusdotnet的文档,按照如下结构来翻译: 事件 OnAuthorize OnFileComplete OnBe ...
- 我为什么学习Haskell
说起来,Haskell真是相当冷门而小众的一门语言.在我工作第一年的时候,我平时从网络的一些学习资料上时不时看到有人提到这门语言.那时候的认识就是除了我们平时用的“面向对象语言 (OOP: Objec ...
- Java解析复杂JSON数据的一种方法
1.需解析JSON数据: { "code": 0, "message": "success", "sid": " ...
- python基础知识(最基本)
保留字(关键字) False None True and as break class continue def elif else except finally for from global ...
- http头字段
HTTP头字段总结 本节摘自https://www.cnblogs.com/skynet/archive/2010/12/11/1903347.html. 1. Accept:告诉WEB服务器自己接受 ...
- @Async源码探究
1. @Async源码探究 1.1. 上代码 @SpringBootApplication @EnableAsync public class SpringbootLearnApplication { ...
- nginx上部署PHP
环境:centos7 nginx1.16.1 (1)先将tp源代码下载到nginx的站点目录下 注意:存放tp的目录要有可执行权限,否则无法进入目录,访问报403 (2)servr配置: serve ...