.net core 2.0的认证和授权
在asp.net core中,微软提供了基于认证(Authentication)和授权(Authorization)的方式,来实现权限管理的,本篇博文,介绍基于固定角色的权限管理和自定义角色权限管理,本文内容,更适合传统行业的BS应用,而非互联网应用。 在asp.net core中,我们认证(Authentication)通常是在Login的Post Action中进行用户名或密码来验证用户是否正确,如果通过验证,即该用户就会获得一个或几个特定的角色,通过ClaimTypes.Role来存储角色,从而当一个请求到达时,用这个角色和Controller或Action上加的特性 [Authorize(Roles = "admin,system")]来授权是否有权访问该Action。本文中的自定义角色,会把验证放在中间件中进行处理。 一、固定角色: 即把角色与具体的Controller或Action直接关联起来,整个系统中的角色是固定的,每种角色可以访问那些Controller或Action也是固定的,这做法比较适合小型项目,角色分工非常明确的项目。 项目代码: https://github.com/axzxs2001/Asp.NetCoreExperiment/tree/master/Asp.NetCoreExperiment/%E6%9D%83%E9%99%90%E7%AE%A1%E7%90%86/RolePrivilegeManagement 始于startup.cs 需要在ConfigureServices中注入Cookie的相关信息,options是CookieAuthenticationOptions,关于这个类型提供如下属性,可参考:https://docs.microsoft.com/en-us/aspnet/core/security/authentication/cookie?tabs=aspnetcore2x 它提供了登录的一些信息,或登录生成Cookie的一些信息,用以后 public void ConfigureServices(IServiceCollection services)
{
services.AddMvc();
//添加认证Cookie信息
services.AddAuthentication(CookieAuthenticationDefaults.AuthenticationScheme)
.AddCookie(options =>
{
options.LoginPath = new PathString("/login");
options.AccessDeniedPath = new PathString("/denied");
});
} public void Configure(IApplicationBuilder app, IHostingEnvironment env)
{
if (env.IsDevelopment())
{
app.UseDeveloperExceptionPage();
app.UseBrowserLink();
}
else
{
app.UseExceptionHandler("/Home/Error");
}
app.UseStaticFiles();
//验证中间件
app.UseAuthentication();
app.UseMvc(routes =>
{
routes.MapRoute(
name: "default",
template: "{controller=Home}/{action=Index}/{id?}");
});
} HomeController.cs 对于Login Get的Action,把returnUrl用户想要访问的地址(有可能用户记录下想要访问的url了,但系统会转到登录页,登录成功后直接跳转到想要访问的returnUrl页) 对于Login Post的Action,验证用户密和密码,成功能,定义一个ClaimsIdentity,把用户名和角色,和用户姓名的声明都添回进来(这个角色,就是用来验证可访问action的角色 )作来该用户标识,接下来调用HttpContext.SignInAsync进行登录,注意此方法的第一个参数,必需与StartUp.cs中services.AddAuthentication的参数相同,AddAuthentication是设置登录,SigninAsync是按设置参数进行登录 对于Logout Get的Action,是退出登录 HomeController上的[Authorize(Roles=”admin,system”)]角色和权限的关系时,所有Action只有admin和system两个角色能访问到,About上的[Authorize(Roles=”admin”)]声明这个action只能admin角色访问,Contact上的[Authorize(Roles=”system”)]声明这个action只能system角色访问,如果action上声明的是[AllowAnomymous],说明不受授权管理,可以直接访问。 using System;
using System.Collections.Generic;
using System.Diagnostics;
using System.Linq;
using System.Threading.Tasks;
using Microsoft.AspNetCore.Mvc;
using RolePrivilegeManagement.Models;
using System.Security.Claims;
using Microsoft.AspNetCore.Authentication;
using Microsoft.AspNetCore.Authentication.Cookies;
using Microsoft.AspNetCore.Authorization; namespace RolePrivilegeManagement.Controllers
{
[Authorize(Roles = "admin,system")]
public class HomeController : Controller
{
public IActionResult Index()
{
return View();
}
[Authorize(Roles = "admin")]
public IActionResult About()
{
ViewData["Message"] = "Your application description page.";
return View();
}
[Authorize(Roles = "system")]
public IActionResult Contact()
{
ViewData["Message"] = "Your contact page.";
return View();
}
public IActionResult Error()
{
return View(new ErrorViewModel { RequestId = Activity.Current?.Id ?? HttpContext.TraceIdentifier });
}
[AllowAnonymous]
[HttpGet("login")]
public IActionResult Login(string returnUrl = null)
{
TempData["returnUrl"] = returnUrl;
return View();
}
[AllowAnonymous]
[HttpPost("login")]
public async Task<IActionResult> Login(string userName, string password, string returnUrl = null)
{
var list = new List<dynamic> {
new { UserName = "gsw", Password = "", Role = "admin" },
new { UserName = "aaa", Password = "", Role = "system" }
};
var user = list.SingleOrDefault(s => s.UserName == userName && s.Password == password);
if (user!=null)
{
//用户标识
var identity = new ClaimsIdentity(CookieAuthenticationDefaults.AuthenticationScheme);
identity.AddClaim(new Claim(ClaimTypes.Sid, userName));
identity.AddClaim(new Claim(ClaimTypes.Name, user.Name));
identity.AddClaim(new Claim(ClaimTypes.Role, user.Role));
await HttpContext.SignInAsync(CookieAuthenticationDefaults.AuthenticationScheme, new ClaimsPrincipal(identity));
if (returnUrl == null)
{
returnUrl = TempData["returnUrl"]?.ToString();
}
if (returnUrl != null)
{
return Redirect(returnUrl);
}
else
{
return RedirectToAction(nameof(HomeController.Index), "Home");
}
}
else
{
const string badUserNameOrPasswordMessage = "用户名或密码错误!";
return BadRequest(badUserNameOrPasswordMessage);
}
}
[HttpGet("logout")]
public async Task<IActionResult> Logout()
{
await HttpContext.SignOutAsync(CookieAuthenticationDefaults.AuthenticationScheme);
return RedirectToAction("Index", "Home");
}
[AllowAnonymous]
[HttpGet("denied")]
public IActionResult Denied()
{
return View();
}
}
} 前端_Layout.cshtml布局页,在登录成功后的任何页面都可以用@User.Identity.Name就可以获取用户姓名,同时用@User.Claims.SingleOrDefault(s=>s.Type== System.Security.Claims.ClaimTypes.Sid).Value可以获取用户名或角色。 <nav class="navbar navbar-inverse navbar-fixed-top">
<div class="container">
<div class="navbar-header">
<button type="button" class="navbar-toggle" data-toggle="collapse" data-target=".navbar-collapse">
<span class="sr-only">Toggle navigation</span>
<span class="icon-bar"></span>
<span class="icon-bar"></span>
<span class="icon-bar"></span>
</button>
<a asp-area="" asp-controller="Home" asp-action="Index" class="navbar-brand">RolePrivilegeManagement</a>
</div>
<div class="navbar-collapse collapse">
<ul class="nav navbar-nav">
<li><a asp-area="" asp-controller="Home" asp-action="Index">Home</a></li>
<li><a asp-area="" asp-controller="Home" asp-action="About">About</a></li>
<li><a asp-area="" asp-controller="Home" asp-action="Contact">Contact</a></li>
</ul>
<ul class="" style="float:right; margin:0;">
<li style="overflow:hidden;">
<div style="float:left;line-height:50px;margin-right:10px;">
<span style="color:#ffffff">当前用户:@User.Identity.Name</span>
</div>
<div style="float:left;line-height:50px;">
<a asp-area="" asp-controller="Home" asp-action="Logout">注销</a>
</div>
</li>
</ul>
</div>
</div>
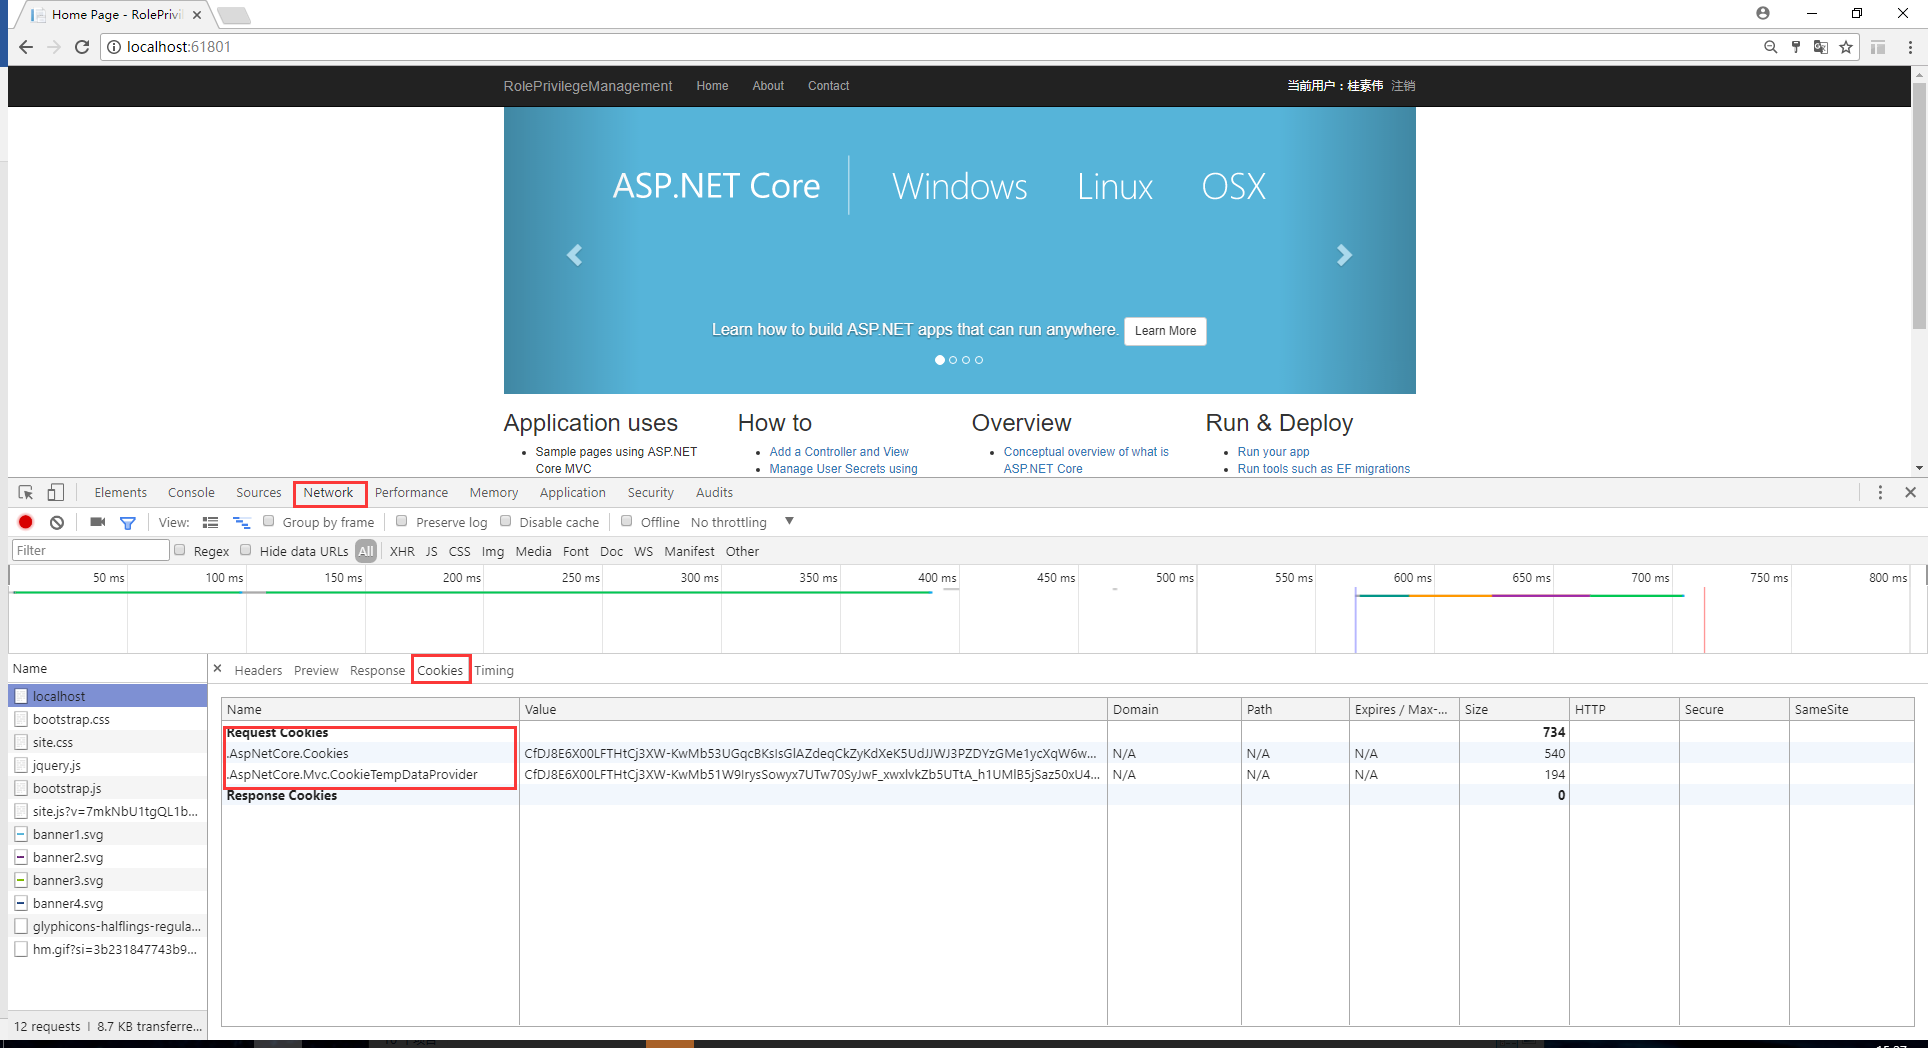
</nav> 现在可以用chrome运行了,进行登录页后F12,查看Network—Cookies,可以看到有一个Cookie,这个是记录returnUrl的Cookie,是否记得HomeController.cs中的Login Get的Action中代码:TempData["returnUrl"] = returnUrl;这个TempData最后转成了一个Cookie返回到客户端了,如下图:
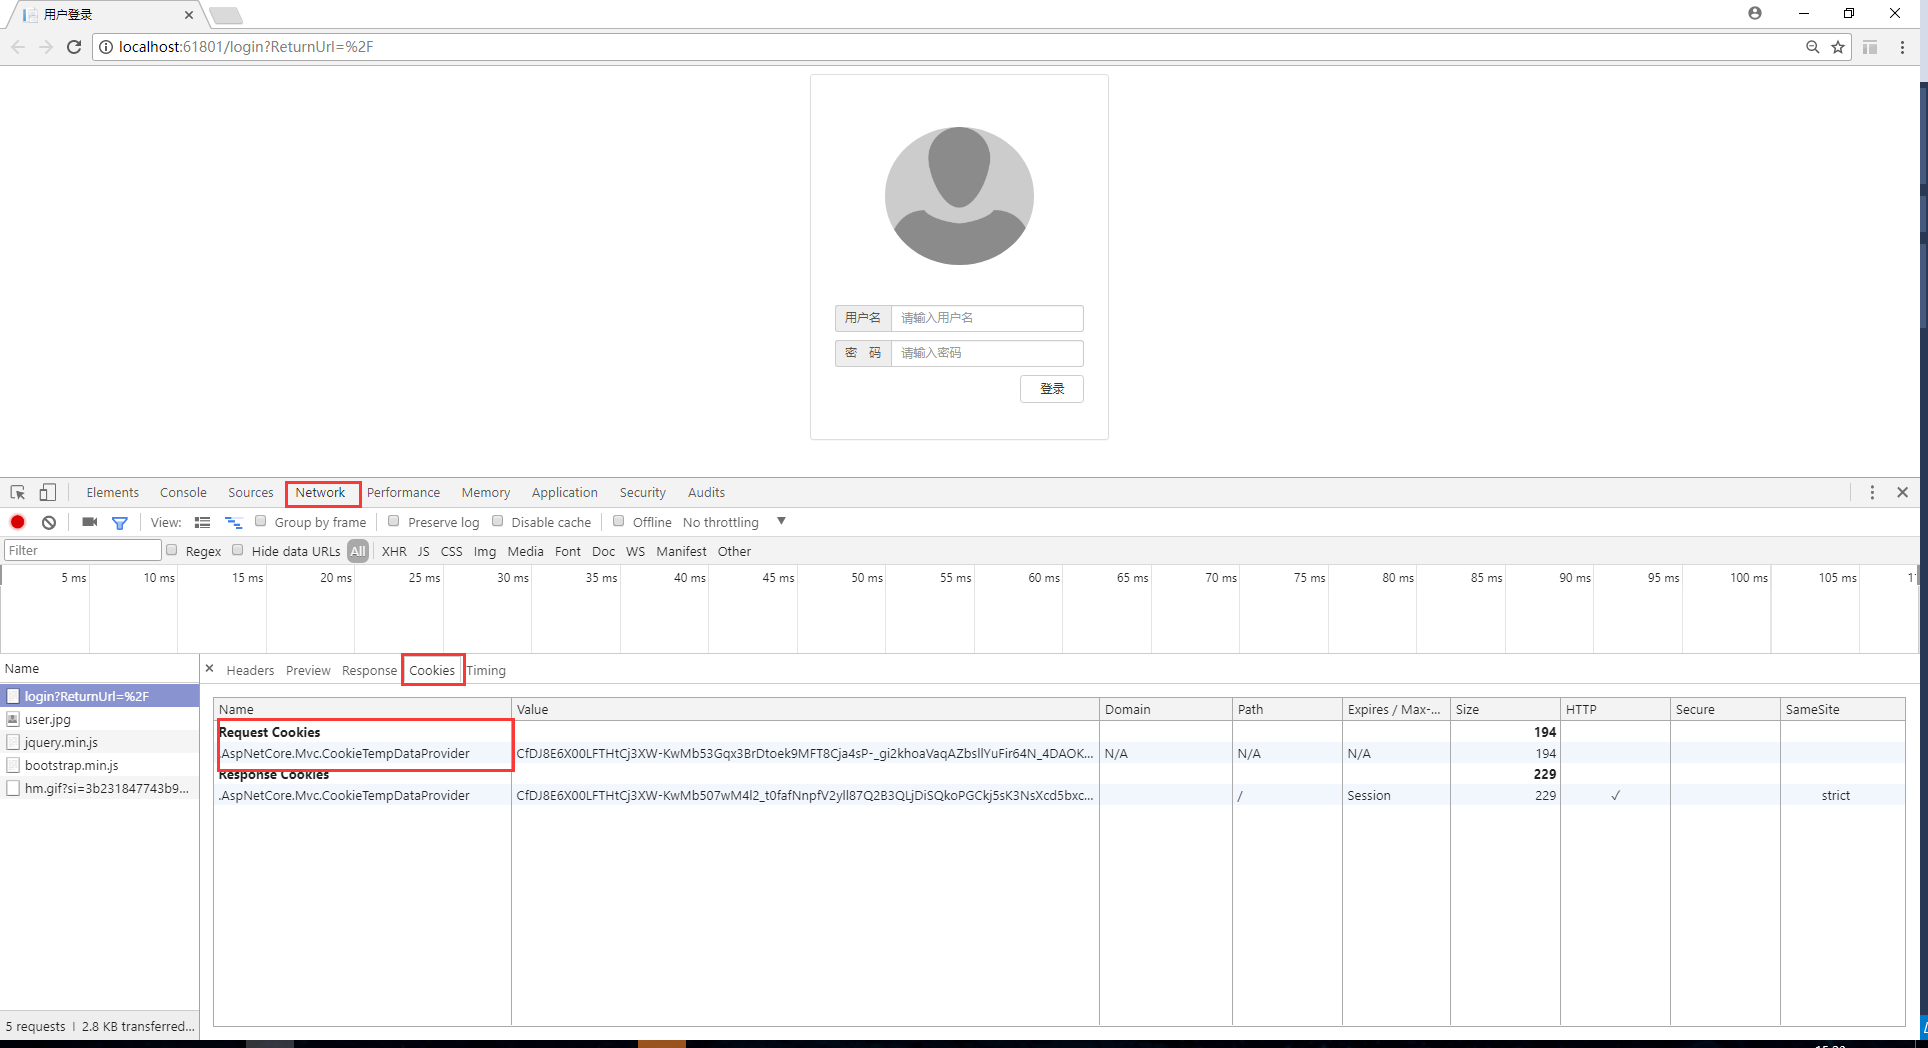
输入用户名,密码登录,再次查看Cookies,发现多了一个.AspNetCore.Cookies,即把用户验证信息加密码保存在了这个Cookie中,当跳转到别的页面时,这两个Cookie会继续在客户端和服务传送,用以验证用户角色。
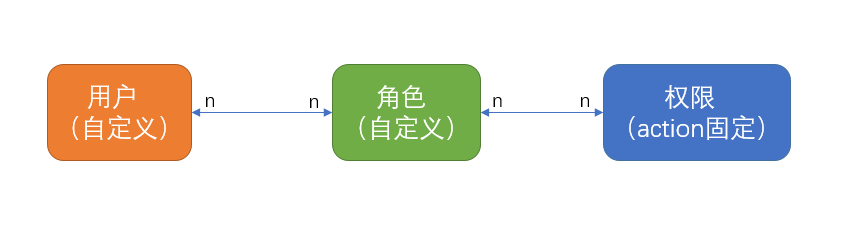
二、自定义角色

系统的角色可以自定义,用户是自写到义,权限是固定的,角色对应权限可以自定义,用户对应角色也是自定义的,如下图:
项目代码:

https://github.com/axzxs2001/Asp.NetCoreExperiment/tree/master/Asp.NetCoreExperiment/%E6%9D%83%E9%99%90%E7%AE%A1%E7%90%86/PrivilegeManagement

始于startup.cs

自定义角色与固定角色不同之处在于多了一个中间件(关于中间件学习参看:https://docs.microsoft.com/en-us/aspnet/core/fundamentals/middleware),即在Configure方法中,一定要在app.UseAuthentication下面添加验证权限的中间件,因为UseAuthentication要从Cookie中加载通过验证的用户信息到Context.User中,所以一定放在加载完后才能去验用户信息(当然自己读取Cookie也可以)

using System;

using System.Collections.Generic;

using System.Linq;

using System.Threading.Tasks;

using Microsoft.AspNetCore.Builder;

using Microsoft.AspNetCore.Hosting;

using Microsoft.Extensions.Configuration;

using Microsoft.Extensions.DependencyInjection;

using Microsoft.AspNetCore.Authentication.Cookies;

using Microsoft.AspNetCore.Http;

using PrivilegeManagement.Middleware;

namespace PrivilegeManagement

{

    public class Startup

    {

        public Startup(IConfiguration configuration)

        {

            Configuration = configuration;

        }

        public IConfiguration Configuration { get; }

        public void ConfigureServices(IServiceCollection services)

        {

            services.AddAuthentication(CookieAuthenticationDefaults.AuthenticationScheme)

           .AddCookie(options =>

           {

               options.LoginPath = new PathString("/login");

               options.AccessDeniedPath = new PathString("/denied");

           }

           );

            services.AddMvc();

        }

        public void Configure(IApplicationBuilder app, IHostingEnvironment env)

        {

            if (env.IsDevelopment())

            {

                app.UseDeveloperExceptionPage();

                app.UseBrowserLink();

            }

            else

            {

                app.UseExceptionHandler("/Home/Error");

            }

            app.UseStaticFiles();

            //验证中间件

            app.UseAuthentication();

            ////添加权限中间件, 一定要放在app.UseAuthentication后

            app.UsePermission(new PermissionMiddlewareOption()

            {

                LoginAction = @"/login",

                NoPermissionAction = @"/denied",

                //这个集合从数据库中查出所有用户的全部权限

                UserPerssions = new List<UserPermission>()

                 {

                     new UserPermission { Url="/", UserName="gsw"},

                     new UserPermission { Url="/home/contact", UserName="gsw"},

                     new UserPermission { Url="/home/about", UserName="aaa"},

                     new UserPermission { Url="/", UserName="aaa"}

                 }

            });

            app.UseMvc(routes =>

            {

                routes.MapRoute(

                    name: "default",

                    template: "{controller=Home}/{action=Index}/{id?}");

            });

        }

    }

}

下面看看中间件PermissionMiddleware.cs,在Invoke中用了context.User,如上面所述,首先要调用app.UseAuthentication加载用户信息后才能在这里使用,这个中间件逻辑较简单,如果没有验证的一律放过去,不作处理,如果验证过(登录成功了),就要查看本次请求的url和这个用户可以访问的权限是否匹配,如不匹配,就跳转到拒绝页面(这个是在Startup.cs中添加中间件时,用NoPermissionAction = @"/denied"设置的)

using Microsoft.AspNetCore.Http;

using System;

using System.Collections.Generic;

using System.IO;

using System.Linq;

using System.Reflection;

using System.Security.Claims;

using System.Threading.Tasks;

namespace PrivilegeManagement.Middleware

{

    /// <summary>

    /// 权限中间件

    /// </summary>

    public class PermissionMiddleware

    {

        /// <summary>

        /// 管道代理对象

        /// </summary>

        private readonly RequestDelegate _next;

        /// <summary>

        /// 权限中间件的配置选项

        /// </summary>

        private readonly PermissionMiddlewareOption _option;

        /// <summary>

        /// 用户权限集合

        /// </summary>

        internal static List<UserPermission> _userPermissions;

        /// <summary>

        /// 权限中间件构造

        /// </summary>

        /// <param name="next">管道代理对象</param>

        /// <param name="permissionResitory">权限仓储对象</param>

        /// <param name="option">权限中间件配置选项</param>

        public PermissionMiddleware(RequestDelegate next, PermissionMiddlewareOption option)

        {

            _option = option;

            _next = next;

            _userPermissions = option.UserPerssions;

        }

        /// <summary>

        /// 调用管道

        /// </summary>

        /// <param name="context">请求上下文</param>

        /// <returns></returns>

        public Task Invoke(HttpContext context)

        {

            //请求Url

            var questUrl = context.Request.Path.Value.ToLower();

            //是否经过验证

            var isAuthenticated = context.User.Identity.IsAuthenticated;

            if (isAuthenticated)

            {

                if (_userPermissions.GroupBy(g=>g.Url).Where(w => w.Key.ToLower() == questUrl).Count() > )

                {

                    //用户名

                    var userName = context.User.Claims.SingleOrDefault(s => s.Type == ClaimTypes.Sid).Value;

                    if (_userPermissions.Where(w => w.UserName == userName&&w.Url.ToLower()==questUrl).Count() > )

                    {

                        return this._next(context);

                    }

                    else

                    {

                        //无权限跳转到拒绝页面

                        context.Response.Redirect(_option.NoPermissionAction);

                    }

                }

            }

            return this._next(context);

        }

    }

}

扩展中间件类PermissionMiddlewareExtensions.cs

using Microsoft.AspNetCore.Builder;

using System;

using System.Collections.Generic;

using System.Linq;

using System.Threading.Tasks;

namespace PrivilegeManagement.Middleware

{

    /// <summary>

    /// 扩展权限中间件

    /// </summary>

    public static class PermissionMiddlewareExtensions

    {

        /// <summary>

        /// 引入权限中间件

        /// </summary>

        /// <param name="builder">扩展类型</param>

        /// <param name="option">权限中间件配置选项</param>

        /// <returns></returns>

        public static IApplicationBuilder UsePermission(

              this IApplicationBuilder builder, PermissionMiddlewareOption option)

        {

            return builder.UseMiddleware<PermissionMiddleware>(option);

        }

    }

}

中间件属性PermissionMiddlewareOption.cs

using System;

using System.Collections.Generic;

using System.Linq;

using System.Threading.Tasks;

namespace PrivilegeManagement.Middleware

{

    /// <summary>

    /// 权限中间件选项

    /// </summary>

    public class PermissionMiddlewareOption

    {

        /// <summary>

        /// 登录action

        /// </summary>

        public string LoginAction

        { get; set; }

        /// <summary>

        /// 无权限导航action

        /// </summary>

        public string NoPermissionAction

        { get; set; }

        /// <summary>

        /// 用户权限集合

        /// </summary>

        public List<UserPermission> UserPerssions

        { get; set; } = new List<UserPermission>();

    }

}

中间件实体类UserPermission.cs

using System;

using System.Collections.Generic;

using System.Linq;

using System.Threading.Tasks;

namespace PrivilegeManagement.Middleware

{

    /// <summary>

    /// 用户权限

    /// </summary>

    public class UserPermission

    {

        /// <summary>

        /// 用户名

        /// </summary>

        public string UserName

        { get; set; }

        /// <summary>

        /// 请求Url

        /// </summary>

        public string Url

        { get; set; }

    }

}

关于自定义角色,因为不需要授权时带上角色,所以可以定义一个基Controller类BaseController.cs,其他的Controller都继承BaseController,这样所有的action都可以通过中间件来验证,当然像登录,无权限提示页面还是在Action上加[AllowAnomymous]

using Microsoft.AspNetCore.Authorization;

using Microsoft.AspNetCore.Mvc;

namespace PrivilegeManagement.Controllers

{

    [Authorize]

    public class BaseController:Controller

    {

    }

}

HomeController.cs如下,与固定角色的HomeController.cs差异只在Controller和Action上的Authorize特性。

using System;

using System.Collections.Generic;

using System.Diagnostics;

using System.Linq;

using System.Threading.Tasks;

using Microsoft.AspNetCore.Mvc;

using PrivilegeManagement.Models;

using Microsoft.AspNetCore.Authorization;

using System.Security.Claims;

using Microsoft.AspNetCore.Authentication.Cookies;

using Microsoft.AspNetCore.Authentication;

namespace PrivilegeManagement.Controllers

{

    public class HomeController : BaseController

    {

        public IActionResult Index()

        {

            return View();

        }

        public IActionResult About()

        {

            ViewData["Message"] = "Your application description page.";

            return View();

        }

        public IActionResult Contact()

        {

            ViewData["Message"] = "Your contact page.";

            return View();

        }

        public IActionResult Error()

        {

            return View(new ErrorViewModel { RequestId = Activity.Current?.Id ?? HttpContext.TraceIdentifier });

        }

        [AllowAnonymous]

        [HttpGet("login")]

        public IActionResult Login(string returnUrl = null)

        {

            TempData["returnUrl"] = returnUrl;

            return View();

        }

        [AllowAnonymous]

        [HttpPost("login")]

        public async Task<IActionResult> Login(string userName,string password, string returnUrl = null)

        {

            var list = new List<dynamic> {

                new { UserName = "gsw", Password = "", Role = "admin",Name="桂素伟" },

                new { UserName = "aaa", Password = "", Role = "system",Name="测试A" }

            };

            var user = list.SingleOrDefault(s => s.UserName == userName && s.Password == password);

            if (user != null)

            {

                //用户标识

                var identity = new ClaimsIdentity(CookieAuthenticationDefaults.AuthenticationScheme);

                identity.AddClaim(new Claim(ClaimTypes.Sid, userName));

                identity.AddClaim(new Claim(ClaimTypes.Name, user.Name));

                identity.AddClaim(new Claim(ClaimTypes.Role, user.Role));

                await HttpContext.SignInAsync(CookieAuthenticationDefaults.AuthenticationScheme, new ClaimsPrincipal(identity));

                if (returnUrl == null)

                {

                    returnUrl = TempData["returnUrl"]?.ToString();

                }

                if (returnUrl != null)

                {

                    return Redirect(returnUrl);

                }

                else

                {

                    return RedirectToAction(nameof(HomeController.Index), "Home");

                }

            }

            else

            {

                const string badUserNameOrPasswordMessage = "用户名或密码错误!";

                return BadRequest(badUserNameOrPasswordMessage);

            }

        }

        [HttpGet("logout")]

        public async Task<IActionResult> Logout()

        {

            await HttpContext.SignOutAsync(CookieAuthenticationDefaults.AuthenticationScheme);

            return RedirectToAction("Index", "Home");

        }

        [HttpGet("denied")]

        public IActionResult Denied()

        {

            return View();

        }

    }

}

全部代码:https://github.com/axzxs2001/Asp.NetCoreExperiment/tree/master/Asp.NetCoreExperiment/%E6%9D%83%E9%99%90%E7%AE%A1%E7%90%86

原文地址:https://www.cnblogs.com/axzxs2001/p/7482771.html
.net core 2.0的认证和授权的更多相关文章
- asp.net core 2.0的认证和授权
在asp.net core中,微软提供了基于认证(Authentication)和授权(Authorization)的方式,来实现权限管理的,本篇博文,介绍基于固定角色的权限管理和自定义角色权限管理, ...
- 【转载】asp.net core 2.0的认证和授权
在asp.net core中,微软提供了基于认证(Authentication)和授权(Authorization)的方式,来实现权限管理的,本篇博文,介绍基于固定角色的权限管理和自定义角色权限管理, ...
- 如何使用Swagger为.NET Core 3.0应用添加JWT授权说明文档
简介 本教程采用WHY-WHAT-HOW黄金圈思维模式编写,黄金圈法则强调的是从WHY为什么学,到WHAT学到什么,再到HOW如何学.从模糊到清晰的学习模式.大家的时间都很宝贵,我们做事前先想清楚为什 ...
- Asp.net Core 系列之--5.认证、授权与自定义权限的实现
ChuanGoing 2019-11-24 asp.net core系列已经来到了第五篇,通过之前的基础介绍,我们了解了事件订阅/发布的eventbus整个流程,初探dapper ORM实现,并且简单 ...
- asp.net core 3.0 身份认证 替换为自已的提供程序 AuthenticationStateProvider replace to SelfAuthenticationStateProvider
public void ConfigureServices(IServiceCollection services) { // 添加身份验证服务 services.AddAuthorizationCo ...
- .net core 1.0 Web MVC 自定义认证过程
通过官方的介绍可知,若要本地开始部署搭建一个基于.net core 1.0的Web应用,需要下载dotnet SDK,或在Visual Studio IDE之上安装相关插件以布置开发环境.为了使开发环 ...
- 聊聊 asp.net core 认证和授权
使用asp.net core 开发应用系统过程中,基本上都会涉及到用户身份的认证,及授权访问控制,因此了解认证和授权流程也相当重要,下面通过分析asp.net core 框架中的认证和授权的源码来分析 ...
- .Net Core Cookie-Based认证与授权
.Net Core的其中一种认证与授权模式是基于Cookie的,首先我们先创建一个.Net Core MVC 项目: 然后增加对页面访问的权限控制,对要访问的页面Conytroller增加Author ...
- 【翻译】asp.net core2.1认证和授权解密
asp.net core2.1认证和授权解密 本篇文章翻译自:https://digitalmccullough.com/posts/aspnetcore-auth-system-demystifie ...
随机推荐
- CPU和Memory压力测试方法
一:用原生Centos自带的工具 1. CPU 下面命令会创建 CPU 负荷,方法是通过压缩随机数据并将结果发送到 /dev/null: cat /dev/urandom | gzip -9 > ...
- passwd修改密码失败,报鉴定令牌操作错误
出现这个情况,从四个方面来分析: 1./usr/bin/passwd 的权限中没有添加s即SUID特殊权限 即:-rwxr-xr-x. 1 root root 27000 8月 22 2010 /u ...
- ubuntu安装vbox虚拟机
ubuntu安装vbox虚拟机 一.安装准备 1.查看主机配置 二.下载安装包 (建议将安装包下载并保存) a.下载virtualbox安装包 下载链接https://www.virtualbo ...
- iview admin动态路由实现
参考 https://blog.csdn.net/weixin_41538490/article/details/93749942
- django rest framework 解析器组件 接口设计,视图组件 (2)
1. 使用视图组件进行接口优化 1.1 使用视图组件的mixin进行接口逻辑优化 - 导入mixin from rest_framework.mixinx import ( ListModelMix, ...
- Springboot测试类之@RunWith注解
@runWith注解作用: --@RunWith就是一个运行器 --@RunWith(JUnit4.class)就是指用JUnit4来运行 --@RunWith(SpringJUnit4ClassRu ...
- Consul 学习资料
资料 网址 Consul 入门指南 https://book-consul-guide.vnzmi.com/
- CNN是怎样一步步工作的?
非常形象详细的博客:链接1 链接2 为了完成我们的卷积,我们不断地重复着上述过程,将feature和图中每一块进行卷积操作.最后通过每一个feature的卷积操作,我们会得到一个新的二维数组.这也可以 ...
- SDN Reading Notes
网络操作编程语言:Frenetic QoS策略实施框架:PolicyCop
- ubuntu16.04深度学习环境配置
https://www.lizenghai.com/archives/14651.html https://blog.csdn.net/qq_40936141/article/details/8119 ...