
EOS测试链智能合约部署调用
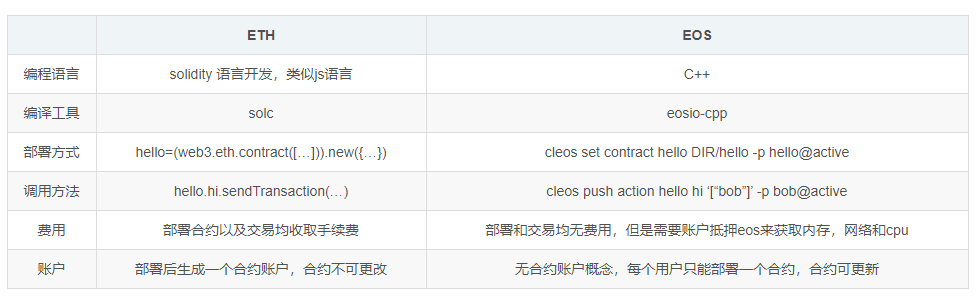
ETH与EOS两者智能合约进行简单的对比。
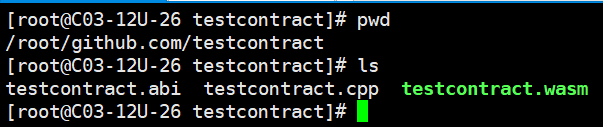
1、编译智能合约(合约编译成.wasm与.abi格式后即可部署到区块链)
[root@C03-12U-26 testcontract]# cat testcontract.cpp

#include <eosiolib/eosio.hpp>

class [[eosio::contract]] testcontract : public eosio::contract

{

public:

    testcontract( eosio::name receiver, eosio::name code, eosio::datastream<const char*> ds )

        : eosio::contract(receiver, code, ds),  _students(receiver, code.value)

    {}

    //添加学生

    [[eosio::action]]

    void add(eosio::name user, std::string studentName,std::string studentGender,uint32_t studentAge,uint32_t studentHeight)

    {

        require_auth(user);

        eosio::print("Add student ", studentName);

        _students.emplace(get_self(), [&](auto& p) {

            p.id = _students.available_primary_key();

            p.studentName = studentName;

            p.studentGender = studentGender;

            p.studentAge = studentAge;

            p.studentHeight = studentHeight;

        });

    }

    //根据主键删除学生

    [[eosio::action]]

    void del(eosio::name user, uint64_t id)

    {

        require_auth(user);

        eosio::print("Del student", id);

        auto itr = _students.find(id);

        if (itr != _students.end()) {

            _students.erase(itr);

        }

    }

    //根据主键修改学生

    [[eosio::action]]

    void update(eosio::name user, uint64_t id,std::string studentName,std::string studentGender,uint32_t studentAge,uint32_t studentHeight)

    {

        require_auth(user);

        eosio::print("update student", studentName);

        auto itr = _students.find(id);

        if (itr != _students.end())

        {

            _students.modify(itr, user, [&]( auto& p ) {

                p.studentName = studentName;

                p.studentGender = studentGender;

                p.studentAge = studentAge;

                p.studentHeight = studentHeight;

            });

        }

    }

    //清空表,待定

    [[eosio::action]]

    void clear(eosio::name user)

    {

        require_auth(user);

        std::vector<uint64_t> keysForDeletion;

        for(auto& item : _students) {

            keysForDeletion.push_back(item.id);

        }

        for (uint64_t key : keysForDeletion) {

            eosio::print("remove from _students ", key);

            auto itr = _students.find(key);

            if (itr != _students.end()) {

                _students.erase(itr);

            }

        }

    }

    //private: -- not private so the cleos get table call can see the table data.

    // create the multi index tables to store the data

    struct [[eosio::table]] students

    {

        uint64_t      id; // primary key

        std::string   studentName;

        std::string   studentGender;

        uint32_t    studentAge;

        uint32_t    studentHeight;

        uint64_t primary_key() const { return id; }

        uint64_t by_age() const {return studentAge; }

    };

    //数据表根据age排序

    typedef eosio::multi_index<"students"_n, students, eosio::indexed_by<"studentage"_n, eosio::const_mem_fun<students, uint64_t, &students::by_age>>> studentstable;

    //students数据库表

    studentstable _students;

};

EOSIO_DISPATCH( testcontract, (add)(del)(update)(clear))
2、部署智能合约
解锁账号钱包
cleos -u https://jungle2.cryptolions.io:443 wallet unlock -n zmcheng-wallet
部署合约
cleos -u https://jungle2.cryptolions.io:443 set contract zmcheng12345 /root/github.com/testcontract -p zmcheng12345@active
Reading WASM from /root/github.com/testcontract/testcontract.wasm...
Publishing contract...
executed transaction: 785f421fe911a142b7cc4b15131cf3f4947847531ed8c52150aa148fe405ea0d 7536 bytes 1560 us
# eosio <= eosio::setcode {"account":"zmcheng12345","vmtype":0,"vmversion":0,"code":"0061736d0100000001d0012060000060037f7e7e0...
# eosio <= eosio::setabi {"account":"zmcheng12345","abi":"0e656f73696f3a3a6162692f312e3100050361646400050475736572046e616d650...
warning: transaction executed locally, but may not be confirmed by the network yet
调用合约(增删改查)
[root@C03-12U-26 testcontract]# cleos -u https://jungle2.cryptolions.io:443 push action zmcheng12345 add '["zmcheng12345","zmcheng","male",25,170]' -p zmcheng12345@active

executed transaction: a64271659aea1ce07fd05a4ff1bb0188c441de04263f3a18b819cbee205d2bbd  128 bytes  273 us

#  zmcheng12345 <= zmcheng12345::add            {"user":"zmcheng12345","studentName":"zmcheng","studentGender":"male","studentAge":25,"studentHeight...

>> Add student zmcheng

warning: transaction executed locally, but may not be confirmed by the network yet         ]

[root@C03-12U-26 testcontract]# cleos -u https://jungle2.cryptolions.io:443 get table zmcheng12345 zmcheng12345 students

{

  "rows": [{

      "id": 0,

      "studentName": "zmcheng",

      "studentGender": "male",

      "studentAge": 25,

      "studentHeight": 170

    },{

      "id": 1,

      "studentName": "www",

      "studentGender": "male",

      "studentAge": 26,

      "studentHeight": 170

    }

  ],

  "more": false

}

[root@C03-12U-26 testcontract]# cleos -u https://jungle2.cryptolions.io:443 push action zmcheng12345 update '["zmcheng12345",1,"www","male",12,123]' -p zmcheng12345@active

executed transaction: 765c35452964de54771c3fe505daad272a8a53ec61954a2cc43350f7f84e86e3  128 bytes  213 us

#  zmcheng12345 <= zmcheng12345::update         {"user":"zmcheng12345","id":1,"studentName":"www","studentGender":"male","studentAge":12,"studentHei...

>> update studentwww

warning: transaction executed locally, but may not be confirmed by the network yet         ]

[root@C03-12U-26 testcontract]# cleos -u https://jungle2.cryptolions.io:443 get table zmcheng12345 zmcheng12345 students

{

  "rows": [{

      "id": 0,

      "studentName": "zmcheng",

      "studentGender": "male",

      "studentAge": 25,

      "studentHeight": 170

    },{

      "id": 1,

      "studentName": "www",

      "studentGender": "male",

      "studentAge": 12,

      "studentHeight": 123

    }

  ],

  "more": false

}

[root@C03-12U-26 testcontract]#

[root@C03-12U-26 testcontract]# cleos -u https://jungle2.cryptolions.io:443 push action zmcheng12345 del '["zmcheng12345",1]' -p zmcheng12345@active

executed transaction: 1a64a42ebccac0f9b7061c42a0fa8daaebe7b1a18db1cb058fe479608ee9170a  112 bytes  255 us

#  zmcheng12345 <= zmcheng12345::del            {"user":"zmcheng12345","id":1}

>> Del student1

warning: transaction executed locally, but may not be confirmed by the network yet         ]

[root@C03-12U-26 testcontract]# cleos -u https://jungle2.cryptolions.io:443 get table zmcheng12345 zmcheng12345 students

{

  "rows": [{

      "id": 0,

      "studentName": "zmcheng",

      "studentGender": "male",

      "studentAge": 25,

      "studentHeight": 170

    }

  ],

  "more": false

}
EOS测试链智能合约部署调用的更多相关文章
- Solidity truffle,部署合约到Ropsten测试链或主链,调用合约(转)
Solidity truffle,部署合约到Ropsten测试链或主链,调用合约 转 https://blog.csdn.net/houyanhua1/article/details/89010896 ...
- EOS智能合约开发(四):智能合约部署及调试(附编程示例)
EOS智能合约开发(一):EOS环境搭建和创建节点 EOS智能合约开发(二):EOS创建和管理钱包 EOS智能合约开发(三):EOS创建和管理账号 部署智能合约的示例代码如下: $ cleos set ...
- 使用 Browser-solidity 在 Go-Ethereum1.7.2 上进行简单的智能合约部署
目录 目录 1.基本概念 1.1.什么是智能合约? 1.2.什么是Solidity? 1.2.1.Solidity的语言特性 1.3.什么是 Browser-solidity? 2.Browser-s ...
- EOS之hello智能合约解析
传送门: 柏链项目学院 EOS的智能合约与以太坊区别很大, EOS 的智能合约基于 WebAssembly(WASM) 技术执行用户生成的应用程序和代码.WASM是一项新兴的网络标准,得到了谷歌, ...
- Eos的Wasm智能合约的局限性
官方只支持用C++写智能合约 用C++写智能合约门槛过高,会把许多开发者挡在门外,C++的复杂性也会让智能合约的设计变得困难. Wasm智能合约的效率并不是最优 由于C++最终也是编译成wasm字节码 ...
- Remix+Geth 实现智能合约部署和调用详解
Remix编写智能合约 编写代码 在线调试 实现部署 调用接口 Geth实现私有链部署合约和调用接口 部署合约 调用合约 获得合约实例 通过实例调用合约接口 Remix编写智能合约 编写代码 Remi ...
- 用Java为Hyperledger Fabric(超级账本)开发区块链智能合约链代码之部署与运行示例代码
部署并运行 Java 链代码示例 您已经定义并启动了本地区块链网络,而且已构建 Java shim 客户端 JAR 并安装到本地 Maven 存储库中,现在已准备好在之前下载的 Hyperledger ...
- 区块链入门(5)Truffle 项目实战,Solidity IDE, 智能合约部署
在上一张我们学习了Truffle项目的创建,部署等相关内容,今天我们就来实战一下. 今天我们要做3件事: 1) 学习搭建一个Solidity IDE(Remix). 2) 使用这个Solidity I ...
- 用Java为Hyperledger Fabric(超级账本)编写区块链智能合约链代码
编写第一个 Java 链代码程序 在上一节中,您已经熟悉了如何构建.运行.部署和调用链代码,但尚未编写任何 Java 代码. 在本节中,将会使用 Eclipse IDE.一个用于 Eclipse 的 ...
随机推荐
- MySQL Case--Strict mode与NOT NULL
事故回溯 某业务流程操作为: 1.循环扫描某张待处理请求表,查看是否有请求等待处理. 2.找到待处理请求后,申请相关资源进行处理,并将处理结果插入到处理结果表中. 3.将该请求从待处理请求表中移除. ...
- Python with语句和__enter__、__exit__过程抽取思想
with语句的应用场景 编程中有很多操作都是配套使用的,这种配套的流程可以称为计算过程,Python语言为这种计算过程专门设计了一种结构:with语句.比如文件处理就是这类计算过程的典型代表. 使 ...
- Pyspark中遇到的 java.io.IOException: Not a file 和 pyspark.sql.utils.AnalysisException: 'Table or view not found
最近执行pyspark时,直接读取hive里面的数据,经常遇到几个问题: 1. java.io.IOException: Not a file —— 然而事实上文件是存在的,是 hdfs 的默认路径 ...
- Linux-存储服务之NFS
NFS介绍 官方文档 NFS(Network File System)即网络文件系统,它最大的功能就是通过TCP/IP网络共享资源.在NFS的应用中,本地NFS的客户端应用可以透明地读写位于远端NFS ...
- 51nod 1053 最大M子段和 V2
N个整数组成的序列a[1],a[2],a[3],…,a[n],将这N个数划分为互不相交的M个子段,并且这M个子段的和是最大的.如果M >= N个数中正数的个数,那么输出所有正数的和. 例如:-2 ...
- ms08067 分析与利用
分析 漏洞位于 NetpwPathCanonicalize 函数里面,这个函数的作用在于处理路径中的 ..\ 和 .\ 信息.该函数声明如下: DWORD NetpwPathCanonicalize( ...
- Python开发笔记之-浮点数传输
操作系统 : CentOS7.3.1611_x64 gcc版本 :4.8.5 Python 版本 : 2.7.5 思路如下 : 1.将浮点数a通过内存拷贝,赋值给相同字节的整型数据b: 2.将b转换为 ...
- ActiveMQ基础
消息队列的作用 为什么使用ActiveMQ,不使用其他工具 下载安装包并启动 http://localhost:8161/admin/ (账号:admin:admin) Java实现步骤: // 1. ...
- Windows 2008R2 安装PostgreSQL 11.6
前些天在CentOS 7.5 下安装了PostgreSQL 11.6.除了在无外网环境下需要另外配置之外,其他没有什么差别.今天主要写一下在Windows下面安装PostgreSQL的问题. 在官网看 ...
- python 数据分析
pandas 格式化数据的读取 numpy 提供数组处理,类似matlap matplotlib 数据可视化 https://www.cnblogs.com/5poi/p/7148000.html