Spring Security 入门—内存用户验证
简介
作为 Spring 全家桶组件之一,Spring Security 是一个提供安全机制的组件,它主要解决两个问题:
- 认证:验证用户名和密码;
- 授权:对于不同的 URL 权限不一样,只有当认证的用户拥有某个 URL 的需要的权限时才能访问。
Spring Security 底层使用的是过滤器,针对 URL 进行的拦截,对应到 Java 中也就是类; 因此被称为粗粒度授权验证,就是验证 URL ,当前用户是否有这个 URL 的权限。
入门
创建项目
使用 Idea 创建 Spring Boot 项目,勾选需要的组件:
- Spring Web
- Spring Security
或者创建项目后添加依赖:
<dependency>

    <groupId>org.springframework.boot</groupId>

    <artifactId>spring-boot-starter-security</artifactId>

</dependency>

<dependency>

    <groupId>org.springframework.boot</groupId>

    <artifactId>spring-boot-starter-web</artifactId>

</dependency>
这里使用的是 JSP 作为模板,有关如何在 Spring Boot 中使用 JSP 作为模板请访问:https://www.cnblogs.com/cloudfloating/p/11787222.html
WebSecurityConfig
package top.cloudli.demo.security;

import org.springframework.context.annotation.Configuration;

import org.springframework.security.config.annotation.authentication.builders.AuthenticationManagerBuilder;

import org.springframework.security.config.annotation.method.configuration.EnableGlobalMethodSecurity;

import org.springframework.security.config.annotation.web.builders.HttpSecurity;

import org.springframework.security.config.annotation.web.configuration.EnableWebSecurity;

import org.springframework.security.config.annotation.web.configuration.WebSecurityConfigurerAdapter;

import org.springframework.security.crypto.bcrypt.BCryptPasswordEncoder;

import org.springframework.security.crypto.password.PasswordEncoder;

@Configuration

@EnableWebSecurity

@EnableGlobalMethodSecurity(prePostEnabled=true)

public class SecurityConfig extends WebSecurityConfigurerAdapter {

    @Override

    protected void configure(AuthenticationManagerBuilder auth) throws Exception {

        PasswordEncoder encoder = new BCryptPasswordEncoder();

        auth.inMemoryAuthentication()

                .passwordEncoder(encoder)

                .withUser("root")

                .password(encoder.encode("root@123456"))

                .roles("ROOT", "USER")

                .and()

                .withUser("user")

                .password(encoder.encode("user@123456"))

                .roles("USER");

    }

    @Override

    protected void configure(HttpSecurity http) throws Exception {

        http.authorizeRequests()

                .antMatchers("/css/**")

                .permitAll()        // css 不用验证

                .anyRequest()

                .authenticated()    // 其它页面全部需要验证

                .and()

                .formLogin()        // 使用默认登录页面

                .and()

                .exceptionHandling()

                .accessDeniedPage("/401")   // 无权限时跳转的页面

                .and()

                .logout();

    }

}
@EnableWebSecurity注解启用验证;@EnableGlobalMethodSecurity(prePostEnabled=true)注解允许我们在控制器的方法中使用@PreAuthorize实现权限分割。
此处创建了两个用户并保存在内存中,分别是拥有 ROOT 和 USER 权限的 root 用户和仅拥有 USER 权限的 user 用户。
fromLogin() 方法可以接着调用 loginPage() 指定一个自定义登录页面,这里使用的是默认登录页面。
编写页面
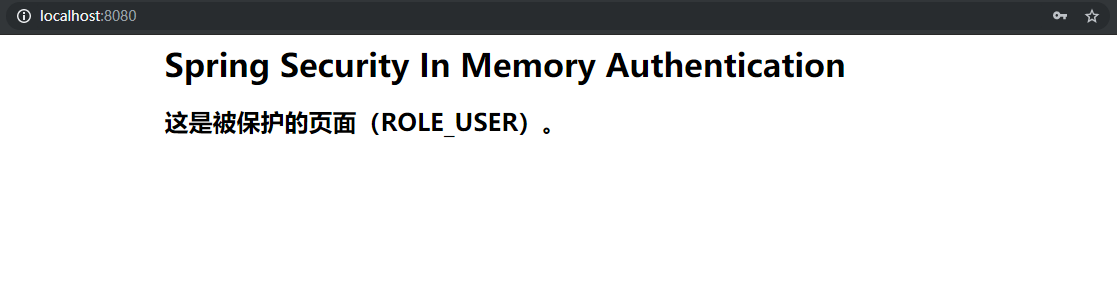
1.index.jsp,所有通过验证的用户都可以访问:
<%--

  任何通过验证的用户都能访问的页面

--%>

<%@ page contentType="text/html;charset=UTF-8" language="java" %>

<html>

<head>

    <title>Spring Security Demo Application</title>

    <link rel="stylesheet" type="text/css" href="css/style.css">

</head>

<body>

<div class="content">

    <h1>Spring Security In Memory Authentication</h1>

    <h2>这是被保护的页面(ROLE_USER)。</h2>

</div>

</body>

</html>
2.root.jsp,只有拥有 ROOT 权限的用户能访问:
<%--

  需要 ROLE_ROOT 才能访问的页面

--%>

<%@ page contentType="text/html;charset=UTF-8" language="java" %>

<html>

<head>

    <title>Root Page</title>

    <link rel="stylesheet" type="text/css" href="css/style.css">

</head>

<body>

<div class="content">

    <h1>Root Page</h1>

    <h2>你正在访问受保护的页面(ROLE_ROOT)。</h2>

</div>

</body>

</html>
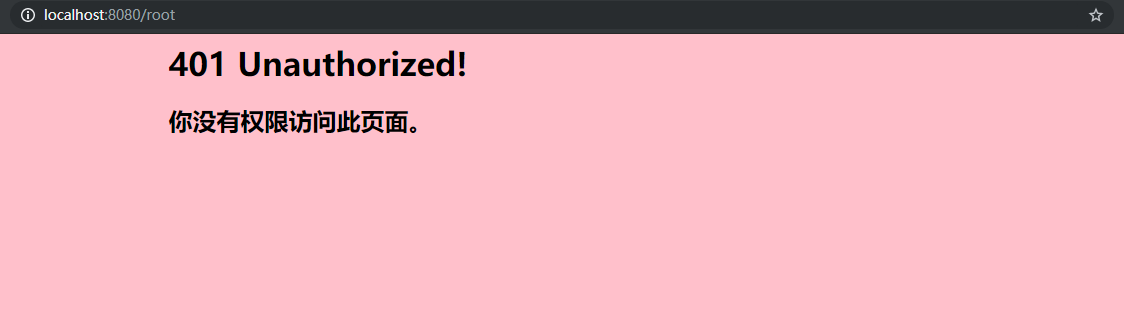
3.401.jsp,没有权限时跳转的页面:
<%--

  权限不够时跳转的页面

--%>

<%@ page contentType="text/html;charset=UTF-8" language="java" %>

<html>

<head>

    <title>401 Unauthorized</title>

    <link rel="stylesheet" type="text/css" href="css/style.css">

</head>

<body class="error">

<div class="content">

    <h1>401 Unauthorized!</h1>

    <h2>你没有权限访问此页面。</h2>

</div>

</body>

</html>
控制器
package top.cloudli.demo.controller;

import org.springframework.security.access.prepost.PreAuthorize;

import org.springframework.stereotype.Controller;

import org.springframework.web.bind.annotation.GetMapping;

@Controller

public class DemoController {

    @PreAuthorize("hasAnyAuthority('ROLE_USER')")

    @GetMapping("/")

    public String index() {

        return "index";

    }

    @PreAuthorize("hasAnyAuthority('ROLE_ROOT')")

    @GetMapping("/root")

    public String root() {

        return "root";

    }

    @GetMapping("/401")

    public String accessDenied() {

        return "401";

    }

}
@PreAuthorize 注解指定了访问页面所需要的权限,这里的权限要加上 ROLE_ 前缀。
Run
访问 http://localhost:8080/ 将进入登录页面(这里使用的是 Spring Security 的默认登录页面):

使用刚才创建的内存用户 user 登录后将返回 index 页面:
访问 http://localhost:8080/root,由于 user 用户没有 ROLE_ROOT 权限,跳转到 401 页面:
访问 http://localhost:8080/logout 将进入默认登出页面:
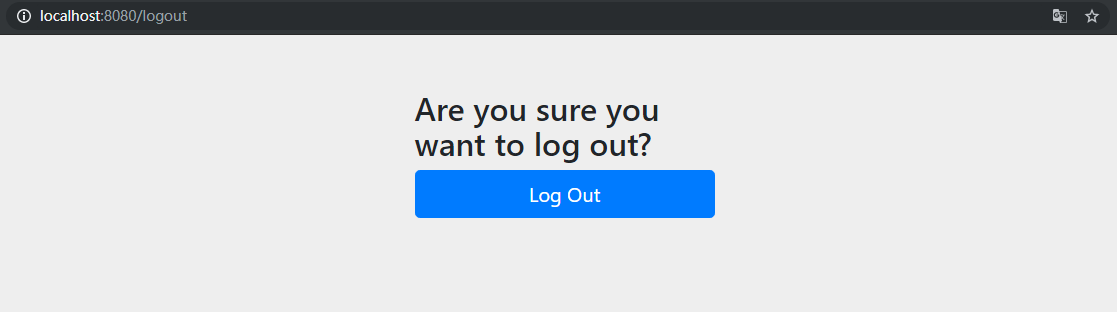
这里的登录和登出页面均可以使用自定义页面,只需要在自定义的页面中把数据通过 PSOT 请求提交到 /login 或 /logout 即可完成登录和登出。
Spring Security 入门—内存用户验证的更多相关文章
- Spring security 浅谈用户验证机制
step1:首先ApplicationUserDetailsService需要实现UserDetailsService接口(在 org.springframework.security.core.us ...
- 030 SSM综合练习06--数据后台管理系统--SSM权限操作及Spring Security入门
1.权限操作涉及的三张表 (1)用户表信息描述users sql语句: CREATE TABLE users ( id ) DEFAULT SYS_GUID () PRIMARY KEY, email ...
- SpringBoot集成Spring Security入门体验
一.前言 Spring Security 和 Apache Shiro 都是安全框架,为Java应用程序提供身份认证和授权. 二者区别 Spring Security:重量级安全框架 Apache S ...
- Spring Security 入门(基本使用)
Spring Security 入门(基本使用) 这几天看了下b站关于 spring security 的学习视频,不得不说 spring security 有点复杂,脑袋有点懵懵的,在此整理下学习内 ...
- Spring security 获取当前用户
spring security中当前用户信息 1:如果在jsp页面中获取可以使用spring security的标签库 在页面中引入标签 1 <%@ taglib prefix=" ...
- Spring Security 入门(1-7)Spring Security - Session管理
参考链接:https://xueliang.org/article/detail/20170302232815082 session 管理 Spring Security 通过 http 元素下的子元 ...
- Spring Security 入门(1-3-1)Spring Security - http元素 - 默认登录和登录定制
登录表单配置 - http 元素下的 form-login 元素是用来定义表单登录信息的.当我们什么属性都不指定的时候 Spring Security 会为我们生成一个默认的登录页面. 如果不想使用默 ...
- Spring Security入门(2-3)Spring Security 的运行原理 4 - 自定义登录方法和页面
参考链接,多谢作者: http://blog.csdn.net/lee353086/article/details/52586916 http元素下的form-login元素是用来定义表单登录信息的. ...
- Spring Security默认的用户登录表单 页面源代码
Spring Security默认的用户登录表单 页面源代码 <html><head><title>Login Page</title></hea ...
随机推荐
- 【IPHONE开发-OBJECTC入门学习】对象的归档和解归档
转自:http://blog.csdn.net/java886o/article/details/9046967 #import <Foundation/Foundation.h> #im ...
- 结对编程-python实现
目录 软件工程结对项目:Python实现wc程序 结对项目Github地址 项目成员 项目要求 说明 需求 PSP表格 解题思路描述 设计实现 代码组织图 代码分析 代码覆盖率 测试 单元测试 回归测 ...
- centos6.8下hadoop3.1.1完全分布式安装指南
前述:这篇文档是建立在三台虚拟机相互ping通,防火墙关闭,hosts文件修改,SSH 免密码登录,主机名修改等的基础上开始的. 一.传入文件 1.创建安装目录 mkdir /usr/local/so ...
- 使用redis实现程序或者服务的高可用
使用redis实现程序或者服务的高可用,就是将某一程序或服务部署在不同服务器上,或者是跨机房部署,当运行服务的服务器挂了之后,其他服务器上的该服务能立马顶上,这里我简单的使用redis实现这一目的. ...
- pytest中怎么实现参数化?
我们在组自动化项目中,肯定会遇到需要数据驱动的地方,在unittest中我们直接采用ddt的方式,但是在pytest中我们不能用ddt来实现,所以我们采用了参数化的方式来实现 那么具体怎么完成这个参数 ...
- Rust中的结构体及方法语法
这个可以和类作比较,或是go当中的方法比较. #[derive(Debug)] struct Rectangle { width: u32, height: u32, } impl Rectangle ...
- pdfium sdk调用方式
FPDF_InitLibrary(NULL); FPDF_CreateNewDocument(); FPDF_DestroyLibrary();
- Qt工程管理
Qt Creator工程管理Qt Creator以工程项目的方式对源码进行管理一个Qt Creator工程包含不同类型的文件 .pro项目描述文件.pro.user用户配置描述文件 //由Qt Cre ...
- 代码审计-md5加密相等绕过
<?php $md51 = md5('QNKCDZO'); $a = @$_GET['a']; $md52 = @md5($a); if(isset($a)){ if ($a != 'QNKCD ...
- socket缓冲区以及阻塞模式(七)
一.socket缓冲区 每个 socket 被创建后,都会分配两个缓冲区,输入缓冲区和输出缓冲区. 以下用write()/send()表示写数据/发送数据,read()/recv() 表示读数据/接收 ...