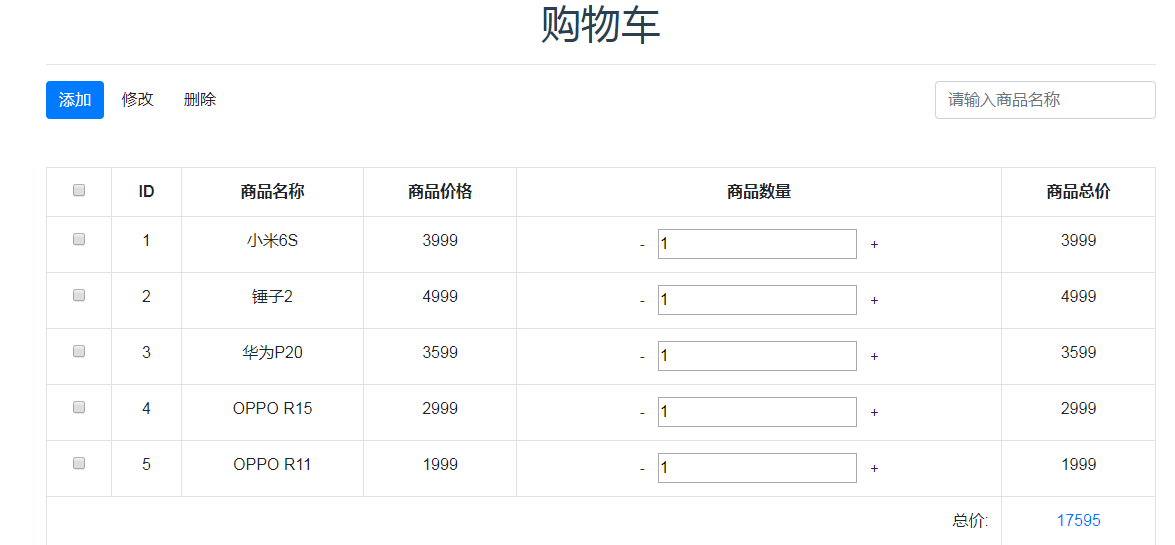
Vue+Bootstrap实现购物车程序(3)
效果展示:(说明:使用webpack重构购物车程序,使用vue-cli生成项目脚手架)
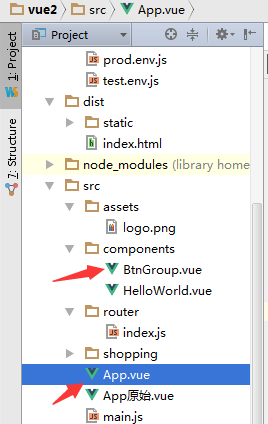
文件结构:
代码:
(1)将原来编写的btn-grp组件单独编写到BtnGrp.vue文件中
可以看到现在代码清晰了很多,template标签部分编写模板,script标签部分编写组件的交互代码,编写方式和原先写在HTML的代码一致
现在整个前端应用都是基于组件化的,代码变得更加清晰了
<!--vue组件-->

<template>

    <div style="float:right;">

      <input class="form-control"

             v-model="searchProduct"

             @keyup.enter="filterProduct"

             type="text"

             placeholder="请输入商品名称"/>

    </div>

</template>

<script type="application/javascript">

//    import App from '../App';

    export default{

      name:"BtnGroup",

      props:['products'],

      data:function(){

        return {

          searchProduct:''

        }

      },

      methods:{

        /* 商品筛选 */

        filterProduct:function(){

//          console.log(this.$parent.products)

          var searchArr = [];

          for(let i=;i<this.$parent.products.length;i++){

            searchArr.push(this.$parent.products[i].name)

          }

          var searchIndex = searchArr.indexOf(this.searchProduct);

          if(searchIndex !== -){

            this.$parent.products = this.$parent.products.filter(function(element, index, self){

              /* element数组元素、index元素索引、self数组本身 */

              return index == searchIndex;

            })

          }else{

            alert('暂无符合商品');

          }

        }

      }

    }

//    module.exports = BtnGroup;

//    export default BtnGroup;

//  export default {

//    props: ['buttons']

//  }

</script>

<!-- Add "scoped" attribute to limit CSS to this component only -->

<!--翻译:添加“scoped”属性以仅将CSS限制为此组件-->

<style type="text/css" scoped>

</style>
(2)将原来写在HTML中的代码重构到App.vue中
此处因为需要用到BtnGrp组件,所以需要先import 组件,然后在components中引用该组件
<!--主页组件-->

<template>

  <div id="app" class="container">

    <h1>购物车</h1>

    <hr>

    <!--<BtnGroup v-bind:buttons="buttons"></BtnGroup>-->

    <div style="overflow: hidden">

      <div style="float: left">

        <button type="button" v-on:click="addHandler" class="btn btn-primary">添加</button>

        <button type="button" v-on:click="changeHandler" class="btn btn-default">修改</button>

        <button type="button" v-on:click="delateHandler" class="btn btn-default">删除</button>

      </div>

      <BtnGroup :products="products"></BtnGroup>

    </div>

    <br>

    <br>

    <table class="table table-bordered table-striped table-hover">

      <tr>

        <td><input type="checkbox" v-on:click="selectAll" name="selectAllBtn" v-model="selectAllState"/></td>

        <th>ID</th>

        <th>商品名称</th>

        <th>商品价格</th>

        <th>商品数量</th>

        <th>商品总价</th>

      </tr>

      <tr v-for="(product,index) in products">

        <td>

          <input type="checkbox" v-on:click="checkItem(product)" v-model="product.state" name="checkbox" />

        </td>

        <td>{{index+}}</td>

        <td>{{product.name}}</td>

        <td>{{product.price}}</td>

        <td>

          <!--可以将两个按钮的方法合成一个,通过传参-->

          <!--<button @click="changeCount(prod, -1)">-</button>-->

          <button @click="cutCount(product)" class="btn btn-default btn-sm">-</button>

          <input type="number" v-model="product.count"/>

          <!--<button @click="changeCount(prod, 1)">-</button>-->

          <button @click="addCount(product)" class="btn btn-default btn-sm">+</button>

        </td>

        <td>{{product.price * product.count}}</td>

      </tr>

      <tr>

        <!--text-right排版文本右对齐-->

        <td colspan="" class="text-right">总价:</td>

        <!--text-primary辅助类文本-->

        <td class="text-primary">{{totalMoney}}</td>

      </tr>

    </table>

  </div>

</template>

<script>

  /* eslint-disable no-new */

  import 'bootstrap/dist/css/bootstrap.min.css'

  import BtnGroup from './components/BtnGroup'

  export default{

    name: 'App',

    components: {BtnGroup},

    data:function(){

      return{

        products: [

          {

            name: '小米6S',

            price: ,

            count: ,

            state:false

          },

          {

            name: '锤子2',

            price: ,

            count: ,

            state:false

          },

          {

            name: '华为P20',

            price: ,

            count: ,

            state:false

          },

          {

            name: 'OPPO R15',

            price: ,

            count: ,

            state:false

          },

          {

            name: 'OPPO R11',

            price: ,

            count: ,

            state:false

          },

        ],

        selectAllState:false

        /*

          注意:这里修正下,页面里的死数据,操作类的直接写好即可,不用遍历数据获取。

          只有页面中的展示信息即动态设置

         */

        /*

        buttons:[

          {title:'添加',class:'btn-primary',handler:function(){alert('点击添加按钮')}},

          {title:'修改',class:'btn-default',handler:function(){alert('点击修改按钮')}},

          {title:'删除',class:'btn-default',handler:function(){

            for(let i =0;i<app.data().products.length;i++){

//              console.log(app.data().products[i].state)

              if(app.data().products[i].state){

                app.data().products.splice(i,1);

                i--;

              }

            };

            全选按钮状态清空

            document.querySelectorAll('input[name="selectAllBtn"]')[0].checked = false;

          }}

        ]

  */

      }

    },

    methods:{

      // 用户点击加减数量时调用

      cutCount:function(product){

        if(product.count>){

          product.count--

        }else{

          alert('商品数量不能小于0')

        }

      },

      addCount:function(product){

        product.count++

      },

      checkItem:function(product){

        product.state = !product.state;

      },

      selectAll:function() {

        var checkObj = document.querySelectorAll('input[name="checkbox"]'); // 获取所有checkbox项

        if (event.target.checked) {

          // 点击全选事件

          for (var i = ; i < checkObj.length; i++) {

            checkObj[i].checked = true;//选中样式

            this.products[i].state = true;//动态改变值,供删除用

          }

        } else {

          for (var i = ; i < checkObj.length; i++) {

            checkObj[i].checked = false;

            this.products[i].state = false;

          }

        }

      },

      /*添加 */

      addHandler:function(){

        alert("点击添加按钮")

      },

      /* 修改 */

      changeHandler:function(){

        alert("点击修改按钮")

      },

      /* 删除 */

      delateHandler:function(){

        for(let i=;i<this.products.length;i++){

          if(this.products[i].state){

            this.products.splice(i,);

            i--;

          }

        }

         /* 注意:vue里尽量避免DOM操作。所有的操作都是数据驱动 */

        this.selectAllState = false;//还原全选按钮状态

      }

    },

    computed:{

      totalMoney:function(){

        var price = ;

        for(var i = ; i < this.products.length; ++i) {

          price += parseFloat(this.products[i].price * this.products[i].count);

        }

        return price;

      }

    }

  }

//  module.exports = App;

//  export default app;

</script>

<style>

  #app {

    font-family: 'Avenir', Helvetica, Arial, sans-serif;

    -webkit-font-smoothing: antialiased;

    -moz-osx-font-smoothing: grayscale;

    text-align: center;

    color: #2c3e50;

    margin-top: 60px;

  }

</style>
Vue+Bootstrap实现购物车程序(3)的更多相关文章
- Vue+Bootstrap实现购物车程序(2)
先简单看下效果图:(在原先基础上添加了删除和筛选操作) 代码: <!DOCTYPE html> <html> <head lang="en"> ...
- Vue+Bootstrap实现购物车程序(1)
先看下案例效果:(简单的数量控制及价格运算) 代码: <!DOCTYPE html> <html> <head lang="en"> <m ...
- vue.js实现购物车功能
购物车是电商必备的功能,可以让用户一次性购买多个商品,常见的购物车实现方式有如下几种: 1. 用户更新购物车里的商品后,页面自动刷新. 2. 使用局部刷新功能,服务器端返回整个购物车的页面html 3 ...
- 基于 Vue BootStrap的迷你Chrome插件
代码地址如下:http://www.demodashi.com/demo/14306.html 安装 安装 Visual Studio Code 和Chrome, 自行FQ 详细安装这里略过 安装包管 ...
- 用vue.js实现购物车功能
购物车是电商必备的功能,可以让用户一次性购买多个商品,常见的购物车实现方式有如下几种: 1. 用户更新购物车里的商品后,页面自动刷新. 2. 使用局部刷新功能,服务器端返回整个购物车的页面html 3 ...
- 利用JSP编程技术实现一个简单的购物车程序
实验二 JSP编程 一.实验目的1. 掌握JSP指令的使用方法:2. 掌握JSP动作的使用方法:3. 掌握JSP内置对象的使用方法:4. 掌握JavaBean的编程技术及使用方法:5. 掌握JSP ...
- 简单购物车程序(Python)
#简单购物车程序:money_all=0tag=Trueshop_car=[]shop_info={'apple':10,'tesla':100000,'mac':3000,'lenovo':3000 ...
- vue项目向小程序迁移调研
概述 今天调研了一下vue项目怎么向小程序迁移,有些心得,记录下来,供以后开发时参考,相信对其他人也有用. 基本上vue项目向小程序迁移不外乎2种方法,一种是用小程序的web-view组件,另一种是用 ...
- python学习:购物车程序
购物车程序 product_list = [ ('mac',9000), ('kindle',800), ('tesla',900000), ('python book',105), ('bike', ...
随机推荐
- BZOJ_1511_[POI2006]OKR-Periods of Words_KMP
BZOJ_1511_[POI2006]OKR-Periods of Words_KMP Description 一个串是有限个小写字符的序列,特别的,一个空序列也可以是一个串. 一个串P是串A的前缀, ...
- python的termcolor模块
termcolor是一个python包,可以改变控制台输出的颜色,支持各种terminal(WINDOWS的cmd.exe除外). 它支持下列的文字颜色: grey, red, green, yell ...
- Lightoj 1068(数位DP)
求一段区间中被k整除,各个位数相加之和被k整除的数的个数. 这不是重点,重点是k太大了,最大值有10000,所以不能直接开那么大的数组. 仔细分析一下可以发现,由于数最大是2的31次方(2147483 ...
- 【415】C语言文件读写
A program can open and close, and read from, and write to, a file that is defined by the user This i ...
- linuxmint17.3提示flash不是最新版本解决方法(copy)
[资料来自于:http://blog.csdn.net/kh896424665/article/details/54879608] 问题:播放视频提示:Adobe Flash Player 不是最新版 ...
- UIBC 小註解(转载)
转自:http://www.cash.idv.tw/wordpress/?p=7942 UIBC 是指 User Input Back Channel, 用在 WIFI Display 的情境之下. ...
- centos6中office及中文输入法安装 (转载)
原创作品,允许转载,转载时请务必以超链接形式标明文章 原始出处 .作者信息和本声明.否则将追究法律责任.http://xuxuezhe.blog.51cto.com/1636138/73 ...
- poj 2987 Firing【最大权闭合子图+玄学计数 || BFS】
玄学计数 LYY Orz 第一次见这种神奇的计数方式,乍一看非常不靠谱但是仔细想想还卡不掉 就是把在建图的时候把正权变成w*10000-1,负权变成w*10000+1,跑最大权闭合子图.后面的1作用是 ...
- bzoj 4555: [Tjoi2016&Heoi2016]求和【NTT】
暴力推式子推诚卷积形式,但是看好多blog说多项式求逆不知道是啥.. \[ \sum_{i=0}^{n}\sum_{j=0}^{n}S(i,j)*2^j*j! \] \[ S(i,j)=\frac{1 ...
- 洛谷P1505 [国家集训队]旅游(树剖+线段树)
传送门 这该死的码农题…… 把每一条边变为它连接的两个点中深度较浅的那一个,然后就是一堆单点修改/路径查询,不讲了 这里就讲一下怎么搞路径取反,只要打一个标记就好了,然后把区间和取反,最大最小值交换然 ...