
hadoop2-elasticsearch的安装
本文主要讲elasticsearch-2.2.1的安装过程。
准备工作:
1.搭建虚拟机
你需要先参考
把你的虚拟机搭建起来-hadoop环境可以先不用搭建(完成步骤1到步骤8)
2.下载elasticsearch包
这里我搭建的是4台虚拟机(node1,node2,node3,node4)
elasticsearch 只允许普通用户操作,不允许root用户操作
--1.关闭防火墙

service iptables stop

--2.创建用户elsearch

useradd elsearch

--3.给用户elsearch设置密码

passwd elsearch

--4.在/opt目录下面创建elsearch/es/目录

mkdir /opt/elsearch/es/

--5.进入到/opt目录下面

cd /opt/

--6.把elsearch目录以及里面的子目录的权限设置为elsearch

chown -R elsearch:elsearch elsearch

--此时,/elsearch, /elsearch/es的权限都应该为elsearch

--7.切换用户到elsearch

su elsearch
此时,所有节点都应该是elsearch用户,而不是root用户。
现在去到node1节点上面进行操作
--此时,在node1上面操作

--1.此时,我们就可以把下载好的elasticsearch-2.2.1.tar.zip文件上传到node1下面的/opt/elsearch/es/

--2.解压/opt/elsearch/es/elasticsearch-2.2.1.tar.zip文件

cd /opt/elsearch/es/

unzip elasticsearch-2.2.1.tar.zip

--3.修改配置文件

cd /opt/elsearch/es/elasticsearch-2.2.1/conf/

vi elasticsearch.yml

# ======================== Elasticsearch Configuration =========================

#

# NOTE: Elasticsearch comes with reasonable defaults for most settings.

#       Before you set out to tweak and tune the configuration, make sure you

#       understand what are you trying to accomplish and the consequences.

#

# The primary way of configuring a node is via this file. This template lists

# the most important settings you may want to configure for a production cluster.

#

# Please see the documentation for further information on configuration options:

# <http://www.elastic.co/guide/en/elasticsearch/reference/current/setup-configuration.html>

#

# ---------------------------------- Cluster -----------------------------------

#

# Use a descriptive name for your cluster:

#

cluster.name: elsearch-app

#

# ------------------------------------ Node ------------------------------------

#

# Use a descriptive name for the node:

#

node.name: node1

#

# Add custom attributes to the node:

#

# node.rack: r1

#

# ----------------------------------- Paths ------------------------------------

#

# Path to directory where to store the data (separate multiple locations by comma):

#

# path.data: /path/to/data

#

# Path to log files:

#

# ----------------------------------- Memory -----------------------------------

#

# Lock the memory on startup:

#

# bootstrap.mlockall: true

#

# Make sure that the `ES_HEAP_SIZE` environment variable is set to about half the memory

# available on the system and that the owner of the process is allowed to use this limit.

#

# Elasticsearch performs poorly when the system is swapping the memory.

#

# ---------------------------------- Network -----------------------------------

#

# Set the bind address to a specific IP (IPv4 or IPv6):

#

network.host: 192.168.79.138

#

# Set a custom port for HTTP:

#

http.port: 9200

#

# For more information, see the documentation at:

# <http://www.elastic.co/guide/en/elasticsearch/reference/current/modules-network.html>

#

#

# discovery.zen.ping.unicast.hosts: ["host1", "host2"]

#

# Prevent the "split brain" by configuring the majority of nodes (total number of nodes / 2 + 1):

#

# discovery.zen.minimum_master_nodes: 3

#

# For more information, see the documentation at:

# <http://www.elastic.co/guide/en/elasticsearch/reference/current/modules-discovery.html>

#

# ---------------------------------- Gateway -----------------------------------

#

# Block initial recovery after a full cluster restart until N nodes are started:

#

# gateway.recover_after_nodes: 3

#

# For more information, see the documentation at:

# <http://www.elastic.co/guide/en/elasticsearch/reference/current/modules-gateway.html>

#

# ---------------------------------- Various -----------------------------------

#

# Disable starting multiple nodes on a single system:

#

# node.max_local_storage_nodes: 1

#

# Require explicit names when deleting indices:

#

# action.destructive_requires_name: true

discovery.zen.ping.multicast.enabled: false

discovery.zen.ping.unicast.hosts: ["192.168.79.138","192.168.79.139", "192.168.79.140","192.168.79.141"]

discovery.zen.ping_timeout: 120s

client.transport.ping_timeout: 60s

:wq

--4.然后从node1分发到其他节点(node2, node3, node4)的相同目录

cd /opt/elsearch/es

scp -r ./elasticsearch-2.2.1 elsearch@node2:/opt/elsearch/es

scp -r ./elasticsearch-2.2.1 elsearch@node3:/opt/elsearch/es

scp -r ./elasticsearch-2.2.1 elsearch@node4:/opt/elsearch/es
接下来在node2,node3,node4上面进行操作
--分别修改node2,node3,node4上面的配置文件

cd /opt/elsearch/es/elasticsearch-2.2.1/conf/

vi elasticsearch.yml

--修改两个地方

--1.node.name: node1

--2.network.host: 192.168.79.138

--修改为和下面相对应,然后保存

192.168.79.138 node1

192.168.79.139 node2

192.168.79.140 node3

192.168.79.141 node4
最后,在所有节点(node1,node2,node3,node4)上面进行操作
--启动elasticsearch

cd /opt/elsearch/es/elasticsearch-2.2.1/bin

./elasticsearch
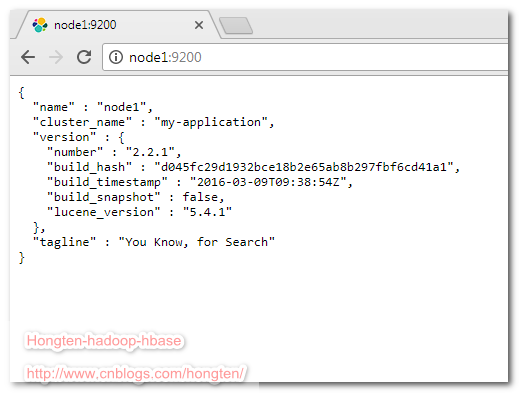
打开浏览器,输入:node1:9200可以看见一下效果
添加插件elasticsearch-head
把下载好的插件重命名为
head
然后添加到所有节点(node1,node2,node3,node4)的
/opt/elsearch/es/elasticsearch-2.2.1/plugins
目录。
然后重启所有节点。
--启动elasticsearch

cd /opt/elsearch/es/elasticsearch-2.2.1/bin

./elasticsearch
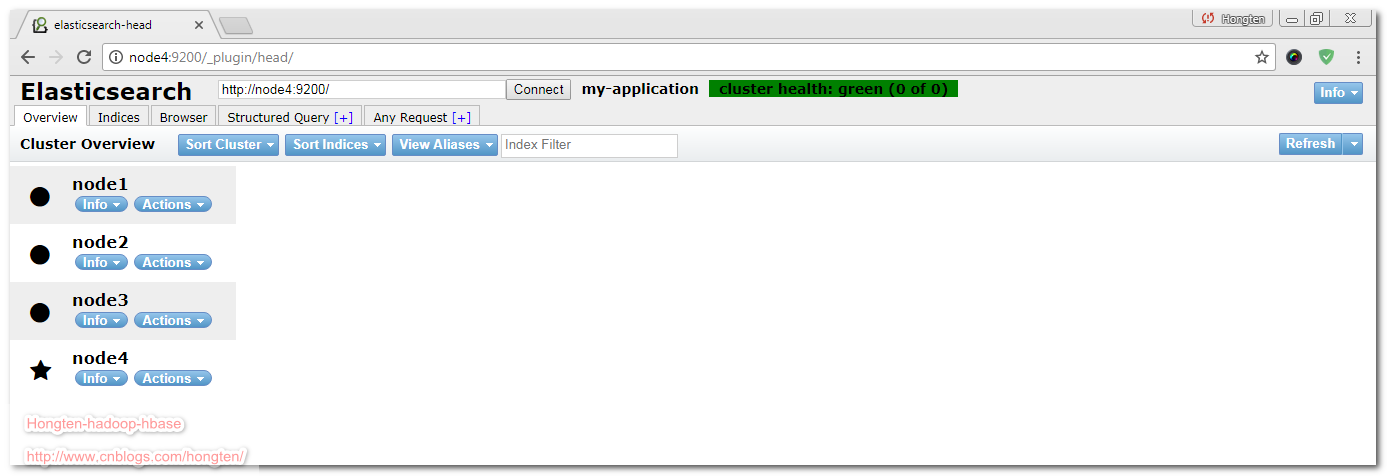
效果如下:
了解更多:elasticsearch-head
========================================================
More reading,and english is important.
I'm Hongten

大哥哥大姐姐,觉得有用打赏点哦!你的支持是我最大的动力。谢谢。
Hongten博客排名在100名以内。粉丝过千。
Hongten出品,必是精品。
E | hongtenzone@foxmail.com B | http://www.cnblogs.com/hongten
========================================================
hadoop2-elasticsearch的安装的更多相关文章
- 如何在Elasticsearch中安装中文分词器(IK+pinyin)
如果直接使用Elasticsearch的朋友在处理中文内容的搜索时,肯定会遇到很尴尬的问题--中文词语被分成了一个一个的汉字,当用Kibana作图的时候,按照term来分组,结果一个汉字被分成了一组. ...
- Linux Hadoop2.7.3 安装(单机模式) 一
Linux Hadoop2.7.3 安装(单机模式) 一 Linux Hadoop2.7.3 安装(单机模式) 二 java环境安装 http://www.cnblogs.com/zeze/p/590 ...
- Apache Hadoop2.x 边安装边入门
完整PDF版本:<Apache Hadoop2.x边安装边入门> 目录 第一部分:Linux环境安装 第一步.配置Vmware NAT网络 一. Vmware网络模式介绍 二. NAT模式 ...
- Linux Hadoop2.7.3 安装(单机模式) 二
Linux Hadoop2.7.3 安装(单机模式) 一 Linux Hadoop2.7.3 安装(单机模式) 二 YARN是Hadoop 2.0中的资源管理系统,它的基本设计思想是将MRv1中的Jo ...
- Hadoop2.6.0安装 — 集群
文 / vincentzh 原文连接:http://www.cnblogs.com/vincentzh/p/6034187.html 这里写点 Hadoop2.6.0集群的安装和简单配置,一方面是为自 ...
- elasticsearch rpm 安装
参考:http://www.elasticsearch.org/guide/en/elasticsearch/reference/current/setup-repositories.html Dow ...
- Linux初学 - Elasticsearch环境安装
下载 https://www.elastic.co/downloads/elasticsearch 安装 rpm -ivh 也可以双击rpm包安装 修改elastaticsearch host配置 修 ...
- Hadoop第3周练习--Hadoop2.X编译安装和实验
作业题目 位系统下进行本地编译的安装方式 选2 (1) 能否给web监控界面加上安全机制,怎样实现?抓图过程 (2)模拟namenode崩溃,例如将name目录的内容全部删除,然后通过secondar ...
- hadoop2.7.1安装
Hadoop2.7.1安装与配置 http://www.oschina.net/question/117352_247251 http://www.cnblogs.com/wayne1017/arch ...
- centos 6.7下 elasticsearch的安装
1.下载elasticsearch的安装包,用ftp上传到linux系统下目录中,如在当前用户root的目录下新建目录elasticsearch,放入安装包 不要忘了添加执行权限 chmod +x * ...
随机推荐
- C#中 将图片保存到Sql server 中
private void Form1_Load(object sender, EventArgs e) { #region 保存数据库 string url = @"C:\Users\Adm ...
- 查询SQL Server执行过的SQL语句
SELECT TOP 1000 ST.text AS '执行的SQL语句', QS.execution_count AS '执行次数', QS.total_ ...
- js变量类型和计算
# js入门基础-变量类型和计算 ` --首先由于我使用了一个不太合格的markdown来编写来文章,所以在移动端阅读不要太方便,建议移动端使用横屏模式或pc端阅读,当然如果你有平板那是最好的. -- ...
- python爬虫之xpath的基本使用
一.简介 Xpath是一门在XML文档中查找信息的语言.Xpath可用来在XML文档中对元素和属性进行遍历.Xpath是W3C XSLT标准的主要元素,并且XQuery和XPointer都构建于XPa ...
- 2019 icpc南昌全国邀请赛-网络选拔赛J题 树链剖分+离线询问
链接:https://nanti.jisuanke.com/t/38229 题意: 给一棵树,多次查询,每次查询两点之间权值<=k的边个数 题解: 离线询问,树链剖分后bit维护有贡献的位置即可 ...
- I - Beautiful People ZOJ - 2319 (二分法)
The most prestigious sports club in one city has exactly N members. Each of its members is strong an ...
- 高可用Redis(三):Hash类型
1.哈希类型键值结构 哈希类型也是key-value结构,key是字符串类型,其value分为两个部分:field和value 其中field部分代表属性,value代表属性对应的值 上面的图里,us ...
- 关于mvc中传递匿名对象,view中无法解析
最近做项目用到MVC,发现用linq查询得到的数据是匿名类型对象,通过模型绑定.或者ViewBag.ViewData进行数据传递后,View解析报错:“object 未包含xx的定义”: 没找到好的解 ...
- java PageHelper 分页插件出现 Cause: com.mysql.jdbc.exceptions.jdbc4.MySQLSyntaxErrorException: Duplicate column name 'Id' 错误
情景: Mapper.xml定义连表查询,如果sql的字段名中有sql关键字,会导致PageHelper插件出现 com.mysql.jdbc.exceptions.jdbc4.MySQLSyntax ...
- maven问题解决:提示maven依赖包缺失,但是去文件夹下找确实有这个包
出现问题:提示maven依赖包缺失,但是去文件夹下找确实有这个包. (我的操作就是:删除文件夹中的jar.重新update,) 搞了好多遍,工具总是提示错误信息,没办法,请求大神 操作大概过程: 1 ...