
CentOS7用yum快速搭建LAMP平台
实验环境:
[root@nmserver-7 html]# cat  /etc/redhat-release

CentOS release 7.3.1611 (AltArch)

[root@nmserver-7 html]# uname -a

Linux nmserver-7.test.com 3.10.0-514.el7.centos.plus.i686 #1 SMP Wed Jan 25 12:55:04 UTC 2017 i686 i686 i386 GNU/Linux
1、安装apache
1.1 安装apache
[root@nmserver-7 ~]# yum install httpd httpd-devel
1.2 启动apache服务
[root@nmserver-7 ~]# systemctl start httpd
1.3 设置httpd服务开机启动
[root@nmserver-7 ~]# systemctl enable  httpd

Created symlink from /etc/systemd/system/multi-user.target.wants/httpd.service to /usr/lib/systemd/system/httpd.service.
1.4 查看服务状态

[root@nmserver-7 ~]# systemctl status httpd

● httpd.service - The Apache HTTP Server

   Loaded: loaded (/usr/lib/systemd/system/httpd.service; enabled; vendor preset: disabled)

   Active: active (running) since 五 2017-07-21 17:21:37 CST; 6min ago

     Docs: man:httpd(8)

           man:apachectl(8)

 Main PID: 2449 (httpd)

   Status: "Total requests: 11; Current requests/sec: 0; Current traffic:   0 B/sec"

   CGroup: /system.slice/httpd.service

           ├─2449 /usr/sbin/httpd -DFOREGROUND

           ├─2450 /usr/sbin/httpd -DFOREGROUND

           ├─2451 /usr/sbin/httpd -DFOREGROUND

           ├─2452 /usr/sbin/httpd -DFOREGROUND

           ├─2453 /usr/sbin/httpd -DFOREGROUND

           ├─2454 /usr/sbin/httpd -DFOREGROUND

           ├─2493 /usr/sbin/httpd -DFOREGROUND

           ├─2494 /usr/sbin/httpd -DFOREGROUND

           └─2495 /usr/sbin/httpd -DFOREGROUND

7月 21 17:21:35 nmserver-7.test.com systemd[1]: Starting The Apache HTTP Server...

7月 21 17:21:36 nmserver-7.test.com httpd[2449]: AH00558: httpd: Could not reliably determine the server's fully q...ssage

7月 21 17:21:37 nmserver-7.test.com systemd[1]: Started The Apache HTTP Server.

Hint: Some lines were ellipsized, use -l to show in full.
1.5 防火墙设置开启80端口[root@nmserver-7 ~]
# firewall-cmd --permanent --zone=public --add-service=http
success
这一步如果出现这个异常,说明防火墙没有打开.
防火墙打开命令
# systemctl start firewalld 查看防火墙状态 要是打开,就在执行上面一句.
# systemctl status firewalld[root@nmserver-7 ~]# firewall-cmd --permanent --zone=public --add-service=https
success
[root@nmserver-7 ~]# firewall-cmd --reload
success
1.6确认80端口监听中
[root@nmserver-7 ~]# netstat -tulp

Active Internet connections (only servers)

Proto Recv-Q Send-Q Local Address           Foreign Address         State       PID/Program name

tcp        0      0 0.0.0.0:ssh             0.0.0.0:*               LISTEN      1084/sshd

tcp        0      0 localhost:smtp          0.0.0.0:*               LISTEN      1486/master

tcp6       0      0 [::]:ssh                [::]:*                  LISTEN      1084/sshd

tcp6       0      0 localhost:smtp          [::]:*                  LISTEN      1486/master

tcp6       0      0 [::]:http               [::]:*                  LISTEN      2449/httpd

udp        0      0 localhost:323           0.0.0.0:*                           592/chronyd

udp6       0      0 localhost:323           [::]:*                              592/chronyd
1.8 查服务器IP
[root@nmserver-7 ~]# ip addr

1: lo: <LOOPBACK,UP,LOWER_UP> mtu 65536 qdisc noqueue state UNKNOWN qlen 1

    link/loopback 00:00:00:00:00:00 brd 00:00:00:00:00:00

    inet 127.0.0.1/8 scope host lo

       valid_lft forever preferred_lft forever

    inet6 ::1/128 scope host

       valid_lft forever preferred_lft forever

2: ens33: <BROADCAST,MULTICAST,UP,LOWER_UP> mtu 1500 qdisc pfifo_fast state UP qlen 1000

    link/ether 00:0c:29:56:bc:cf brd ff:ff:ff:ff:ff:ff

    inet 192.168.8.9/24 brd 192.168.8.255 scope global ens33

       valid_lft forever preferred_lft forever

    inet6 fe80::20c:29ff:fe56:bccf/64 scope link

       valid_lft forever preferred_lft forever

3: bridge0: <NO-CARRIER,BROADCAST,MULTICAST,UP> mtu 1500 qdisc noqueue state DOWN qlen 1000

    link/ether ea:89:d5:c7:32:73 brd ff:ff:ff:ff:ff:ff
1.9 浏览器登陆
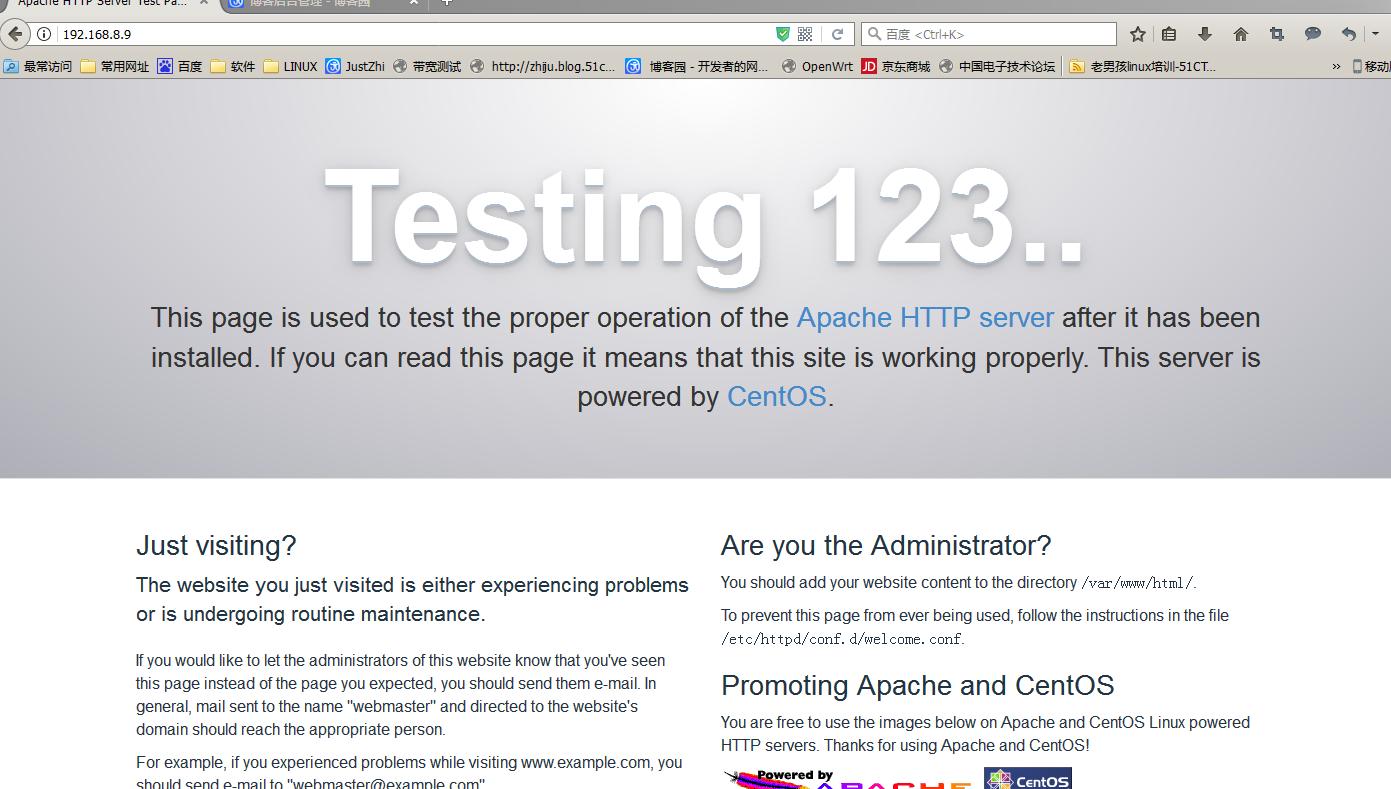
2、安装mysql
2.1安装mysql
[root@nmserver-7 ~]# yum install mariadb mariadb-server mariadb-libs mariadb-devel
root@nmserver-7 ~]# rpm -qa |grep maria

mariadb-libs-5.5.52-1.el7.i686

mariadb-5.5.52-1.el7.i686

mariadb-server-5.5.52-1.el7.i686

mariadb-devel-5.5.52-1.el7.i686
2.2 开启mysql服务,并设置开机启动,检查mysql状态
[root@nmserver-7 ~]# systemctl start  mariadb

[root@nmserver-7 ~]# systemctl enable  mariadb

Created symlink from /etc/systemd/system/multi-user.target.wants/mariadb.service to /usr/lib/systemd/system/mariadb.service.

[root@nmserver-7 ~]# systemctl status  mariadb

● mariadb.service - MariaDB database server

   Loaded: loaded (/usr/lib/systemd/system/mariadb.service; enabled; vendor preset: disabled)

   Active: active (running) since 六 2017-07-22 21:19:20 CST; 21s ago

 Main PID: 9603 (mysqld_safe)

   CGroup: /system.slice/mariadb.service

           ├─9603 /bin/sh /usr/bin/mysqld_safe --basedir=/usr

           └─9760 /usr/libexec/mysqld --basedir=/usr --datadir=/v...

7月 22 21:19:15 nmserver-7.test.com mariadb-prepare-db-dir[9524]: ...

7月 22 21:19:15 nmserver-7.test.com mariadb-prepare-db-dir[9524]: ...

7月 22 21:19:15 nmserver-7.test.com mariadb-prepare-db-dir[9524]: ...

7月 22 21:19:15 nmserver-7.test.com mariadb-prepare-db-dir[9524]: ...

7月 22 21:19:15 nmserver-7.test.com mariadb-prepare-db-dir[9524]: ...

7月 22 21:19:15 nmserver-7.test.com mariadb-prepare-db-dir[9524]: ...

7月 22 21:19:15 nmserver-7.test.com mariadb-prepare-db-dir[9524]: ...

7月 22 21:19:16 nmserver-7.test.com mysqld_safe[9603]: 170722 21...

7月 22 21:19:16 nmserver-7.test.com mysqld_safe[9603]: 170722 21...

7月 22 21:19:20 nmserver-7.test.com systemd[1]: Started MariaDB ...
[root@nmserver-7 ~]# netstat -tulp

Active Internet connections (only servers)

Proto Recv-Q Send-Q Local Address           Foreign Address         State       PID/Program name

tcp        0      0 0.0.0.0:ssh             0.0.0.0:*               LISTEN      1084/sshd

tcp        0      0 0.0.0.0:mysql           0.0.0.0:*               LISTEN      9760/mysqld

tcp6       0      0 [::]:ssh                [::]:*                  LISTEN      1084/sshd

tcp6       0      0 [::]:http               [::]:*                  LISTEN      2449/httpd

udp        0      0 localhost:323           0.0.0.0:*                           592/chronyd

udp6       0      0 localhost:323           [::]:*                              592/chronyd
2.3 数据库安全设置
[root@nmserver-7 ~]# mysql_secure_installation

NOTE: RUNNING ALL PARTS OF THIS SCRIPT IS RECOMMENDED FOR ALL MariaDB

      SERVERS IN PRODUCTION USE!  PLEASE READ EACH STEP CAREFULLY!

In order to log into MariaDB to secure it, we'll need the current

password for the root user.  If you've just installed MariaDB, and

you haven't set the root password yet, the password will be blank,

so you should just press enter here.

Enter current password for root (enter for none):

OK, successfully used password, moving on...

Setting the root password ensures that nobody can log into the MariaDB

root user without the proper authorisation.

Set root password? [Y/n] y

New password:

Re-enter new password:

Password updated successfully!

Reloading privilege tables..

 ... Success!

By default, a MariaDB installation has an anonymous user, allowing anyone

to log into MariaDB without having to have a user account created for

them.  This is intended only for testing, and to make the installation

go a bit smoother.  You should remove them before moving into a

production environment.

Remove anonymous users? [Y/n] y

 ... Success!

Normally, root should only be allowed to connect from 'localhost'.  This

ensures that someone cannot guess at the root password from the network.

Disallow root login remotely? [Y/n] n

 ... skipping.

By default, MariaDB comes with a database named 'test' that anyone can

access.  This is also intended only for testing, and should be removed

before moving into a production environment.

Remove test database and access to it? [Y/n] y

 - Dropping test database...

 ... Success!

 - Removing privileges on test database...

 ... Success!

Reloading the privilege tables will ensure that all changes made so far

will take effect immediately.

Reload privilege tables now? [Y/n] y

 ... Success!

Cleaning up...

All done!  If you've completed all of the above steps, your MariaDB

installation should now be secure.

Thanks for using MariaDB!
2.4 登陆数据库测试
[root@nmserver-7 ~]# mysql -uroot -p

Enter password:

Welcome to the MariaDB monitor.  Commands end with ; or \g.

Your MariaDB connection id is 11

Server version: 5.5.52-MariaDB MariaDB Server

Copyright (c) 2000, 2016, Oracle, MariaDB Corporation Ab and others.

Type 'help;' or '\h' for help. Type '\c' to clear the current input statement.

MariaDB [(none)]> show databases;

+--------------------+

| Database           |

+--------------------+

| information_schema |

| mysql              |

| performance_schema |

+--------------------+

3 rows in set (0.02 sec)

MariaDB [(none)]>
3、安装PHP
3.1 安装php
[root@nmserver-7 ~]# yum -y install php
[root@nmserver-7 ~]# rpm -ql php

/etc/httpd/conf.d/php.conf

/etc/httpd/conf.modules.d/10-php.conf

/usr/lib/httpd/modules/libphp5.so

/usr/share/httpd/icons/php.gif

/var/lib/php/session
3.2 将php与mysql关联起来
[root@nmserver-7 ~]# yum install php-mysql

[root@nmserver-7 ~]# rpm -ql php-mysql

/etc/php.d/mysql.ini

/etc/php.d/mysqli.ini

/etc/php.d/pdo_mysql.ini

/usr/lib/php/modules/mysql.so

/usr/lib/php/modules/mysqli.so

/usr/lib/php/modules/pdo_mysql.so
3.3 安装常用PHP模块
[root@nmserver-7 ~]# yum install -y php-gd php-ldap php-odbc php-pear php-xml php-xmlrpc php-mbstring php-snmp php-soap curl curl-devel php-bcmath
3.4 测试PHP
[root@nmserver-7 ~]# cd  /var/www/html/
[root@nmserver-7 html]# ls
[root@nmserver-7 html]# pwd
/var/www/html
[root@nmserver-7 html]# vi info.php

<?php
        phpinfo();
?>
~
~
~
~
~
~
~
~

:wq
3.5重启apache服务器
[root@nmserver-7 html]# systemctl restart http
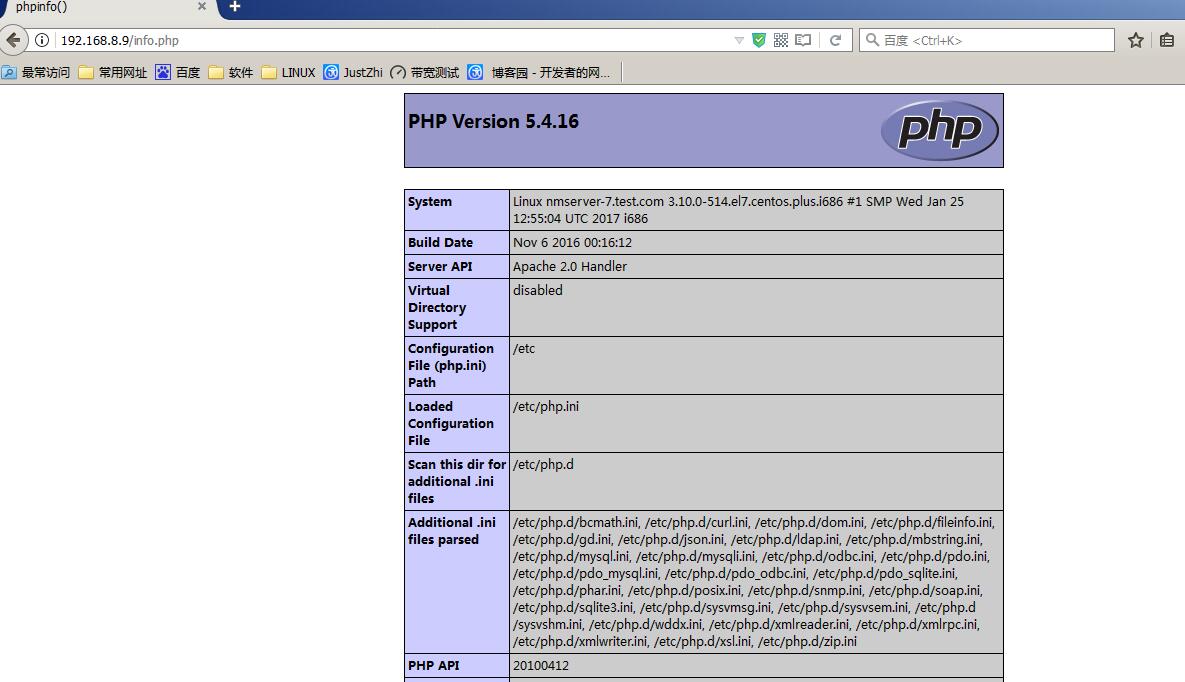
3.6测试PHP
在自己电脑浏览器输入 192.168.8.9/info.php,你可以看到已经安装的模块;
CentOS7用yum快速搭建LAMP平台的更多相关文章
- 用yum快速搭建LAMP平台
实验环境: [root@nmserver-7 html]# cat /etc/redhat-release CentOS Linux release 7.5.1804 (Core) [root@nms ...
- 用yum快速搭建LAMP平台与虚拟域名配置
实验环境: [root@nmserver-7 html]# cat /etc/redhat-release CentOS release 7.3.1611 (AltArch) [root@nmserv ...
- centos7.2快速搭建LAMP平台
#查看linux系统版本信息 cat /etc/redhat-release 以上是操作系统的所有信息,补充下内核信息参数介绍: 3.10.0-514.26.2.el7.x86_64 3表示主版本号, ...
- CentOS6.5使用yum快速搭建LAMP环境
1.安装Apache # yum -y install httpd # 开机自启动 # chkconfig httpd on # 启动httpd 服务 # service httpd start # ...
- redhat利用yum快速搭建LAMP环境
LAMP LAMP环境,对于PHP开发及其开源的PHP项目的部署都很关键的. LAMP的含义: L ---Linux A ---Apache web M ---Mysql datab ...
- CentOS 6.5使用yum快速搭建LAMP环境
由于这里采用yum方式安装,前提是我们必须配置好yum源.为了加快下载速度,建议使用网易的yum源. 这种方式对于初学者来说,非常方便,但是可定制性不强,而且软件版本较低.一般用于实验和学习环境. 1 ...
- Centos6 使用yum快速搭建LAMP环境
1.安装Apache [root@localhost ~]# yum -y install httpd # 开机自启动 [root@localhost ~]# chkconfig httpd on ...
- CentOS 7使用yum快速搭建LAMP环境
1.安装Apache [root@localhost ~]# yum -y install httpd # 开机自启动 [root@localhost ~]# chkconfig httpd on # ...
- logstash+elasticsearch+kibana快速搭建日志平台
使用logstash+elasticsearch+kibana快速搭建日志平台 日志的分析和监控在系统开发中占非常重要的地位,系统越复杂,日志的分析和监控就越重要,常见的需求有: 根据关键字查询日 ...
随机推荐
- nginx——优化 Nginx 连接超时时间
1. 什么是连接超时 (1) 举个例子,某饭店请了服务员招待顾客,但是现在饭店不景气,因此要解雇掉一些服务员,这里的服务员就相当于 Nginx 服务建立的连接 (2) 当服务器建立的连接没有接收处理请 ...
- 使用Pretues仿真Arduino驱动步进电机
这几天想做一个给金鱼自动喂食的装置,所以学习了下如何操控步进电机,现在做个记录. 使用Pretues仿真Arduino的话,可以参考:http://www.geek-workshop.com/thre ...
- WebStorm Goland PyCharm 等JetBrains验证服务器
http://idea.iteblog.com/key.php http://idea.idbry.com 2017年12月08日20:05:08 http://xdouble.cn:8888/ ht ...
- wpf binging Class 双向绑定 需要实现的接口
public class HuMan : INotifyPropertyChanged { private string name; private string age; private strin ...
- linux系统之tr命令
tr命令介绍以及使用 目录: 1.tr命令的介绍 2.tr命令格式 3tr命令使用项. 4.常见的tr命令的使用 tr命令介绍 从标准输入中翻译.压缩和/或删除字符,写入标准输出,说白了就转换和删除字 ...
- [C# 基础知识系列]专题五:当点击按钮时触发Click事件背后发生的事情 (转载)
当我们在点击窗口中的Button控件VS会帮我们自动生成一些代码,我们只需要在Click方法中写一些自己的代码就可以实现触发Click事件后我们Click方法中代码就会执行,然而我一直有一个疑问的—— ...
- python--sort()和sorted()高级排序
1.list中的sort()方法: def sort(self, key=None, reverse=False): # real signature unknown; restored from _ ...
- 【图解】Hive文件存储格式
摘自:https://blog.csdn.net/xueyao0201/article/details/79103973 引申阅读原理篇: 大数据:Hive - ORC 文件存储格式 大数据:Parq ...
- 使用docker部署springboot应用
1.构造Dockerfile打包文件 # from base image centos FROM centos #MAINTAINER lirenqing #Java Version #ENV JAV ...
- Java——string类型与date类型之间的转化
String类型转化为Date类型 方法一 Date date=new Date("2019-01-25"); 方法二 String =(new SimpleDateFormat( ...