
感知器基础原理及python实现
简单版本,按照李航的《统计学习方法》的思路编写
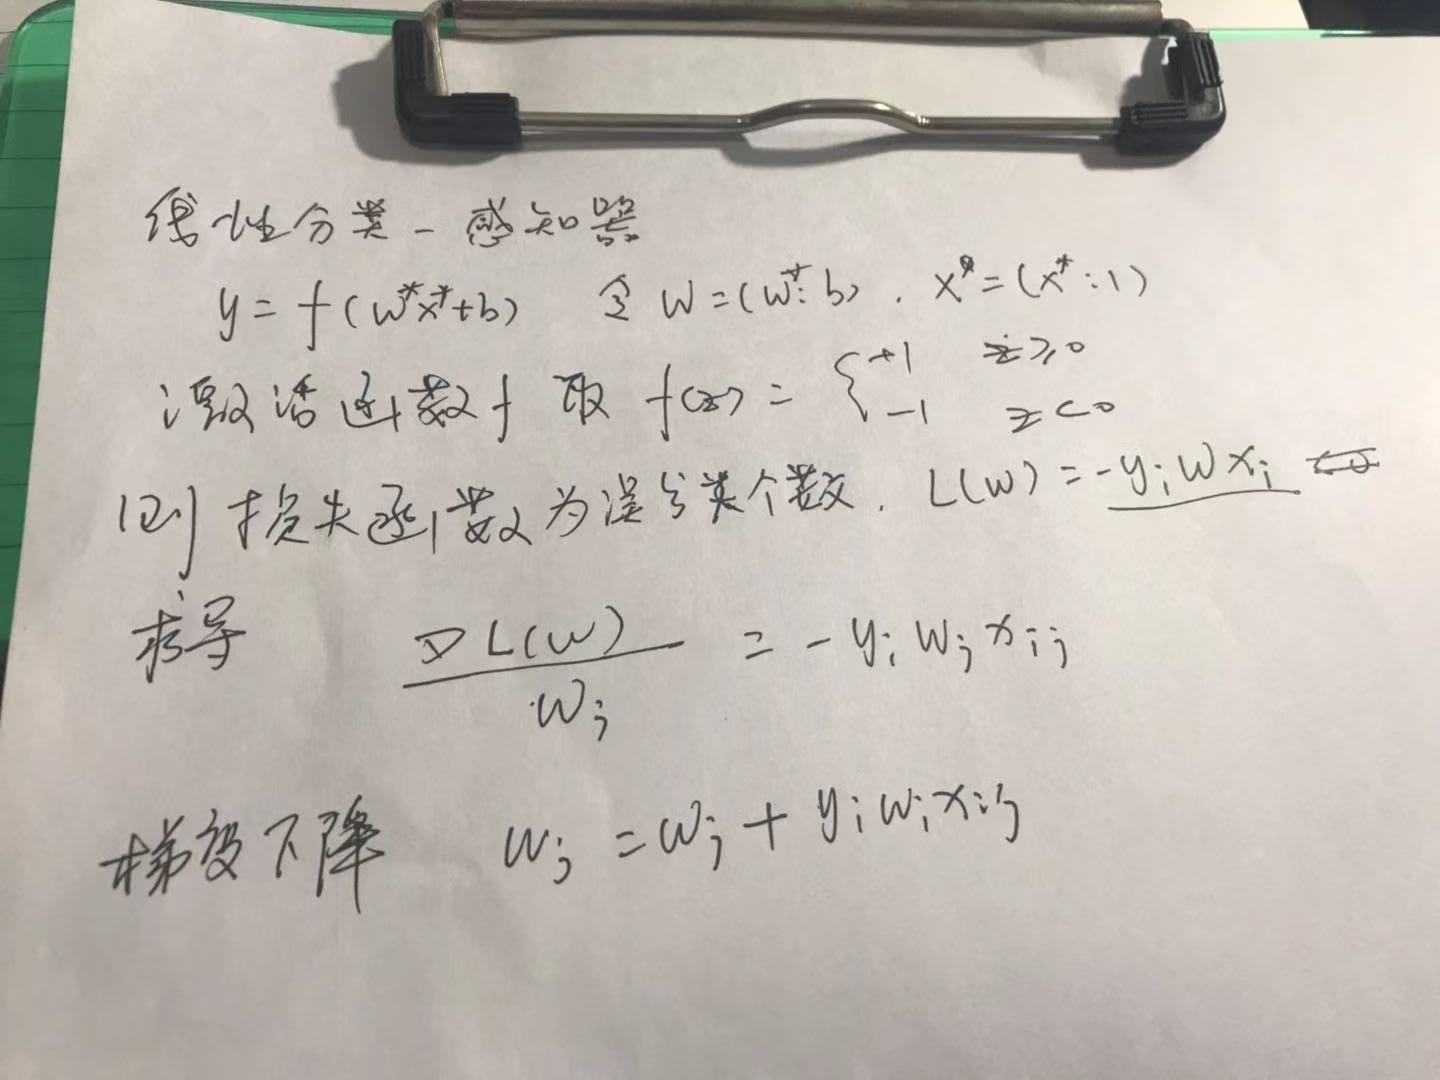
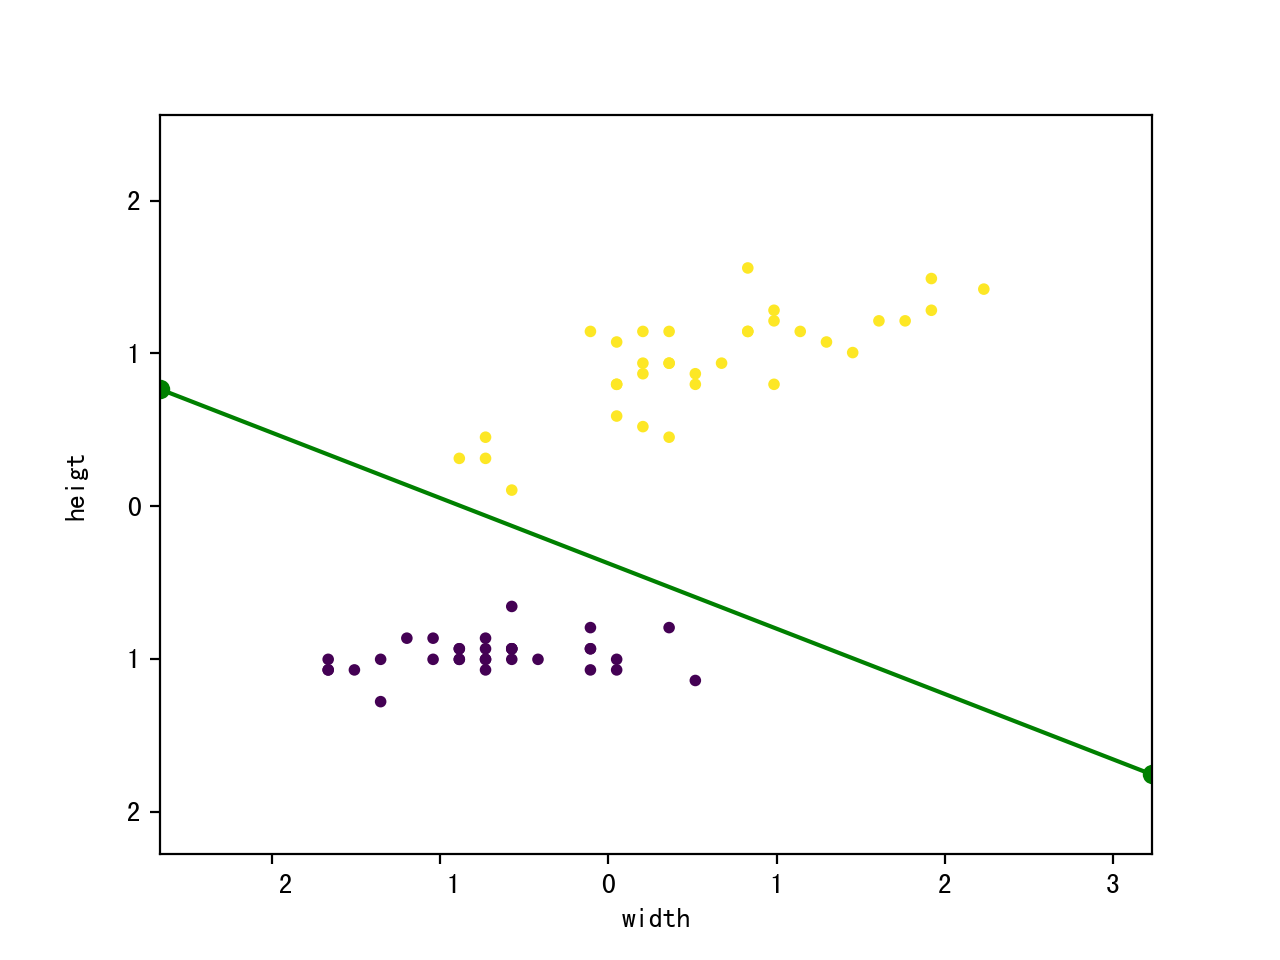
数据采用了著名的sklearn自带的iries数据,最优化求解采用了SGD算法。
预处理增加了标准化操作。
'''

perceptron classifier

created on 2019.9.14

author: vince

'''

import pandas

import numpy

import logging

import matplotlib.pyplot as plt

from sklearn.datasets import load_iris

from sklearn.model_selection import train_test_split

from sklearn.metrics import accuracy_score

'''

perceptron classifier

Attributes

w: ld-array = weights after training

l: list = number of misclassification during each iteration

'''

class Perceptron:

    def __init__(self, eta = 0.01, iter_num = 50, batch_size = 1):

        '''

        eta: float = learning rate (between 0.0 and 1.0).

        iter_num: int = iteration over the training dataset.

        batch_size: int = gradient descent batch number,

            if batch_size == 1, used SGD;

            if batch_size == 0, use BGD;

            else MBGD;

        '''

        self.eta = eta;

        self.iter_num = iter_num;

        self.batch_size = batch_size;

    def train(self, X, Y):

        '''

        train training data.

        X:{array-like}, shape=[n_samples, n_features] = Training vectors,

            where n_samples is the number of training samples and

            n_features is the number of features.

        Y:{array-like}, share=[n_samples] = traget values.

        '''

        self.w = numpy.zeros(1 + X.shape[1]);

        self.l = numpy.zeros(self.iter_num);

        for iter_index  in range(self.iter_num):

            for sample_index in range(X.shape[0]):

                if (self.activation(X[sample_index]) != Y[sample_index]):

                    logging.debug("%s: pred(%s), label(%s), %s, %s" % (sample_index,

                        self.net_input(X[sample_index]) , Y[sample_index],

                        X[sample_index, 0], X[sample_index, 1]));

                    self.l[iter_index] += 1;

            for sample_index in range(X.shape[0]):

                if (self.activation(X[sample_index]) != Y[sample_index]):

                    self.w[0] += self.eta * Y[sample_index];

                    self.w[1:] += self.eta * numpy.dot(X[sample_index], Y[sample_index]);

                    break;

            logging.info("iter %s: %s, %s, %s, %s" %

                    (iter_index, self.w[0], self.w[1], self.w[2], self.l[iter_index]));

    def activation(self, x):

        return numpy.where(self.net_input(x) >= 0.0 , 1 , -1);

    def net_input(self, x):

        return numpy.dot(x, self.w[1:]) + self.w[0];

    def predict(self, x):

        return self.activation(x);

def main():

    logging.basicConfig(level = logging.INFO,

            format = '%(asctime)s %(filename)s[line:%(lineno)d] %(levelname)s %(message)s',

            datefmt = '%a, %d %b %Y %H:%M:%S');

    iris = load_iris();

    features = iris.data[:99, [0, 2]];

    # normalization

    features_std = numpy.copy(features);

    for i in range(features.shape[1]):

        features_std[:, i] = (features_std[:, i] - features[:, i].mean()) / features[:, i].std();

    labels = numpy.where(iris.target[:99] == 0, -1, 1);

    # 2/3 data from training, 1/3 data for testing

    train_features, test_features, train_labels, test_labels = train_test_split(

            features_std, labels, test_size = 0.33, random_state = 23323);

    logging.info("train set shape:%s"  % (str(train_features.shape)));

    p = Perceptron();

    p.train(train_features, train_labels);

    test_predict = numpy.array([]);

    for feature in test_features:

        predict_label = p.predict(feature);

        test_predict = numpy.append(test_predict, predict_label);

    score = accuracy_score(test_labels, test_predict);

    logging.info("The accruacy score is: %s "% (str(score)));

    #plot

    x_min, x_max = train_features[:, 0].min() - 1, train_features[:, 0].max() + 1;

    y_min, y_max = train_features[:, 1].min() - 1, train_features[:, 1].max() + 1;

    plt.xlim(x_min, x_max);

    plt.ylim(y_min, y_max);

    plt.xlabel("width");

    plt.ylabel("heigt");

    plt.scatter(train_features[:, 0], train_features[:, 1], c = train_labels, marker = 'o', s = 10);

    k = - p.w[1] / p.w[2];

    d = - p.w[0] / p.w[2];

    plt.plot([x_min, x_max], [k * x_min + d, k * x_max + d], "go-");

    plt.show();

if __name__ == "__main__":

    main();
感知器基础原理及python实现的更多相关文章
- 机器学习之感知器算法原理和Python实现
(1)感知器模型 感知器模型包含多个输入节点:X0-Xn,权重矩阵W0-Wn(其中X0和W0代表的偏置因子,一般X0=1,图中X0处应该是Xn)一个输出节点O,激活函数是sign函数. (2)感知器学 ...
- 机器学习:Python实现单层Rosenblatt感知器
如果对Rosenblatt感知器不了解,可以先查看下相关定义,然后对照下面的代码来理解. 代码中详细解释了各步骤的含义,有些涉及到了数学公式的解释. 这篇文章是以理解Rosenblatt感知器的原理为 ...
- RBF神经网络学习算法及与多层感知器的比较
对于RBF神经网络的原理已经在我的博文<机器学习之径向基神经网络(RBF NN)>中介绍过,这里不再重复.今天要介绍的是常用的RBF神经网络学习算法及RBF神经网络与多层感知器网络的对比. ...
- 感知器做二分类的原理及python实现
本文目录: 1. 感知器 2. 感知器的训练法则 3. 梯度下降和delta法则 4. python实现 1. 感知器[1] 人工神经网络以感知器(perceptron)为基础.感知器以一个实数值向量 ...
- python之感知器-从零开始学深度学习
感知器-从零开始学深度学习 未来将是人工智能和大数据的时代,是各行各业使用人工智能在云上处理大数据的时代,深度学习将是新时代的一大利器,在此我将从零开始记录深度学习的学习历程. 我希望在学习过程中做到 ...
- 【转】【python】装饰器的原理
写在前面: 在开发OpenStack过程中,经常可以看到代码中的各种注解,自己也去查阅了资料,了解了这是python中的装饰器,因为弱类型的语言可以将函数当成返回值返回,这就是装饰器的原理. 虽然说知 ...
- 机器学习 —— 基础整理(六)线性判别函数:感知器、松弛算法、Ho-Kashyap算法
这篇总结继续复习分类问题.本文简单整理了以下内容: (一)线性判别函数与广义线性判别函数 (二)感知器 (三)松弛算法 (四)Ho-Kashyap算法 闲话:本篇是本系列[机器学习基础整理]在time ...
- 感知器算法--python实现
写在前面: 参考: 1 <统计学习方法>第二章感知机[感知机的概念.误分类的判断] http://pan.baidu.com/s/1hrTscza 2 点到面的距离 3 梯度 ...
- Python开发基础-Day7-闭包函数和装饰器基础
补充:全局变量声明及局部变量引用 python引用变量的顺序: 当前作用域局部变量->外层作用域变量->当前模块中的全局变量->python内置变量 global关键字用来在函数或其 ...
随机推荐
- 得亏了它,我才把潜藏那么深的Bug挖出来
2020年写了很多事故解决的文章,并不是我绞尽脑汁想出来的,而是真的遇到了这些问题.通过文章的方式记录下来,分享出去,才有意义. 事故背景 首先看下面的图吧,这是我从cat上截的图. 可以看到是一个R ...
- APM监控工具Pinpoint搭建
一:Pinpoint简介与架构图示 Pinpoint是什么Pinpoint是开源在github上的一款使用JAVA语言编写的APM监控工具,用于大规模分布式系统监控.它对性能的影响较小,只增加约3%的 ...
- 使用Pods中使用Swift和Objective-C混编-编译不通过的原因
iOS开发#使用Pods中使用Swift和Objective-C混编-编译不通过的原因-ld: symbol(s) not found for architecture arm64 问题基本描述 在P ...
- Java基础--数组的定义
1.数组的定义 数组:一组能够储存相同数据类型值的变量的集合. 2.数组的赋值方式 (1)使用默认的初始值来初始化数组中的每一个元素 语法:数组元素类型[]数组名 = new数组元素类型[数组中元素的 ...
- Vue项目三、项目中碰到的问题详解
一.组件的划分创建 方法一: 把页面上需要复用的模块,拆分成组件.比如,页面的header.footer.面包屑.弹出框等拆分成组件.所以在src中应该有一个文件夹(components)专门放这些会 ...
- redis环境搭建及一主二从三哨兵模式配置
一.单机redis环境搭建 1.安装: OS:linux redhat6.5 下载redis 官网下载链接:https://redis.io/download 把安装包上传到服务器,进行解压 [roo ...
- eetcode必要技巧--动态规划(一)
首先我们要搞清楚什么是动态规划 动态规划是运筹学中用于求解决策过程中的最优化数学方法.当然,我们在这里关注的是作为一种算法设计技术,作为一种使用多阶段决策过程最优的通用方法. 当然这个很难理解,但是按 ...
- eclipse代码提示完善
转载请注明出处:https://www.cnblogs.com/Higurashi-kagome/p/12263267.html 1.参考https://blog.csdn.net/ithomer/a ...
- 解决 unable to lock the administration directory (/var/lib/dpkg/) 问题
阿里开源镜像站提供了raspbian的软件包镜像,国内的用户可以选择改用阿里镜像站作为更新源. 但是在更换源之后,执行 sudo apt-get update && apt-get u ...
- C 和 C++语言中的内存拷贝函数memcpy()
memcpy指的是C和C++使用的内存拷贝函数 函数原型为void *memcpy(void *destin, void *source, unsigned n): 函数的功能是从源内存地址的起始位置 ...