.NET Core微服务之基于IdentityServer建立授权与验证服务(续)
Tip: 此篇已加入.NET Core微服务基础系列文章索引
上一篇我们基于IdentityServer4建立了一个AuthorizationServer,并且继承了QuickStartUI,能够成功获取Token了。这一篇我们了解下如何集成API Service和MVC Web Application。
一、集成API Service
1.1 添加ASP.NET Core WebAPI项目
新建两个WebAPI程序,假设这里取名为ApiService01(占用端口5010)和ApiService02(占用端口5020)。

为了方便快速启动,可以继续在launchSettings.json中删掉关于IISExpress的部分,由于是WebAPI,所以也不需要启动浏览器(将其设为false):
{

  "profiles": {

    "Manulife.DNC.MSAD.IdentityServer4Test.ApiService01": {

      "commandName": "Project",

      "launchBrowser": false,

      "launchUrl": "api/values",

      "environmentVariables": {

        "ASPNETCORE_ENVIRONMENT": "Development"

      },

      "applicationUrl": "http://localhost:5010/"

    }

  }

}
1.2 安装IdentityServer4.AccessTokenValidation
NuGet>Install-Package IdentityServer4.AccessTokenValidation
安装完成之后,需要做一些适配,所以我们来注册一下关于其的配置:这里设置的默认模式是Bearer,其中AddIdentityServerAuthentication方法是将我们上一篇创建的授权服务器注册为token的处理人,即在本API程序中涉及到token的处理,都会移交给指定服务器(这里即上一篇中创建的AuthorizationServer)进行处理。
    public void ConfigureServices(IServiceCollection services)

    {

        ......

        // IdentityServer

        services.AddMvcCore().AddAuthorization().AddJsonFormatters();

        services.AddAuthentication(Configuration["Identity:Scheme"])

            .AddIdentityServerAuthentication(options =>

            {

                options.RequireHttpsMetadata = false; // for dev env

                options.Authority = $"http://{Configuration["Identity:IP"]}:{Configuration["Identity:Port"]}";

                options.ApiName = Configuration["Service:Name"]; // match with configuration in IdentityServer

            });

        // Swagger

        ......

    }
配置文件中的内容如下所示:这里需要注意的是Name需要和我们在上一篇中的InMemoryConfiguration中自行hard-code的一样。
{

  "Service": {

    "Name": "clientservice",

    "Port": "",

    "DocName": "clientservice",

    "Version": "v1",

    "Title": "CAS Client Service API",

    "Description": "CAS Client Service API provide some API to help you get client information from CAS",

    "Contact": {

      "Name": "CAS 2.0 Team",

      "Email": "EdisonZhou@manulife.com"

    },

    "XmlFile": "Manulife.DNC.MSAD.IdentityServer4Test.ApiService01.xml"

  },

  "Identity": {

    "IP": "localhost",

    "Port": "",

    "Scheme": "Bearer"

  }

}
此外,还需要在Configure方法中配置Authentication中间件:这里需要注意的就是需要放在UseMvc()之前调用。
    public void Configure(IApplicationBuilder app, IHostingEnvironment env)

    {

        if (env.IsDevelopment())

        {

            app.UseDeveloperExceptionPage();

        }

        // authentication

        app.UseAuthentication();

        app.UseMvc();

        // swagger

        .......

    }
以上是ApiService01的配置,ApiService02的配置类似,只是配置文件中的信息从clientservice改为了productservice。
1.3 为要进行验证授权的方法添加[Authorize]特性
由于我们创建WebAPI时,默认有一个ValuesController,保留它,我们直接为这个Controller添加一个[Authorize]特性。
    [Authorize]

    [Route("api/[controller]")]

    public class ValuesController : Controller

    {

        ......

    }
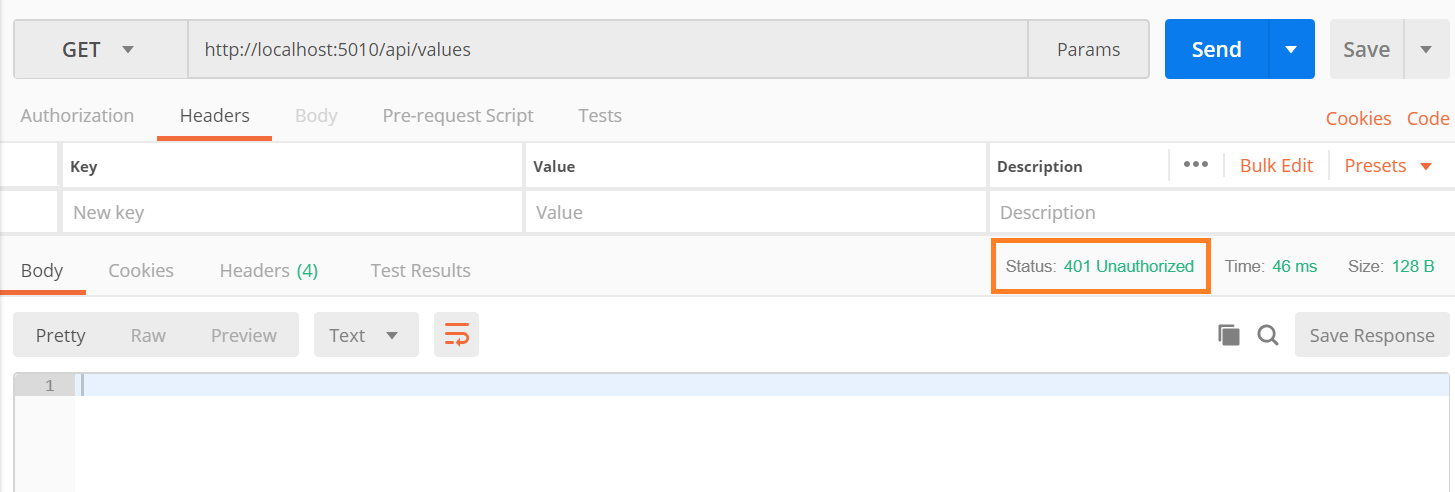
这样的话,刚刚注册的中间件就会在请求的过程中基于传递过来的token进行Authorization,如果没有token或者token是非法的,它就会告诉api的消费者这个请求时未授权的(HTTP StatusCode 401)
1.4 简单测试一下
测试之前首先确保AuthorizationServer和两个ApiService都一起启动,可以在解决方案属性的启动选项中进行设置。
(1)不带token的情况
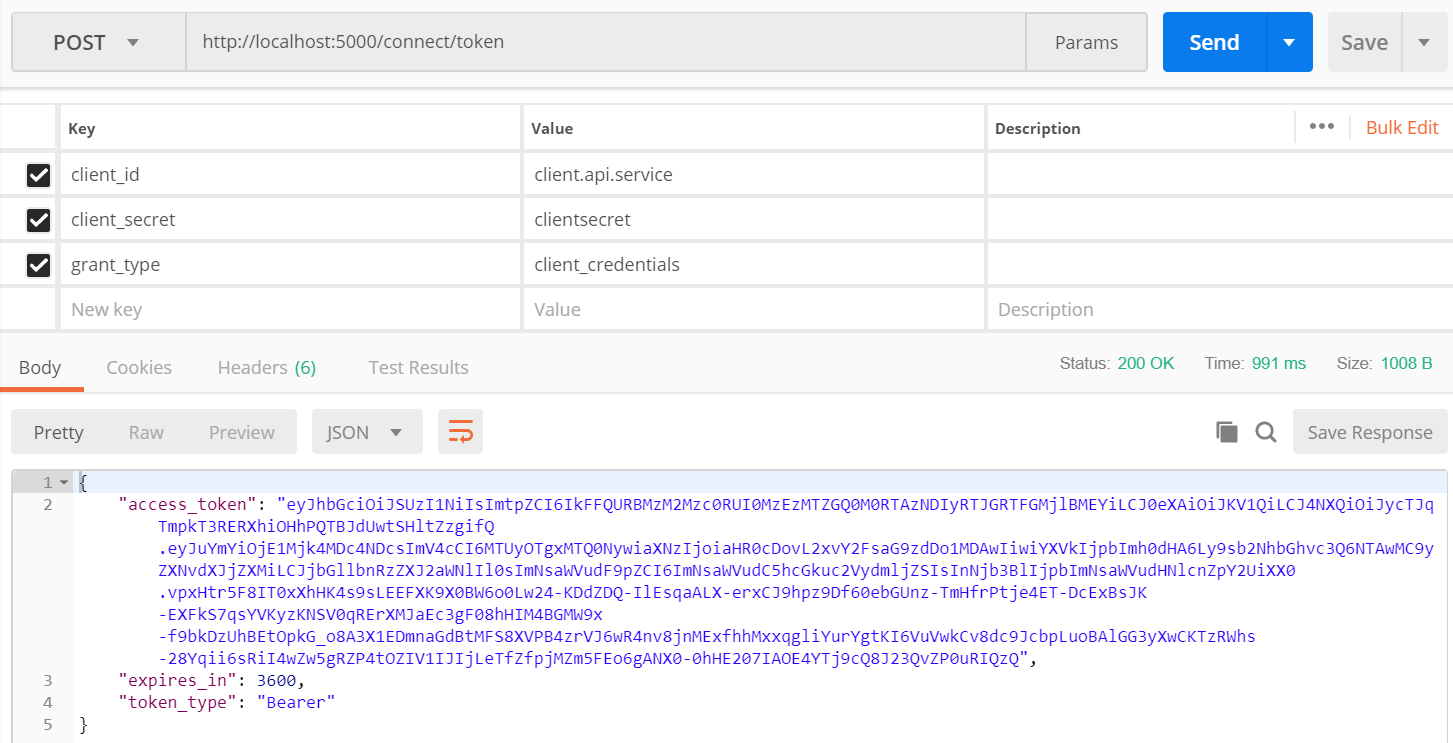
(2)带正确token的情况
首先请求获取一下token:这里我们使用的grant_type是client_credentials,也可以使用password(需要输入用户名和密码)。
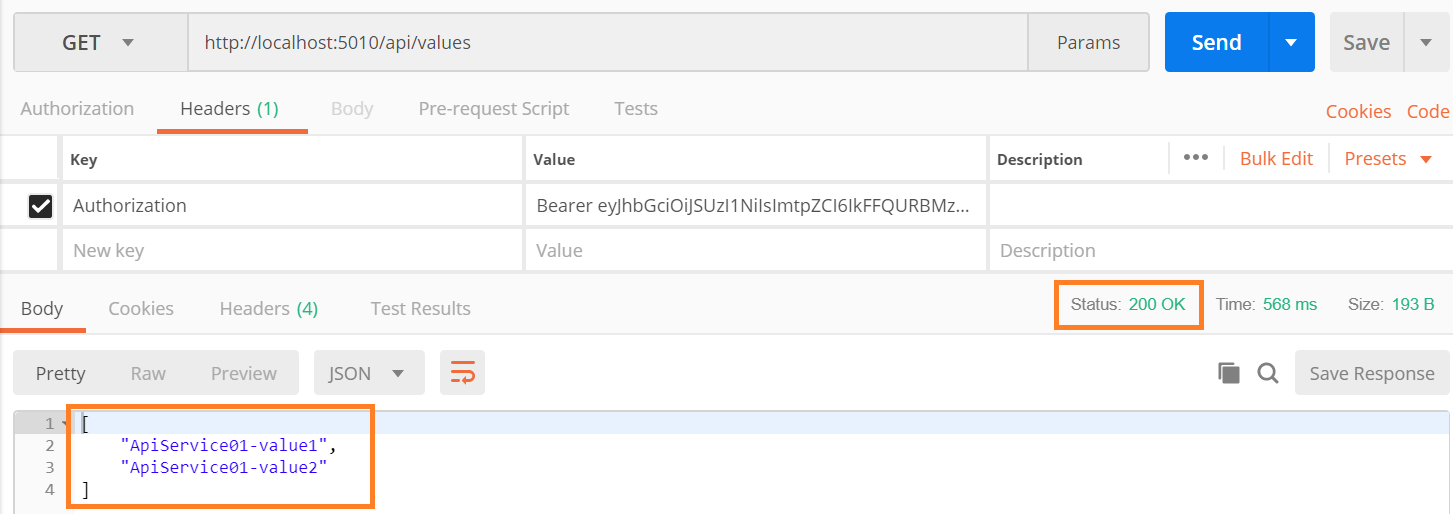
带上这个token再去调用api service
(3)带不正确的token的情况(这里简单改一下token的值)

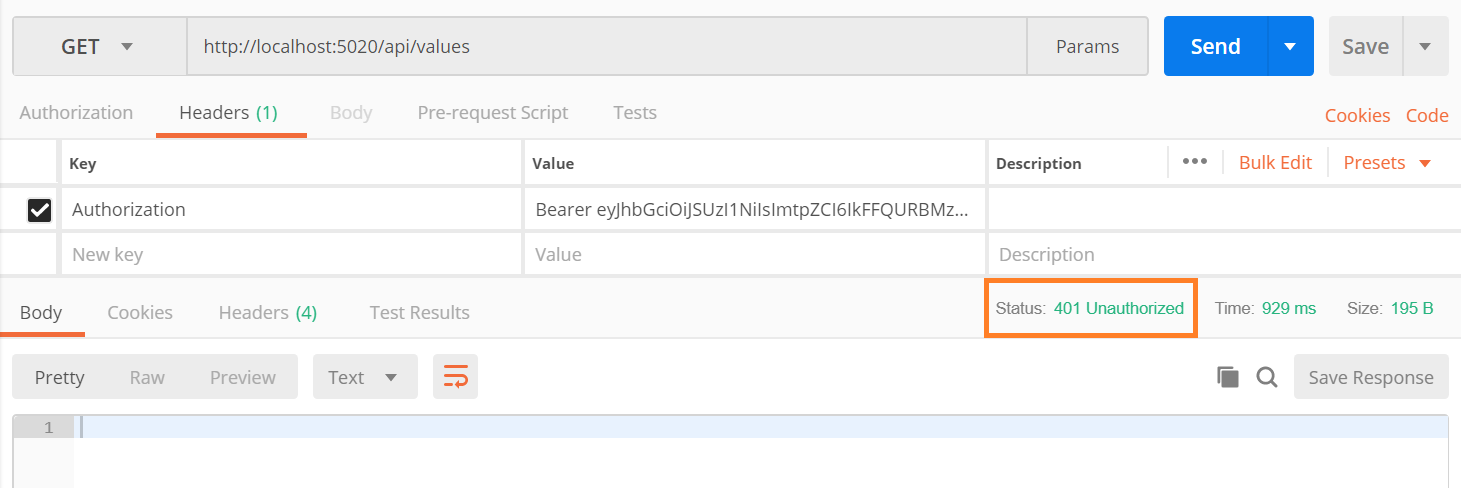
(4)用刚刚授予(clientservice)的token访问未经授权的productservice
我们也可以通过在ValuesController中加上如下的一句,来获取Claims => 它是从已验证过的token中抽取的信息。如果我们将上面获取的token的grant_type设置为password的话,那我们会在Claims中获取到用户ID的信息。


二、集成MVC Web Application
2.1 添加ASP.NET Core MVC项目
新建一个ASP.NET Core MVC项目,这里假设取名为MvcClient(占用端口5100)
仍然修改launchSettings.json,删掉IISExpress部分,但仍然选择启动浏览器:
{

  "profiles": {

    "Manulife.DNC.MSAD.IdentityServer4Test.MvcClient": {

      "commandName": "Project",

      "launchBrowser": true,

      "environmentVariables": {

        "ASPNETCORE_ENVIRONMENT": "Development"

      },

      "applicationUrl": "http://localhost:5100/"

    }

  }

}
2.2 为指定方法添加[Authorize]特性
这里我们在HomeController的About方法上面添加[Authorize]特性:
    [Authorize]

    public IActionResult About()

    {

        ViewData["Message"] = "Your application description page.";

        return View();

    }
这时如果我们直接访问About,会抛异常,告知我们No authenticationScheme was specified......
而我们想要的效果是当User第一次点击About,页面重定向到AuthorizationServer (localhost:5000),当用户登录验证授权之后,再重定向到该网站。此后一定时间范围内的第二次,第三次点击,都不再需要再重定向到AuthorizationServer,而是直接读取保存的token。
2.3 添加OpenID Connect Authentication
这一部分主要集中于做Authentication(身份验证)而非Authorization(授权)。
    public void ConfigureServices(IServiceCollection services)

    {

        services.AddMvc();

        JwtSecurityTokenHandler.DefaultInboundClaimTypeMap.Clear(); // ensure not change any return Claims from Authorization Server

        services.AddAuthentication(options =>

        {

            options.DefaultScheme = "Cookies";

            options.DefaultChallengeScheme = "oidc"; // oidc => open ID connect

        })

        .AddCookie("Cookies")

        .AddOpenIdConnect("oidc", options =>

        {

            options.SignInScheme = "Cookies";

            options.Authority = $"http://{Configuration["Identity:IP"]}:{Configuration["Identity:Port"]}";

            options.RequireHttpsMetadata = false; // please use https in production env

            options.ClientId = "cas.mvc.client.implicit";

            options.ResponseType = "id_token token"; // allow to return access token

            options.SaveTokens = true;

        });

    }
这里我们使用的是implicit这个flow(详细内容可以阅读ddrsql的IdentityServer4之Implicit(隐式许可)),它主要用于客户端应用程序(主要指基于javascript的应用),它允许客户端程序重定向到AuthorizationServer,然后带着token重定向回来。值得一提的是这里的ResponseType为"id_token token",表示既获取id_token也获取access_token。而SaveTokens设为true则表示要将从AuthorizationServer返回的token持久化在cookie之中,这样就不用每次都去请求token了。
当然,也还得在Configure方法中,配置Authentication中间件:
    public void Configure(IApplicationBuilder app, IHostingEnvironment env)

    {

        if (env.IsDevelopment())

        {

            app.UseBrowserLink();

            app.UseDeveloperExceptionPage();

        }

        else

        {

            app.UseExceptionHandler("/Home/Error");

        }

        app.UseAuthentication();

        app.UseStaticFiles();

        app.UseMvc(routes =>

        {

            routes.MapRoute(

                name: "default",

                template: "{controller=Home}/{action=Index}/{id?}");

        });

    }
*.位置仍然需要在UseMvc之前。
2.4 在AuthorizationServer添加这个MvcClient
在InMemoryConfiguration类中修改GetClients方法:
    public static IEnumerable<Client> GetClients()

    {

        return new[]

        {

            new Client

            {

                ClientId = "client.api.service",

                ClientSecrets = new [] { new Secret("clientsecret".Sha256()) },

                AllowedGrantTypes = GrantTypes.ResourceOwnerPasswordAndClientCredentials,

                AllowedScopes = new [] { "clientservice" }

            },

            ......,

            new Client

            {

                ClientId = "cas.mvc.client.implicit",

                ClientName = "CAS MVC Web App Client",

                AllowedGrantTypes = GrantTypes.Implicit,

                RedirectUris = { $"http://{Configuration["Clients:MvcClient:IP"]}:{Configuration["Clients:MvcClient:Port"]}/signin-oidc" },

                PostLogoutRedirectUris = { $"http://{Configuration["Clients:MvcClient:IP"]}:{Configuration["Clients:MvcClient:Port"]}/signout-callback-oidc" },

                AllowedScopes = new [] {

                    IdentityServerConstants.StandardScopes.OpenId,

                    IdentityServerConstants.StandardScopes.Profile,

                    "agentservice", "clientservice", "productservice"

                },

                AllowAccessTokensViaBrowser = true // can return access_token to this client

            }

        };

    }
这里的ClientId要和MvcClient中设置的一致。RedirectUris是指登录成功之后需要重定向的地址(这里这个位置在MvcClient中),而PostLogoutRedirectUris是指登出之后需要重定向的地址。和API Service Client的设置不同的就是在AllowedScopes中给它增加了OpenId和Profile,因为我们为MvcClient设定的是oidc而不是bearer的模式。最后为了使用这些OpenID Connect Scopes,需要设置这些Identity Resources:
    public static IEnumerable<IdentityResource> GetIdentityResources()

    {

        return new List<IdentityResource>

        {

            new IdentityResources.OpenId(),

            new IdentityResources.Profile(),

        };

    }

    public void ConfigureServices(IServiceCollection services)

    {

        .......

        services.AddIdentityServer()

            //.AddDeveloperSigningCredential()

            .AddSigningCredential(new X509Certificate2(Path.Combine(basePath,

                Configuration["Certificates:CerPath"]),

                Configuration["Certificates:Password"]))

            .AddInMemoryIdentityResources(InMemoryConfiguration.GetIdentityResources())

            .AddTestUsers(InMemoryConfiguration.GetUsers().ToList())

            .AddInMemoryClients(InMemoryConfiguration.GetClients())

            .AddInMemoryApiResources(InMemoryConfiguration.GetApiResources());

        ......

    }
同时,为了演示方便,我们在MvcClient的About视图中添加几句:
@{

    ViewData["Title"] = "About";

}

<h2>@ViewData["Title"]</h2>

<h3>@ViewData["Message"]</h3>

@using Microsoft.AspNetCore.Authentication

<div>

    <strong>id_token</strong>

    <span>@await ViewContext.HttpContext.GetTokenAsync("id_token")</span>

</div>

<div>

    <strong>access_token</strong>

    <span>@await ViewContext.HttpContext.GetTokenAsync("access_token")</span>

</div>

<dl>

    @foreach (var claim in User.Claims)

    {

        <dt>@claim.Type</dt>

        <dd>@claim.Value</dd>

    }

</dl>
这里我们将id_token, access_token(只有拿到access_token,才可以在MvcClient中发起请求调用API Service,而具体可以访问哪些API Service是在InMemoryConfiguration中配置的AllowScopes里面的那些)都显示出来,还会将Claims数据也显示出来(这里的Claims数据就是从AuthorizationServer返回的token里面payload部分的数据,关于payload请搜索JWT)
2.5 简单测试一下
(1)未登陆的情况
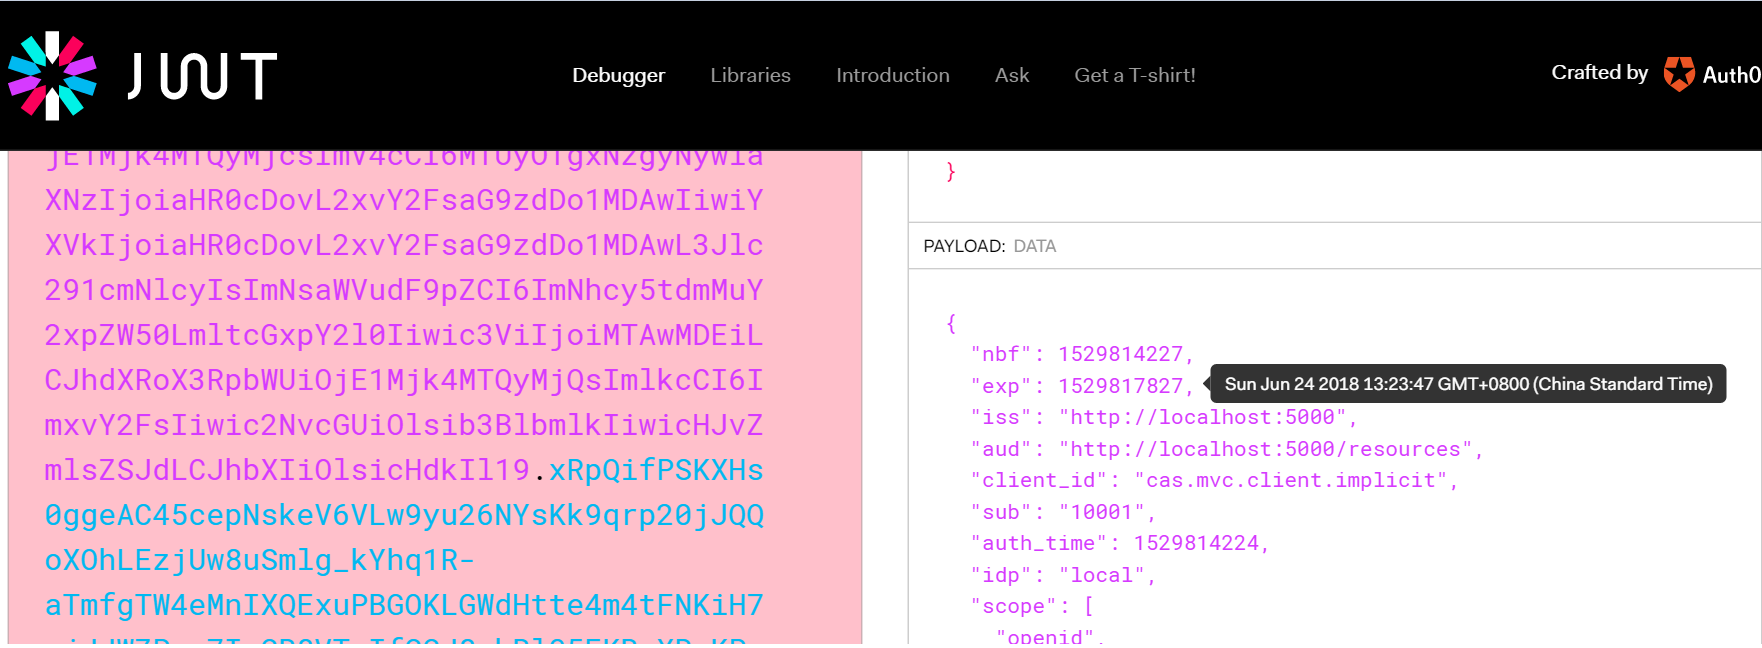
拿到access_token,可以去JWT.io上进行解析看看:比如关注payload部分,可以得到很多信息,比如过期时间为1小时(默认)
(2)已登录的情况
这里为了方便演示,新增一个Logout方法:这里需要确保同时登出MvcClient的Cookies和OpenId Connect(即到Identity Server去清除单点登录的Session)。
    public class HomeController: Controller

    {

        ......

        public async Task Logout()

        {

            await HttpContext.SignOutAsync("Cookies");

            await HttpContext.SignOutAsync("oidc");

        }

        ......

    }
最后,关于access token的生命周期,可以阅读一下园友晓晨Master(李志强)的《IdentityServer4实战 - AccessToken 生命周期分析》,里面提到一个时间偏移的概念,需要了解一下。另外,如果是前后端分离的结构,也可以浏览一下ddrsql的《IdentityServer4之Implicit(隐式许可) —— oidc-client-js前后端分离》,里面介绍了oidc-client这个JS库的使用,以及如何支持跨域。
三、小结
本篇基于上一篇搭建好的AuthorizationServer,通过集成API Service与MVC Web Application来演示他们如何与Authorization Server的交互,了解了两种不同的Scheme(Bearer和Implicit),最后补充了一些材料供扩展阅读。但是,IdentityServer的内容很多,我只是学习了一些我要掌握以做POC的部分,其他还有很多功能和知识点我没有学习,大家可以通过搜索园子里各种大神(eg.晓晨Master, solenovex等等等等)的文章进行学习。后面我会将IdentityServer与Ocelot进行集成,尝试在API网关处做统一验证与授权。最后,感谢参考资料的作者们,本篇主要基于参考资料的学习而成的笔记。另外,一些朋友十分想要一些基于生产环境的采坑经验以及更加实际的应用案例,对此我只能说声抱歉,我目前仍然处于学习与准备POC阶段,目的是为了在公司里推广以及给老板安利(虽然很难),还没有实际项目迁移到.NET Core微服务架构上去,但是如果不努力让公司迁移和应用,那像我司一样的传统行业的金融保险公司是不会主动升级的,还请各位谅解。

示例代码
Click => https://github.com/EdisonChou/EDC.IdentityServer4.Demo
参考资料
《identityserver4官方文档》=> 重点关注那些流程图与术语
ddrsql,《IdentityServer4之Implicit(隐式许可)》
solenovex,《学习Identity Server4的预备知识》
solenovex,《使用Identity Server 4建立Authorization Server (1)》
solenovex,《使用Identity Server 4建立Authorization Server (2)》
solenovex,《使用Identity Server 4建立Authorization Server (3)》
晓晨Master,《IdentityServer4实战 - AccessToken 生命周期分析》
.NET Core微服务之基于IdentityServer建立授权与验证服务(续)的更多相关文章
- .NET Core微服务之基于IdentityServer建立授权与验证服务
Tip: 此篇已加入.NET Core微服务基础系列文章索引 一.IdentityServer的预备知识 要学习IdentityServer,事先得了解一下基于Token的验证体系,这是一个庞大的主题 ...
- ASP.NET Core 2.1中基于角色的授权
ASP.NET Core 2.1中基于角色的授权 授权是来描述用户能够做什么的过程.例如,只允许管理员用户可以在电脑上进行软件的安装以及卸载.而非管理员用户只能使用软件而不能进行软件的安装以及卸载.它 ...
- .NET Core微服务系列基础文章索引(目录导航Final版)
一.为啥要总结和收集这个系列? 今年从原来的Team里面被抽出来加入了新的Team,开始做Java微服务的开发工作,接触了Spring Boot, Spring Cloud等技术栈,对微服务这种架构有 ...
- .NET Core微服务系列基础文章
今年从原来的Team里面被抽出来加入了新的Team,开始做Java微服务的开发工作,接触了Spring Boot, Spring Cloud等技术栈,对微服务这种架构有了一个感性的认识.虽然只做了两个 ...
- .NET Core微服务架构学习与实践系列文章索引目录
一.为啥要总结和收集这个系列? 今年从原来的Team里面被抽出来加入了新的Team,开始做Java微服务的开发工作,接触了Spring Boot, Spring Cloud等技术栈,对微服务这种架构有 ...
- .NET Core微服务系列基础文章索引(目录导航Draft版)
一.为啥要写这个系列? 今年从原来的Team里面被抽出来加入了新的Team,开始做Java微服务的开发工作,接触了Spring Boot, Spring Cloud等技术栈,对微服务这种架构有了一个感 ...
- .NET Core微服务之基于Ocelot+IdentityServer实现统一验证与授权
Tip: 此篇已加入.NET Core微服务基础系列文章索引 一.案例结构总览 这里,假设我们有两个客户端(一个Web网站,一个移动App),他们要使用系统,需要通过API网关(这里API网关始终作为 ...
- .NET Core微服务之基于Exceptionless实现分布式日志记录
Tip: 此篇已加入.NET Core微服务基础系列文章索引 一.Exceptionless极简介绍 Exceptionless 是一个开源的实时的日志收集框架,它可以应用在基于 ASP.NET,AS ...
- 庐山真面目之十二微服务架构基于Docker搭建Consul集群、Ocelot网关集群和IdentityServer版本实现
庐山真面目之十二微服务架构基于Docker搭建Consul集群.Ocelot网关集群和IdentityServer版本实现 一.简介 在第七篇文章<庐山真面目之七微服务架构Consul ...
随机推荐
- github 用git bash上传项目 最后提示 Everything up-to-date 但没传上去
今天为了把本地的项目远程到githup远程仓库,把好久不用的githup命令重新用了起来,不用怀疑,很正常的出错了. 为了长点记性,总结错误与解决办法如下: 1.我犯得第一个简单错误,是忘了git c ...
- GitHub 系列之「Git速成」
1.什么是Git? Git 是 Linux 发明者 Linus 开发的一款新时代的版本控制系统,那什么是版本控制系统呢?怎么理解?网上一大堆详细的介绍,但是大多枯燥乏味,对于新手也很难理解,这里我只举 ...
- SpringCloud实战8-Bus消息总线
好了现在我们接着上一篇的随笔,继续来讲.上一篇我们讲到,我们如果要去更新所有微服务的配置,在不重启的情况下去更新配置,只能依靠spring cloud config了,但是,是我们要一个服务一个服务的 ...
- golang 通过exec Command启动的进程如何关闭的解决办法 以及隐藏黑色窗口
golang 通过exec Command启动的进程如何关闭的解决办法 在用exec包调用的其他进程后如何关闭结束,可以使用context包的机制进行管理,context包的使用详见:https:// ...
- 随手一记,maven打包
<plugin> <groupId>org.apache.maven.plugins</groupId> <artifactId>maven-depen ...
- BZOJ_4819_[Sdoi2017]新生舞会_01分数规划+费用流
BZOJ_4819_[Sdoi2017]新生舞会_01分数规划+费用流 Description 学校组织了一次新生舞会,Cathy作为经验丰富的老学姐,负责为同学们安排舞伴.有n个男生和n个女生参加舞 ...
- python strip()函数和Split函数的用法总结
strip函数原型 声明:s为字符串,rm为要删除的字符序列. 只能删除开头或是结尾的字符或是字符串.不能删除中间的字符或是字符串. s.strip(rm) 删除s字符串中开头.结尾处,位于 rm删除 ...
- Opencv(C++)实现二阶线性插值
#include<opencv2\opencv.hpp> #include<iostream> using namespace cv; using namespace std; ...
- 轻量化卷积神经网络MobileNet论文详解(V1&V2)
本文是 Google 团队在 MobileNet 基础上提出的 MobileNetV2,其同样是一个轻量化卷积神经网络.目标主要是在提升现有算法的精度的同时也提升速度,以便加速深度网络在移动端的应用.
- keras实现简单CNN人脸关键点检测
用keras实现人脸关键点检测 改良版:http://www.cnblogs.com/ansang/p/8583122.html 第一步:准备好需要的库 tensorflow 1.4.0 h5py ...