Android自定义控件2--优酷菜单界面初始化
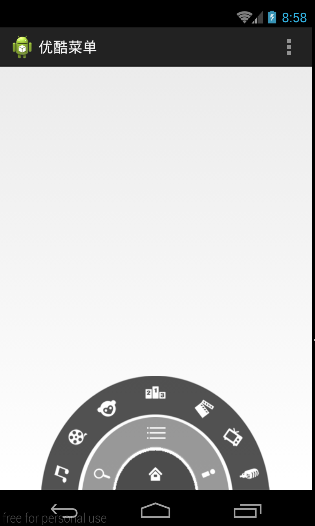
本文开始将逐步去实现下面优酷菜单的效果:
本文地址:http://www.cnblogs.com/wuyudong/p/5912538.html,转载请注明源地址。
本文首先来实现优酷菜单界面初始化工作
首先使用相对布局
<RelativeLayout xmlns:android="http://schemas.android.com/apk/res/android"

    xmlns:tools="http://schemas.android.com/tools"

    android:layout_width="match_parent"

    android:layout_height="match_parent"

    tools:context=".MainActivity" >

    <RelativeLayout

        android:layout_width="100dp"

        android:layout_height="50dp"

        android:background="@drawable/level1"

        android:layout_alignParentBottom="true"

        android:layout_centerHorizontal="true"

        ></RelativeLayout>

    <RelativeLayout

        android:layout_width="180dp"

        android:layout_height="90dp"

        android:background="@drawable/level2"

        android:layout_alignParentBottom="true"

        android:layout_centerHorizontal="true"

        ></RelativeLayout>

    <RelativeLayout

        android:layout_width="280dp"

        android:layout_height="140dp"

        android:background="@drawable/level3"

        android:layout_alignParentBottom="true"

        android:layout_centerHorizontal="true"

        ></RelativeLayout>

</RelativeLayout>
实现下面的效果

接着将一些小图标嵌入里面,布局比较简单有规律
<RelativeLayout xmlns:android="http://schemas.android.com/apk/res/android"

    xmlns:tools="http://schemas.android.com/tools"

    android:layout_width="match_parent"

    android:layout_height="match_parent"

    tools:context=".MainActivity" >

    <RelativeLayout

        android:layout_width="100dp"

        android:layout_height="50dp"

        android:layout_alignParentBottom="true"

        android:layout_centerHorizontal="true"

        android:background="@drawable/level1" >

        <ImageButton

            android:layout_width="wrap_content"

            android:layout_height="wrap_content"

            android:layout_centerInParent="true"

            android:background="@null"

            android:src="@drawable/icon_home" />

    </RelativeLayout>

    <RelativeLayout

        android:layout_width="180dp"

        android:layout_height="90dp"

        android:layout_alignParentBottom="true"

        android:layout_centerHorizontal="true"

        android:background="@drawable/level2" >

          <ImageButton

            android:layout_width="wrap_content"

            android:layout_height="wrap_content"

            android:layout_alignParentBottom="true"

            android:layout_alignParentLeft="true"

            android:layout_marginBottom="5dp"

            android:layout_marginLeft="10dp"

            android:background="@null"

            android:src="@drawable/icon_search" />

        <ImageButton

            android:layout_width="wrap_content"

            android:layout_height="wrap_content"

            android:layout_centerHorizontal="true"

            android:layout_marginTop="5dp"

            android:background="@null"

            android:src="@drawable/icon_menu" />

         <ImageButton

            android:layout_width="wrap_content"

            android:layout_height="wrap_content"

            android:layout_alignParentBottom="true"

            android:layout_alignParentRight="true"

            android:layout_marginBottom="5dp"

            android:layout_marginRight="10dp"

            android:background="@null"

            android:src="@drawable/icon_myyouku" />

    </RelativeLayout>

    <RelativeLayout

        android:layout_width="280dp"

        android:layout_height="140dp"

        android:layout_alignParentBottom="true"

        android:layout_centerHorizontal="true"

        android:background="@drawable/level3" >

        <ImageButton

            android:layout_width="wrap_content"

            android:layout_height="wrap_content"

            android:layout_alignParentBottom="true"

            android:layout_alignParentLeft="true"

            android:layout_marginBottom="5dp"

            android:layout_marginLeft="10dp"

            android:background="@null"

            android:src="@drawable/channel1" />

        <ImageButton

            android:layout_width="wrap_content"

            android:layout_height="wrap_content"

            android:layout_marginLeft="30dp"

            android:layout_marginTop="60dp"

            android:background="@null"

            android:src="@drawable/channel2" />

        <ImageButton

            android:layout_width="wrap_content"

            android:layout_height="wrap_content"

            android:layout_marginLeft="65dp"

            android:layout_marginTop="25dp"

            android:background="@null"

            android:src="@drawable/channel3" />

        <ImageButton

            android:layout_width="wrap_content"

            android:layout_height="wrap_content"

            android:layout_centerHorizontal="true"

            android:layout_marginTop="5dp"

            android:background="@null"

            android:src="@drawable/channel4" />

        <ImageButton

            android:layout_width="wrap_content"

            android:layout_height="wrap_content"

            android:layout_alignParentRight="true"

            android:layout_marginRight="30dp"

            android:layout_marginTop="60dp"

            android:background="@null"

            android:src="@drawable/channel5" />

        <ImageButton

            android:layout_width="wrap_content"

            android:layout_height="wrap_content"

            android:layout_alignParentRight="true"

            android:layout_marginRight="65dp"

            android:layout_marginTop="25dp"

            android:background="@null"

            android:src="@drawable/channel6" />

        <ImageButton

            android:layout_width="wrap_content"

            android:layout_height="wrap_content"

            android:layout_alignParentBottom="true"

            android:layout_alignParentRight="true"

            android:layout_marginBottom="5dp"

            android:layout_marginRight="10dp"

            android:background="@null"

            android:src="@drawable/channel7" />

    </RelativeLayout>

</RelativeLayout>
运行后的效果如下:
Android自定义控件2--优酷菜单界面初始化的更多相关文章
- android自定义控件之模仿优酷菜单
去年的优酷HD版有过这样一种菜单,如下图: 应用打开之后,先是三个弧形的三级菜单,点击实体键menu之后,这三个菜单依次旋转退出,再点击实体键menu之后,一级菜单会旋转进入,点击一级菜单,二级菜单旋 ...
- 自定义View(一)-ViewGroup实现优酷菜单
自定义View的第一个学习案例 ViewGroup是自动以View中比较常用也比较简单的一种方式,通过组合现有的UI控件,绘制出一个全新的View 效果如下: 主类实现如下: package com. ...
- Android自定义控件系列(四)—底部菜单(下)
转载请注明出处:http://www.cnblogs.com/landptf/p/6290862.html 在app中经常会用到底部菜单的控件,每次都需要写好多代码,今天我们用到了前几篇博客里的控件来 ...
- Android自定义控件7--自定义开关--绘制界面内容
本文实现全自定义控件--自定义开关 本文地址:http://www.cnblogs.com/wuyudong/p/5922316.html,转载请注明源地址. 自定义开关 (View),本文完成下面内 ...
- Android自定义控件4--优酷菜单的菜单键及细节补充
在上篇文章中实现了优酷菜单执行动画,本文接着完善已经实现的动画功能 本文地址:http://www.cnblogs.com/wuyudong/p/5915958.html ,转载请注明源地址. 已经实 ...
- Android自定义控件3--优酷菜单执行动画
在上篇文章中实现了优酷菜单的布局,本文接着实现动画功能 本文地址:http://www.cnblogs.com/wuyudong/p/5914901.html,转载请注明源地址. 新建动画工具类Ani ...
- android 使用WebView 支持播放优酷视频,土豆视频
看了很多文章和所谓的解决android WebView播放优酷,土豆等视频的办法,都是什么 setPluginsEnabled,在android 4.x之后都不好使,压根就没这函数,因为android ...
- Android笔记——Android自定义控件
目录: 1.自定义控件概述 01_什么是自定义控件 Android系统中,继承Android系统自带的View或者ViewGroup控件或者系统自带的控件,并在这基础上增加或者重新组合成我们想要的效果 ...
- [android] 优酷环形菜单-相对布局练习
优酷环形菜单 布局文件,使用<RelativeLayout/>控件作为第一级菜单,相对布局,位于父控件的底部,水平居中,因为图片不是特别的标准,因此宽度和高度都钉死,宽度是高度的两倍 二次 ...
随机推荐
- SQL Server如何在变长列上存储索引
这篇文章我想谈下SQL Server如何在变长列上存储索引.首先我们创建一个包含变长列的表,在上面定义主键,即在上面定义了聚集索引,然后往里面插入80000条记录: -- Create a new t ...
- HTML5矢量实现文件上传进度条
在HTML中,在文件上传的过程中,很多情况都是没有任何的提示,这在体验上很不好,用户都不知道到时有没有在上传.上传成功了没有,所以今天给大家介绍的内容是通过HT for Web矢量来实现HTML5文件 ...
- 修改cdh5集群中主机节点IP或hostName
前言 在使用cdh集群过程中,难免会因为某些不可抗拒的原因导致节点IP或hostName变动,而cm的监控界面无法完成这些事情,但是cm将集群中所有的主机的信息都存在postgresql数据库的hos ...
- 数据结构(C语言第2版)----时间复杂度和单链表
马上要到校招了,复习下相关的基础知识. 时间复杂度是什么? 官方解释: 算法的执行时间需要依据算法所编制的程序在计算机上于运行时所消耗的时间来度量.在算法中可以使用基本的语句的执行次数作为算法的时间复 ...
- Stream Player control
In this article you will find an implementation of a stream player control. Download WPF demo - 11 M ...
- WPF DataGrid绑定及列居中
基本的数据绑定 把集合的字段(属性)绑定在DataGrid的Binding属性就能将数据绑定列表 public class CashItem { public int Value { get; set ...
- win10 设置 计算机/此电脑/我的电脑 图标到桌面上
桌面上右键--个性化 选择右边的 主题选项 然后点击 桌面图标设置 勾选计算机 图标 需要什么图标就勾选哪个就行了 然后点击 确定 这样就可以了
- 身份证验证合法性js--已验证
<!DOCTYPE html PUBLIC "-//W3C//DTD XHTML 1.0 Transitional//EN" "http://www.w3.org/ ...
- Yii2框架打包成Phar包报错的经历
以yii2为例 打包文件过程比较简单,但打包好以后简单测试yii命令,一直报错: PHP Fatal error: Uncaught yii\base\InvalidParamException: T ...
- 双系统下删除Linux系统方法和Windows无法启动问题的解决方法
装了一个linux,后面直接把它删掉了,结果电脑重启的时候重启不了,总是一开机就出现 grub> 心中无比的恼火,后面想不通了,就打算直接重装系统,结果重装系统的过程中遇到了问题,B ...