Java进阶知识05 Hibernate联合主键之Annotation(注解)和XML实现方式
1、Hibernate联合主键(Annotation实现)
1.1、单列主键
1.1.1、为什么要有主键? //唯一确定一条记录
1.1.2、一个表能否有多个主键? //不能
1.1.3、为什么把id设为主键? //如果有其他的方式可以作为主键,id可以不要
1.1.4、主键生成策略:
identity:自增长,对DB2,MySQL, MS SQL Server, Sybase和HypersonicSQL的内置标识字段提供支持。 返回的标识符是long, short 或者int类型的。
sequence:自增长,在DB2,PostgreSQL, Oracle, SAP DB, McKoi中使用序列(sequence), 而在Interbase中使用生成器(generator)。返回的标识符是long, short或者 int类型的。
native:自增长,根据底层数据库的能力选择identity, sequence 或者hilo中的一个。如果是mysql,自动选择identity,如果是oracle,自动选择sequence 。
increment:自增长,只有在没有其他进程往同一张表中插入数据时才能使用。 在集群下不要使用。
assigned:指定主键生成策略
uuid:随机生成唯一值(String类型)
1.2、联合主键类必须要序列化,并重写equals和hashCode方法
主键类为什么要序列化?如果多个该类对象同时放入内存中,在一个集群系统中,其中一台服务器如果down机了,需要将内存中对象写到其它服务器。同时,如果该服务器内存已满,需要用虚拟内存,这就需要序列化后才能写到硬盘上。
1.3、注解
@Entity
@Table(name=”XXXX”) //类名和表名一样,可省略不写
@Column(.....)
A.实现方式一:将联合主键类注解为@Embeddable、将对象中联合主键注解为@Id
B.实现方式二:在对象中把联合主键引用注解为@EmbeddedId
C.实现方式三:在对象中包含联合主键的字段、并将其都注解为@Id,并在该对象类上注解@IdClass(联合主键类.class)
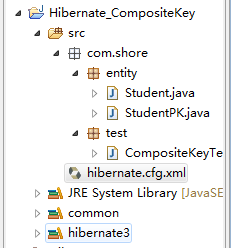
1.4、实例
1.4.1、创建一个实体类Student和StudentPK:联合主键类序列化,重写equals和hashCode方法
StudentPK 实体类:
 package com.shore.entity;

 import java.io.Serializable;

 import javax.persistence.Entity;

 /**

  * @author DSHORE/2019-9-16

  *

  */

 @Entity

 public class StudentPK implements Serializable {

     private static final long serialVersionUID = -2060041603022800114L; //序列化

     // name+address作为联合主键

     private String name;

     private String address;

     public StudentPK() {

         super();

     }

     public StudentPK(String name, String address) {

         super();

         this.name = name;

         this.address = address;

     }

     public String getName() {

         return name;

     }

     public void setName(String name) {

         this.name = name;

     }

     public String getAddress() {

         return address;

     }

     public void setAddress(String address) {

         this.address = address;

     }

     //联合主键类序列化,重写equals和hashCode方法

     @Override

     public boolean equals(Object object) {

         // instanceof——判断左边对象是否为右边对象的实例

         if (object instanceof StudentPK) {

             StudentPK pk = (StudentPK) object;

             if (this.name.equals(pk.getName())

                     && this.address.equals(pk.getAddress())) {

                 return true;

             }

         }

         return false;

     }

     @Override

     public int hashCode() {

         return this.name.hashCode();

     }

 }
Student 实体类:
 package com.shore.entity;

 import java.io.Serializable;

 import javax.persistence.EmbeddedId;

 import javax.persistence.Entity;

 import org.hibernate.annotations.Type;

 /**

  * @author DSHORE/2019-9-16

  *

  */

 @Entity

 public class Student implements Serializable {

     //对应的Student对象类建议也要序列化,但是可以不重写equals和hashCode方法

     private static final long serialVersionUID = -2924879320015689901L;

     private StudentPK keys;//联合主键 别名

     private Boolean sex;

     private String hobby;

     public Student() {

         super();

     }

     public Student(StudentPK keys, Boolean sex, String hobby) {

         super();

         this.keys = keys;

         this.sex = sex;

         this.hobby = hobby;

     }

     @EmbeddedId  //指定keys为联合主键

     public StudentPK getKeys() {

         return keys;

     }

     public void setKeys(StudentPK keys) {

         this.keys = keys;

     }

     @Type(type = "yes_no")  //数据库中,会以Y/N的形式插入到sex字段中

     public Boolean getSex() {

         return sex;

     }

     public void setSex(Boolean sex) {

         this.sex = sex;

     }

     public String getHobby() {

         return hobby;

     }

     public void setHobby(String hobby) {

         this.hobby = hobby;

     }

 }
1.4.2、创建hibernate.cfg.xml配置文件
 <?xml version='1.0' encoding='utf-8'?>

 <!DOCTYPE hibernate-configuration PUBLIC

         "-//Hibernate/Hibernate Configuration DTD 3.0//EN"

         "http://www.hibernate.org/dtd/hibernate-configuration-3.0.dtd">

 <hibernate-configuration>

     <session-factory>

         <!-- Database connection settings -->

         <property name="connection.driver_class">com.mysql.jdbc.Driver</property>

         <property name="connection.url">jdbc:mysql://localhost:3306/school</property>

         <property name="connection.username">root</property>

         <property name="connection.password">123456</property>

         <property name="dialect">org.hibernate.dialect.MySQLDialect</property>

         <property name="cache.provider_class">org.hibernate.cache.NoCacheProvider</property>

         <property name="show_sql">true</property>

         <property name="hbm2ddl.auto">create</property>

         <!-- <mapping resource="com/shore/entity/Student.hbm.xml"/> -->

         <mapping class="com.shore.entity.Student" />

     </session-factory>

 </hibernate-configuration>
联合主键,MySQL数据库的写法:(本文不需要手动创建数据表,是自动创建的,下面的MySQL建表脚本,仅提供参考)
 CREATE TABLE student(

   name VARCHAR(20),

   address VARCHAR(100),

   sex BOOLEAN,

   hobby VARCHAR(60),

   PRIMARY KEY(name,address)  -- 联合主键

 )
1.4.3、创建测试类CompositeKeyTest ,开始测试:
package com.shore.test; import org.hibernate.Session;
import org.hibernate.SessionFactory;
import org.hibernate.Transaction;
import org.hibernate.cfg.AnnotationConfiguration;
import org.junit.AfterClass;
import org.junit.BeforeClass;
import org.junit.Test; import com.shore.entity.Student;
import com.shore.entity.StudentPK; /**
* @author DSHORE/2019-9-16
*
*/
public class CompositeKeyTest {
public static SessionFactory sessionFactory = null;
public static Session session = null; @BeforeClass
public static void buildSessionFactory() {
//联合主键之Annotation实现,用的是AnnotationConfiguration方法
sessionFactory = new AnnotationConfiguration().configure().buildSessionFactory();
} @AfterClass
public static void close() {
session.close();
sessionFactory.close();
} @Test
public void test() {
session = sessionFactory.openSession();//打开一个session
Transaction transaction = session.beginTransaction();//开启事务
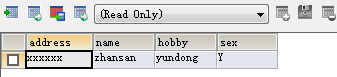
Student student = new Student(new StudentPK("zhansan", "xxxxxx"), true, "yundong");
session.save(student);
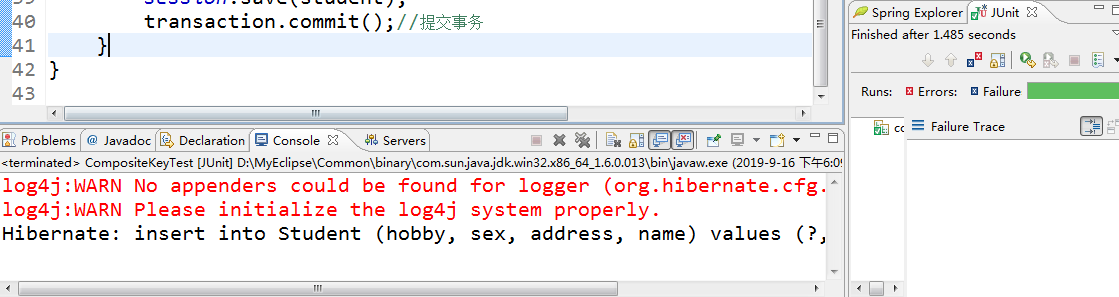
transaction.commit();//提交事务
}
}
1.4.4、测试结果图:
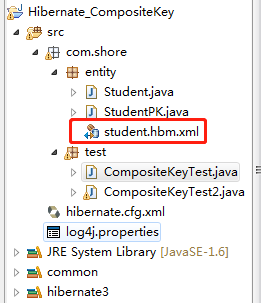
2、Hibernate联合主键(XML实现)
代码和上面的全部一样,不一样的地方如下所示:
2.1、首先,注解得全部去掉。
2.2、多了一个配置文件:student.hbm.xml
 <?xml version="1.0"?>

 <!DOCTYPE hibernate-mapping PUBLIC

         "-//Hibernate/Hibernate Mapping DTD 3.0//EN"

         "http://www.hibernate.org/dtd/hibernate-mapping-3.0.dtd">

 <hibernate-mapping package="com.shore.entity">

     <class name="Student">

         <composite-id name="keys">

             <key-property name="name"/>

             <key-property name="address"/>

         </composite-id>

         <property name="sex" type="java.lang.Boolean"/>

         <property name="hobby" type="java.lang.String"/>

     </class>

 </hibernate-mapping>
2.3、最后在hibernate.cfg.xml配置文件中引入“student.hbm.xml”文件即可
 <?xml version='1.0' encoding='utf-8'?>

 2 <!DOCTYPE hibernate-configuration PUBLIC

          "-//Hibernate/Hibernate Configuration DTD 3.0//EN"

          "http://www.hibernate.org/dtd/hibernate-configuration-3.0.dtd">

 6 <hibernate-configuration>

 7     <session-factory>         <!-- Database connection settings -->

 9         <property name="connection.driver_class">com.mysql.jdbc.Driver</property>

10         <property name="connection.url">jdbc:mysql://localhost:3306/school</property>

11         <property name="connection.username">root</property>         <property name="connection.password">123456</property>

14         <property name="dialect">org.hibernate.dialect.MySQLDialect</property>

15         <property name="cache.provider_class">org.hibernate.cache.NoCacheProvider</property>

16         <property name="show_sql">true</property>

17         <property name="hbm2ddl.auto">create</property>

19         <mapping resource="com/shore/entity/Student.hbm.xml"/>

20         <!-- <mapping class="com.shore.entity.Student" /> -->

21     </session-factory>

22 </hibernate-configuration>
2.4、还有sessionFactory创建方式不一样:
 package com.shore.test;

 import org.hibernate.Session;

 import org.hibernate.SessionFactory;

 import org.hibernate.Transaction;

 import org.hibernate.cfg.AnnotationConfiguration;

 import org.junit.AfterClass;

 import org.junit.BeforeClass;

 import org.junit.Test;

 import com.shore.entity.Student;

 import com.shore.entity.StudentPK;

 /**

  * @author DSHORE/2019-9-16

  *

  */

 public class CompositeKeyTest2 {

     public static SessionFactory sessionFactory = null;

     public static Session session = null;

     @BeforeClass

     public static void buildSessionFactory() {

                         //联合主键之xml实现,用的是Configuration()方法

         sessionFactory = new Configuration().configure().buildSessionFactory(); //之前用的是:AnnotationConfiguration()

     }

     @AfterClass

     public static void close() {

         session.close();

         sessionFactory.close();

     }

     @Test

     public void test() {

         session = sessionFactory.openSession();//打开一个session

         Transaction transaction = session.beginTransaction();//开启事务

         Student student = new Student(new StudentPK("zhansan", "xxxxxx"), true, "yundong");

         session.save(student);

         transaction.commit();//提交事务

     }

 }
|
原创作者:DSHORE 作者主页:http://www.cnblogs.com/dshore123/ 原文出自:https://www.cnblogs.com/dshore123/p/11528059.html 欢迎转载,转载务必说明出处。(如果本文对您有帮助,可以点击一下右下角的 推荐,或评论,谢谢!) |
Java进阶知识05 Hibernate联合主键之Annotation(注解)和XML实现方式的更多相关文章
- hibernate 联合主键生成机制(组合主键XML配置方式)
hibernate 联合主键生成机制(组合主键XML配置方式) 如果数据库中用多个字段而不仅仅是一个字段作为主键,也就是联合主键,这个时候就可以使用hibernate提供的联合主键生成策略. 具体 ...
- 这是一个hibernate 联合主键的例子
package com.bird.entity; import java.io.Serializable; import javax.persistence.Entity; import javax. ...
- hibernate 联合主键 composite-id
如果表使用联合主键(一个表有两个以上的主键),你可以映射类的多个属性为标识符属性.如:<composite-id>元素接受<key-property> 属性映射(单表映射)和& ...
- hibernate 联合主键
xml方式处理联合主键: 以有两个主键:id和name的student表为例. 先创建个主键类: package com.bjsxt.hibernate; //黑色为必写项 public ...
- Hibernate联合主键映射
1.联合主键的映射规则 1) 类中的每个主键属性都对应到数据表中的每个主键列. Hibernate要求具有联合主键的实体类实现Serializable接口,并且重写hashCode与equals方法, ...
- Java进阶知识07 Hibernate一对一双向外键关联(Annotation+XML实现)
1.Annotation 注解版 1.1.创建Husband类和Wife类 package com.shore.model; import javax.persistence.Entity; impo ...
- Java进阶知识06 Hibernate一对一单向外键关联(Annotation+XML实现)
1.Annotation 注解版 1.1.创建Husband类和Wife类 package com.shore.model; import javax.persistence.Entity; impo ...
- hibernate ——联合主键
接上一篇博客:http://www.cnblogs.com/tengpan-cn/p/5551323.html 主键类不需要写任何注解,表对象类使用@IdClass注解 在表对象类前面加@IdClas ...
- Java进阶知识03 Hibernate的基础配置详解
1.Hibernate的原理/流程步骤 1.通过Configuration().configure(); 读取并解析hibernate.cfg.xml配置文件,并创建一个configuration对象 ...
随机推荐
- import xxx和from xxx import xx中修改被导入模块里面的变量的坑
现在有如下几个模块: A.py 功能:定义全局变量,供其他模块使用 name = "张三" lists = [1, 2, 3, 4, 5] B.py 功能:打印A.py中的变量 f ...
- JS基础_质数练习,用到了标记flag
<!DOCTYPE html> <html> <head> <meta charset="UTF-8"> <title> ...
- JS基础_if注意问题
<!DOCTYPE html> <html> <head> <meta charset="utf-8" /> <title&g ...
- luogu题解 UVA11992 【Fast Matrix Operations】
题目链接: https://www.luogu.org/problemnew/show/UVA11992 题目大意: 一个r*c的矩阵,一开始元素都是0,然后给你m次三种操作,分别是将一个子矩阵中所有 ...
- 03 Go语言特性
一.基本注意事项 1.转义字符 \t 一个制表符,代表一次tab \n 换行符 \\ 转义代表 \ \" 转义代表 " \r 一个回车,从当前行的最前面开始输出,会覆盖以前的内容, ...
- [CSS] w3c 盒模型 和 IE 盒模型
- uni app以及小程序 --环境搭建以及编辑器
https://developers.weixin.qq.com/miniprogram/dev/devtools/download.html 根据以上网页下载自己电脑相应的版本的微信开发者工具(目录 ...
- 能当壁纸用的Git常用命令速查表
使用Microsoft Office 2016手工绘制. 链接: https://pan.baidu.com/s/18KsH-u5T2iSTHaXd6iQWGA 提取码: w8da 复制这段内容后打开 ...
- 第十二章·Kibana深入-日志图形展示
1.Kibana创建区域图 Kibana支持多重图从展示功能,需要日志是json格式的支持. Kibana区域图 打开浏览器,访问:http://10.0.0.54:5601   选择一个日志  ...
- ble ic
ti cc25xxnordic nrf24xx nrf51xx nrf52xx Beken bk34xx