
canva绘制圆角矩形
在做组态的时候,需要支持矩形圆角格式,但是因为canvas本身不带有圆角矩形,需要自行算出坐标进行绘制
方案一、统一圆角
<!DOCTYPE html>

<html>

<head>

    <meta charset="utf-8">

    <title>canvas制作圆角矩形(包括填充矩形的功能)</title>

</head>

<body>

    <canvas id="myCanvas" style="border:1px solid #d3d3d3;">

        您的浏览器不支持 HTML5 canvas 标签。</canvas>

    <script>

    window.onload = function() {

        var myCanvas = document.getElementById("myCanvas"); //获取canvas对象

        if (myCanvas.getContext("2d")) { //判断浏览器是否支持canvas标签

            //设置canvas的宽度和高度

            myCanvas.width = 400;

            myCanvas.height = 200;

            var context = myCanvas.getContext("2d"); //获取画布context的上下文环境

            //绘制一个圆角矩形

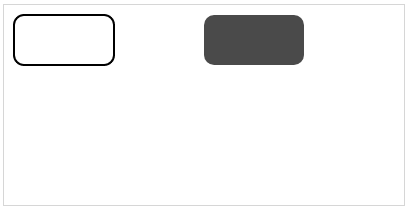
            strokeRoundRect(context, 10, 10, 100, 50, 10);

            //绘制并填充一个圆角矩形

            fillRoundRect(context, 200, 10, 100, 50, 10, 'rgba(0,0,0,0.7)');

        } else {

            alert("您的浏览器不支持canvas,请换个浏览器试试");

        }

    };

    /**该方法用来绘制一个有填充色的圆角矩形

     *@param cxt:canvas的上下文环境

     *@param x:左上角x轴坐标

     *@param y:左上角y轴坐标

     *@param width:矩形的宽度

     *@param height:矩形的高度

     *@param radius:圆的半径

     *@param fillColor:填充颜色

     **/

    function fillRoundRect(cxt, x, y, width, height, radius, /*optional*/ fillColor) {

        //圆的直径必然要小于矩形的宽高

        if (2 * radius > width || 2 * radius > height) { return false; }

        cxt.save();

        cxt.translate(x, y);

        //绘制圆角矩形的各个边

        drawRoundRectPath(cxt, width, height, radius);

        cxt.fillStyle = fillColor || "#000"; //若是给定了值就用给定的值否则给予默认值

        cxt.fill();

        cxt.restore();

    }

    /**该方法用来绘制圆角矩形

     *@param cxt:canvas的上下文环境

     *@param x:左上角x轴坐标

     *@param y:左上角y轴坐标

     *@param width:矩形的宽度

     *@param height:矩形的高度

     *@param radius:圆的半径

     *@param lineWidth:线条粗细

     *@param strokeColor:线条颜色

     **/

    function strokeRoundRect(cxt, x, y, width, height, radius, /*optional*/ lineWidth, /*optional*/ strokeColor) {

        //圆的直径必然要小于矩形的宽高

        if (2 * radius > width || 2 * radius > height) { return false; }

        cxt.save();

        cxt.translate(x, y);

        //绘制圆角矩形的各个边

        drawRoundRectPath(cxt, width, height, radius);

        cxt.lineWidth = lineWidth || 2; //若是给定了值就用给定的值否则给予默认值2

        cxt.strokeStyle = strokeColor || "#000";

        cxt.stroke();

        cxt.restore();

    }

    function drawRoundRectPath(cxt, width, height, radius) {

        cxt.beginPath(0);

        //从右下角顺时针绘制,弧度从0到1/2PI

        cxt.arc(width - radius, height - radius, radius, 0, Math.PI / 2);

        //矩形下边线

        cxt.lineTo(radius, height);

        //左下角圆弧,弧度从1/2PI到PI

        cxt.arc(radius, height - radius, radius, Math.PI / 2, Math.PI);

        //矩形左边线

        cxt.lineTo(0, radius);

        //左上角圆弧,弧度从PI到3/2PI

        cxt.arc(radius, radius, radius, Math.PI, Math.PI * 3 / 2);

        //上边线

        cxt.lineTo(width - radius, 0);

        //右上角圆弧

        cxt.arc(width - radius, radius, radius, Math.PI * 3 / 2, Math.PI * 2);

        //右边线

        cxt.lineTo(width, height - radius);

        cxt.closePath();

    }

    </script>

</body>

</html>
效果图
方案二、支持多种圆角格式【右下、左下、左上、右上】
申明一个变量,以数组的形式,然后将 drawRoundRectPath函数重新改写一下即可
    drawRoundRectPath(cxt, width, height) {

      var radius = this.radius;//vue data里面的数据

      var  r0 = radius[0],r1 = radius[1],r2 = radius[2],r3 = radius[3];

      cxt.beginPath(0);

      //从右下角顺时针绘制,弧度从0到1/2PI

      cxt.arc(width - r0, height - r0, r0, 0, Math.PI / 2);

      //矩形下边线

      cxt.lineTo(r1, height);

      //左下角圆弧,弧度从1/2PI到PI

      cxt.arc(r1, height - r1, r1, Math.PI / 2, Math.PI);

      //矩形左边线

      cxt.lineTo(0, r2);

      //左上角圆弧,弧度从PI到3/2PI

      cxt.arc(r2, r2, r2, Math.PI, Math.PI * 3 / 2);

      //上边线

      cxt.lineTo(width - r3, 0);

      //右上角圆弧

      cxt.arc(width - r3, r3, r3, Math.PI * 3 / 2, Math.PI * 2);

      //右边线

      cxt.lineTo(width, height - r3);

      cxt.closePath();

    }
实例
vue进行绘制矩形
<template>

  <canvas

    :id="options.id"

    ref="canvas"

    class="elem-container"

    :width="canvasWidth"

    :height="canvasHeight"

    :style="assignStyle"

  />

</template>

<script>

import mixins from './canvasMixins.js'

export default {

  name: 'RectElem',

  mixins: [mixins],

  data() {

    return {

      myOptions: {

        penStyle: 0

      },

      assignStyle: {} // 合并样式

    }

  },

  computed: {

    'canvasWidth': function() {

      return (parseFloat(this.myOptions.width) + parseFloat(this.myOptions.borderWidth))

    },

    'canvasHeight': function() {

      return (parseFloat(this.myOptions.height) + parseFloat(this.myOptions.borderWidth))

    },

    'radius' : function(){

      debugger;

      if(this.myOptions.radius == "none"){ return [0,0,0,0]}

      return !!this.myOptions.radius ? JSON.parse(this.myOptions.radius) : [0,0,0,0]

    }

  },

  mounted() {

    this.initialStyleOfRec()

  },

  methods: {

    initialStyleOfRec() {

      const options = this.myOptions // 父组件传入的参数

      const bWidth = options.borderWidth

      let baseStyle = options.style // 未转为对象前的基础样式(字符串)

      const width = options.width ? `width:${options.borderWidth ? (options.width * 1 + options.borderWidth) : options.width}px;` : ''

      const height = options.height ? `height:${options.borderWidth ? (options.height * 1 + options.borderWidth) : options.height}px;` : ''

      const len = baseStyle.length

      baseStyle = baseStyle.charAt(len - 1) === ';' ? (baseStyle + width + height) : (baseStyle + ';' + width + height)

      this.baseStyle = this.style2Object(baseStyle)

      if (bWidth && bWidth !== '') {

        this.baseStyle.top = `${-0.5 * (this.options.borderWidth || 0)}px`

        this.baseStyle.left = `${-0.5 * (this.options.borderWidth || 0)}px`

      }

      this.assignStyle = this.baseStyle

    },

    // // 把字符串样式转化为{}

    // styleToObject(style) {

    //   let styleObject = {}

    //   if (style && style !== '' && style !== 'null') {

    //     const len = style.length

    //     styleObject = style.charAt(len - 1) === ';' ? '{' + style + '}' : '{' + style + ';}' // 统一样式后面以";"结束

    //     // 将字符串转化为json标准字符串

    //     styleObject = styleObject.replace(/{/g, '{\"')

    //     styleObject = styleObject.replace(/:/g, '\":\"')

    //     styleObject = styleObject.replace(/;/g, '\",\"')

    //     styleObject = styleObject.replace(/,"}/g, '}')

    //     // 将json标准字符串转化为{}对象

    //     styleObject = JSON.parse(styleObject)

    //   }

    //   return styleObject

    // },

    render(options) {

      const ctx = this.getCleanCtx()// 获取canvas画布

      const penStyle = options.penStyle// 线型

      // 判断

      const halfBW = 0.5 * (options.borderWidth || 0) // 线宽的一半

      const fillColor = options.fillColor

      if (penStyle === 0) {

        ctx.lineWidth === 0

      } else if (penStyle !== 1) {

        ctx.setLineDash(this.getLineDashArr(penStyle))

      }

      let param = {

          x:0 + halfBW,

          y:0 + halfBW,

          w:options.width,

          h:options.height,

          radius:options.radius || [0,0,0,0]

        }

      if (fillColor !== 'none') {

        // 绘制填充矩形

        ctx.fillStyle = fillColor

       // ctx.fillRect(0 + halfBW, 0 + halfBW, options.width, options.height);

        //绘制填充圆角矩形

        this.fillRoundRect(ctx,param);

        //ctx.fill()

      }

      ctx.lineWidth = options.borderWidth

      ctx.strokeStyle = options.borderColor

      //ctx.strokeRect(0 + halfBW, 0 + halfBW, options.width, options.height)

      //绘制描边圆角矩形

      this.strokeRoundRect(ctx,param);

    },

    /**该方法用来绘制一个有填充色的圆角矩形

     *@param cxt:canvas的上下文环境

     *@param param.x:左上角x轴坐标

     *@param param.y:左上角y轴坐标

     *@param param.w:矩形的宽度

     *@param param.h:矩形的高度

     *@param param.radius:圆的半径

     **/

    fillRoundRect(cxt, param) {

        let x = param.x,

        ctx = ctx,

        y = param.y,

        width = param.w,

        height = param.h,

        radius = param.radius;

        //圆的直径必然要小于矩形的宽高

        if (2 * radius > width || 2 * radius > height) { return false; }

        cxt.save();

        cxt.translate(x, y);

        //绘制圆角矩形的各个边

        this.drawRoundRectPath(cxt, width, height, radius);

        //cxt.fillStyle = fillColor || "#000"; //若是给定了值就用给定的值否则给予默认值

        cxt.fill();

        cxt.restore();

    },

    drawRoundRectPath(cxt, width, height) {

      var radius = this.radius;

      var  r0 = radius[0],r1 = radius[1],r2 = radius[2],r3 = radius[3];

      cxt.beginPath(0);

      //从右下角顺时针绘制,弧度从0到1/2PI

      cxt.arc(width - r0, height - r0, r0, 0, Math.PI / 2);

      //矩形下边线

      cxt.lineTo(r1, height);

      //左下角圆弧,弧度从1/2PI到PI

      cxt.arc(r1, height - r1, r1, Math.PI / 2, Math.PI);

      //矩形左边线

      cxt.lineTo(0, r2);

      //左上角圆弧,弧度从PI到3/2PI

      cxt.arc(r2, r2, r2, Math.PI, Math.PI * 3 / 2);

      //上边线

      cxt.lineTo(width - r3, 0);

      //右上角圆弧

      cxt.arc(width - r3, r3, r3, Math.PI * 3 / 2, Math.PI * 2);

      //右边线

      cxt.lineTo(width, height - r3);

      cxt.closePath();

    },

    /**该方法用来绘制描边圆角矩形

     *@param cxt:canvas的上下文环境

     *@param x:左上角x轴坐标

     *@param y:左上角y轴坐标

     *@param width:矩形的宽度

     *@param height:矩形的高度

     *@param radius:圆的半径

     *@param lineWidth:线条粗细

     *@param strokeColor:线条颜色

     **/

    strokeRoundRect(cxt,param){

      let x = param.x,

      y = param.y,

      width = param.w,

      height = param.h,

      radius = param.radius;

      //圆的直径必然要小于矩形的宽高

      if (2 * radius > width || 2 * radius > height) { return false; }

      cxt.save();

      cxt.translate(x, y);

      //绘制圆角矩形的各个边

      this.drawRoundRectPath(cxt, width, height, radius);

     // cxt.lineWidth = lineWidth || 2; //若是给定了值就用给定的值否则给予默认值2

      //cxt.strokeStyle = strokeColor || "#000";

      cxt.stroke();

      cxt.restore();

    }

  }

}

</script>
canva绘制圆角矩形的更多相关文章
- 在Microsoft Expression Blend 2 中绘制圆角矩形按钮
原文:在Microsoft Expression Blend 2 中绘制圆角矩形按钮 /* 声明:转载请保留此信息:http://www.BrawDraw.com, http://www.ZPXP.c ...
- Android中绘制圆角矩形图片及任意形状图片
圆角矩形图片在苹果的产品中很流行,相比于普通的矩形,很多人都喜欢圆角矩形的图片,因为它避开了直角的生硬,带来更好的用户体验,下面是几个设计的例子: 下面在Android中实现将普通的矩形图片绘制成圆角 ...
- Delphi中绘制圆角矩形的窗体
制作圆角矩形的窗体: 01.procedure TPortForm.FormCreate(Sender: Tobject); 02.var hr :thandle; 03.begin 04.hr:=c ...
- C# 绘制圆角矩形
Graphics g = e.Graphics; // 圆角半径 ; // 要实现 圆角化的 矩形 Rectangle rect = , , panel4.Width - cRadius, panel ...
- Cocos2d-x绘制圆角矩形
/* * @brief 画圆角矩形 * @param origin 矩形开始点 * @param destination 矩形结束点 * @param radius 圆角半径 * @param seg ...
- canvas 绘制圆角矩形
<!DOCTYPE HTML> <head> <meta charset = "utf-8"> <title>canvas</ ...
- 使用Draw rect 绘制圆角矩形
- (void)drawRect:(CGRect)rect { CGContextRef context = UIGraphicsGetCurrentContext(); UIGraphicsPush ...
- 详解使用CSS3绘制矩形、圆角矩形、圆形、椭圆形、三角形、弧
1.矩形 绘制矩形应该是最简单的了,直接设置div的宽和高,填充颜色,效果就出来了. 2.圆角矩形 绘制圆角矩形也很简单,在1的基础上,在使用css3的border-radius,即可. 3.圆 根据 ...
- Android开发之自定义圆角矩形图片ImageView的实现
android中的ImageView只能显示矩形的图片,这样一来不能满足我们其他的需求,比如要显示圆角矩形的图片,这个时候,我们就需要自定义ImageView了,其原理就是首先获取到图片的Bitmap ...
随机推荐
- Spring配置文件里加载路径中的通配符
?代表匹配任意一个字符 *代表匹配0个或多个任意字符 **/匹配任意多个目录 classpath:app-Beans.xml 查找app-Beans.xm ...
- maven项目无法导入Oracle的jdbc连接jar包【我】
导入一个maven项目,启动一直报错 找不到Oracle的jdbc连接驱动Class, 用Eclipse导入 ojdbc14.jar 连接包,各种方法都无效,无法引入到部署后的lib目录中,可以直接放 ...
- virtualbox迁移虚拟机
我用的Ubuntu16.04,下图为装好virtualbox时安装好系统后默认的存储位置. 促使我想迁移的原因是我的/home下因为虚拟机的存储原因导致/home下还剩1.5M可用空间..... 该目 ...
- [ML] Online learning
复习 一.Spark 流处理 使用Spark Streaming与我们操作RDD的方式很接近,处理数据流也变得简单了.使用Spark的流处理元素结合MLlib的基于SGD的在线学习能力,可以创建实时的 ...
- [GPU] Install H2O.ai
一.前言 主页:https://www.h2o.ai/products/h2o4gpu/ GPU版本安装:h2oai/h2o4gpu 采用GPU,能否成为超越下面链接中实验的存在? [ML] LIBS ...
- php上传文件夹
用过浏览器的开发人员都对大文件上传与下载比较困扰,之前遇到了一个php文件夹上传下载的问题,无奈之下自己开发了一套文件上传控件,在这里分享一下.希望能对你有所帮助. 功能介绍: 树形目录导航.您可以通 ...
- PJzhang:python基础进阶的10个疗程-three
猫宁!!! 参考:北京理工大学-python程序语言设计 第3节:基本数据类型 默写代码的重要性. 保留字一定要全部都会默写,不能有错. pow(x,y),计算x的y次方,整数没有大小限制 整数进制 ...
- 使用国内镜像给ROS安装提速
大半年没写博客了.最近有幸参与机器人导航研究,在学习ROS相关知识.在安装ROS时使用国外的官方源安装非常慢.这里把使用国内镜像的安装方式做一个记录. 笔者用的是Kinetic版本,操作系统是Ubun ...
- 又做了个新的Blog
http://inkhin.com 服务器比较渣,访问不了的请见谅.
- day33 网络编程之UDP与进程了解
UDP 什么是UDP协议 在上节课的练习中,使用TCP进行网络编程时,我们会遇到粘包问题,这是因为TCP是流式协议,而今天学习的UDP协议不是流式协议,其发送的数据是数据报格式的,在进行数据发送时该协 ...