
Install TightVNC Server in RHEL/CentOS and Fedora to Access Remote Desktops
Virtual Networking Computing (VNC) is a Kind of remote sharing system that makes it possible to take control of any other computer connected to internet. Keyboard and mouse clicks can easily transmit from one computer to another. It helps administrator and technical staff to manage their servers and desktops without being to the same location physically.
VNC is an open source application created in late 1990′s. It is independent and is compatible with Windows and Unix/Linux. Means a normal Windows based user can interact with Linux based system without any hazel.
To use VNC you must have TCP/IP connection and VNC viewer client to connect to a computer running VNC server component. The server transmits a duplicate display of a remote computer to the viewer.
This artilce demonstrates how to install VNC Server using TightVNC a much enhanced version of a older VNC program, with GNOME Desktop remote access on RHEL, CentOS andFedora systems.
Step 1: Installing GNOME Desktop
If you’ve installed a minimal version of Operating System, which gives only a command-line interface not GUI. Then you need to install a GUI (Graphical User Interface) withGNOME Desktop. The GNOME desktop provides a lightweight desktop environment that works very well on remote VNC desktops.
[root@tecmint ~]# yum groupinstall "X Window System" "Desktop"
Step 2: Installing TightVNC Server
TightVNC a remote desktop control software that enables us to connect to remote desktops. To install, use the following yum command as shown below.
[root@tecmint ~]# yum -y install tigervnc-server xorg-x11-fonts-Type1
Step 3: Create a Normal VNC User
Create a normal user, that will be used to connect to remote desktop. For example, I’ve used “tecmint” as a user, you can choose your own username.
[root@tecmint ~]# useradd tecmint

[root@tecmint ~]# passwd tecmint

Changing password for user tecmint.

New password:

Retype new password:

passwd: all authentication tokens updated successfully.
Step 4: Set VNC Password for User
Create a new password for newly created user. Login to the user (su – tecmint) and run ‘vncpasswd‘ to set the VNC password for the user.
Note : This password is for accessing VNC remote desktop, and the password we created instep 3 is for accessing SSH.
[root@tecmint ~]# su - tecmint

[tecmint@tecmint ~]$ vncpasswd

Password:

Verify:
The above command ask you to supply password twice and creates “.vnc” directory under user’s home directory with passwd file inside it. You can check the password file is created, by using following command.
# ls -l /home/tecmint/.vnc

-rw------- 1 tecmint tecmint 8 Jul 14 21:33 passwd
Now exit from user login and return to root user login.
[tecmint@tecmint ~]$ exit

exit
Step 5: Create VNC Xstartup Script
Create the xstartup script as root user. This can be created by starting the VNC server.
[root@tecmint ~]# /etc/init.d/vncserver start

Starting VNC server: 1:tecmint

New 'tecmint.com:1 (tecmint)' desktop is tecmint.com:1

Starting applications specified in /home/tecmint/.vnc/xstartup

Log file is /home/tecmint/.vnc/tecmint.com:1.log

						 [  OK  ]
Next, check whether xstartup script is created under (tecmint) user’s home directory, do “ls -l” command.
[root@tecmint ~]# ls -l /home/tecmint/.vnc/

-rw-------. 1 tecmint tecmint    8 Jul 15 12:27 passwd

-rwxr-xr-x. 1 tecmint tecmint  654 Oct 11  2012 xstartup
Once, it created, set a desktop resolution in xstartup file. For this, you must stop running VNC service.
[root@tecmint ~]# /etc/init.d/vncserver stop

Shutting down VNC server: 1:tecmint              [  OK  ]
Step 6: Setting Xstarup Resolution
Open file “/etc/sysconfig/vncservers” file your choice of editor. Here I’m using “nano” editor. Create new VNC Session for “tecmint” with below command. where “-geomerty” is used define desktop resolution.
[root@tecmint ~]# nano /etc/sysconfig/vncservers
And add following lines to it at the bottom of file. Save and close it.
## Single User ##

VNCSERVERS="1:tecmint"

VNCSERVERARGS[1]="-geometry 1280x1024"
If you’re dealing with multiple users, first create a vncpasswd for all user’s as described above in step 4, and then add those user’s to the VNCSERVERS line and add aVNCSERVERARGS[x] entry as shown below. Where ‘x‘ is the ID number.
## Multiple Users ##

VNCSERVERS="2:ravi 3:navin 4:avishek"

VNCSERVERARGS[2]="-geometry 1280x1024"

VNCSERVERARGS[3]="-geometry 1280x1024"

VNCSERVERARGS[4]="-geometry 1280x1024"
Step 7: Starting TightVNC Server
After making all changes, run the following command to start again the VNC server. Before starting VNC session to “tecmint” user, let me give you a small intro about Port Numbers and ID‘s. By Default VNC runs on Port 5900 and ID:0 (which is for root user). In our scenario I’ve created tecmint, ravi, navin and avishek. So, the ports andid’s are used by these users as follows
User's		Port's		ID's

5900		root		:0

5901		tecmint		:1

5902		ravi		:2

5903		navin		:3

5904		avishek		:4
So, here user “tecmint” will get port 5901 and id as :1 and so on. If you’ve created another user say (user5) then he will get port 5905 and id:5 and so on for each user you creates.
[root@tecmint ~]# /etc/init.d/vncserver start

Starting VNC server: 1:tecmint

New 'tecmint.com:1 (tecmint)' desktop is tecmint.com:1

Starting applications specified in /home/tecmint/.vnc/xstartup

Log file is /home/tecmint/.vnc/tecmint.com:1.log

2:ravi

New 'tecmint.com:2 (ravi)' desktop is tecmint.com:2

Starting applications specified in /home/ravi/.vnc/xstartup

Log file is /home/ravi/.vnc/tecmint.com:2.log

3:navin

New 'tecmint.com:3 (navin)' desktop is tecmint.com:3

Starting applications specified in /home/navin/.vnc/xstartup

Log file is /home/navin/.vnc/tecmint.com:3.log

4:avishek

New 'tecmint.com:4 (avishek)' desktop is tecmint.com:4

Starting applications specified in /home/avishek/.vnc/xstartup

Log file is /home/avishek/.vnc/tecmint.com:4.log

                                                           [  OK  ]
Step 8: Open VNC Ports on Firewall
Open port on iptables, say for user (tecmint) at 5901.
[root@tecmint ~]# iptables -A INPUT -m state --state NEW -m tcp -p tcp --dport 5901 -j ACCEPT
For multiple users, ravi, navin and avishek. I open ports 5902, 5903 and 5904respectively.
[root@tecmint ~]# iptables -I INPUT 5 -m state --state NEW -m tcp -p tcp -m multiport --dports 5902:5904 -j ACCEPT
Restart Iptables service.
[root@tecmint ~]# service iptables save

[root@tecmint ~]# service iptables restart
Step 9: Download VNC Client
Now go to your Windows or Linux machine and download VNC Viewer client and install in your system to access the desktop.
Step 10: Connect to Remote Desktop Using Client
After you installed the VNC Viewer client, open it you’ll get similar to below screen. Enter VNC Server IP address along with VNC ID (i.e 1) for user tecmint.
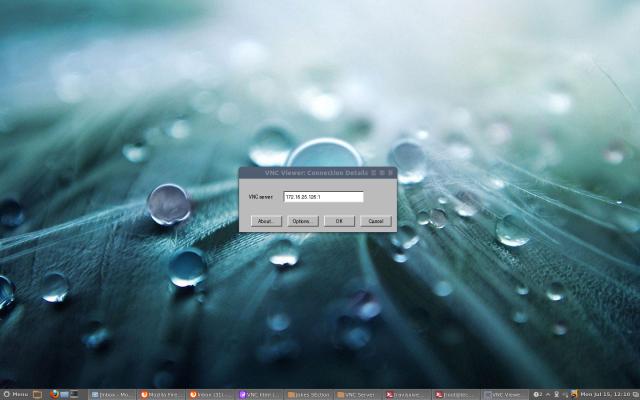
Enter VNC Server IP Address
Enter password that we created with “vncpasswd” command.
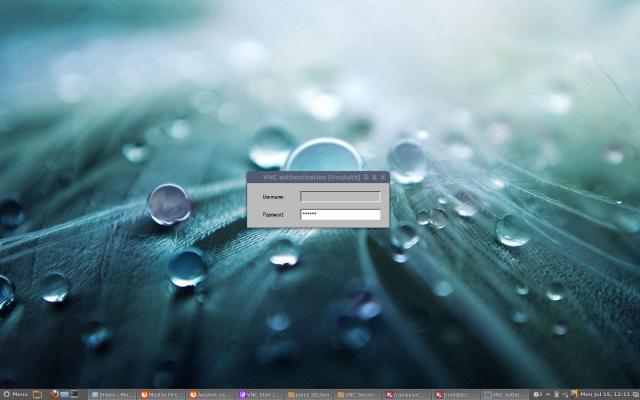
Enter VNC User Password
That’s it, you connected to your Remote Desktop.
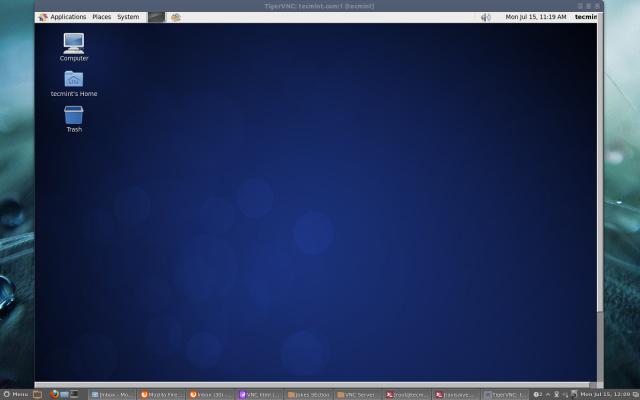
VNC Remote Desktop
Read Also : Access VNC Desktop from Web Browser
from:http://www.tecmint.com/install-tightvnc-remote-desktop/
Install TightVNC Server in RHEL/CentOS and Fedora to Access Remote Desktops的更多相关文章
- Installation of NVIDIA Drivers in RHEL/CentOS and Fedora
1.首先安装所需的软件: # yum groupinstall "Development Tools" # yum install kernel-devel kernel-head ...
- Google Chrome 55 Released – Install on RHEL/CentOS 7/6 and Fedora 25-20
Google Chrome is a freeware web browser developed by Google Inc. Google Chrome team proudly announce ...
- Install LAMP Server (Apache, MariaDB, PHP) On CentOS/RHEL/Scientific Linux 7
Install LAMP Server (Apache, MariaDB, PHP) On CentOS/RHEL/Scientific Linux 7 By SK - August 12, 201 ...
- Install Apache 2.2.15, MySQL 5.5.34 & PHP 5.5.4 on RHEL/CentOS 6.4/5.9 & Fedora 19-12 [转]
Step 1: Installing Remi Repository ## Install Remi Repository on Fedora , , , , ## rpm -Uvh http://d ...
- How to install 64-bit Google Chrome 28+ on 64-bit RHEL/CentOS 6 or 7
How to install 64-bit Google Chrome 28+ on 64-bit RHEL/CentOS 6 or 7 The problem Google developers s ...
- 转: How to Install MongoDB 3.2 on CentOS/RHEL & Fedora (简单易懂)
from: http://tecadmin.net/install-mongodb-on-centos-rhel-and-fedora/ MongoDB (named from “huMONGOus ...
- [转载]How to Install Google Chrome 39 in CentOS/RHEL 6 and Fedora 19/18
FROM: http://tecadmin.net/install-google-chrome-in-centos-rhel-and-fedora/ Google Chrome is a freewa ...
- How to install redis server on CentOS 7 / RHEL 7
在本教程中,我们将学习如何在CentOS 7 / RHEL 7上安装Redis服务器. redis的缩写是REmote DIctionary Server. 它是最流行的开源,高级键值缓存和存储之一. ...
- RHEL/CentOS/Fedora各种源(EPEL、Remi、RPMForge、RPMFusion)配置
最新文章:Virson’s Blog CentOS默认自带CentOS-Base.repo源,但官方源中去除了很多有版权争议的软件,而且安装的软件也不是最新的稳定版.Fedora自带的源中也找不到很多 ...
随机推荐
- C#中WebClient使用DownloadString中文乱码的解决办法
原文:C#中WebClient中文乱码的解决办法 第一次尝试: string question = textBox1.Text.ToString(); WebClient client= new We ...
- python defaultdict 类型
在Python里面有一个模块collections,解释是数据类型容器模块.这里面有一个collections.defaultdict()经常被用到.主要说说这个东西. 综述: 这里的defaultd ...
- java学习之即时通信项目实战
项目总结:这次项目主要是根据视频来的,结果跟到一半感觉跟不上,慢慢自己有了自己的想法,决定自己先不看学习视频,自己先试着写. 总结写前面,算是写的第一个项目吧.项目中遇到几点问题,首先Scoket对 ...
- IPhone多视图切换
处理IPhone多个view切换是我们常遇到的问题,接下来有个比较实用的方法: 而且还附有创建空项目,内存告急处理和动画效果的实现! 具体步骤: 1.创建一个空的项目,然后添加一个ViewContro ...
- Dancing Stars on Me(判断正多边形)
Dancing Stars on Me Time Limit: 2000/1000 MS (Java/Others) Memory Limit: 262144/262144 K (Java/Ot ...
- weblogic的ejb远程调用
这是一篇对EJB远程调用的简单范例. 1.环境:win7 + weblogic 12c + myeclipse8.5 2.目的:实现在myeclispe中对weblogic中EJ ...
- Oracle包Package调用Package
Package左侧文件: create or replace package CALL_DETAILS is strdatarange varchar2(1) := '1'; numrow_num n ...
- c#程序添加其他网站的webservice引用。
前言: 有A网站,B网站两个网站独立运行.某一天,需要两个网站进行合作来完成一件事,比如用A网站接收一些数据进行处理,存入中转数据库,B网站定时去取数据进入自己的系统进行处理. 可能我们会先想到在B网 ...
- ansible模块
ansible模块: 模块(Modules),类似于 "任务插件"("task plugins")或"库插件"("library ...
- 「Foundation」结构体
一.基本知识 Foundation—基础框架.框架中包含了很多开发中常用的数据类型,如结构体,枚举,类等,是其他ios框架的基础. 如果要想使用foundation框架中的数据类型,那么包含它的主头文 ...