SpringBoot整合Shiro自定义Redis存储
Shiro
Shiro 主要分为 安全认证 和 接口授权 两个部分,其中的核心组件为 Subject、 SecurityManager、 Realms,公共部分 Shiro 都已经为我们封装好了,我们只需要按照一定的规则去编写响应的代码即可…
Subject 表示主体,将用户的概念理解为当前操作的主体,它即可以是一个通过浏览器请求的用户,也可能是一个运行的程序,外部应用与 Subject 进行交互,记录当前操作用户。Subject 代表当前用户的安全操作,SecurityManager 则管理所有用户的安全操作。
SecurityManager 即安全管理器,对所有的 Subject 进行安全管理,并通过它来提供安全管理的各种服务(认证、授权等)
Realm 充当了应用与数据安全间的 桥梁 或 连接器。当对用户执行认证(登录)和授权(访问控制)验证时,Shiro 会从应用配置的 Realm 中查找用户及其权限信息。
1.导入shiro依赖

        <dependency>

            <groupId>org.apache.shiro</groupId>

            <artifactId>shiro-spring</artifactId>

            <version>1.4.0</version>

        </dependency>


     <!-- hiro-redis插件用于实现:将用户信息交给redis管理 -->
        <dependency>

            <groupId>org.crazycake</groupId>

            <artifactId>shiro-redis</artifactId>

            <version>2.8.24</version>

        </dependency>
2.shiro配置类
import org.apache.shiro.authc.credential.HashedCredentialsMatcher;

import org.apache.shiro.mgt.SecurityManager;

import org.apache.shiro.session.mgt.SessionManager;

import org.apache.shiro.spring.security.interceptor.AuthorizationAttributeSourceAdvisor;

import org.apache.shiro.spring.web.ShiroFilterFactoryBean;

import org.apache.shiro.web.mgt.DefaultWebSecurityManager;

import org.crazycake.shiro.RedisCacheManager;

import org.crazycake.shiro.RedisManager;

import org.crazycake.shiro.RedisSessionDAO;

import org.springframework.aop.framework.autoproxy.DefaultAdvisorAutoProxyCreator;

import org.springframework.beans.factory.annotation.Value;

import org.springframework.context.annotation.Bean;

import org.springframework.context.annotation.Configuration;

import org.springframework.web.servlet.HandlerExceptionResolver;

import java.util.LinkedHashMap;

import java.util.Map;

@Configuration

public class ShiroConfig {

    @Value("${spring.redis.shiro.host}")

    private String host;

    @Value("${spring.redis.shiro.port}")

    private int port;

    @Value("${spring.redis.shiro.timeout}")

    private int timeout;

    @Value("${spring.redis.shiro.password}")

    private String password;

    @Bean

    public ShiroFilterFactoryBean shirFilter(SecurityManager securityManager) {

        System.out.println("ShiroConfiguration.shirFilter()");

        ShiroFilterFactoryBean shiroFilterFactoryBean = new ShiroFilterFactoryBean();

        shiroFilterFactoryBean.setSecurityManager(securityManager);

        Map<String, String> filterChainDefinitionMap = new LinkedHashMap<String, String>();

        // 注意过滤器配置顺序 不能颠倒

        // 配置退出 过滤器,其中的具体的退出代码Shiro已经替我们实现了,登出后跳转配置的loginUrl

        filterChainDefinitionMap.put("/logout", "logout");

        // 配置不会被拦截的链接 顺序判断,在 ShiroConfiguration 中的 shiroFilter 处配置了 /ajaxLogin=anon,意味着可以不需要认证也可以访问

        filterChainDefinitionMap.put("/static/**", "anon");

        filterChainDefinitionMap.put("/*.html", "anon");

        filterChainDefinitionMap.put("/ajaxLogin", "anon");

        filterChainDefinitionMap.put("/login", "anon");

        filterChainDefinitionMap.put("/**", "authc");

        // 配置shiro默认登录界面地址,前后端分离中登录界面跳转应由前端路由控制,后台仅返回json数据

        shiroFilterFactoryBean.setLoginUrl("/unauth");

        // 登录成功后要跳转的链接

     // shiroFilterFactoryBean.setSuccessUrl("/index");

        // 未授权界面;

     // shiroFilterFactoryBean.setUnauthorizedUrl("/403");

        shiroFilterFactoryBean.setFilterChainDefinitionMap(filterChainDefinitionMap);

        return shiroFilterFactoryBean;

    }

    /**

     * 凭证匹配器

     * (由于我们的密码校验交给Shiro的SimpleAuthenticationInfo进行处理了)

     *

     * @return

     */

    @Bean

    public HashedCredentialsMatcher hashedCredentialsMatcher() {

        HashedCredentialsMatcher hashedCredentialsMatcher = new HashedCredentialsMatcher();

        hashedCredentialsMatcher.setHashAlgorithmName("md5");//散列算法:这里使用MD5算法;

        hashedCredentialsMatcher.setHashIterations(1024);//散列的次数,比如散列两次,相当于 md5(md5(""));

        return hashedCredentialsMatcher;

    }

    @Bean

    public MyShiroRealm myShiroRealm() {

        MyShiroRealm myShiroRealm = new MyShiroRealm();

        myShiroRealm.setCredentialsMatcher(hashedCredentialsMatcher());

        return myShiroRealm;

    }

    @Bean

    public SecurityManager securityManager() {

        DefaultWebSecurityManager securityManager = new DefaultWebSecurityManager();

        securityManager.setRealm(myShiroRealm());

        // 自定义session管理 使用redis

        securityManager.setSessionManager(sessionManager());

        // 自定义缓存实现 使用redis

        securityManager.setCacheManager(cacheManager());

        return securityManager;

    }

    //自定义sessionManager

    @Bean

    public SessionManager sessionManager() {

        MySessionManager mySessionManager = new MySessionManager();

        mySessionManager.setSessionDAO(redisSessionDAO());

        return mySessionManager;

    }

    /**

     * 配置shiro redisManager

     *

     * 使用的是shiro-redis开源插件

     *

     * @return

     */

    public RedisManager redisManager() {

        RedisManager redisManager = new RedisManager();

        redisManager.setHost(host);

        redisManager.setPort(port);

        redisManager.setExpire(1800);// 配置缓存过期时间

        redisManager.setTimeout(timeout);

        redisManager.setPassword(password);

        return redisManager;

    }

    /**

     * cacheManager 缓存 redis实现

     *

     * 使用的是shiro-redis开源插件

     *

     * @return

     */

    @Bean

    public RedisCacheManager cacheManager() {

        RedisCacheManager redisCacheManager = new RedisCacheManager();

        redisCacheManager.setRedisManager(redisManager());

        return redisCacheManager;

    }

    /**

     * RedisSessionDAO shiro sessionDao层的实现 通过redis

     *

     * 使用的是shiro-redis开源插件

     */

    @Bean

    public RedisSessionDAO redisSessionDAO() {

        RedisSessionDAO redisSessionDAO = new RedisSessionDAO();

        redisSessionDAO.setRedisManager(redisManager());

        return redisSessionDAO;

    }

    /**

     * 开启shiro aop注解支持.

     * 使用代理方式;所以需要开启代码支持;

     *

     * @param securityManager

     * @return

     */

    @Bean

    public AuthorizationAttributeSourceAdvisor authorizationAttributeSourceAdvisor(SecurityManager securityManager) {

        AuthorizationAttributeSourceAdvisor authorizationAttributeSourceAdvisor = new AuthorizationAttributeSourceAdvisor();

        authorizationAttributeSourceAdvisor.setSecurityManager(securityManager);

        return authorizationAttributeSourceAdvisor;

    }

    /**

     * 注册全局异常处理

     * @return

     */

    @Bean(name = "exceptionHandler")

    public HandlerExceptionResolver handlerExceptionResolver() {

        return new MyExceptionHandler();

    }

    //自动创建代理,没有这个鉴权可能会出错

    @Bean

    public DefaultAdvisorAutoProxyCreator getDefaultAdvisorAutoProxyCreator() {

        DefaultAdvisorAutoProxyCreator autoProxyCreator = new DefaultAdvisorAutoProxyCreator();

        autoProxyCreator.setProxyTargetClass(true);

        return autoProxyCreator;

    }

}
3.安全认证和权限验证的核心,自定义Realm
import com.google.gson.JsonObject;

import com.test.cbd.service.UserService;

import com.test.cbd.vo.SysPermission;

import com.test.cbd.vo.SysRole;

import com.test.cbd.vo.UserInfo;

import org.apache.commons.beanutils.BeanUtils;

import org.apache.shiro.SecurityUtils;

import org.apache.shiro.authc.*;

import org.apache.shiro.authz.AuthorizationInfo;

import org.apache.shiro.authz.SimpleAuthorizationInfo;

import org.apache.shiro.realm.AuthorizingRealm;

import org.apache.shiro.session.Session;

import org.apache.shiro.subject.PrincipalCollection;

import org.apache.shiro.subject.Subject;

import org.apache.shiro.util.ByteSource;

import springfox.documentation.spring.web.json.Json;

import javax.annotation.Resource;

import java.util.HashSet;

import java.util.Set;

public class MyShiroRealm extends AuthorizingRealm {

    @Resource

    private UserService userInfoService;

    @Override

    protected AuthorizationInfo doGetAuthorizationInfo(PrincipalCollection principals){

//        // 权限信息对象info,用来存放查出的用户的所有的角色(role)及权限(permission)

        SimpleAuthorizationInfo authorizationInfo = new SimpleAuthorizationInfo();

        Session session = SecurityUtils.getSubject().getSession();

        UserInfo user = (UserInfo) session.getAttribute("USER_SESSION");

        // 用户的角色集合

        Set<String> roles = new HashSet<>();

        roles.add(user.getRoleList().get(0).getRole());

        authorizationInfo.setRoles(roles);

        return authorizationInfo;

    }

    /*主要是用来进行身份认证的,也就是说验证用户输入的账号和密码是否正确。*/

    @Override

    protected AuthenticationInfo doGetAuthenticationInfo(AuthenticationToken token)

            throws AuthenticationException {

     // System.out.println("MyShiroRealm.doGetAuthenticationInfo()");

        // 获取用户的输入的账号.

        String username = (String) token.getPrincipal();

     // System.out.println(token.getCredentials());

        // 通过username从数据库中查找 User对象,如果找到,没找到.

        // 实际项目中,这里可以根据实际情况做缓存,如果不做,Shiro自己也是有时间间隔机制,2分钟内不会重复执行该方法

        UserInfo userInfo = userInfoService.findByUsername(username);

        // Subject subject = SecurityUtils.getSubject();

        // Session session = subject.getSession();

        // session.setAttribute("role",userInfo.getRoleList());

        // System.out.println("----->>userInfo="+userInfo);

        if (userInfo == null) {

            return null;

        }

        if (userInfo.getState() == 1) { //账户冻结

            throw new LockedAccountException();

        }

        String credentials = userInfo.getPassword();

        System.out.println("credentials="+credentials);

        ByteSource credentialsSalt = ByteSource.Util.bytes(username);

        SimpleAuthenticationInfo authenticationInfo = new SimpleAuthenticationInfo(

                userInfo.getUserName(), //用户名

                credentials, //密码

                credentialsSalt,

                getName()  //realm name

        );

        Session session = SecurityUtils.getSubject().getSession();

        session.setAttribute("USER_SESSION", userInfo);

        return authenticationInfo;

    }

}
4.全局异常处理器
import com.alibaba.fastjson.support.spring.FastJsonJsonView;

import org.apache.shiro.authz.UnauthenticatedException;

import org.apache.shiro.authz.UnauthorizedException;

import org.springframework.web.servlet.HandlerExceptionResolver;

import org.springframework.web.servlet.ModelAndView;

import javax.servlet.http.HttpServletRequest;

import javax.servlet.http.HttpServletResponse;

import java.util.HashMap;

import java.util.Map;

/**

 * Created by Administrator on 2017/12/11.

 * 全局异常处理

 */

public class MyExceptionHandler implements HandlerExceptionResolver {

    public ModelAndView resolveException(HttpServletRequest httpServletRequest,
            HttpServletResponse httpServletResponse, Object o, Exception ex) {

        ModelAndView mv = new ModelAndView();

        FastJsonJsonView view = new FastJsonJsonView();

        Map<String, Object> attributes = new HashMap<String, Object>();

        if (ex instanceof UnauthenticatedException) {

            attributes.put("code", "1000001");

            attributes.put("msg", "token错误");

        } else if (ex instanceof UnauthorizedException) {

            attributes.put("code", "1000002");

            attributes.put("msg", "用户无权限");

        } else {

            attributes.put("code", "1000003");

            attributes.put("msg", ex.getMessage());

        }

        view.setAttributesMap(attributes);

        mv.setView(view);

        return mv;

    }

}
5.因为现在的项目大多都是前后端分离的,所以我们需要实现自己的session管理
import org.apache.shiro.web.servlet.ShiroHttpServletRequest;

import org.apache.shiro.web.session.mgt.DefaultWebSessionManager;

import org.apache.shiro.web.util.WebUtils;

import org.springframework.util.StringUtils;

import javax.servlet.ServletRequest;

import javax.servlet.ServletResponse;

import java.io.Serializable;

public class MySessionManager extends DefaultWebSessionManager {

    private static final String TOKEN = "token";

    private static final String REFERENCED_SESSION_ID_SOURCE = "Stateless request";

    public MySessionManager() {

        super();

    }

    @Override

    protected Serializable getSessionId(ServletRequest request, ServletResponse response) {

        String id = WebUtils.toHttp(request).getHeader(TOKEN);

        //如果请求头中有 token 则其值为sessionId

        if (!StringUtils.isEmpty(id)) {

            request.setAttribute(ShiroHttpServletRequest.REFERENCED_SESSION_ID_SOURCE, REFERENCED_SESSION_ID_SOURCE);

            request.setAttribute(ShiroHttpServletRequest.REFERENCED_SESSION_ID, id);

            request.setAttribute(ShiroHttpServletRequest.REFERENCED_SESSION_ID_IS_VALID, Boolean.TRUE);

            return id;

        } else {

            //否则按默认规则从cookie取sessionId

            return super.getSessionId(request, response);

        }

    }

}
6.控制器
import com.alibaba.fastjson.JSONObject;
import com.test.cbd.vo.UserInfo;
import io.swagger.annotations.Api;
import lombok.extern.slf4j.Slf4j;
import org.apache.shiro.SecurityUtils;
import org.apache.shiro.authc.AuthenticationException;
import org.apache.shiro.authc.IncorrectCredentialsException;
import org.apache.shiro.authc.LockedAccountException;
import org.apache.shiro.authc.UsernamePasswordToken;
import org.apache.shiro.authz.annotation.RequiresRoles;
import org.apache.shiro.crypto.hash.SimpleHash;
import org.apache.shiro.session.Session;
import org.apache.shiro.subject.Subject;
import org.apache.shiro.util.ByteSource;
import org.springframework.web.bind.annotation.*; import javax.servlet.http.HttpServletRequest;
import java.net.InetAddress; @Slf4j
@Api(value="shiro测试",description="shiro测试")
@RestController
@RequestMapping("/")
public class ShiroLoginController { /**
* 登录测试
* @param userInfo
* @return
*/
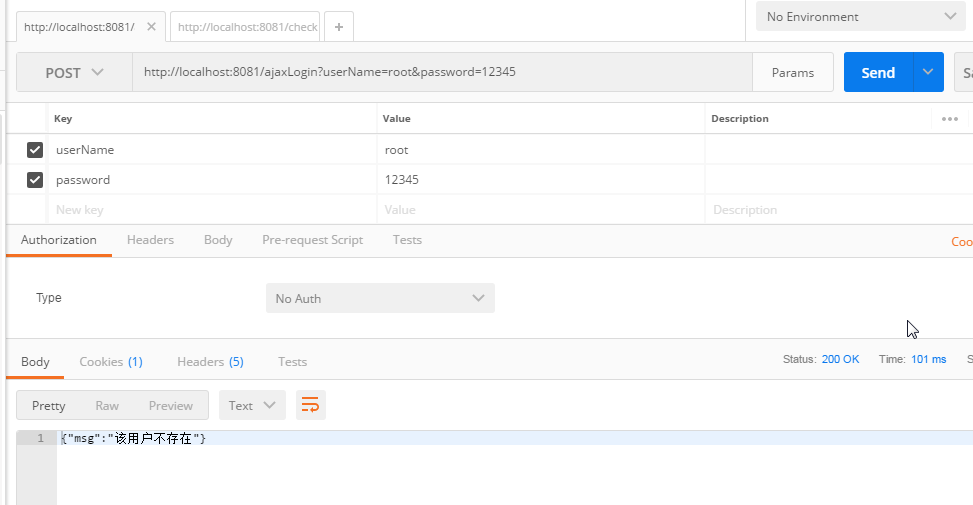
@RequestMapping(value = "/ajaxLogin", method = RequestMethod.POST)
@ResponseBody
public String ajaxLogin(UserInfo userInfo) {
JSONObject jsonObject = new JSONObject();
UsernamePasswordToken token = new UsernamePasswordToken(userInfo.getUserName(), userInfo.getPassword());
Subject subject = SecurityUtils.getSubject();
try {
subject.login(token);
jsonObject.put("token", subject.getSession().getId());
jsonObject.put("msg", "登录成功");
} catch (IncorrectCredentialsException e) {
jsonObject.put("msg", "密码错误");
} catch (LockedAccountException e) {
jsonObject.put("msg", "登录失败,该用户已被冻结");
} catch (AuthenticationException e) {
jsonObject.put("msg", "该用户不存在");
} catch (Exception e) {
e.printStackTrace();
}
return jsonObject.toString();
} /**
* 鉴权测试
* @param userInfo
* @return
*/
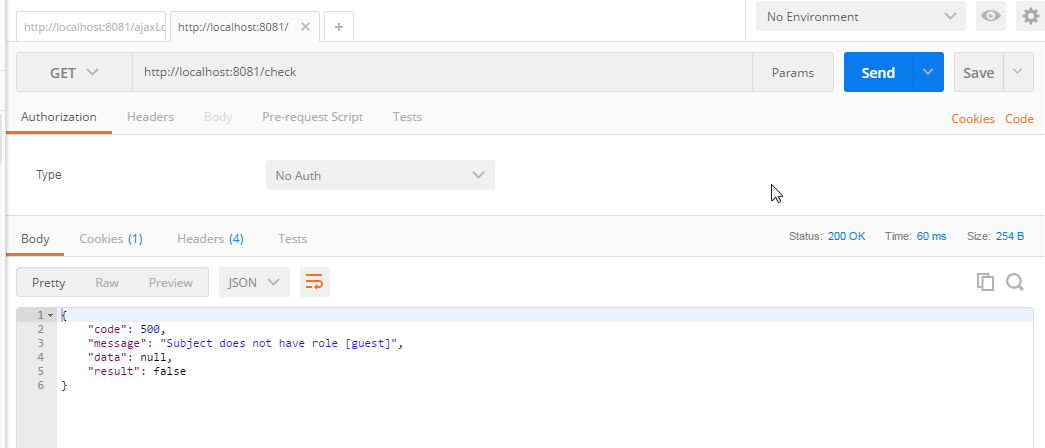
@RequestMapping(value = "/check", method = RequestMethod.GET)
@ResponseBody
@RequiresRoles("guest")
public String check() {
JSONObject jsonObject = new JSONObject();
jsonObject.put("msg", "鉴权测试");
return jsonObject.toString();
}
}
常用注解
@RequiresGuest 代表无需认证即可访问,同理的就是 /path=anon
@RequiresAuthentication 需要认证,只要登录成功后就允许你操作
@RequiresPermissions 需要特定的权限,没有则抛出 AuthorizationException
@RequiresRoles 需要特定的橘色,没有则抛出 AuthorizationException
7.以上就是shiro登陆和鉴权的主要配置和类,下面补充一下其他信息。
①application.properties中shiro-redis相关配置:
spring.redis.shiro.host=127.0.0.1

spring.redis.shiro.port=6379

spring.redis.shiro.timeout=5000

spring.redis.shiro.password=123456
②因为数据是模拟的,所以在登陆认证的时候,并没有通过数据库查用户信息,可以通过以下方式模拟加密后的密码:
    /**

     * 生成测试用的md5加密的密码

     * @param args

     */

    public static void main(String[] args) {

        String hashAlgorithmName = "md5";

        String credentials = "123456";//密码

        int hashIterations = 1024;

        ByteSource credentialsSalt = ByteSource.Util.bytes("root");//账号

        String  obj = new SimpleHash(hashAlgorithmName, credentials, credentialsSalt, hashIterations).toHex();

        System.out.println(obj);

    }
上面obj的结果是b1ba853525d0f30afe59d2d005aad96c
③登陆认证的findByUsername方法,模拟到数据库查询用户信息,实际是自己构造的数据,偷偷懒。
    public UserInfo findByUsername(String userName){

        SysRole admin = SysRole.builder().role("admin").build();

        List<SysPermission> list=new ArrayList<SysPermission>();

        SysPermission sysPermission=new SysPermission("read");

        SysPermission sysPermission1=new SysPermission("write");

        list.add(sysPermission);

        list.add(sysPermission1);

        admin.setPermissions(list);

        UserInfo root = UserInfo.builder().userName("root").password("b1ba853525d0f30afe59d2d005aad96c").credentialsSalt("123").state(0).build();

        List<SysRole> roleList=new ArrayList<SysRole>();

        roleList.add(admin);

        root.setRoleList(roleList);

        return root;

    }
8.结果演示
输入正确的账号密码时,返回信息如下:

故意输错密码时,返回信息如下:
鉴权时,如果该用户没有角色:
SpringBoot整合Shiro自定义Redis存储的更多相关文章
- SpringBoot整合Shiro完成验证码校验
SpringBoot整合Shiro完成验证码校验 上一篇:SpringBoot整合Shiro使用Redis作为缓存 首先编写生成验证码的工具类 package club.qy.datao.utils; ...
- SpringBoot整合Shiro+MD5+Salt+Redis实现认证和动态权限管理|前后端分离(下)----筑基后期
写在前面 在上一篇文章<SpringBoot整合Shiro+MD5+Salt+Redis实现认证和动态权限管理(上)----筑基中期>当中,我们初步实现了SpringBoot整合Shiro ...
- SpringBoot整合Shiro+MD5+Salt+Redis实现认证和动态权限管理(上)----筑基中期
写在前面 通过前几篇文章的学习,我们从大体上了解了shiro关于认证和授权方面的应用.在接下来的文章当中,我将通过一个demo,带领大家搭建一个SpringBoot整合Shiro的一个项目开发脚手架, ...
- 补习系列(6)- springboot 整合 shiro 一指禅
目标 了解ApacheShiro是什么,能做什么: 通过QuickStart 代码领会 Shiro的关键概念: 能基于SpringBoot 整合Shiro 实现URL安全访问: 掌握基于注解的方法,以 ...
- SpringBoot 整合Shiro 一指禅
目标 了解ApacheShiro是什么,能做什么: 通过QuickStart 代码领会 Shiro的关键概念: 能基于SpringBoot 整合Shiro 实现URL安全访问: 掌握基于注解的方法,以 ...
- SpringBoot整合Shiro权限框架实战
什么是ACL和RBAC ACL Access Control list:访问控制列表 优点:简单易用,开发便捷 缺点:用户和权限直接挂钩,导致在授予时的复杂性,比较分散,不便于管理 例子:常见的文件系 ...
- SpringBoot整合Shiro实现权限控制
目录 1.SpringBoot整合Shiro 1.1.shiro简介 1.2.代码的具体实现 1.2.1.Maven的配置 1.2.2.整合需要实现的类 1.2.3.项目结构 1.2.4.ShiroC ...
- SpringBoot系列十二:SpringBoot整合 Shiro
声明:本文来源于MLDN培训视频的课堂笔记,写在这里只是为了方便查阅. 1.概念:SpringBoot 整合 Shiro 2.具体内容 Shiro 是现在最为流行的权限认证开发框架,与它起名的只有最初 ...
- SpringBoot整合Shiro实现基于角色的权限访问控制(RBAC)系统简单设计从零搭建
SpringBoot整合Shiro实现基于角色的权限访问控制(RBAC)系统简单设计从零搭建 技术栈 : SpringBoot + shiro + jpa + freemark ,因为篇幅原因,这里只 ...
随机推荐
- java 面向对象(二十一):属性的赋值顺序
* ①默认初始化 * ②显式初始化/⑤在代码块中赋值 * ③构造器中初始化 * ④有了对象以后,可以通过"对象.属性"或"对象.方法"的方式,进行赋值 * * ...
- 数据可视化之DAX篇(十七)Power BI表格总计行错误的终极解决方案
https://zhuanlan.zhihu.com/p/68183990 我在知识星球收到的问题中,关于表格和矩阵(以下统称表格)总计行错误算是常见的问题之一了,不少初学者甚为不解,在Excel透视 ...
- 数据可视化之PowerQuery篇(十四)产品关联度分析
https://zhuanlan.zhihu.com/p/64510355 逛超市的时候,面对货架上琳琅满目的商品,你会觉得这些商品的摆放,或者不同品类的货架分布是随机排列的吗,当然不是. 应该都听说 ...
- 《你还在写sql语句吗?》人生苦短,进入MybatisPlus的丝滑体验
一.发展历程 依稀记得大学期间,类中写sql语句的日子,一个sql语句占据了大部分时间,到后来hibernate的出现算是解决了这一痛点.工作 后,我们又接触到了mybatis这样的框架,瞬间感觉这个 ...
- Python实现性能自动化测试的方法【推荐好文】
1.什么是性能自动化测试? ◆ 性能 △ 系统负载能力 △ 超负荷运行下的稳定性 △ 系统瓶颈 ◆ 自动化测试 △ 使用程序代替手工 △ 提升测试效率 ◆ 性能自动化 △ 使用代码模拟大批量用户 △ ...
- OSCP Learning Notes - Privilege Escalation
Privilege Escalation Download the Basic-pentesting vitualmation from the following website: https:// ...
- 题解 洛谷 P4189 【[CTSC2010]星际旅行】
一个比较直接的想法就是对每个点进行拆点,拆成入点和出点,限制放在入点和出点相连的边上,然后跑最大费用最大流即可. 但是这样复杂度无法接受,所以考虑模拟费用流来解决本题. 发现 \(H\) 都大于等于该 ...
- 基于Python爬虫采集天气网实时信息
相信小伙伴们都知道今冬以来范围最广.持续时间最长.影响最重的一场低温雨雪冰冻天气过程正在进行中.预计,今天安徽.江苏.浙江.湖北.湖南等地有暴雪,局地大暴雪,新增积雪深度4-8厘米,局地可达10- ...
- Django开发之Ajax 返回内容报错
预期效果 Django通过Ajax POST提交数据,前台弹窗处理结果 粗略代码 # views.py 代码 ...省略... msg = { 'code': 200, 'message': 'Hel ...
- RHEL7配置ip地址
通过修改ifcfg-eno16777728配置文件来修改配置ip 网卡命令格式:eno16777728 en:代表enthernet(以太网) o:代表onboard(内置) 16777728:是主板 ...