springcloud系列三 搭建服务模块
搭建服务模块为了模拟正式开发环境,只是少写了service层直接在controller里面直接引用,直接上图和代码:更为方便:
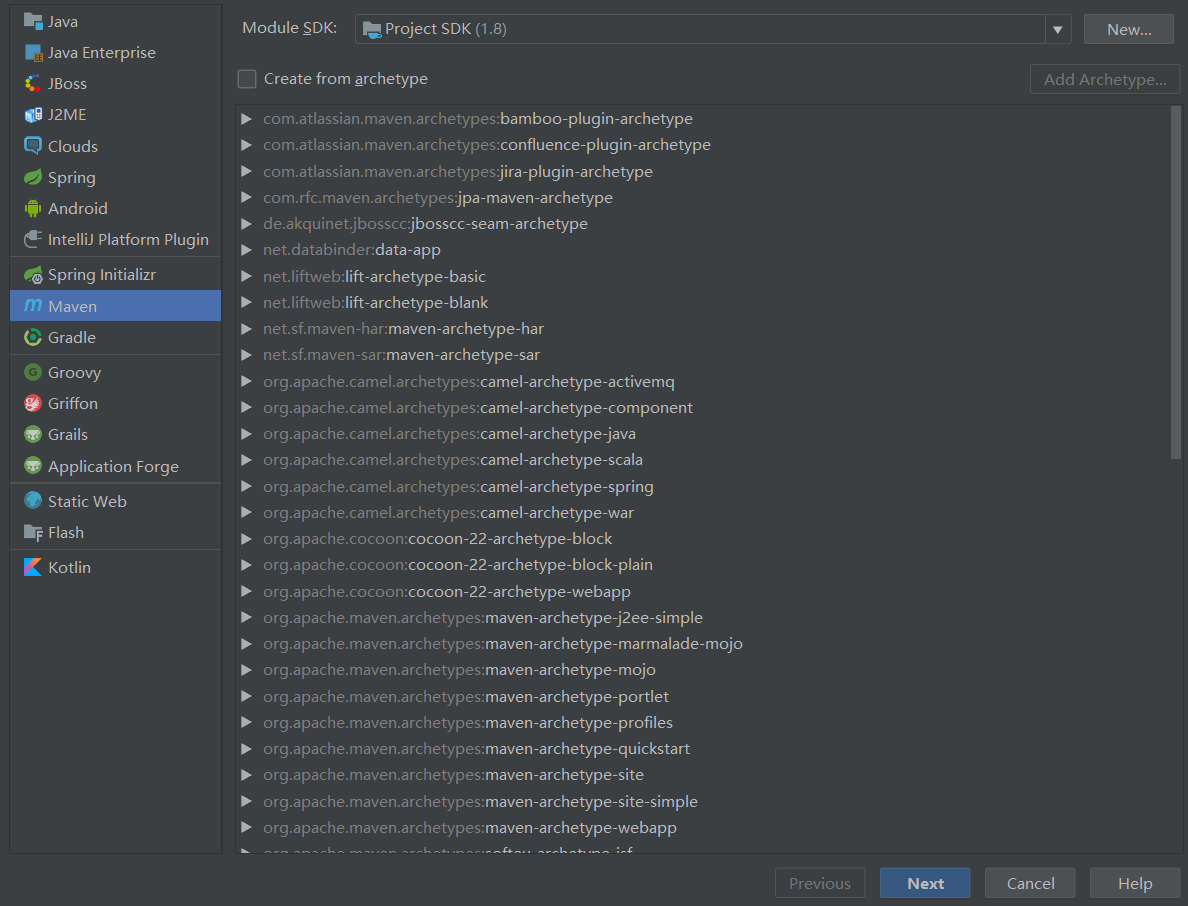
创建完成之后加入配置:
pom.xml文件:
<?xml version="1.0" encoding="UTF-8"?>

<project xmlns="http://maven.apache.org/POM/4.0.0"

         xmlns:xsi="http://www.w3.org/2001/XMLSchema-instance"

         xsi:schemaLocation="http://maven.apache.org/POM/4.0.0 http://maven.apache.org/xsd/maven-4.0.0.xsd">

    <parent>

        <artifactId>springcloud-parent</artifactId>

        <groupId>com.cxy</groupId>

        <version>0.0.-SNAPSHOT</version>

    </parent>

    <modelVersion>4.0.</modelVersion>

    <packaging>jar</packaging>

    <artifactId>spring-person</artifactId>

    <dependencies>

        <dependency>

            <groupId>org.springframework.cloud</groupId>

            <!--千万注意,不要写成spring-cloud-netflix-eureka-client,写成这样不会报错,但是注册不了服务-->

            <artifactId>spring-cloud-starter-netflix-eureka-client</artifactId>

        </dependency>

        <dependency>

            <groupId>org.mybatis.spring.boot</groupId>

            <artifactId>mybatis-spring-boot-starter</artifactId>

            <version>2.0.</version>

        </dependency>

        <dependency>

            <groupId>mysql</groupId>

            <artifactId>mysql-connector-java</artifactId>

            <version>5.1.</version>

        </dependency>

        <dependency>

            <groupId>org.springframework.boot</groupId>

            <artifactId>spring-boot-starter-web</artifactId>

        </dependency>

    </dependencies>

    <build>

        <plugins>

            <plugin>

                <groupId>org.springframework.boot</groupId>

                <artifactId>spring-boot-maven-plugin</artifactId>

            </plugin>

            <plugin>

                <groupId>org.mybatis.generator</groupId>

                <artifactId>mybatis-generator-maven-plugin</artifactId>

                <version>1.3.</version>

                <dependencies>

                    <dependency>

                        <groupId>org.mybatis.generator</groupId>

                        <artifactId>mybatis-generator-core</artifactId>

                        <version>1.3.</version>

                    </dependency>

                    <dependency>

                        <groupId>mysql</groupId>

                        <artifactId>mysql-connector-java</artifactId>

                        <version>5.1.</version>

                    </dependency>

                </dependencies>

                <executions>

                    <execution>

                        <id>mybatis generator</id>

                        <phase>package</phase>

                        <goals>

                            <goal>generate</goal>

                        </goals>

                    </execution>

                </executions>

                <configuration>

                    <!--允许移动生产的文件-->

                    <verbose>true</verbose>

                    <!--允许自动覆盖文件,在开发者不可以设置为true-->

                    <overwrite>true</overwrite>

                    <!--制定生产文件的位置-->

                    <configurationFile>

                        src/main/resources/mybatis_generator.xml

                    </configurationFile>

                </configuration>

            </plugin>

        </plugins>

    </build>

</project>
这个插件中加入了自动生成代码插件:
mybatis_generator.xml
<?xml version="1.0" encoding="UTF-8" ?>
<!DOCTYPE generatorConfiguration PUBLIC
"-//mybatis.org//DTD MyBatis Generator Configuration 1.0//EN"
"http://mybatis.org/dtd/mybatis-generator-config_1_0.dtd" >
<generatorConfiguration>
<!--驱动包的路径-->
<!--<classPathEntry location="F:\maven\repos\mysql\mysql-connector-java\5.1.34\mysql-connector-java-5.1.34.jar"/>-->
<context id="DB2Tables" targetRuntime="MyBatis3">
<!--注释-->
<commentGenerator>
<property name="suppressAllComments" value="true"/>
<property name="suppressDate" value="true"/>
</commentGenerator>
<!--数据库连接-->
<jdbcConnection driverClass="com.mysql.jdbc.Driver"
connectionURL="jdbc:mysql://127.0.0.1:3306/fr_db?zeroDateTimeBehavior=convertToNull&
autoReconnect=true&useUnicode=true&characterEncoding=utf-"
userId="root"
password=""/> <javaTypeResolver>
<property name="forceBigDecimals" value="false"/>
</javaTypeResolver> <!--生成Model类存放位置-->
<javaModelGenerator targetPackage="com.cxy.dataObject" targetProject="src/main/java">
<!--是否对model添加构造函数-->
<property name="constructorBased" value="false"/>
<!--是否允许子包-->
<property name="enableSubPackages" value="true"/>
<!--建立的model对象是否不可变,也就是生成的model没有setter方法-->
<property name="immutable" value="false"/>
<property name="trimStrings" value="false"/>
</javaModelGenerator> <!--生成映射文件存放位置-->
<sqlMapGenerator targetPackage="mapping" targetProject="src/main/resources">
<property name="enableSubPackages" value="true"/>
</sqlMapGenerator> <!--生成Mapper类存放位置-->
<javaClientGenerator type="XMLMAPPER" targetPackage="com.cxy.dao" targetProject="src/main/java">
<property name="enableSubPackages" value="true"/>
</javaClientGenerator> <!--生成与表对应的类名-->
<table tableName="person" domainObjectName="PersonDo" enableCountByExample="false"
enableDeleteByExample="false"
enableSelectByExample="false" enableUpdateByExample="false" selectByExampleQueryId="false"></table> </context> </generatorConfiguration>
yml文件:
eureka:

  client:

    serviceUrl:

     defaultZone: http://127.0.0.1:8761/eureka/  #eureka注册中心地址

spring:

  application:

    name: cxy-person-service #应用名

 #datasource,数据连接

  datasource:

    driver-class-name: com.mysql.jdbc.Driver

    url : jdbc:mysql://127.0.0.1:3306/fr_db?zeroDateTimeBehavior=convertToNull&autoReconnect=true&useUnicode=true&characterEncoding=utf-8

    password:

    username: root

 #mybatis

mybatis:

    type-aliases-package: com.cxy.dataObject #实体类映射文件包

    mapper-locations: classpath:mapping/*.xml #生成的sql语句

server:

  port: 8081
笔者在这个文件配置时候出现很多问题,慢慢的解决了,
注意yml文件格式
启动类:
package com.cxy;

import org.mybatis.spring.annotation.MapperScan;

import org.springframework.boot.SpringApplication;

import org.springframework.boot.autoconfigure.SpringBootApplication;

import org.springframework.boot.autoconfigure.jdbc.DataSourceAutoConfiguration;

import org.springframework.cloud.netflix.eureka.EnableEurekaClient;

/***

 * @ClassName: PersonApplication

 * @Description:

 * @Auther: 陈绪友

 * @Date: 2019/1/2816:30

 * @version : V1.0

 */

@SpringBootApplication

@EnableEurekaClient  //开启注解,注册服务

@MapperScan("com.cxy.dao")

public class PersonApplication {

    public static void main(String[] args) {

        SpringApplication.run(PersonApplication.class,args);

    }

}
controller
package com.cxy.controller;

import com.cxy.dao.PersonDoMapper;

import com.cxy.dataObject.PersonDo;

import org.springframework.beans.factory.annotation.Autowired;

import org.springframework.web.bind.annotation.PathVariable;

import org.springframework.web.bind.annotation.RequestMapping;

import org.springframework.web.bind.annotation.RequestMethod;

import org.springframework.web.bind.annotation.RestController;

/***

 * @ClassName: PersonController

 * @Description:

 * @Auther: 陈绪友

 * @Date: 2019/1/2816:31

 * @version : V1.0

 */

@RequestMapping("/person")

@RestController

public class PersonController {

    @Autowired

    private PersonDoMapper personDoMapper;

    @RequestMapping(value = "{id}",method = RequestMethod.GET)

  public PersonDo selectPersonDoByid(@PathVariable Integer id){

    return personDoMapper.selectByPrimaryKey(id); }
  @RequestMapping(value = "{id}",method = RequestMethod.DELETE)

  public Integer deletePersonDoByid(@PathVariable Integer id){

    return personDoMapper.deleteByPrimaryKey(id); } }
dao
package com.cxy.dao;

import com.cxy.dataObject.PersonDo;

import org.apache.ibatis.annotations.Mapper;

@Mapper

public interface PersonDoMapper {

    int deleteByPrimaryKey(Integer id);

    int insert(PersonDo record);

    int insertSelective(PersonDo record);

    PersonDo selectByPrimaryKey(Integer id);

    int updateByPrimaryKeySelective(PersonDo record);

    int updateByPrimaryKey(PersonDo record);

}
pojo:个人喜欢叫做数据库数据模型,在正式开发中和这个是不可以直接返回给前端的,是需要进行封装给前端的
po,对应的数据库数据模型
dto 返回给前端的数据模型,即就是页面展示的模型
vo 是前端传输过来给后台的模型
package com.cxy.dataObject;

public class PersonDo {

    private Integer id;

    private String name;

    private Integer age;

    private String address;

    public Integer getId() {

        return id;

    }

    public void setId(Integer id) {

        this.id = id;

    }

    public String getName() {

        return name;

    }

    public void setName(String name) {

        this.name = name;

    }

    public Integer getAge() {

        return age;

    }

    public void setAge(Integer age) {

        this.age = age;

    }

    public String getAddress() {

        return address;

    }

    public void setAddress(String address) {

        this.address = address;

    }

}
xml.
<?xml version="1.0" encoding="UTF-8"?>

<!DOCTYPE mapper PUBLIC "-//mybatis.org//DTD Mapper 3.0//EN" "http://mybatis.org/dtd/mybatis-3-mapper.dtd">

<mapper namespace="com.cxy.dao.PersonDoMapper">

  <resultMap id="BaseResultMap" type="com.cxy.dataObject.PersonDo">

    <id column="id" jdbcType="INTEGER" property="id" />

    <result column="name" jdbcType="VARCHAR" property="name" />

    <result column="age" jdbcType="INTEGER" property="age" />

    <result column="address" jdbcType="VARCHAR" property="address" />

  </resultMap>

  <sql id="Base_Column_List">

    id, name, age, address

  </sql>

  <select id="selectByPrimaryKey" parameterType="java.lang.Integer" resultMap="BaseResultMap">

    select

    <include refid="Base_Column_List" />

    from person

    where id = #{id,jdbcType=INTEGER}

  </select>

  <delete id="deleteByPrimaryKey" parameterType="java.lang.Integer">

    delete from person

    where id = #{id,jdbcType=INTEGER}

  </delete>

  <insert id="insert" parameterType="com.cxy.dataObject.PersonDo">

    insert into person (id, name, age,

      address)

    values (#{id,jdbcType=INTEGER}, #{name,jdbcType=VARCHAR}, #{age,jdbcType=INTEGER},

      #{address,jdbcType=VARCHAR})

  </insert>

  <insert id="insertSelective" parameterType="com.cxy.dataObject.PersonDo">

    insert into person

    <trim prefix="(" suffix=")" suffixOverrides=",">

      <if test="id != null">

        id,

      </if>

      <if test="name != null">

        name,

      </if>

      <if test="age != null">

        age,

      </if>

      <if test="address != null">

        address,

      </if>

    </trim>

    <trim prefix="values (" suffix=")" suffixOverrides=",">

      <if test="id != null">

        #{id,jdbcType=INTEGER},

      </if>

      <if test="name != null">

        #{name,jdbcType=VARCHAR},

      </if>

      <if test="age != null">

        #{age,jdbcType=INTEGER},

      </if>

      <if test="address != null">

        #{address,jdbcType=VARCHAR},

      </if>

    </trim>

  </insert>

  <update id="updateByPrimaryKeySelective" parameterType="com.cxy.dataObject.PersonDo">

    update person

    <set>

      <if test="name != null">

        name = #{name,jdbcType=VARCHAR},

      </if>

      <if test="age != null">

        age = #{age,jdbcType=INTEGER},

      </if>

      <if test="address != null">

        address = #{address,jdbcType=VARCHAR},

      </if>

    </set>

    where id = #{id,jdbcType=INTEGER}

  </update>

  <update id="updateByPrimaryKey" parameterType="com.cxy.dataObject.PersonDo">

    update person

    set name = #{name,jdbcType=VARCHAR},

      age = #{age,jdbcType=INTEGER},

      address = #{address,jdbcType=VARCHAR}

    where id = #{id,jdbcType=INTEGER}

  </update>

</mapper>
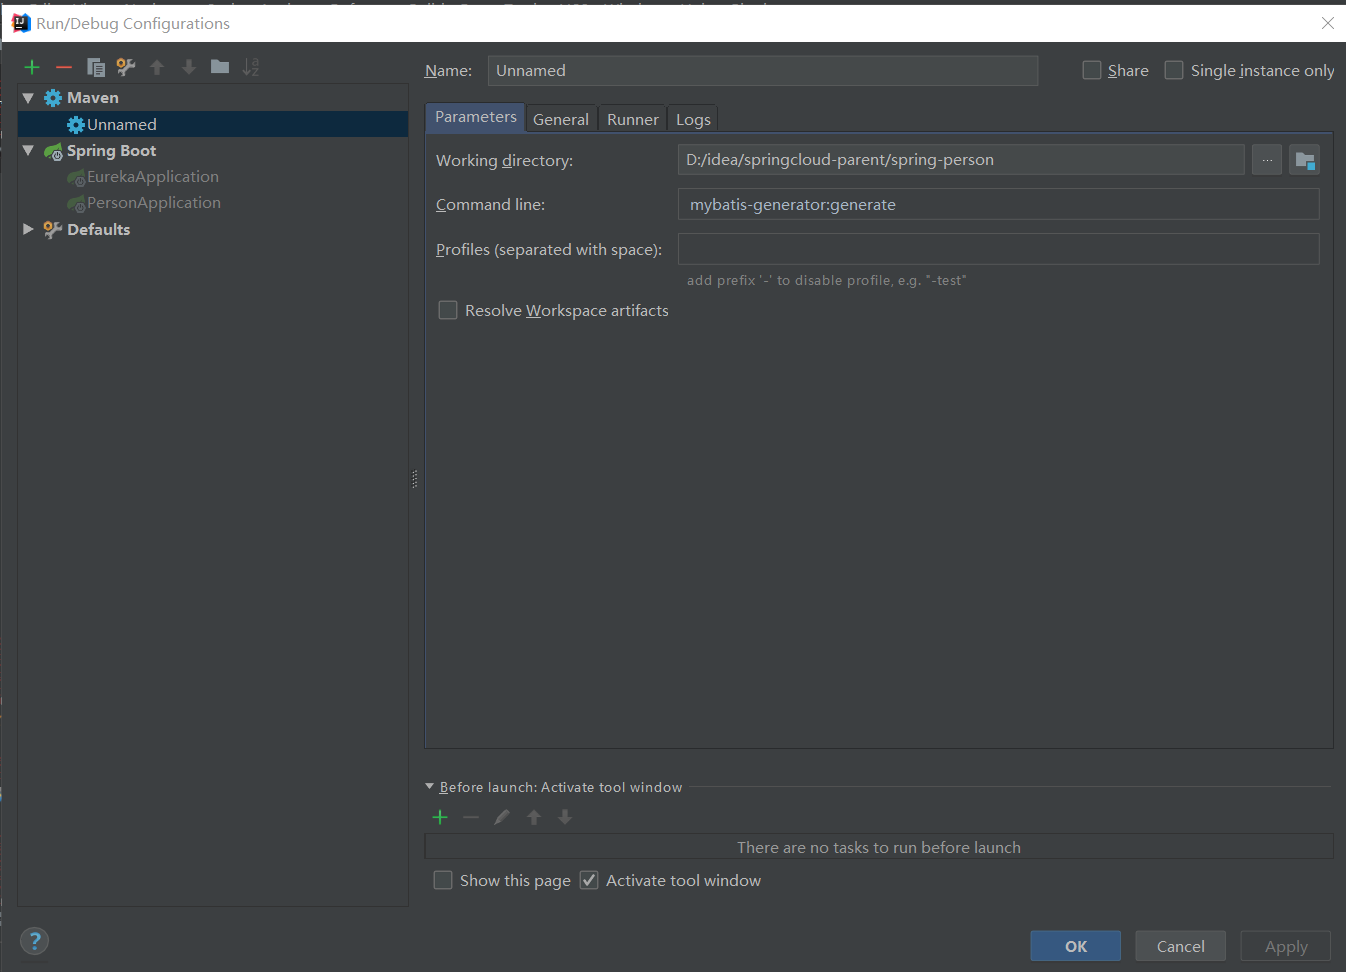
这个是代码生成命令的截图
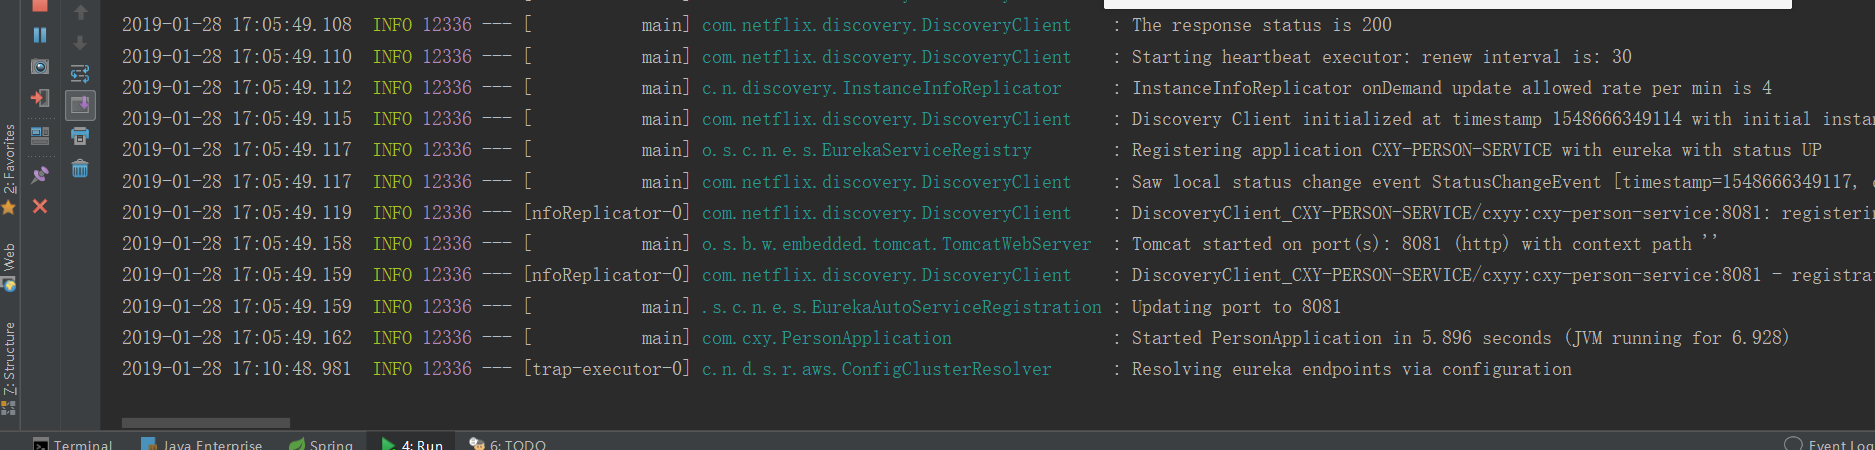
启动服务:
进入注册中心查看:
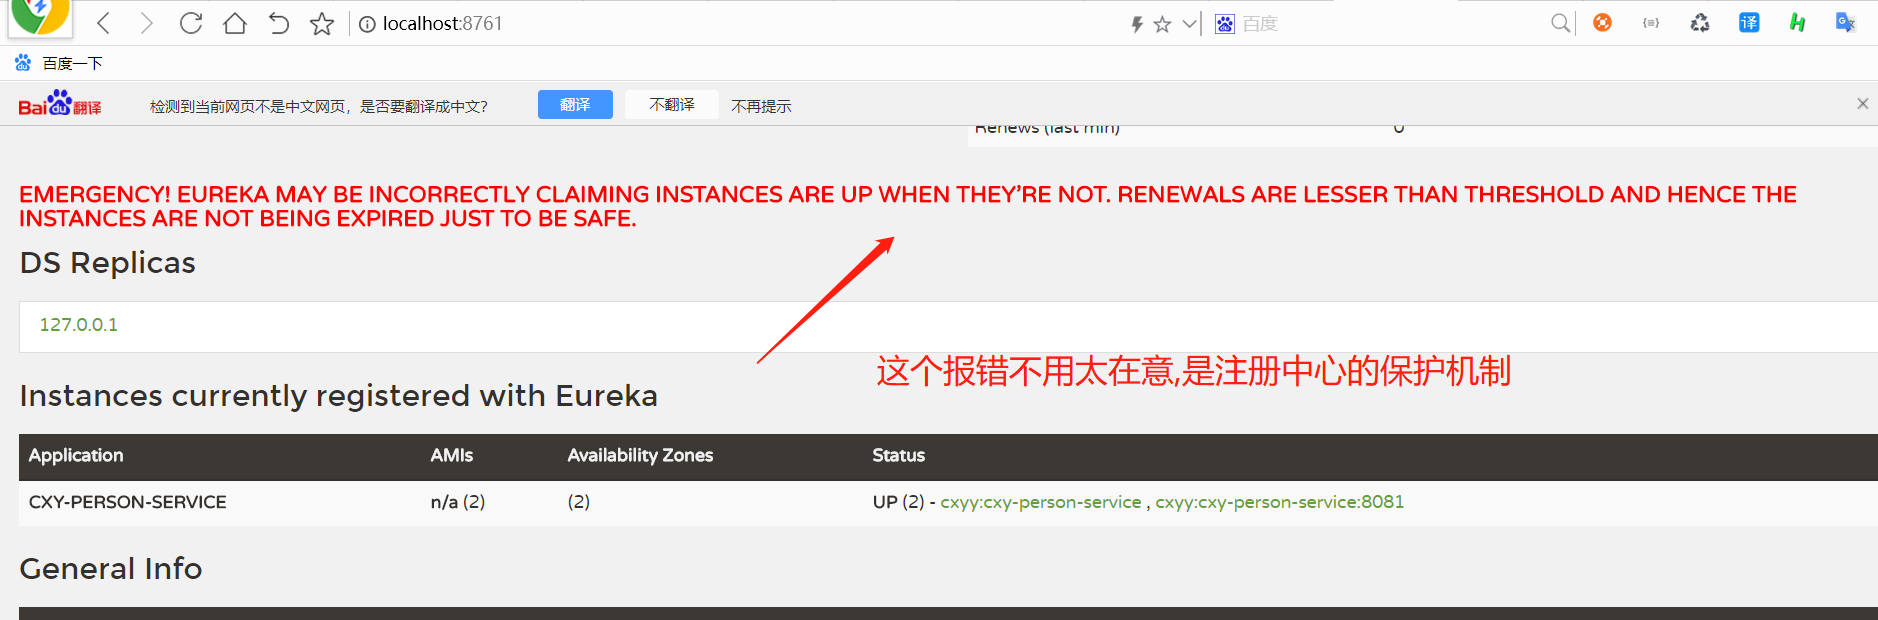
在此服务注册就完成了,那么远程是如何进行调用的呢,下接将会整合opnfeign进行服务调用,当然传统的httpclient,restemplate都是可以进行服务调用的
传统的方法就不调用了,比较繁琐,
springcloud系列三 搭建服务模块的更多相关文章
- springcloud系列四 搭建服务模块重点讲解
首先这个服务地址:一定不要写错,是自己注册中心开启的地址 如果注意到这些了,可以简单的进行操作,也可以不需要mybatis与数据库连接,在controller里直接返回相应的数据可以了,不用这么幸苦的 ...
- 学习一下 SpringCloud (三)-- 服务调用、负载均衡 Ribbon、OpenFeign
(1) 相关博文地址: 学习一下 SpringCloud (一)-- 从单体架构到微服务架构.代码拆分(maven 聚合): https://www.cnblogs.com/l-y-h/p/14105 ...
- SpringCloud系列三:SpringSecurity 安全访问(配置安全验证、服务消费端处理、无状态 Session 配置、定义公共安全配置程序类)
1.概念:SpringSecurity 安全访问 2.具体内容 所有的 Rest 服务最终都是暴露在公网上的,也就是说如果你的 Rest 服务属于一些你自己公司的私人业务,这样的结果会直接 导致你信息 ...
- SpringCloud系列三:将微服务注册到Eureka Server上
1. 回顾 通过上篇博客的讲解,我们知道硬编码提供者地址的方式有不少问题.要想解决这些问题,服务消费者需要一个强大的服务发现机制,服务消费者使用这种机制获取服务提供者的网络信息.不仅如此,即使服务提供 ...
- springcloud系列二 搭建注册中心启动
创建modul 然后就创建完成了 添加yml文件: server: port: eureka: client: register-with-eureka: false #单机版建议设置为false,设 ...
- Eureka系列(三)获取服务Client端具体实现
获取服务Client 端流程 我们先看下面这张图片,这张图片简单描述了下我们Client是如何获取到Server已续约实例信息的流程: 从图片中我们可以知晓大致流程就是Client会自己开启一个 ...
- 学习一下 SpringCloud (四)-- 服务降级、熔断 Hystrix、Sentinel
(1) 相关博文地址: 学习一下 SpringCloud (一)-- 从单体架构到微服务架构.代码拆分(maven 聚合): https://www.cnblogs.com/l-y-h/p/14105 ...
- 跟我学SpringCloud | 第三篇:服务的提供与Feign调用
跟我学SpringCloud | 第三篇:服务的提供与Feign调用 上一篇,我们介绍了注册中心的搭建,包括集群环境吓注册中心的搭建,这篇文章介绍一下如何使用注册中心,创建一个服务的提供者,使用一个简 ...
- springCloud系列教程01:Eureka 注册中心集群搭建
springCloud系列教程包含如下内容: springCloud系列教程01:Eureka 注册中心集群搭建 springCloud系列教程02:ConfigServer 配置中心server搭建 ...
随机推荐
- 2015.3.3 VC6调用dll
用VC新建一对话框工程,在一按钮点击事件中添加如下代码: typedef void (WINAPI * TESTDLL)(); HINSTANCE hmod; hmod = ::LoadLibrary ...
- HDLM命令dlnkmgr详解之一__命令格式
dlnkmgr命令格式 dlnkmgr operation [parameter [parameter-value]] dlnkmgr - The command name. operation - ...
- 12-22C#公共控件(基本功能)
在C#窗体中,公共控件的基本功能: 1.获取.设置控件的参数值: 2.事件(其实是一种特殊的方法和属性,当被其他外力触发它,就会发生,类似数据库的触发器.) 下面是基本的公共控件: 1.复选框 1)设 ...
- AndroidStudio 中使用FFMPEG
1.下载 FFmpeg 源码 git clone https://git.ffmpeg.org/ffmpeg.git 这一步可能会花比较长的时间 2.编译 FFmpeg for Android 2.1 ...
- C#WinForm如何调整控件的Tab按键顺序
在日常生活中,很多用户都会有使用Tab键的习惯.而在C#的WinForm开发中,Tab按键的顺序默认是你拖拽进窗体的顺序.那么我们如何修改这个顺序呢?答案如下(以VS2010为例). 只需要点击[视图 ...
- eclipse中maven的配置与使用
以eclipse Juno版本为例 1.插件安装 eclipse==>help====>install new software===>add name :m2e location: ...
- 关于web.xml中的<welcome-file-list>中的默认首页文件
先看我的配置文件: <welcome-file-list> <welcome-file>index.html</welcome-file> </welcome ...
- [poj2976]Dropping tests(01分数规划,转化为二分解决或Dinkelbach算法)
题意:有n场考试,给出每场答对的题数a和这场一共有几道题b,求去掉k场考试后,公式.的最大值 解题关键:01分数规划,double类型二分的写法(poj崩溃,未提交) 或者r-l<=1e-3(右 ...
- html标签的显示模式(块级标签,行内标签,行内块标签)(转)
html标签的显示模式(块级标签,行内标签,行内块标签) 今天讲课的时候,讲到了html中的标签的显示模式,大致分为块级标签和行内标签.那么初学者在刚使用标签的时候会发现有些属性在一些标签上不起作 ...
- QT5环境搭建
https://blog.csdn.net/liang19890820/article/details/53931813