微服务系列-如何使用 RestTemplate 进行 Spring Boot 微服务通信示例
概述
下面我们将学习如何创建多个 Spring boot 微服务以及如何使用 RestTemplate 类在多个微服务之间进行同步通信。
微服务通信有两种风格:
- 同步通讯
- 异步通信
同步通讯
在同步通信的情况下,客户端发送请求并等待服务的响应。这里重要的一点是协议(HTTP/HTTPS)是同步的,客户端代码只有在收到 HTTP 服务器响应时才能继续其任务。
例如,Microservice1 作为客户端发送请求并等待 Microservice2 的响应。
我们可以使用 RestTemplate 或 WebClient 或 Spring Cloud Open Feign 库来同步通信多个微服务。
异步通信
在异步通信的情况下,客户端发送请求并且不等待服务的响应。客户端将继续执行其任务 - 它不会等待服务的响应。
例如, 微服务1 作为客户端发送请求,并不等待 微服务2 的响应。
我们可以使用RabbitMQ和Apache Kafka等消息代理在多个微服务之间进行异步通信。
我们需要做什么
下面我们将创建两个微服务,例如部门服务和用户服务,并且我们将从用户服务到部门服务进行 REST API 调用以获取特定的用户部门。

并且每个微服务创建一个单独的 MySQL 数据库。
在 IntelliJ IDEA 中创建并设置两个 Spring boot 项目作为两个微服务。
1.创建DepartmentService微服务
首先 在 IntelliJ IDEA 中创建并设置部门服务Spring boot 项目
1.在IntelliJ IDEA中创建并设置spring boot项目(部门服务)
我们使用 springinitializr创建一个 Spring boot 项目。
请查看下面的屏幕截图,在使用 springinitializr创建 Spring Boot 应用程序时输入详细信息 :
点击“GENERATE”按钮以 zip 文件形式下载 Spring boot 项目。解压zip文件并在IntelliJ IDEA中导入Spring boot项目。
pom.xml文件供参考:
<?xml version="1.0" encoding="UTF-8"?>

<project xmlns="http://maven.apache.org/POM/4.0.0" xmlns:xsi="http://www.w3.org/2001/XMLSchema-instance"

	xsi:schemaLocation="http://maven.apache.org/POM/4.0.0 https://maven.apache.org/xsd/maven-4.0.0.xsd">

	<modelVersion>4.0.0</modelVersion>

	<parent>

		<groupId>org.springframework.boot</groupId>

		<artifactId>spring-boot-starter-parent</artifactId>

		<version>2.7.17</version>

		<relativePath/> <!-- lookup parent from repository -->

	</parent>

	<groupId>io.wz</groupId>

	<artifactId>department-service</artifactId>

	<version>0.0.1-SNAPSHOT</version>

	<name>department-service</name>

	<description>department-service</description>

	<properties>

		<java.version>1.8</java.version>

	</properties>

	<dependencies>

		<dependency>

			<groupId>org.springframework.boot</groupId>

			<artifactId>spring-boot-starter-data-jpa</artifactId>

		</dependency>

		<dependency>

			<groupId>org.springframework.boot</groupId>

			<artifactId>spring-boot-starter-web</artifactId>

		</dependency>

		<dependency>

			<groupId>com.mysql</groupId>

			<artifactId>mysql-connector-j</artifactId>

			<scope>runtime</scope>

		</dependency>

		<dependency>

			<groupId>org.projectlombok</groupId>

			<artifactId>lombok</artifactId>

			<optional>true</optional>

		</dependency>

		<dependency>

			<groupId>org.springframework.boot</groupId>

			<artifactId>spring-boot-starter-test</artifactId>

			<scope>test</scope>

		</dependency>

	</dependencies>

	<build>

		<plugins>

			<plugin>

				<groupId>org.springframework.boot</groupId>

				<artifactId>spring-boot-maven-plugin</artifactId>

				<configuration>

					<excludes>

						<exclude>

							<groupId>org.projectlombok</groupId>

							<artifactId>lombok</artifactId>

						</exclude>

					</excludes>

				</configuration>

			</plugin>

		</plugins>

	</build>

</project>
DepartmentService - 配置 MySQL 数据库
由于我们使用 MySQL 作为数据库,因此我们需要配置 URL、用户名和密码,以便 Spring boot 在启动时可以与数据库建立连接。
打开 src/main/resources/application.properties 文件并向其中添加以下属性:
spring.datasource.url=jdbc:mysql://localhost:3306/department_db

spring.datasource.username=root

spring.datasource.password=Mysql@123

spring.jpa.properties.hibernate.dialect=org.hibernate.dialect.MySQLDialect

spring.jpa.hibernate.ddl-auto=update
这里注意修改的MySQL密码,另外在 MySQL 中创建一个名为Department_db的数据库 。
不需要创建任何表。Hibernate 将根据我们将在下一步中定义的Department实体自动创建这些表 。这是通过属性 spring.jpa.hibernate.ddl-auto = update 自动实现的。
DepartmentService - 创建部门 JPA 实体
package io.wz.departmentservice.entity;

import javax.persistence.*;

import lombok.AllArgsConstructor;

import lombok.Getter;

import lombok.NoArgsConstructor;

import lombok.Setter;

@Entity

@Table(name = "departments")

@NoArgsConstructor

@AllArgsConstructor

@Setter

@Getter

public class Department {

    @Id

    @GeneratedValue(strategy = GenerationType.IDENTITY)

    private Long id;

    private String departmentName;

    private String departmentAddress;

    private String departmentCode;

}
DepartmentService - 创建 Spring Data JPA 存储库
package io.wz.departmentservice.repository;

import io.wz.departmentservice.entity.Department;

import org.springframework.data.jpa.repository.JpaRepository;

public interface DepartmentRepository extends JpaRepository<Department, Long> {

}
DepartmentService - 创建服务层
DepartmentService
package io.wz.departmentservice.service;

import io.wz.departmentservice.entity.Department;

public interface DepartmentService {

    Department saveDepartment(Department department);

    Department getDepartmentById(Long departmentId);

}
DepartmentServiceImpl 类
package io.wz.departmentservice.service.impl;

import lombok.AllArgsConstructor;

import lombok.extern.slf4j.Slf4j;

import io.wz.departmentservice.entity.Department;

import io.wz.departmentservice.repository.DepartmentRepository;

import io.wz.departmentservice.service.DepartmentService;

import org.springframework.stereotype.Service;

@Service

@AllArgsConstructor

@Slf4j

public class DepartmentServiceImpl implements DepartmentService {

    private DepartmentRepository departmentRepository;

    @Override

    public Department saveDepartment(Department department) {

        return departmentRepository.save(department);

    }

    @Override

    public Department getDepartmentById(Long departmentId) {

        return departmentRepository.findById(departmentId).get();

    }

}
DepartmentService - 创建Controller层
DepartmentController
package io.wz.departmentservice.controller;

import lombok.AllArgsConstructor;

import io.wz.departmentservice.entity.Department;

import io.wz.departmentservice.service.DepartmentService;

import org.springframework.http.HttpStatus;

import org.springframework.http.ResponseEntity;

import org.springframework.web.bind.annotation.*;

@RestController

@RequestMapping("api/departments")

@AllArgsConstructor

public class DepartmentController {

    private DepartmentService departmentService;

    @PostMapping

    public ResponseEntity<Department> saveDepartment(@RequestBody Department department){

        Department savedDepartment = departmentService.saveDepartment(department);

        return new ResponseEntity<>(savedDepartment, HttpStatus.CREATED);

    }

    @GetMapping("{id}")

    public ResponseEntity<Department> getDepartmentById(@PathVariable("id") Long departmentId){

        Department department = departmentService.getDepartmentById(departmentId);

        return ResponseEntity.ok(department);

    }

}
DepartmentService - 启动 Spring Boot 应用程序
我们可以通过两种方式启动独立的 Spring boot 应用程序。
- 从应用程序的根目录并键入以下命令来运行它 -
$ mvn spring-boot:run
- 从 IDE 中,将
DepartmentServiceApplication.main()方法作为独立 Java 类运行,该方法将在端口 8080 上启动嵌入式 Tomcat 服务器并将浏览器指向 http://localhost:8080/。
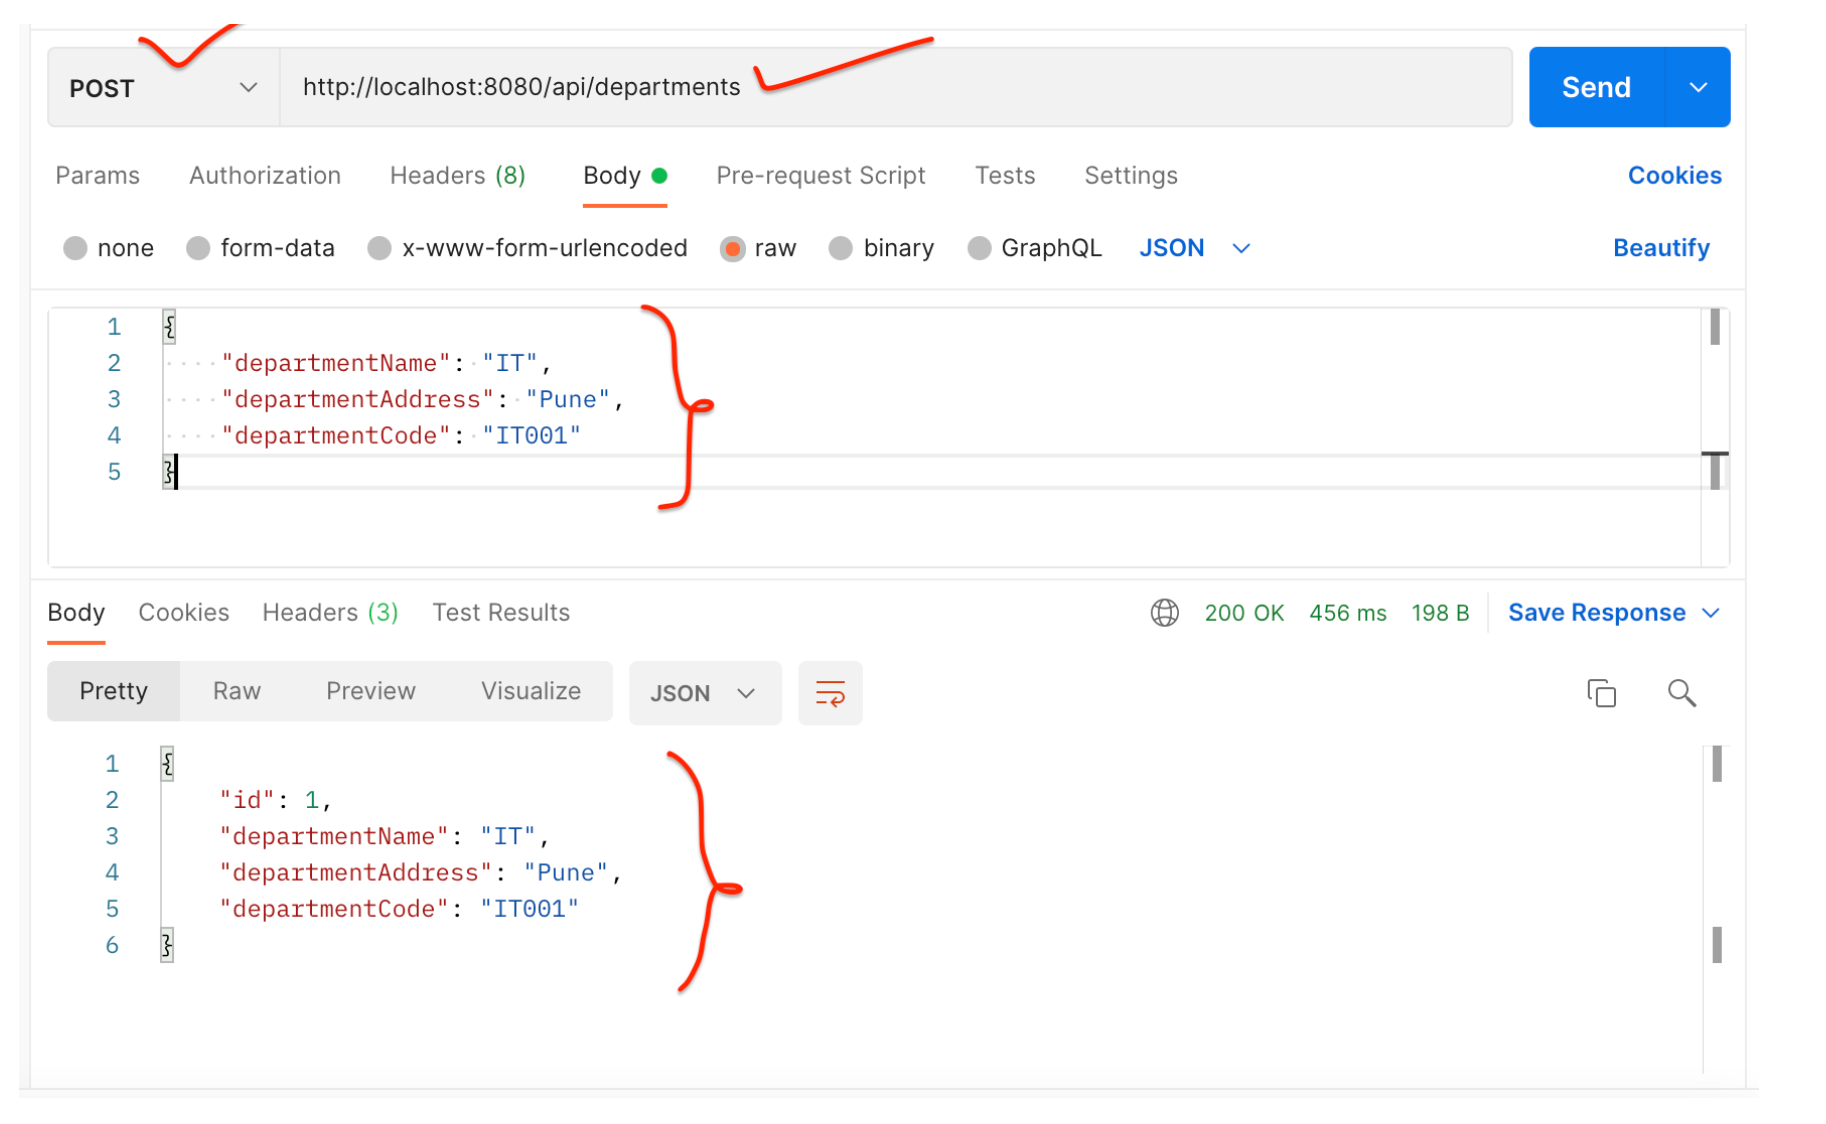
DepartmentService - 使用 Postman 客户端测试 REST API
保存部门 REST API:
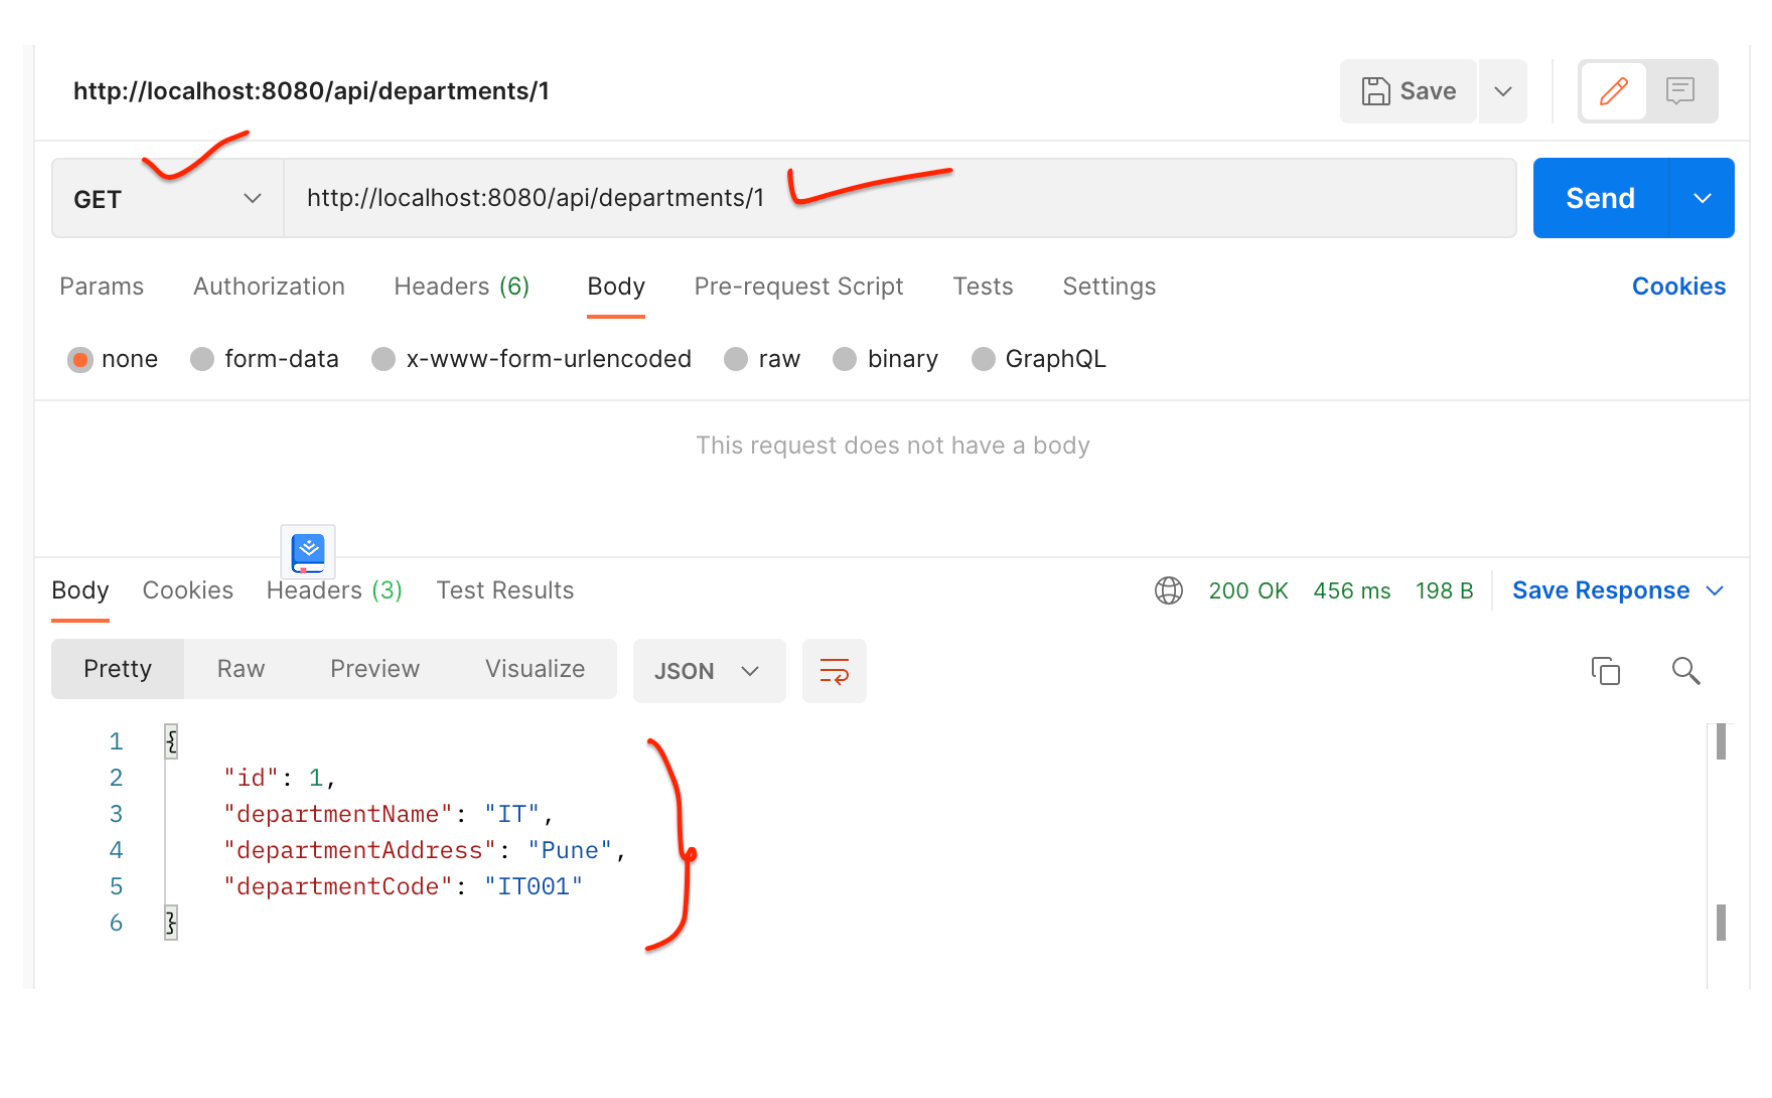
获取单个部门 REST API:
2.创建UserService微服务
我们首先在 IntelliJ IDEA 中创建并设置UserServiceSpring boot 项目
1.在IntelliJ IDEA中创建并设置spring boot项目(用户服务)
使用 springinitializr创建一个 Spring boot 项目。
请参阅下面的屏幕截图,在使用 springinitializr创建 Spring Boot 应用程序时输入详细信息 :

单击“GENRATE”按钮以 zip 文件形式下载 Spring boot 项目。解压zip文件并在IntelliJ IDEA中导入Spring boot项目。
pom.xml 文件供参考:
<?xml version="1.0" encoding="UTF-8"?>

<project xmlns="http://maven.apache.org/POM/4.0.0" xmlns:xsi="http://www.w3.org/2001/XMLSchema-instance"

	xsi:schemaLocation="http://maven.apache.org/POM/4.0.0 https://maven.apache.org/xsd/maven-4.0.0.xsd">

	<modelVersion>4.0.0</modelVersion>

	<parent>

		<groupId>org.springframework.boot</groupId>

		<artifactId>spring-boot-starter-parent</artifactId>

		<version>2.7.17</version>

		<relativePath/> <!-- lookup parent from repository -->

	</parent>

	<groupId>io.wz</groupId>

	<artifactId>user-service</artifactId>

	<version>0.0.1-SNAPSHOT</version>

	<name>user-service</name>

	<description>user-service</description>

	<properties>

		<java.version>1.8</java.version>

	</properties>

	<dependencies>

		<dependency>

			<groupId>org.springframework.boot</groupId>

			<artifactId>spring-boot-starter-data-jpa</artifactId>

		</dependency>

		<dependency>

			<groupId>org.springframework.boot</groupId>

			<artifactId>spring-boot-starter-web</artifactId>

		</dependency>

		<dependency>

			<groupId>com.mysql</groupId>

			<artifactId>mysql-connector-j</artifactId>

			<scope>runtime</scope>

		</dependency>

		<dependency>

			<groupId>org.projectlombok</groupId>

			<artifactId>lombok</artifactId>

			<optional>true</optional>

		</dependency>

		<dependency>

			<groupId>org.springframework.boot</groupId>

			<artifactId>spring-boot-starter-test</artifactId>

			<scope>test</scope>

		</dependency>

	</dependencies>

	<build>

		<plugins>

			<plugin>

				<groupId>org.springframework.boot</groupId>

				<artifactId>spring-boot-maven-plugin</artifactId>

				<configuration>

					<excludes>

						<exclude>

							<groupId>org.projectlombok</groupId>

							<artifactId>lombok</artifactId>

						</exclude>

					</excludes>

				</configuration>

			</plugin>

		</plugins>

	</build>

</project>
UserService - 配置 MySQL 数据库
打开 src/main/resources/application.properties 文件并向其中添加以下属性:
spring.datasource.url=jdbc:mysql://localhost:3306/employee_db

spring.datasource.username=root

spring.datasource.password=Mysql@123

spring.jpa.properties.hibernate.dialect=org.hibernate.dialect.MySQLDialect

spring.jpa.hibernate.ddl-auto=update
这里注意修改的MySQL密码,另外在 MySQL 中创建一个名为employee_db的数据库 。
不需要创建任何表。Hibernate 将根据我们将在下一步中定义的User实体自动创建这些表 。这是通过属性 spring.jpa.hibernate.ddl-auto = update 自动实现的。
UserService - 更改服务器端口
注意,部门服务 Spring boot 项目运行在默认的 tomcat 服务器端口 8080 上。
对于用户服务,我们需要使用以下属性将嵌入式 tomcat 服务器端口更改为 8081:
server.port = 8081
UserService - 创建用户 JPA 实体
package io.wz.userservice.entity;

import javax.persistence.*;

import lombok.AllArgsConstructor;

import lombok.Getter;

import lombok.NoArgsConstructor;

import lombok.Setter;

@Entity

@Table(name = "users")

@Setter

@Getter

@NoArgsConstructor

@AllArgsConstructor

public class User {

    @Id

    @GeneratedValue(strategy = GenerationType.IDENTITY)

    private Long id;

    private String firstName;

    private String lastName;

    @Column(nullable = false, unique = true)

    private String email;

    private String departmentId;

}
UserService - 创建 Spring Data JPA 存储库
package io.wz.userservice.repository;

import io.wz.userservice.entity.User;

import org.springframework.data.jpa.repository.JpaRepository;

public interface UserRepository extends JpaRepository<User, Long> {

}
UserService - 创建 DTO 类
DepartmentDto
package io.wz.userservice.dto;

import lombok.AllArgsConstructor;

import lombok.Getter;

import lombok.NoArgsConstructor;

import lombok.Setter;

@Setter

@Getter

@AllArgsConstructor

@NoArgsConstructor

public class DepartmentDto {

    private Long id;

    private String departmentName;

    private String departmentAddress;

    private String departmentCode;

}
UserDto
package io.wz.userservice.dto;

import lombok.AllArgsConstructor;

import lombok.Getter;

import lombok.NoArgsConstructor;

import lombok.Setter;

@Setter

@Getter

@NoArgsConstructor

@AllArgsConstructor

public class UserDto {

    private Long id;

    private String firstName;

    private String lastName;

    private String email;

}
ResponseDto
package io.wz.userservice.dto;

import lombok.AllArgsConstructor;

import lombok.Getter;

import lombok.NoArgsConstructor;

import lombok.Setter;

@Setter

@Getter

@NoArgsConstructor

@AllArgsConstructor

public class ResponseDto {

    private DepartmentDto department;

    private UserDto user;

}
UserService - 将 RestTemplate 配置为 Spring Bean
将 RestTemplate 类配置为 Spring bean,以便我们可以注入并使用它。
package io.wz.userservice;

import org.springframework.boot.SpringApplication;

import org.springframework.boot.autoconfigure.SpringBootApplication;

import org.springframework.context.annotation.Bean;

import org.springframework.web.client.RestTemplate;

@SpringBootApplication

public class UserServiceApplication {

    public static void main(String[] args) {

        SpringApplication.run(UserServiceApplication.class, args);

    }

    @Bean

    public RestTemplate restTemplate(){

        return new RestTemplate();

    }

}
UserService - 创建服务层
用户服务接口
package io.wz.userservice.service;

import io.wz.userservice.dto.ResponseDto;

import io.wz.userservice.entity.User;

public interface UserService {

    User saveUser(User user);

    ResponseDto getUser(Long userId);

}
UserServiceImpl class
package io.wz.userservice.service.impl;

import lombok.AllArgsConstructor;

import io.wz.userservice.dto.DepartmentDto;

import io.wz.userservice.dto.ResponseDto;

import io.wz.userservice.dto.UserDto;

import io.wz.userservice.entity.User;

import io.wz.userservice.repository.UserRepository;

import io.wz.userservice.service.UserService;

import org.springframework.http.ResponseEntity;

import org.springframework.stereotype.Service;

import org.springframework.web.client.RestTemplate;

@Service

@AllArgsConstructor

public class UserServiceImpl implements UserService {

    private UserRepository userRepository;

    private RestTemplate restTemplate;

    @Override

    public User saveUser(User user) {

        return userRepository.save(user);

    }

    @Override

    public ResponseDto getUser(Long userId) {

        ResponseDto responseDto = new ResponseDto();

        User user = userRepository.findById(userId).get();

        UserDto userDto = mapToUser(user);

        ResponseEntity<DepartmentDto> responseEntity = restTemplate

                .getForEntity("http://localhost:8080/api/departments/" + user.getDepartmentId(),

                DepartmentDto.class);

        DepartmentDto departmentDto = responseEntity.getBody();

        System.out.println(responseEntity.getStatusCode());

        responseDto.setUser(userDto);

        responseDto.setDepartment(departmentDto);

        return responseDto;

    }

    private UserDto mapToUser(User user){

        UserDto userDto = new UserDto();

        userDto.setId(user.getId());

        userDto.setFirstName(user.getFirstName());

        userDto.setLastName(user.getLastName());

        userDto.setEmail(user.getEmail());

        return userDto;

    }

}
请注意,以上我们使用RestTemplate对部门服务进行 REST API 调用:
ResponseEntity<DepartmentDto> responseEntity = restTemplate

                .getForEntity("http://localhost:8080/api/departments/" + user.getDepartmentId(),

                DepartmentDto.class);
UserService - 创建控制器层:UserController
package io.wz.userservice.controller;

import lombok.AllArgsConstructor;

import io.wz.userservice.dto.ResponseDto;

import io.wz.userservice.entity.User;

import io.wz.userservice.service.UserService;

import org.springframework.http.HttpStatus;

import org.springframework.http.ResponseEntity;

import org.springframework.web.bind.annotation.*;

@RestController

@RequestMapping("api/users")

@AllArgsConstructor

public class UserController {

    private UserService userService;

    @PostMapping

    public ResponseEntity<User> saveUser(@RequestBody User user){

        User savedUser = userService.saveUser(user);

        return new ResponseEntity<>(savedUser, HttpStatus.CREATED);

    }

    @GetMapping("{id}")

    public ResponseEntity<ResponseDto> getUser(@PathVariable("id") Long userId){

        ResponseDto responseDto = userService.getUser(userId);

        return ResponseEntity.ok(responseDto);

    }

}
UserService - 启动 Spring Boot 应用程序
我们可以通过两种方式启动独立的 Spring boot 应用程序。
- 从应用程序的根目录并键入以下命令来运行它 -
$ mvn spring-boot:run
- 在 IDE 中,将
UserServiceApplication.main()方法作为独立 Java 类运行,该方法将在端口 8080 上启动嵌入式 Tomcat 服务器并将浏览器指向http://localhost:8081/。
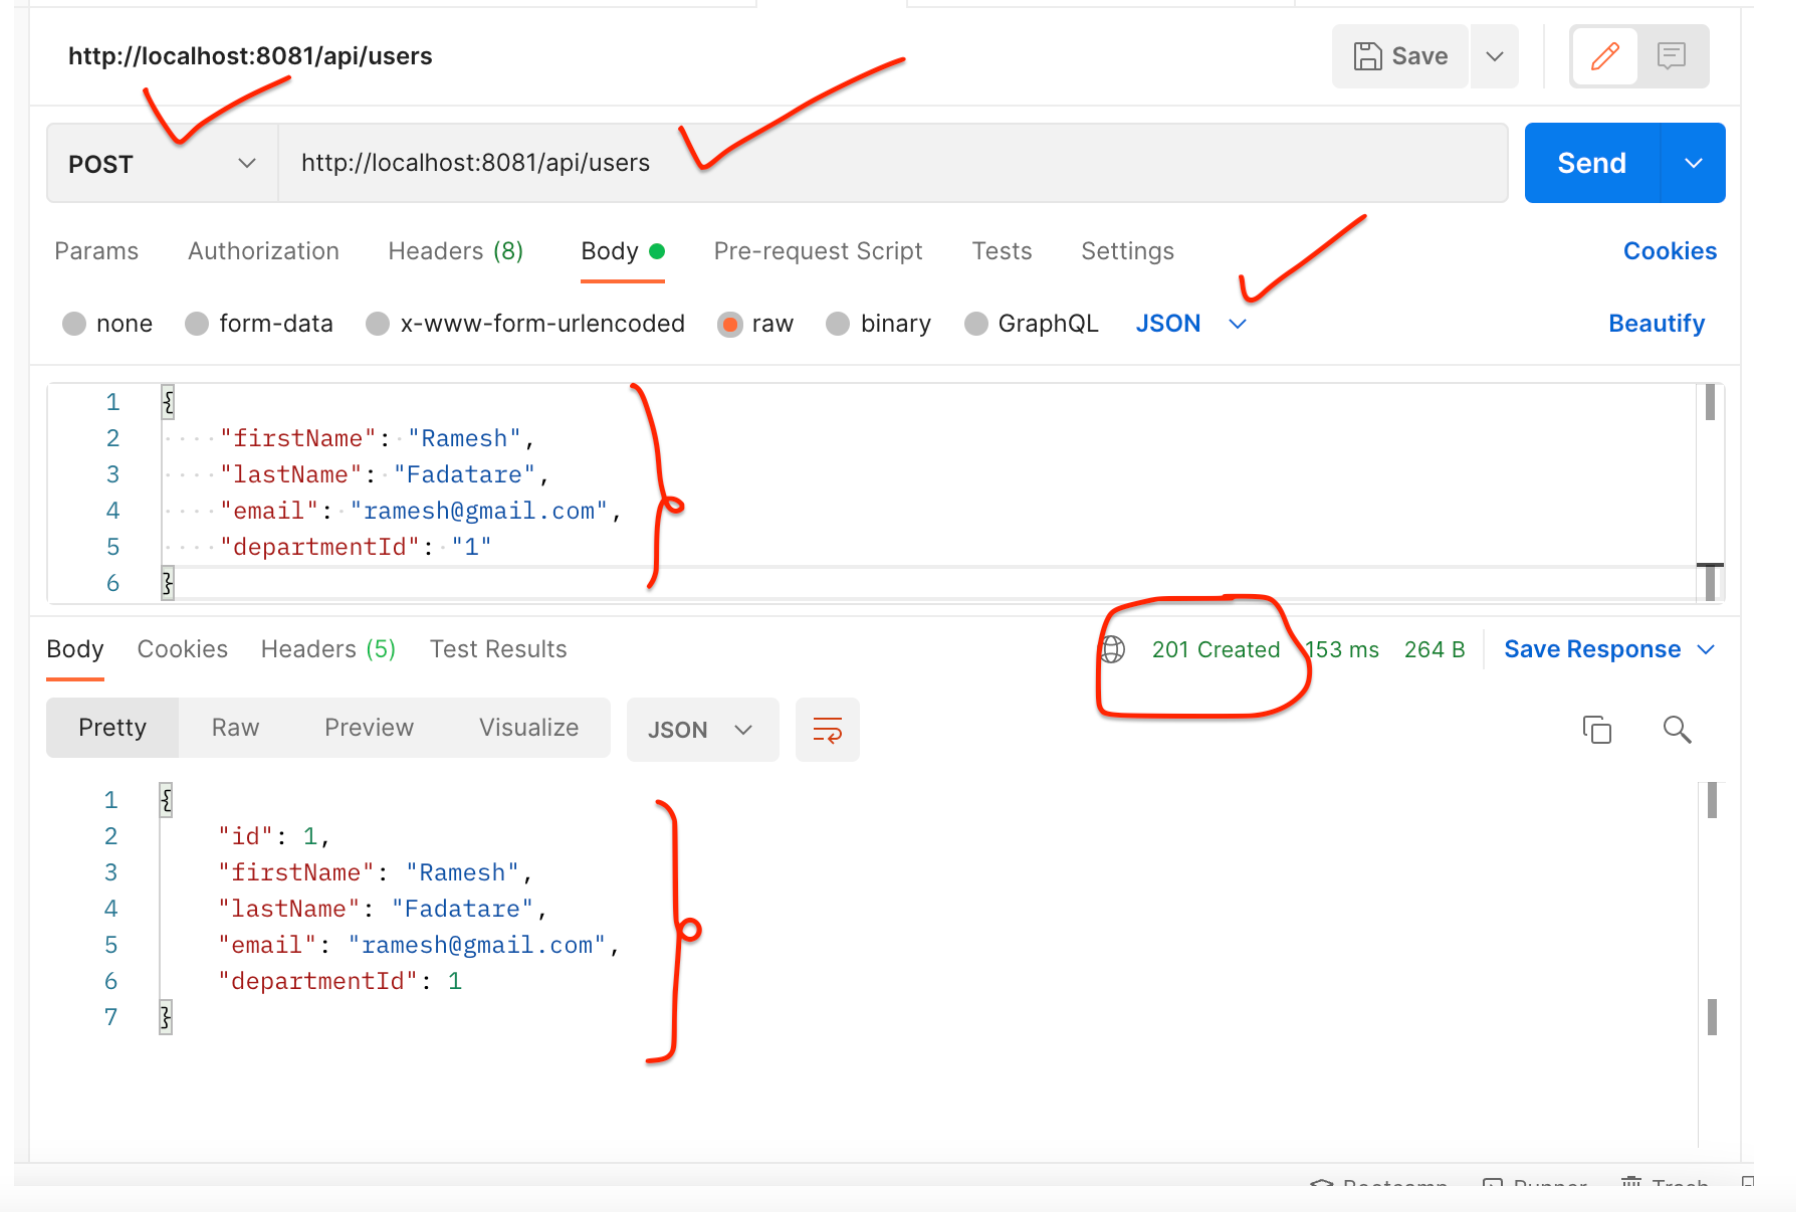
UserService - 使用 Postman 客户端测试 REST API
保存用户 REST API:
获取用户 REST API:
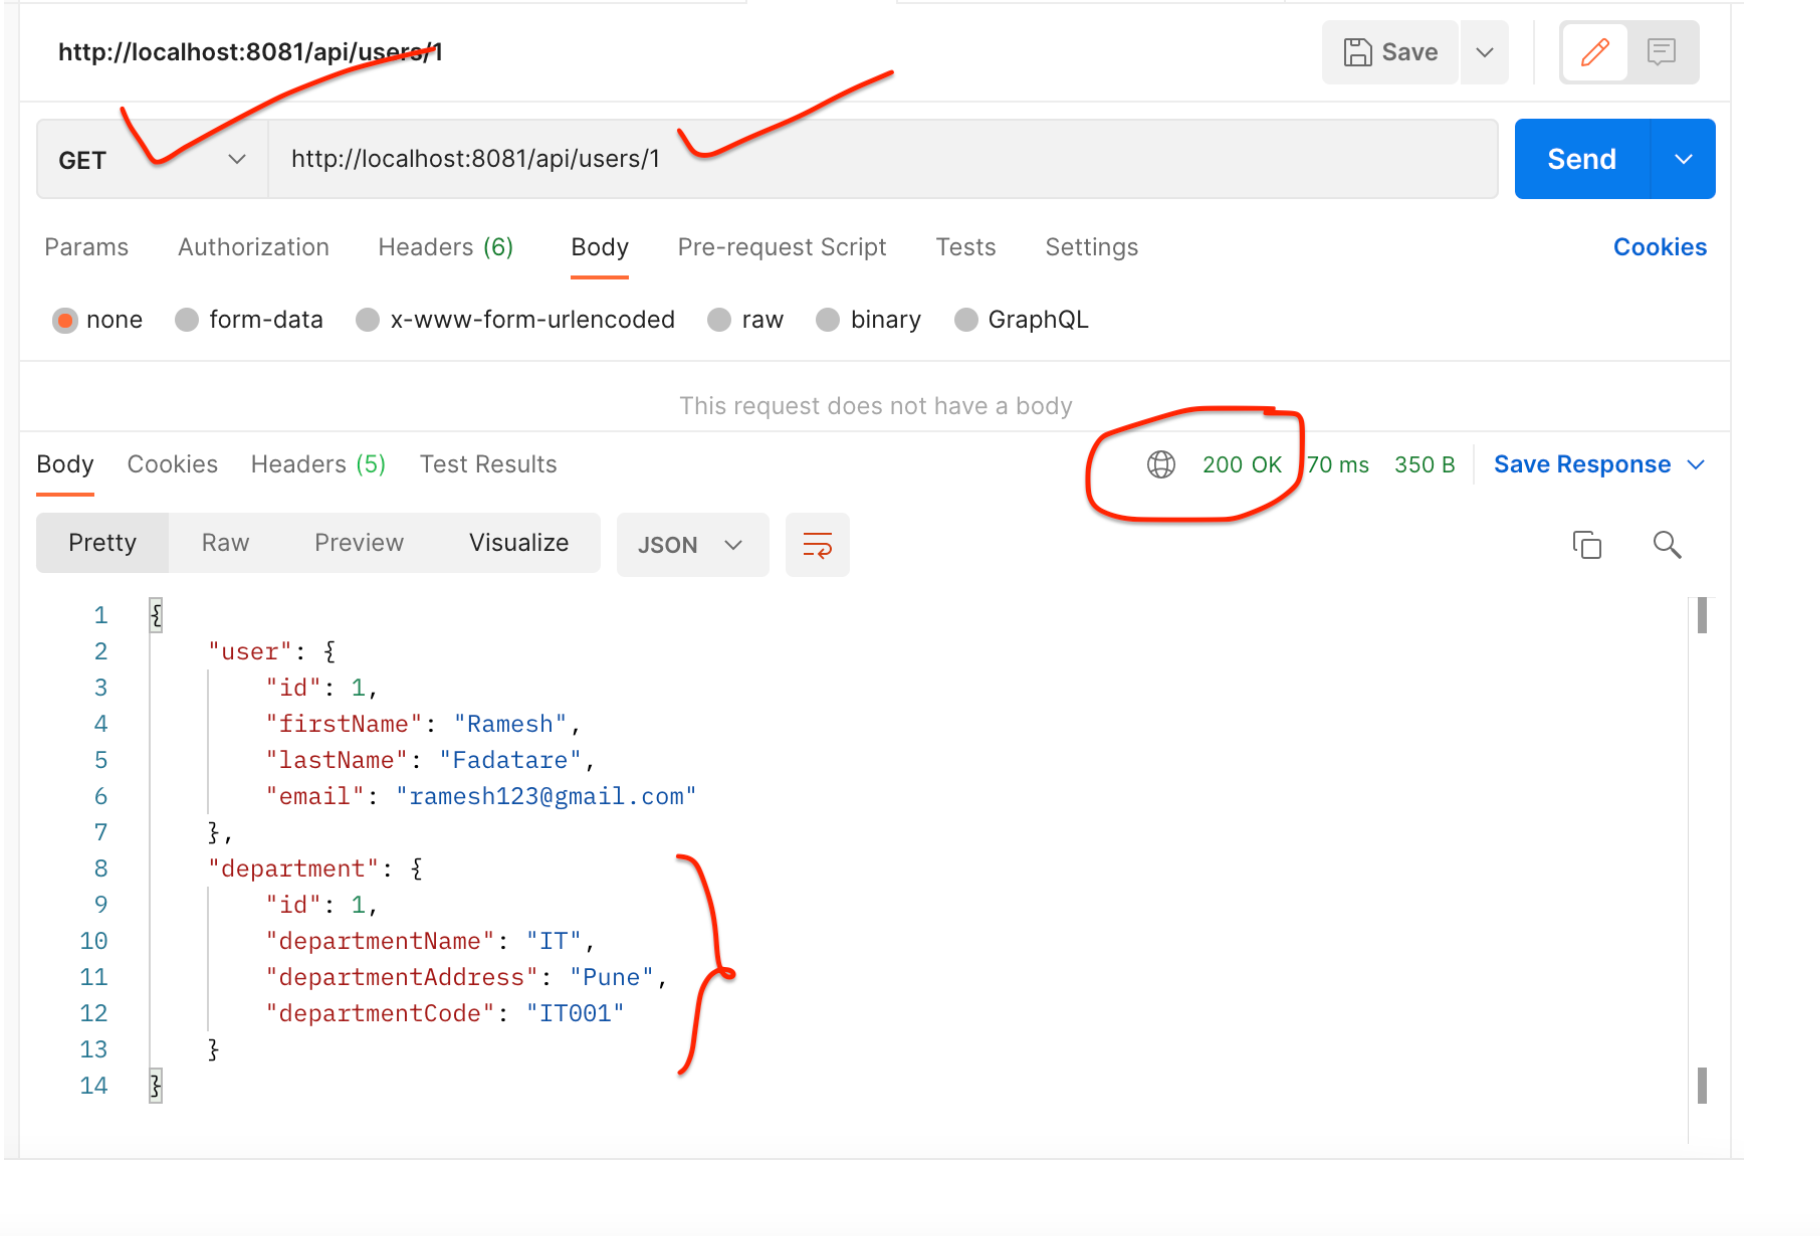
请注意,响应包含用户的部门。这说明我们已成功从 UserService 到 DepartmentService 进行 REST API 调用。
结论
在本教程中,我们学习了如何创建多个 Spring boot 微服务以及如何使用RestTemplate类在多个微服务之间进行同步通信。
从 5.0 开始, RestTemplate 类处于维护模式,很快就会被弃用。因此 Spring 团队推荐使用 org.springframework.web.reactive.client.WebClient ,它具有现代 API 并支持同步、异步和流场景,下一篇文章继续讲解
微服务系列-如何使用 RestTemplate 进行 Spring Boot 微服务通信示例的更多相关文章
- 【原创】Docker容器及Spring Boot微服务应用
Docker容器及Spring Boot微服务应用 1 什么是Docker 1.1 Docker的出现 问题一:项目实施环境复杂问题 传统项目实施过程中经常会出现“程序在我这跑得好好的,在你那怎么就不 ...
- 【spring boot】spring cloud下spring boot微服务启动没有报错,但是访问访问不到
spring cloud下spring boot微服务启动没有报错,但是访问访问不到 解决方法: 可能是端口被占用了,但是依旧启用成功了. 更改一下项目启用的端口号,再重新启动查看是否可以正常访问.
- Spring Boot 微服务应用集成Prometheus + Grafana 实现监控告警
Spring Boot 微服务应用集成Prometheus + Grafana 实现监控告警 一.添加依赖 1.1 Actuator 的 /prometheus端点 二.Prometheus 配置 部 ...
- 3行代码快速实现Spring Boot Oauth2服务
这里的3行代码并不是指真的只需要写3行代码,而是基于我已经写好的一个Spring Boot Oauth2服务.仅仅需要修改3行数据库配置信息,即可得到一个Spring Boot Oauth2服务. 项 ...
- Spring Cloud第十三篇 | Spring Boot Admin服务监控
本文是Spring Cloud专栏的第十三篇文章,了解前十二篇文章内容有助于更好的理解本文: Spring Cloud第一篇 | Spring Cloud前言及其常用组件介绍概览 Spring Clo ...
- Spring Boot系列(一):Spring Boot快速开始
一.Spring Boot介绍 Spring Boot可以很容易的创建可直接运行的独立的基于Spring的应用程序. 功能特点: 创建独立的Spring应用程序: 直接嵌入Tomcat.Jetty等W ...
- Spring Boot系列(四):Spring Boot源码解析
一.自动装配原理 之前博文已经讲过,@SpringBootApplication继承了@EnableAutoConfiguration,该注解导入了AutoConfigurationImport Se ...
- Spring Boot系列(三):Spring Boot整合Mybatis源码解析
一.Mybatis回顾 1.MyBatis介绍 Mybatis是一个半ORM框架,它使用简单的 XML 或注解用于配置和原始映射,将接口和Java的POJOs(普通的Java 对象)映射成数据库中的记 ...
- Spring Boot Ftp Client 客户端示例支持断点续传
本章介绍 Spring Boot 整合 Ftpclient 的示例,支持断点续传 本项目源码下载 1 新建 Spring Boot Maven 示例工程项目 注意:是用来 IDEA 开发工具 File ...
- Spring Boot微服务架构入门
概述 还记得在10年毕业实习的时候,当时后台三大框架为主流的后台开发框架成软件行业的标杆,当时对于软件的认识也就是照猫画虎,对于为什么会有这么样的写法,以及这种框架的优势或劣势,是不清楚的,Sprin ...
随机推荐
- 在Dash中更灵活地编写回调函数
本文示例代码已上传至我的Github仓库https://github.com/CNFeffery/dash-master 大家好我是费老师,使用Dash开发过交互式应用的朋友,想必都不会对回调函数感到 ...
- 在PowerShell脚本中获取程序集文件属性的指定元数据特性的方法——AssemblyMetadataAttribute
在PowerShell脚本中获取程序集文件属性的指定元数据特性的方法--AssemblyMetadataAttribute <# .SYNOPSIS 获取程序集文件属性的指定元数据特性 .DES ...
- Walrus 0.4发布:单一配置、多态运行,体验下一代应用交付模型
今天,我们高兴地宣布云原生统一应用平台 Walrus 0.4 正式发布,这是一个里程碑式的版本更新.新版本采用了全新的应用模型--仅需进行单一配置,即可在多种模态的基础设施及环境中运行包括应用服务及周 ...
- Modbus转PROFIBUS DP 通信网关-应用案例
针对西门子S7系列的PLC,通用串口/PROFIBUS-DP网关(PM-160)为建立西门子PLC与现场RS232/485设备的连接提供了理想解决方案
- java 405_Http状态405-方法不允许
解决方法: 删除下列代码. super.doGet(req.resp); super.doPost(req.resp); 分析: 405错误一般指请求method not allowed 错误. 请求 ...
- python中get请求
先来说说get请求和post请求的区别: 1 最直接的区别,GET请求的参数是放在URL里的,POST请求参数是放在请求body里的: 2 GET请求的URL传参有长度限制,而POST请求没有长度限制 ...
- 使用 Guava Retry 优雅的实现重试机制
王有志,一个分享硬核Java技术的互金摸鱼侠 加入Java人的提桶跑路群:共同富裕的Java人 大家好,我是王有志.今天我会通过一个真实的项目改造案例和大家聊一聊如何优雅的实现 Java 中常用的的重 ...
- Linux磁盘专题-linux文件系统详解
这可是我几年前的杰作笔记呀.....当初手写计算都会,现在忘光光.... 物理硬盘Block的概念和作用 硬盘底层一次IO就是读.写一次扇区,一个扇区默认是512Byte. 读写大量文件如果以扇区为单 ...
- java生成企业公章图片源代码
企业公章图片在电子签章业务中应用广泛,在电子签章应用过程中首先需要生成公章图片,然后再使用公章图片结合数字签名技术完成电子签,这样就实现了从可视化到不可篡改的数字化电子签章功能,以下是企业公章图片生成 ...
- 2022年发布jar到Maven公共仓库最全攻略
2022年jar包发布到Maven公共仓库最全攻略 分几个步骤: 1.注册 issues.sonatype.org 账号 2.创建 issues 填写项目地址(github.gitee等) 3.验证域 ...