Spring Boot系列(四):Spring Boot源码解析
一、自动装配原理
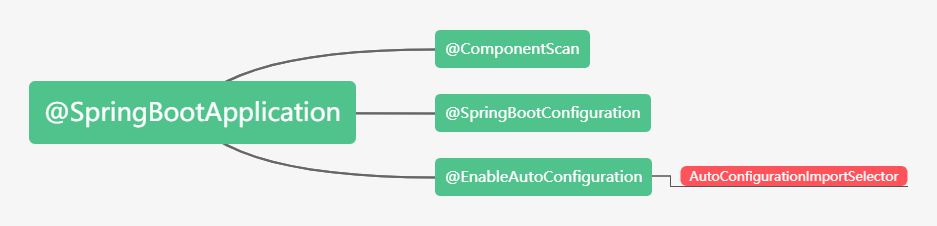
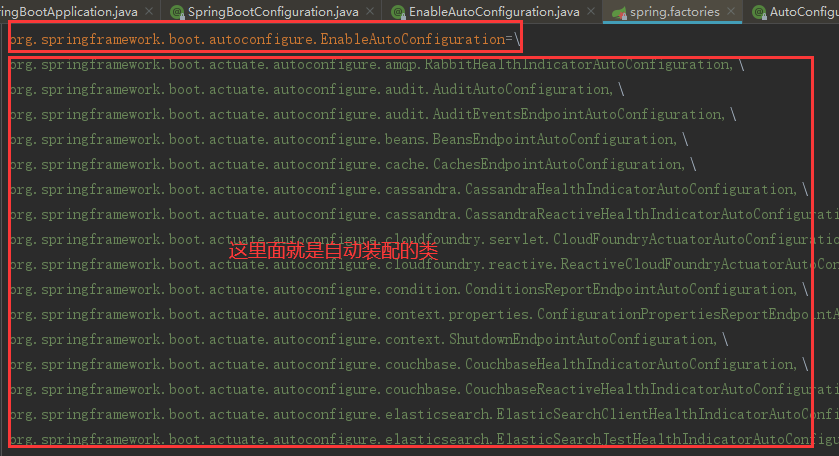
之前博文已经讲过,@SpringBootApplication继承了@EnableAutoConfiguration,该注解导入了AutoConfigurationImport Selector,这个类主要是扫描spring-boot-autoconfigure下面的META-INF\spring.factories中的EnableAutoConfiguration对应的全类名,其中XXXAutoConfiguration都是一个个自动配置类。
自动装配原理具体参考:Spring Boot系列(二):Spring Boot自动装配原理解析
二、Spring Boot的jar启动
1、Spring Boot自动装配Tomcat组件
① EmbeddedWebServerFactoryCustomizerAutoConfiguration内嵌的Web容器工厂定制器自动装配类,装配了TomcatWebServerFactoryCustomizer组件

Tomcat工厂定制器TomcatWebServerFactoryCustomizer用来设置容器的属性,把ServerProperties中的属性设置到Tomcat容器的工厂中。
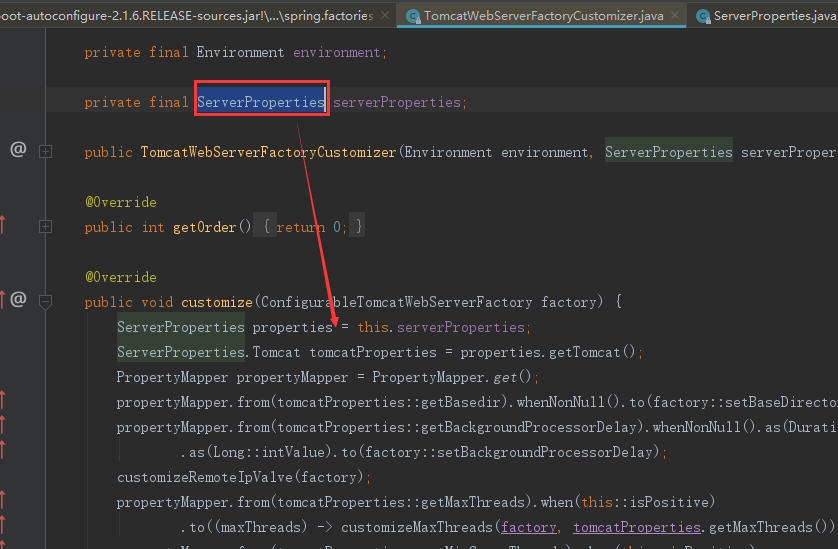
ServerProperties服务的属性类:

② ServletWebServerFactoryAutoConfiguration,ServletWeb工厂自动装配类,装配了如下四个组件
- ServletWebServerFactoryCustomizer:用来定制ServletWeb服务工厂
- TomcatServletWebServerFactoryCustomizer:用来定制TomcatServletWeb服务工厂
- ServletWebServerFactoryAutoConfiguration.BeanPostProcessorsRegistrar :后置处理器
- ServletWebServerFactoryConfiguration:用来配置TomcatServletWeb服务工厂

2、SpringApplication.run启动流程
① new SpringApplication(primarySources),创建了一个SpringApplication
public SpringApplication(ResourceLoader resourceLoader, Class<?>... primarySources) {

        this.resourceLoader = resourceLoader;

        Assert.notNull(primarySources, "PrimarySources must not be null");

        //设置主配置类 我们自己写的Spring Boot的启动类

        this.primarySources = new LinkedHashSet<>(Arrays.asList(primarySources));

        //设置web应用的类型

        this.webApplicationType = WebApplicationType.deduceFromClasspath();

        //设置容器初始化器(ApplicationContextInitializer类型的)

        setInitializers((Collection) getSpringFactoriesInstances(ApplicationContextInitializer.class));

        //把监听器设置到SpringApplication中[ApplicationListener]

        setListeners((Collection) getSpringFactoriesInstances(ApplicationListener.class));

        //设置主配置类

        this.mainApplicationClass = deduceMainApplicationClass();

    }
② SpringApplication的run方法:
主要流程:
第一:创建容器对象
第二:去META-INFO/spring.factories中获取SpringApplicationRunListener监听器(事件发布监听器)
第三:发布容器starting事件(通过spring的事件多播器)
第四:封装命令行参数
第五:准备容器环境
第六:打印Springboot的图标
第七:根据webApplicationType来创建容器
第八:准备容器上下文
第九:发布容器启动事件
第十:发布容器运行事件
public ConfigurableApplicationContext run(String... args) {

        StopWatch stopWatch = new StopWatch();

        stopWatch.start();

        //容器对象

        ConfigurableApplicationContext context = null;

        Collection<SpringBootExceptionReporter> exceptionReporters = new ArrayList<>();

        configureHeadlessProperty();

        //去META-INFO/spring.factories中获取SpringApplicationRunListener监听器(事件发布监听器)

        SpringApplicationRunListeners listeners = getRunListeners(args);

        //发布容器starting事件(通过spring的事件多播器)

        listeners.starting();

        try {

            //封装命令行参数

            ApplicationArguments applicationArguments = new DefaultApplicationArguments(args);

            /**

             * 准备容器环境

             * 1: 获取或者创建环境

             * 2:把命令行参数设置到环境中

             * 3:通过监听器发布环境准备事件

             */

            ConfigurableEnvironment environment = prepareEnvironment(listeners, applicationArguments);

            configureIgnoreBeanInfo(environment);

            //打印Springboot的图标

            Banner printedBanner = printBanner(environment);

            //创建容器根据webApplicationType来创建容器(通过反射创建)

            context = createApplicationContext();

            exceptionReporters = getSpringFactoriesInstances(SpringBootExceptionReporter.class,

                    new Class[] { ConfigurableApplicationContext.class }, context);

            /**

             * 准备上下文

             * 1:把环境设置到容器中

             * 2: 循环调用ApplicationContextInitializer进行容器初始化工作

             * 3: 发布容器上下文准备完成事件

             * 4: 注册关于Springboot特性的相关单例Bean

             * 5: 发布容器上下文加载完毕事件

             */

            prepareContext(context, environment, listeners, applicationArguments, printedBanner);

            refreshContext(context);

            //运行ApplicationRunner和CommandLineRunner

            afterRefresh(context, applicationArguments);

            stopWatch.stop();

            if (this.logStartupInfo) {

                new StartupInfoLogger(this.mainApplicationClass).logStarted(getApplicationLog(), stopWatch);

            }

            //发布容器启动事件

            listeners.started(context);

            //运行ApplicationRunner和CommandLineRunner

            callRunners(context, applicationArguments);

        }

        catch (Throwable ex) {

            //出现异常调用异常分析保护类进行分析

            handleRunFailure(context, ex, exceptionReporters, listeners);

            throw new IllegalStateException(ex);

        }

        try {

            //发布容器运行事件

            listeners.running(context);

        }

        catch (Throwable ex) {

            handleRunFailure(context, ex, exceptionReporters, null);

            throw new IllegalStateException(ex);

        }

        return context;

    }
③ org.springframework.boot.SpringApplication#refreshContext
④ org.springframework.boot.SpringApplication#refresh
⑤ org.springframework.context.support.AbstractApplicationContext#refresh
到了AbstractApplicationContext#refresh方法,之前讲过Spring IoC源码解析讲过该方法的12大步,这里就不细说,详细可以参考:Spring系列(三):Spring IoC源码解析,里面说过有一步就是onRefresh(),这个方法默认是空的,由子类根据自身需要去实现
⑥ org.springframework.boot.web.servlet.context.ServletWebServerApplicationContext#onRefresh
该onRefresh方法分2步
第一:super.onRefresh(); 调用父类的onRefresh()
第二:createWebServer();创建Web服务,很重要,很重要,很重要!!!
⑦ createWebServer()方法
第一:ServletContext servletContext = getServletContext(); 获取Servlet的上下文
第二:ServletWebServerFactory factory = getWebServerFactory();获取Tomcat的Web服务工厂
第三:this.webServer = factory.getWebServer(getSelfInitializer()); 创建一个Web服务器

⑧ TomcatServletWebServerFactory#getWebServer()方法,主要用于创建一个Tomcat Web容器

到此我们知道Spring Boot的启动通过Spring IoC的refresh中的的onRefresh()带动了Tomcat的启动,跟我们之前我们学Spring Mvc的时候刚好相反,Spring Mvc的是Tomcat的启动带动了Spring容器的启动;
三、普通Web工程启动
1、普通的web工程,我们找到web.xml,会发现都配置了如下的加载Spring的配置。
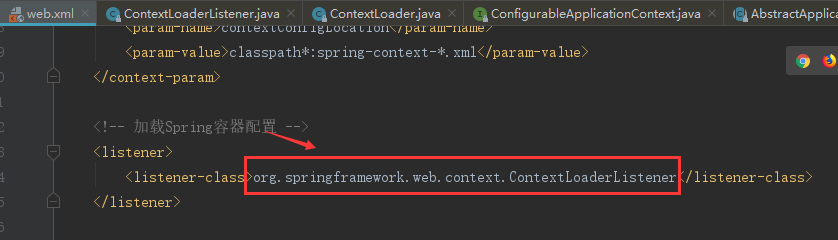
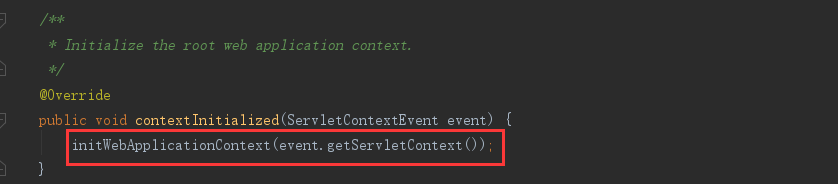
2、Tomcat启动的时候会调用该上下文加载的的监听器的contextInitialized方法,我们进入到该方法:
3、进入初始化Web应用上下文initWebApplicationContext方法中:
- this.context = createWebApplicationContext(servletContext);
- configureAndRefreshWebApplicationContext(cwac, servletContext);
4、进去到configureAndRefreshWebApplicationContext(cwac, servletContext)方法中:

5、进入到refresh方法实际就到了org.springframework.context.support.AbstractApplicationContext#refresh的方法
这个方法很熟悉了,Spring IoC的refresh的12大步;
四、Spring Boot启动流程图

Spring Boot系列(四):Spring Boot源码解析的更多相关文章
- spring MVC cors跨域实现源码解析
# spring MVC cors跨域实现源码解析 > 名词解释:跨域资源共享(Cross-Origin Resource Sharing) 简单说就是只要协议.IP.http方法任意一个不同就 ...
- spring MVC cors跨域实现源码解析 CorsConfiguration UrlBasedCorsConfigurationSource
spring MVC cors跨域实现源码解析 spring MVC cors跨域实现源码解析 名词解释:跨域资源共享(Cross-Origin Resource Sharing) 简单说就是只要协议 ...
- 老生常谈系列之Aop--Spring Aop源码解析(二)
老生常谈系列之Aop--Spring Aop源码解析(二) 前言 上一篇文章老生常谈系列之Aop--Spring Aop源码解析(一)已经介绍完Spring Aop获取advice切面增强方法的逻辑, ...
- 老生常谈系列之Aop--Spring Aop源码解析(一)
老生常谈系列之Aop--Spring Aop源码解析(一) 前言 上一篇文章老生常谈系列之Aop--Spring Aop原理浅析大概阐述了动态代理的相关知识,并且最后的图给了一个Spring Aop实 ...
- 第十四章 Executors源码解析
前边两章介绍了基础线程池ThreadPoolExecutor的使用方式.工作机理.参数详细介绍以及核心源码解析. 具体的介绍请参照: 第十二章 ThreadPoolExecutor使用与工作机理 第十 ...
- ThreadPoolExecutor系列<三、ThreadPoolExecutor 源码解析>
本文系作者原创,转载请注明出处:http://www.cnblogs.com/further-further-further/p/7681826.html 在源码解析前,需要先理清线程池控制的运行状态 ...
- 小学徒成长系列—StringBuilder & StringBuffer关键源码解析
在前面的博文<小学徒成长系列—String关键源码解析>和<小学徒进阶系列—JVM对String的处理>中,我们讲到了关于String的常用方法以及JVM对字符串常量Strin ...
- Java 集合系列Stack详细介绍(源码解析)和使用示例
Stack简介 Stack是栈.它的特性是:先进后出(FILO, First In Last Out). java工具包中的Stack是继承于Vector(矢量队列)的,由于Vector是通过数组实现 ...
- Android进阶:四、RxJava2 源码解析 1
本文适合使用过Rxjava2或者了解Rxjava2的基本用法的同学阅读 一.Rxjava是什么 Rxjava在GitHub 主页上的自我介绍是 "a library for composin ...
- 第四章 CopyOnWriteArraySet源码解析
注:在看这篇文章之前,如果对CopyOnWriteArrayList底层不清楚的话,建议先去看看CopyOnWriteArrayList源码解析. http://www.cnblogs.com/jav ...
随机推荐
- CMD运行JAVA出现“错误:编码GBK的不可映射字符”
问题: 原因: 字符编码问题.由于java文件中有中文字符,而cmd在编译时解码默认使用GBK,所以导致无法解码出正确的中文字符. 解决办法: 使用-encoding指令指定运行编码为UTF-8.
- 蒲公英 · JELLY技术周刊 Vol.16 谷歌首个线上 Web 开发者大会
蒲公英 · JELLY技术周刊 Vol.16 近期,谷歌有史以来的第一次线上谷歌 Web 开发者大会,Web Vitals.PWA.DevTools 和 Lighthouse 6.0 等一系列特性或产 ...
- SQLyog无操作一段时间后重新操作会卡死问题(解决办法)
这种是因为一段时间不操作后,服务器将空闲连接丢弃了,而客户端(sqlyog)不知道,导致长时间无响应,而超时之后,sqlyog 使用了新的连接,所以又可以顺畅操作了. 将会话空闲时间默认改为自定义,填 ...
- MAVEN无法下载com.oracle:jdbc14:jar解决办法
原文链接:https://www.cnblogs.com/gqzdev/p/11742999.html 第一步,下载ojdbc14jar包: 链接:ojdbc14jar 提取码: 2m59 第二步,下 ...
- python数据处理书pdf版本|内附网盘链接直接提取|
Python数据处理采用基于项目的方法,介绍用Python完成数据获取.数据清洗.数据探索.数据呈现.数据规模化和自动化的过程.主要内容包括:Python基础知识,如何从CSV.Excel.XML.J ...
- Python file() 函数
描述 file() 函数用于创建一个 file 对象,它有一个别名叫 open(),更形象一些,它们是内置函数.参数是以字符串的形式传递的.每组词 www.cgewang.com 更多文件操作可参考: ...
- PHP each() 函数
实例 返回当前元素的键名和键值,并将内部指针向后移动: <?php $people = array("Peter", "Joe", "Glenn ...
- PHP is_iterable() 函数
is_iterable() 函数用于检测变量的是否是一个可迭代的值. PHP 版本要求: PHP 7 >= 7.1.0高佣联盟 www.cgewang.com 语法 bool is_iterab ...
- PHP levenshtein() 函数
实例 计算两个字符串之间的 Levenshtein 距离: <?php echo levenshtein("Hello World","ello World&quo ...
- Skill art函数遍历字典
https://www.cnblogs.com/yeungchie/ code procedure(ycartGo(length1) prog(() for(x 1 length1 printf(&q ...