微服务系列-如何使用 RestTemplate 进行 Spring Boot 微服务通信示例
概述
下面我们将学习如何创建多个 Spring boot 微服务以及如何使用 RestTemplate 类在多个微服务之间进行同步通信。
微服务通信有两种风格:
- 同步通讯
- 异步通信
同步通讯
在同步通信的情况下,客户端发送请求并等待服务的响应。这里重要的一点是协议(HTTP/HTTPS)是同步的,客户端代码只有在收到 HTTP 服务器响应时才能继续其任务。
例如,Microservice1 作为客户端发送请求并等待 Microservice2 的响应。
我们可以使用 RestTemplate 或 WebClient 或 Spring Cloud Open Feign 库来同步通信多个微服务。
异步通信
在异步通信的情况下,客户端发送请求并且不等待服务的响应。客户端将继续执行其任务 - 它不会等待服务的响应。
例如, 微服务1 作为客户端发送请求,并不等待 微服务2 的响应。
我们可以使用RabbitMQ和Apache Kafka等消息代理在多个微服务之间进行异步通信。
我们需要做什么
下面我们将创建两个微服务,例如部门服务和用户服务,并且我们将从用户服务到部门服务进行 REST API 调用以获取特定的用户部门。

并且每个微服务创建一个单独的 MySQL 数据库。
在 IntelliJ IDEA 中创建并设置两个 Spring boot 项目作为两个微服务。
1.创建DepartmentService微服务
首先 在 IntelliJ IDEA 中创建并设置部门服务Spring boot 项目
1.在IntelliJ IDEA中创建并设置spring boot项目(部门服务)
我们使用 springinitializr创建一个 Spring boot 项目。
请查看下面的屏幕截图,在使用 springinitializr创建 Spring Boot 应用程序时输入详细信息 :
点击“GENERATE”按钮以 zip 文件形式下载 Spring boot 项目。解压zip文件并在IntelliJ IDEA中导入Spring boot项目。
pom.xml文件供参考:
<?xml version="1.0" encoding="UTF-8"?>

<project xmlns="http://maven.apache.org/POM/4.0.0" xmlns:xsi="http://www.w3.org/2001/XMLSchema-instance"

	xsi:schemaLocation="http://maven.apache.org/POM/4.0.0 https://maven.apache.org/xsd/maven-4.0.0.xsd">

	<modelVersion>4.0.0</modelVersion>

	<parent>

		<groupId>org.springframework.boot</groupId>

		<artifactId>spring-boot-starter-parent</artifactId>

		<version>2.7.17</version>

		<relativePath/> <!-- lookup parent from repository -->

	</parent>

	<groupId>io.wz</groupId>

	<artifactId>department-service</artifactId>

	<version>0.0.1-SNAPSHOT</version>

	<name>department-service</name>

	<description>department-service</description>

	<properties>

		<java.version>1.8</java.version>

	</properties>

	<dependencies>

		<dependency>

			<groupId>org.springframework.boot</groupId>

			<artifactId>spring-boot-starter-data-jpa</artifactId>

		</dependency>

		<dependency>

			<groupId>org.springframework.boot</groupId>

			<artifactId>spring-boot-starter-web</artifactId>

		</dependency>

		<dependency>

			<groupId>com.mysql</groupId>

			<artifactId>mysql-connector-j</artifactId>

			<scope>runtime</scope>

		</dependency>

		<dependency>

			<groupId>org.projectlombok</groupId>

			<artifactId>lombok</artifactId>

			<optional>true</optional>

		</dependency>

		<dependency>

			<groupId>org.springframework.boot</groupId>

			<artifactId>spring-boot-starter-test</artifactId>

			<scope>test</scope>

		</dependency>

	</dependencies>

	<build>

		<plugins>

			<plugin>

				<groupId>org.springframework.boot</groupId>

				<artifactId>spring-boot-maven-plugin</artifactId>

				<configuration>

					<excludes>

						<exclude>

							<groupId>org.projectlombok</groupId>

							<artifactId>lombok</artifactId>

						</exclude>

					</excludes>

				</configuration>

			</plugin>

		</plugins>

	</build>

</project>
DepartmentService - 配置 MySQL 数据库
由于我们使用 MySQL 作为数据库,因此我们需要配置 URL、用户名和密码,以便 Spring boot 在启动时可以与数据库建立连接。
打开 src/main/resources/application.properties 文件并向其中添加以下属性:
spring.datasource.url=jdbc:mysql://localhost:3306/department_db

spring.datasource.username=root

spring.datasource.password=Mysql@123

spring.jpa.properties.hibernate.dialect=org.hibernate.dialect.MySQLDialect

spring.jpa.hibernate.ddl-auto=update
这里注意修改的MySQL密码,另外在 MySQL 中创建一个名为Department_db的数据库 。
不需要创建任何表。Hibernate 将根据我们将在下一步中定义的Department实体自动创建这些表 。这是通过属性 spring.jpa.hibernate.ddl-auto = update 自动实现的。
DepartmentService - 创建部门 JPA 实体
package io.wz.departmentservice.entity;

import javax.persistence.*;

import lombok.AllArgsConstructor;

import lombok.Getter;

import lombok.NoArgsConstructor;

import lombok.Setter;

@Entity

@Table(name = "departments")

@NoArgsConstructor

@AllArgsConstructor

@Setter

@Getter

public class Department {

    @Id

    @GeneratedValue(strategy = GenerationType.IDENTITY)

    private Long id;

    private String departmentName;

    private String departmentAddress;

    private String departmentCode;

}
DepartmentService - 创建 Spring Data JPA 存储库
package io.wz.departmentservice.repository;

import io.wz.departmentservice.entity.Department;

import org.springframework.data.jpa.repository.JpaRepository;

public interface DepartmentRepository extends JpaRepository<Department, Long> {

}
DepartmentService - 创建服务层
DepartmentService
package io.wz.departmentservice.service;

import io.wz.departmentservice.entity.Department;

public interface DepartmentService {

    Department saveDepartment(Department department);

    Department getDepartmentById(Long departmentId);

}
DepartmentServiceImpl 类
package io.wz.departmentservice.service.impl;

import lombok.AllArgsConstructor;

import lombok.extern.slf4j.Slf4j;

import io.wz.departmentservice.entity.Department;

import io.wz.departmentservice.repository.DepartmentRepository;

import io.wz.departmentservice.service.DepartmentService;

import org.springframework.stereotype.Service;

@Service

@AllArgsConstructor

@Slf4j

public class DepartmentServiceImpl implements DepartmentService {

    private DepartmentRepository departmentRepository;

    @Override

    public Department saveDepartment(Department department) {

        return departmentRepository.save(department);

    }

    @Override

    public Department getDepartmentById(Long departmentId) {

        return departmentRepository.findById(departmentId).get();

    }

}
DepartmentService - 创建Controller层
DepartmentController
package io.wz.departmentservice.controller;

import lombok.AllArgsConstructor;

import io.wz.departmentservice.entity.Department;

import io.wz.departmentservice.service.DepartmentService;

import org.springframework.http.HttpStatus;

import org.springframework.http.ResponseEntity;

import org.springframework.web.bind.annotation.*;

@RestController

@RequestMapping("api/departments")

@AllArgsConstructor

public class DepartmentController {

    private DepartmentService departmentService;

    @PostMapping

    public ResponseEntity<Department> saveDepartment(@RequestBody Department department){

        Department savedDepartment = departmentService.saveDepartment(department);

        return new ResponseEntity<>(savedDepartment, HttpStatus.CREATED);

    }

    @GetMapping("{id}")

    public ResponseEntity<Department> getDepartmentById(@PathVariable("id") Long departmentId){

        Department department = departmentService.getDepartmentById(departmentId);

        return ResponseEntity.ok(department);

    }

}
DepartmentService - 启动 Spring Boot 应用程序
我们可以通过两种方式启动独立的 Spring boot 应用程序。
- 从应用程序的根目录并键入以下命令来运行它 -
$ mvn spring-boot:run
- 从 IDE 中,将
DepartmentServiceApplication.main()方法作为独立 Java 类运行,该方法将在端口 8080 上启动嵌入式 Tomcat 服务器并将浏览器指向 http://localhost:8080/。
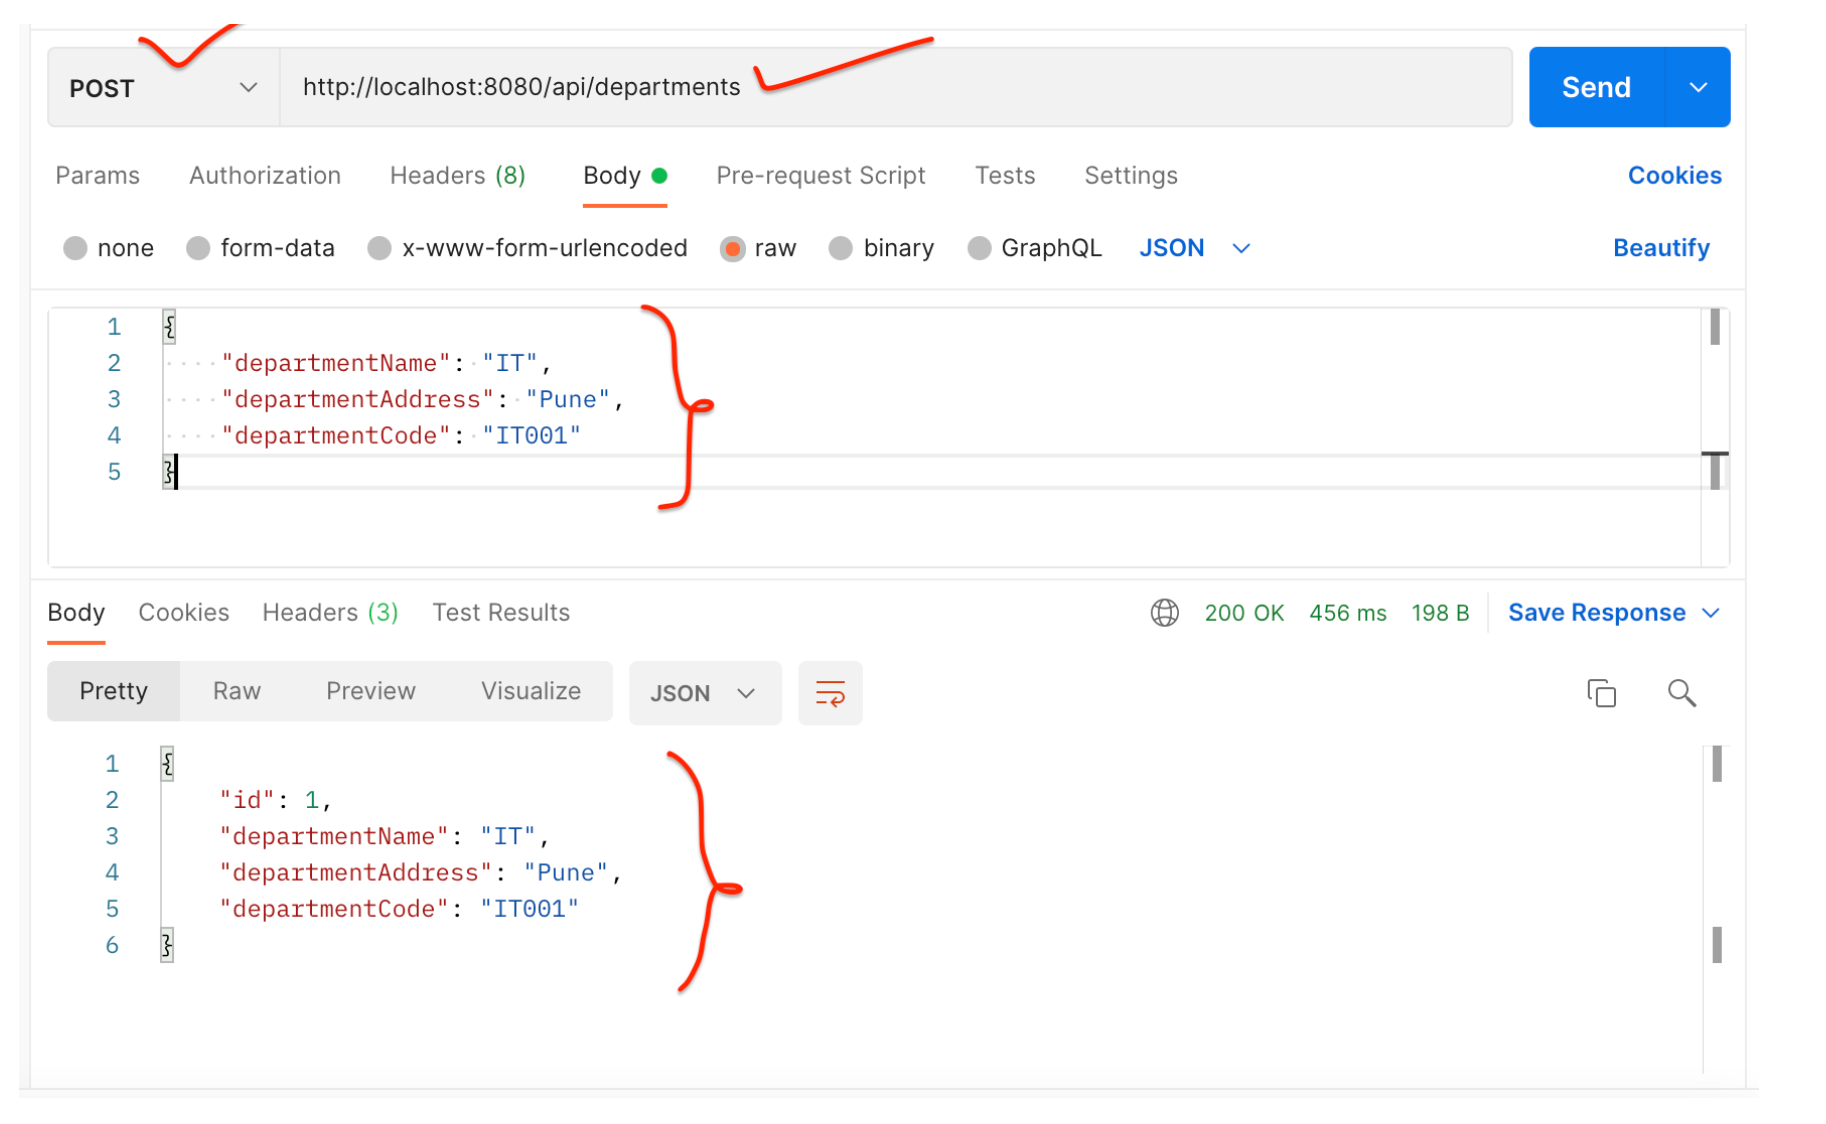
DepartmentService - 使用 Postman 客户端测试 REST API
保存部门 REST API:
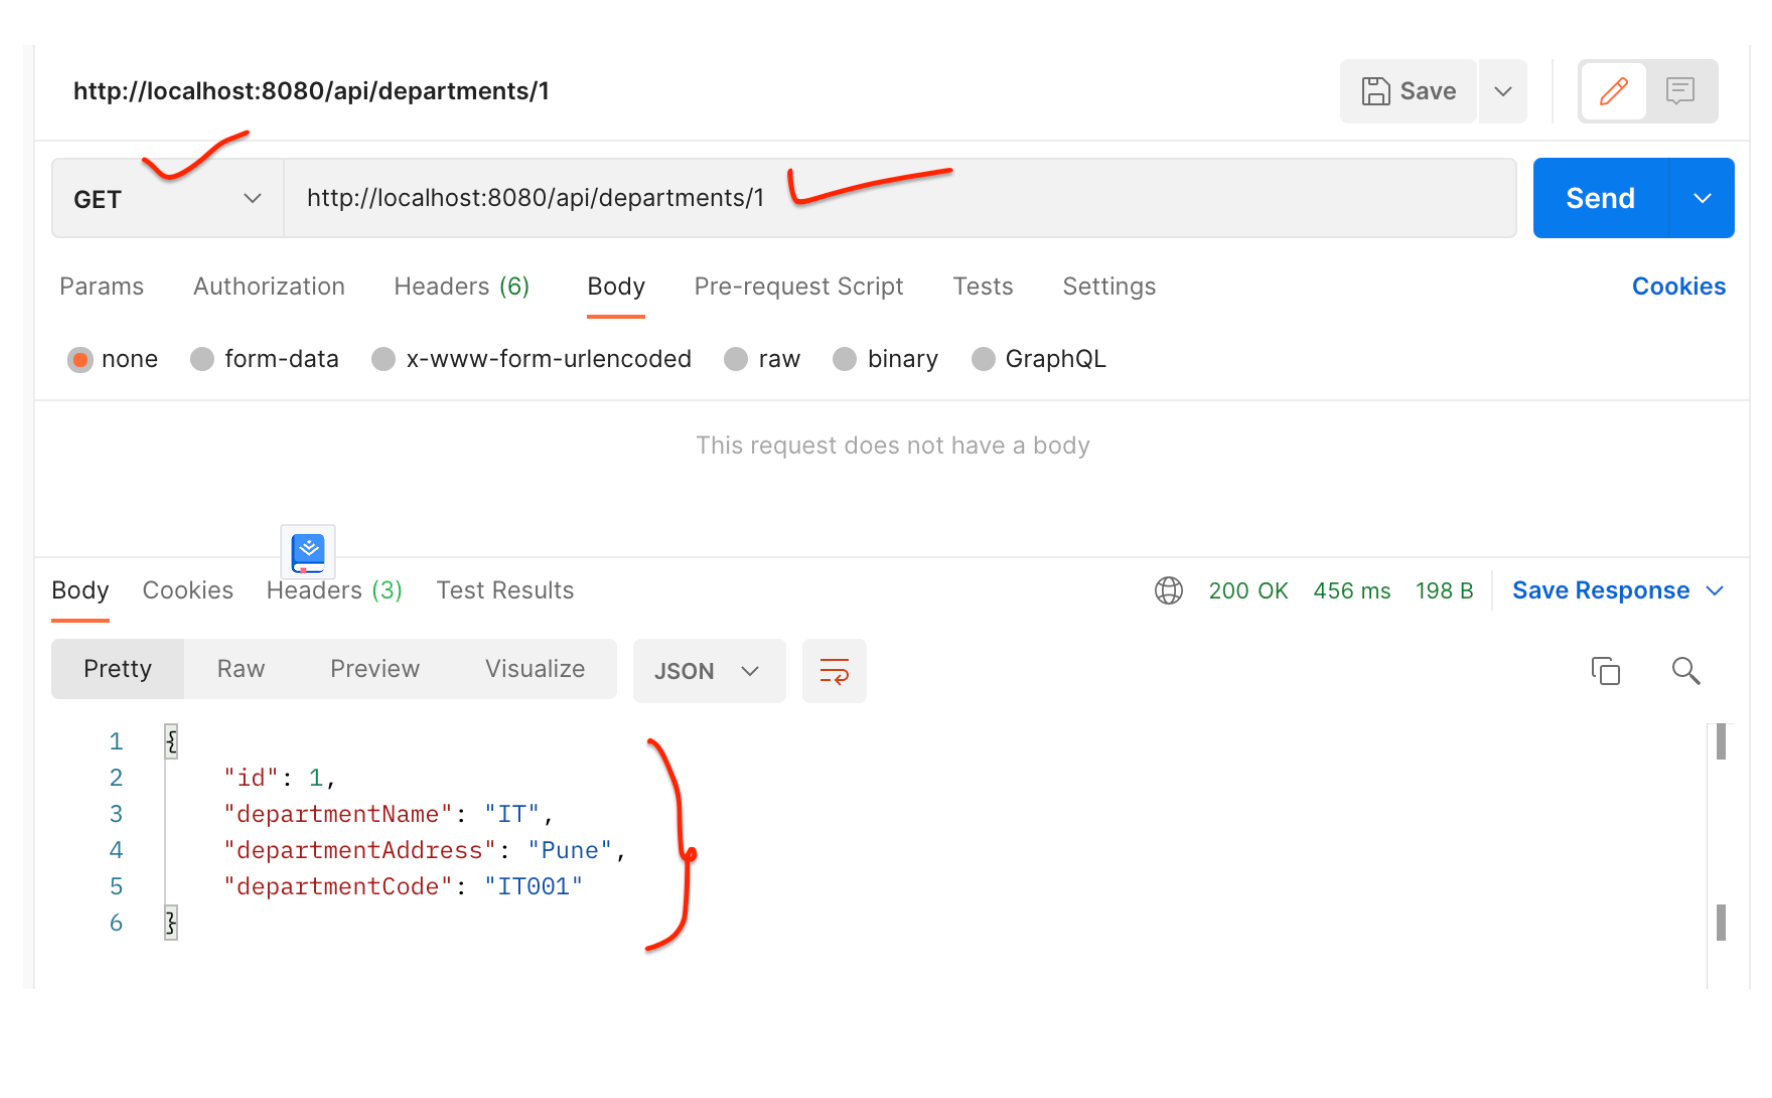
获取单个部门 REST API:
2.创建UserService微服务
我们首先在 IntelliJ IDEA 中创建并设置UserServiceSpring boot 项目
1.在IntelliJ IDEA中创建并设置spring boot项目(用户服务)
使用 springinitializr创建一个 Spring boot 项目。
请参阅下面的屏幕截图,在使用 springinitializr创建 Spring Boot 应用程序时输入详细信息 :

单击“GENRATE”按钮以 zip 文件形式下载 Spring boot 项目。解压zip文件并在IntelliJ IDEA中导入Spring boot项目。
pom.xml 文件供参考:
<?xml version="1.0" encoding="UTF-8"?>

<project xmlns="http://maven.apache.org/POM/4.0.0" xmlns:xsi="http://www.w3.org/2001/XMLSchema-instance"

	xsi:schemaLocation="http://maven.apache.org/POM/4.0.0 https://maven.apache.org/xsd/maven-4.0.0.xsd">

	<modelVersion>4.0.0</modelVersion>

	<parent>

		<groupId>org.springframework.boot</groupId>

		<artifactId>spring-boot-starter-parent</artifactId>

		<version>2.7.17</version>

		<relativePath/> <!-- lookup parent from repository -->

	</parent>

	<groupId>io.wz</groupId>

	<artifactId>user-service</artifactId>

	<version>0.0.1-SNAPSHOT</version>

	<name>user-service</name>

	<description>user-service</description>

	<properties>

		<java.version>1.8</java.version>

	</properties>

	<dependencies>

		<dependency>

			<groupId>org.springframework.boot</groupId>

			<artifactId>spring-boot-starter-data-jpa</artifactId>

		</dependency>

		<dependency>

			<groupId>org.springframework.boot</groupId>

			<artifactId>spring-boot-starter-web</artifactId>

		</dependency>

		<dependency>

			<groupId>com.mysql</groupId>

			<artifactId>mysql-connector-j</artifactId>

			<scope>runtime</scope>

		</dependency>

		<dependency>

			<groupId>org.projectlombok</groupId>

			<artifactId>lombok</artifactId>

			<optional>true</optional>

		</dependency>

		<dependency>

			<groupId>org.springframework.boot</groupId>

			<artifactId>spring-boot-starter-test</artifactId>

			<scope>test</scope>

		</dependency>

	</dependencies>

	<build>

		<plugins>

			<plugin>

				<groupId>org.springframework.boot</groupId>

				<artifactId>spring-boot-maven-plugin</artifactId>

				<configuration>

					<excludes>

						<exclude>

							<groupId>org.projectlombok</groupId>

							<artifactId>lombok</artifactId>

						</exclude>

					</excludes>

				</configuration>

			</plugin>

		</plugins>

	</build>

</project>
UserService - 配置 MySQL 数据库
打开 src/main/resources/application.properties 文件并向其中添加以下属性:
spring.datasource.url=jdbc:mysql://localhost:3306/employee_db

spring.datasource.username=root

spring.datasource.password=Mysql@123

spring.jpa.properties.hibernate.dialect=org.hibernate.dialect.MySQLDialect

spring.jpa.hibernate.ddl-auto=update
这里注意修改的MySQL密码,另外在 MySQL 中创建一个名为employee_db的数据库 。
不需要创建任何表。Hibernate 将根据我们将在下一步中定义的User实体自动创建这些表 。这是通过属性 spring.jpa.hibernate.ddl-auto = update 自动实现的。
UserService - 更改服务器端口
注意,部门服务 Spring boot 项目运行在默认的 tomcat 服务器端口 8080 上。
对于用户服务,我们需要使用以下属性将嵌入式 tomcat 服务器端口更改为 8081:
server.port = 8081
UserService - 创建用户 JPA 实体
package io.wz.userservice.entity;

import javax.persistence.*;

import lombok.AllArgsConstructor;

import lombok.Getter;

import lombok.NoArgsConstructor;

import lombok.Setter;

@Entity

@Table(name = "users")

@Setter

@Getter

@NoArgsConstructor

@AllArgsConstructor

public class User {

    @Id

    @GeneratedValue(strategy = GenerationType.IDENTITY)

    private Long id;

    private String firstName;

    private String lastName;

    @Column(nullable = false, unique = true)

    private String email;

    private String departmentId;

}
UserService - 创建 Spring Data JPA 存储库
package io.wz.userservice.repository;

import io.wz.userservice.entity.User;

import org.springframework.data.jpa.repository.JpaRepository;

public interface UserRepository extends JpaRepository<User, Long> {

}
UserService - 创建 DTO 类
DepartmentDto
package io.wz.userservice.dto;

import lombok.AllArgsConstructor;

import lombok.Getter;

import lombok.NoArgsConstructor;

import lombok.Setter;

@Setter

@Getter

@AllArgsConstructor

@NoArgsConstructor

public class DepartmentDto {

    private Long id;

    private String departmentName;

    private String departmentAddress;

    private String departmentCode;

}
UserDto
package io.wz.userservice.dto;

import lombok.AllArgsConstructor;

import lombok.Getter;

import lombok.NoArgsConstructor;

import lombok.Setter;

@Setter

@Getter

@NoArgsConstructor

@AllArgsConstructor

public class UserDto {

    private Long id;

    private String firstName;

    private String lastName;

    private String email;

}
ResponseDto
package io.wz.userservice.dto;

import lombok.AllArgsConstructor;

import lombok.Getter;

import lombok.NoArgsConstructor;

import lombok.Setter;

@Setter

@Getter

@NoArgsConstructor

@AllArgsConstructor

public class ResponseDto {

    private DepartmentDto department;

    private UserDto user;

}
UserService - 将 RestTemplate 配置为 Spring Bean
将 RestTemplate 类配置为 Spring bean,以便我们可以注入并使用它。
package io.wz.userservice;

import org.springframework.boot.SpringApplication;

import org.springframework.boot.autoconfigure.SpringBootApplication;

import org.springframework.context.annotation.Bean;

import org.springframework.web.client.RestTemplate;

@SpringBootApplication

public class UserServiceApplication {

    public static void main(String[] args) {

        SpringApplication.run(UserServiceApplication.class, args);

    }

    @Bean

    public RestTemplate restTemplate(){

        return new RestTemplate();

    }

}
UserService - 创建服务层
用户服务接口
package io.wz.userservice.service;

import io.wz.userservice.dto.ResponseDto;

import io.wz.userservice.entity.User;

public interface UserService {

    User saveUser(User user);

    ResponseDto getUser(Long userId);

}
UserServiceImpl class
package io.wz.userservice.service.impl;

import lombok.AllArgsConstructor;

import io.wz.userservice.dto.DepartmentDto;

import io.wz.userservice.dto.ResponseDto;

import io.wz.userservice.dto.UserDto;

import io.wz.userservice.entity.User;

import io.wz.userservice.repository.UserRepository;

import io.wz.userservice.service.UserService;

import org.springframework.http.ResponseEntity;

import org.springframework.stereotype.Service;

import org.springframework.web.client.RestTemplate;

@Service

@AllArgsConstructor

public class UserServiceImpl implements UserService {

    private UserRepository userRepository;

    private RestTemplate restTemplate;

    @Override

    public User saveUser(User user) {

        return userRepository.save(user);

    }

    @Override

    public ResponseDto getUser(Long userId) {

        ResponseDto responseDto = new ResponseDto();

        User user = userRepository.findById(userId).get();

        UserDto userDto = mapToUser(user);

        ResponseEntity<DepartmentDto> responseEntity = restTemplate

                .getForEntity("http://localhost:8080/api/departments/" + user.getDepartmentId(),

                DepartmentDto.class);

        DepartmentDto departmentDto = responseEntity.getBody();

        System.out.println(responseEntity.getStatusCode());

        responseDto.setUser(userDto);

        responseDto.setDepartment(departmentDto);

        return responseDto;

    }

    private UserDto mapToUser(User user){

        UserDto userDto = new UserDto();

        userDto.setId(user.getId());

        userDto.setFirstName(user.getFirstName());

        userDto.setLastName(user.getLastName());

        userDto.setEmail(user.getEmail());

        return userDto;

    }

}
请注意,以上我们使用RestTemplate对部门服务进行 REST API 调用:
ResponseEntity<DepartmentDto> responseEntity = restTemplate

                .getForEntity("http://localhost:8080/api/departments/" + user.getDepartmentId(),

                DepartmentDto.class);
UserService - 创建控制器层:UserController
package io.wz.userservice.controller;

import lombok.AllArgsConstructor;

import io.wz.userservice.dto.ResponseDto;

import io.wz.userservice.entity.User;

import io.wz.userservice.service.UserService;

import org.springframework.http.HttpStatus;

import org.springframework.http.ResponseEntity;

import org.springframework.web.bind.annotation.*;

@RestController

@RequestMapping("api/users")

@AllArgsConstructor

public class UserController {

    private UserService userService;

    @PostMapping

    public ResponseEntity<User> saveUser(@RequestBody User user){

        User savedUser = userService.saveUser(user);

        return new ResponseEntity<>(savedUser, HttpStatus.CREATED);

    }

    @GetMapping("{id}")

    public ResponseEntity<ResponseDto> getUser(@PathVariable("id") Long userId){

        ResponseDto responseDto = userService.getUser(userId);

        return ResponseEntity.ok(responseDto);

    }

}
UserService - 启动 Spring Boot 应用程序
我们可以通过两种方式启动独立的 Spring boot 应用程序。
- 从应用程序的根目录并键入以下命令来运行它 -
$ mvn spring-boot:run
- 在 IDE 中,将
UserServiceApplication.main()方法作为独立 Java 类运行,该方法将在端口 8080 上启动嵌入式 Tomcat 服务器并将浏览器指向http://localhost:8081/。
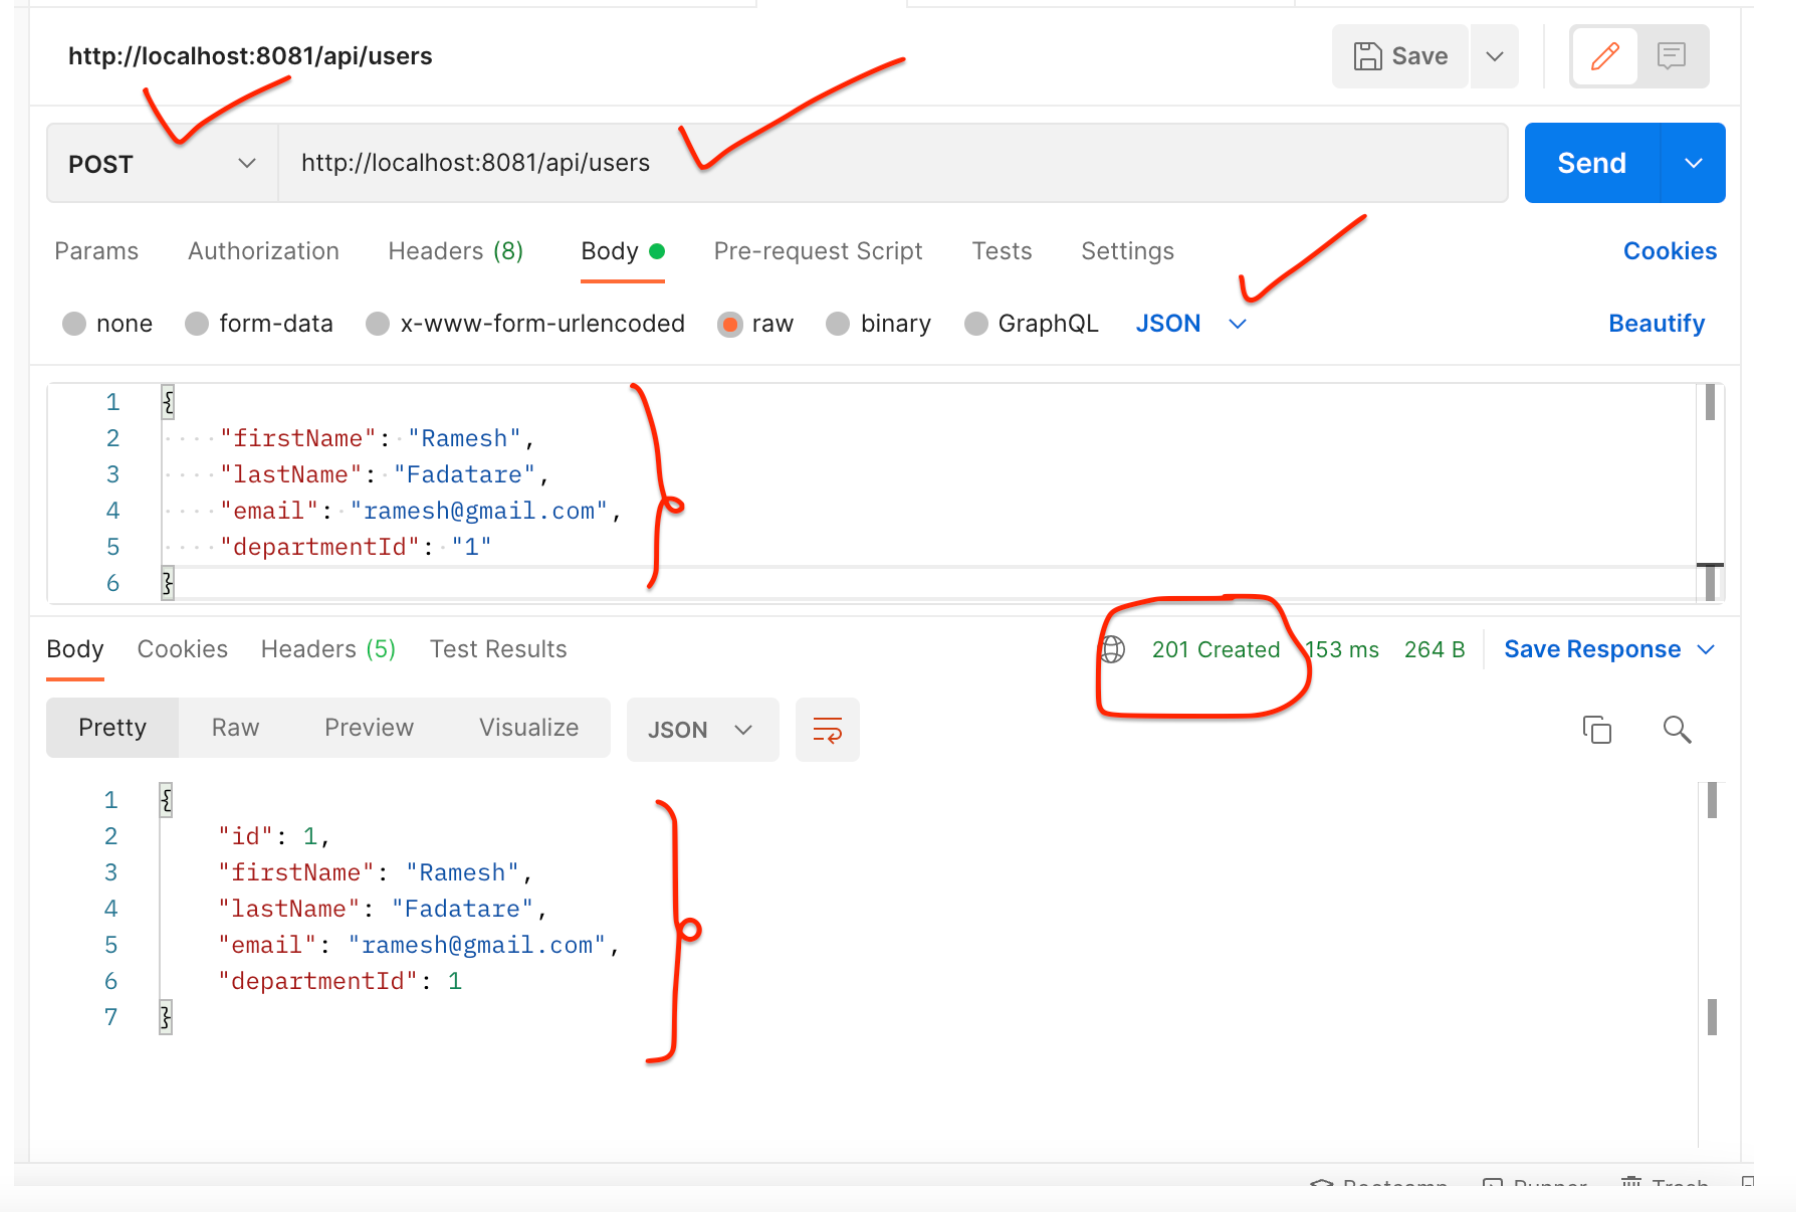
UserService - 使用 Postman 客户端测试 REST API
保存用户 REST API:
获取用户 REST API:
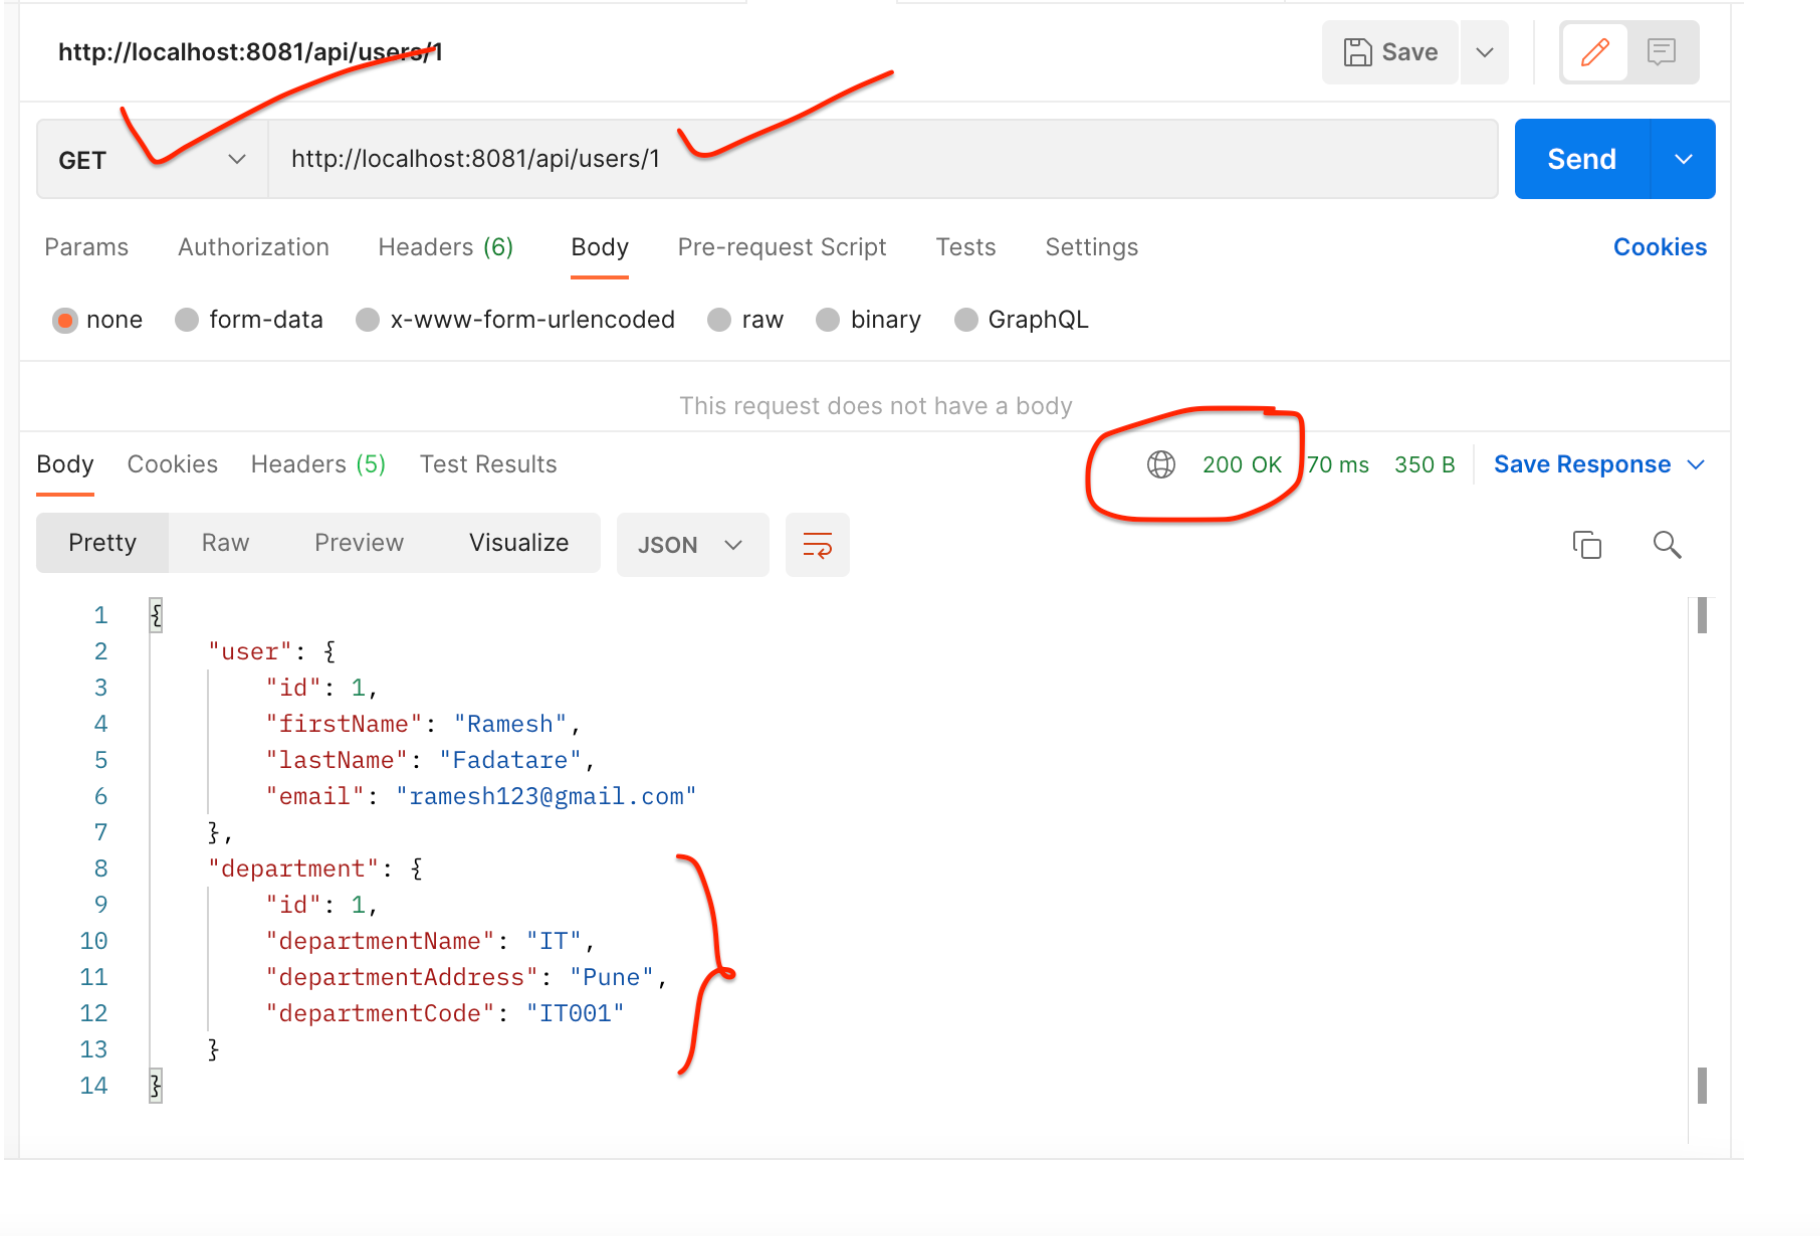
请注意,响应包含用户的部门。这说明我们已成功从 UserService 到 DepartmentService 进行 REST API 调用。
结论
在本教程中,我们学习了如何创建多个 Spring boot 微服务以及如何使用RestTemplate类在多个微服务之间进行同步通信。
从 5.0 开始, RestTemplate 类处于维护模式,很快就会被弃用。因此 Spring 团队推荐使用 org.springframework.web.reactive.client.WebClient ,它具有现代 API 并支持同步、异步和流场景,下一篇文章继续讲解
微服务系列-如何使用 RestTemplate 进行 Spring Boot 微服务通信示例的更多相关文章
- 【原创】Docker容器及Spring Boot微服务应用
Docker容器及Spring Boot微服务应用 1 什么是Docker 1.1 Docker的出现 问题一:项目实施环境复杂问题 传统项目实施过程中经常会出现“程序在我这跑得好好的,在你那怎么就不 ...
- 【spring boot】spring cloud下spring boot微服务启动没有报错,但是访问访问不到
spring cloud下spring boot微服务启动没有报错,但是访问访问不到 解决方法: 可能是端口被占用了,但是依旧启用成功了. 更改一下项目启用的端口号,再重新启动查看是否可以正常访问.
- Spring Boot 微服务应用集成Prometheus + Grafana 实现监控告警
Spring Boot 微服务应用集成Prometheus + Grafana 实现监控告警 一.添加依赖 1.1 Actuator 的 /prometheus端点 二.Prometheus 配置 部 ...
- 3行代码快速实现Spring Boot Oauth2服务
这里的3行代码并不是指真的只需要写3行代码,而是基于我已经写好的一个Spring Boot Oauth2服务.仅仅需要修改3行数据库配置信息,即可得到一个Spring Boot Oauth2服务. 项 ...
- Spring Cloud第十三篇 | Spring Boot Admin服务监控
本文是Spring Cloud专栏的第十三篇文章,了解前十二篇文章内容有助于更好的理解本文: Spring Cloud第一篇 | Spring Cloud前言及其常用组件介绍概览 Spring Clo ...
- Spring Boot系列(一):Spring Boot快速开始
一.Spring Boot介绍 Spring Boot可以很容易的创建可直接运行的独立的基于Spring的应用程序. 功能特点: 创建独立的Spring应用程序: 直接嵌入Tomcat.Jetty等W ...
- Spring Boot系列(四):Spring Boot源码解析
一.自动装配原理 之前博文已经讲过,@SpringBootApplication继承了@EnableAutoConfiguration,该注解导入了AutoConfigurationImport Se ...
- Spring Boot系列(三):Spring Boot整合Mybatis源码解析
一.Mybatis回顾 1.MyBatis介绍 Mybatis是一个半ORM框架,它使用简单的 XML 或注解用于配置和原始映射,将接口和Java的POJOs(普通的Java 对象)映射成数据库中的记 ...
- Spring Boot Ftp Client 客户端示例支持断点续传
本章介绍 Spring Boot 整合 Ftpclient 的示例,支持断点续传 本项目源码下载 1 新建 Spring Boot Maven 示例工程项目 注意:是用来 IDEA 开发工具 File ...
- Spring Boot微服务架构入门
概述 还记得在10年毕业实习的时候,当时后台三大框架为主流的后台开发框架成软件行业的标杆,当时对于软件的认识也就是照猫画虎,对于为什么会有这么样的写法,以及这种框架的优势或劣势,是不清楚的,Sprin ...
随机推荐
- JavaScript高级程序设计笔记10 函数Function
函数 1.几种实例化函数对象的方式 以函数声明的方式定义 函数表达式 箭头函数(arrow function) 使用Function构造函数 接收任意多个字符串参数,最后一个参数始终会被当成函数体,而 ...
- Android RTL 语言适配
RTL 语言,即 right to left language,也就是右对齐的语言,与一般语言按照左对齐的方式不同,需要进行特别适配. AndroidManifest.xml 文件中,增加 andro ...
- Log4j入门使用
前言 本篇文章主要在于,初步了解log4j,以及对它的简单使用 欢迎点赞 收藏 留言评论 私信必回哟 博主将持续更新学习记录收获,友友们有任何问题可以在评论区留言 @ 目录 一,log4j简介 二,配 ...
- 🔥🔥Java开发者的Python快速进修指南:面向对象进阶
在上一期中,我们对Python中的对象声明进行了初步介绍.这一期,我们将深入探讨对象继承.组合以及多态这三个核心概念.不过,这里不打算赘述太多理论,因为我们都知道,Python与Java在这些方面的主 ...
- 使用OSS搭建私有云内网yum仓库的方法
版权声明:原创作品,谢绝转载!否则将追究法律责任. ----- 作者:kirin 使用OSS搭建私有云内网yum仓库的方法 文字&图片内容已脱敏 #.前几天接到一个搭建内网yum源的任务.刚接 ...
- MVC控制器传值到JS
1.传递整形数字 1 <script> 2 var data=@ViewBag.ID; 3 </script> 2.传递字符串 1 <script> 2 var d ...
- vue-test --------事件修饰符
<template> <h3>事件修饰符</h3> <a @click="clickHandle" href="www.baid ...
- 使用jvm工具排查系统问题
java-jvm-tool Jstatd 远程连接(推荐) 不用重启项目 远程机配置 [demo@localhost jvmtest]$ vi jstatd.all.policy# 内容grant c ...
- Celery架构和主要模块
**任务模块 ** 包含异步任务和定时任务.其中,异步任务通常在业务逻辑中被触发并发往任务队列,而定时任务由 Celery Beat 进程周期性地将任务发往任务队列. **消息中间件 Broker * ...
- Windows和Linux下通过go实现自删除
自删除在攻防中都挺常见的,自写远控通常也有需要.可是在度娘里搜不到什么办法,于是就查查Windows api学习记录一回. linux 先获得当前程序的文件名,再使用syscall这个包中的Unlin ...