【Zookeeper】Re02 CuratorAPI
Curator,提供给Java操作ZK的API组件:
需要的组件依赖:
        <!-- https://mvnrepository.com/artifact/org.apache.curator/curator-framework -->

        <dependency>

            <groupId>org.apache.curator</groupId>

            <artifactId>curator-framework</artifactId>

            <version>5.2.0</version>

        </dependency>

        <!-- https://mvnrepository.com/artifact/org.apache.curator/curator-recipes -->

        <dependency>

            <groupId>org.apache.curator</groupId>

            <artifactId>curator-recipes</artifactId>

            <version>5.2.0</version>

        </dependency>

        <dependency>

            <groupId>junit</groupId>

            <artifactId>junit</artifactId>

            <version>4.12</version>

            <scope>test</scope>

        </dependency>

        <!-- https://mvnrepository.com/artifact/org.slf4j/slf4j-api -->

        <dependency>

            <groupId>org.slf4j</groupId>

            <artifactId>slf4j-api</artifactId>

            <version>1.7.32</version>

        </dependency>

        <!-- https://mvnrepository.com/artifact/org.slf4j/slf4j-log4j12 -->

        <dependency>

            <groupId>org.slf4j</groupId>

            <artifactId>slf4j-log4j12</artifactId>

            <version>1.7.32</version>

            <scope>test</scope>

        </dependency>
Curator要求配置日志组件,当然不配也是可以的
Log4J还要求配置log4j.properties,配置文件是随便找的
# priority  :debug<info<warn<error

#you cannot specify every priority with different file for log4j

log4j.rootLogger=debug,stdout,info,debug,warn,error

#console

log4j.appender.stdout=org.apache.log4j.ConsoleAppender

log4j.appender.stdout.layout=org.apache.log4j.PatternLayout

log4j.appender.stdout.layout.ConversionPattern= [%d{yyyy-MM-dd HH:mm:ss a}]:%p %l%m%n

#info log

log4j.logger.info=info

log4j.appender.info=org.apache.log4j.DailyRollingFileAppender

log4j.appender.info.DatePattern='_'yyyy-MM-dd'.log'

log4j.appender.info.File=./src/com/hp/log/info.log

log4j.appender.info.Append=true

log4j.appender.info.Threshold=INFO

log4j.appender.info.layout=org.apache.log4j.PatternLayout

log4j.appender.info.layout.ConversionPattern=%d{yyyy-MM-dd HH:mm:ss a} [Thread: %t][ Class:%c >> Method: %l ]%n%p:%m%n

#debug log

log4j.logger.debug=debug

log4j.appender.debug=org.apache.log4j.DailyRollingFileAppender

log4j.appender.debug.DatePattern='_'yyyy-MM-dd'.log'

log4j.appender.debug.File=./src/com/hp/log/debug.log

log4j.appender.debug.Append=true

log4j.appender.debug.Threshold=DEBUG

log4j.appender.debug.layout=org.apache.log4j.PatternLayout

log4j.appender.debug.layout.ConversionPattern=%d{yyyy-MM-dd HH:mm:ss a} [Thread: %t][ Class:%c >> Method: %l ]%n%p:%m%n

#warn log

log4j.logger.warn=warn

log4j.appender.warn=org.apache.log4j.DailyRollingFileAppender

log4j.appender.warn.DatePattern='_'yyyy-MM-dd'.log'

log4j.appender.warn.File=./src/com/hp/log/warn.log

log4j.appender.warn.Append=true

log4j.appender.warn.Threshold=WARN

log4j.appender.warn.layout=org.apache.log4j.PatternLayout

log4j.appender.warn.layout.ConversionPattern=%d{yyyy-MM-dd HH:mm:ss a} [Thread: %t][ Class:%c >> Method: %l ]%n%p:%m%n

#error

log4j.logger.error=error

log4j.appender.error = org.apache.log4j.DailyRollingFileAppender

log4j.appender.error.DatePattern='_'yyyy-MM-dd'.log'

log4j.appender.error.File = ./src/com/hp/log/error.log

log4j.appender.error.Append = true

log4j.appender.error.Threshold = ERROR

log4j.appender.error.layout = org.apache.log4j.PatternLayout

log4j.appender.error.layout.ConversionPattern = %d{yyyy-MM-dd HH:mm:ss a} [Thread: %t][ Class:%c >> Method: %l ]%n%p:%m%n
API操作:
创建连接:
第一种,根据构造参数创建客户端对象
第二种,使用构建工厂管理创建客户端对象
    /**

     * 创建节点一

     *

     */

    @Test

    public void establishConnection1() {

        /**

         * 方式一

         * String connectString,

         *  单例参数 "192.168.242.101:2181"

         *  集群参数 "192.168.242.101:2181, 192.168.242.102:2181, 192.168.242.103:2181"

         * int sessionTimeoutMs,

         *  回话超时限制

         * int connectionTimeoutMs,

         *  连接超时限制

         * RetryPolicy retryPolicy, ZKClientConfig zkClientConfig

         *  重新连接策略

         *

         */

        ExponentialBackoffRetry exponentialBackoffRetry = new ExponentialBackoffRetry(3000, 10);// 3秒 10次

        CuratorFramework curatorFramework = CuratorFrameworkFactory.newClient(

                "192.168.242.101:2181",

                1000 * 60, // 1分钟

                1000 * 15, // 15秒

                exponentialBackoffRetry

        );

        curatorFramework.start(); // 建立连接

    }

    /**

     * 创建节点二

     *

     *

     */

    @Test

    public void establishConnection2() {

        CuratorFramework curatorFramework = CuratorFrameworkFactory

                .builder()

                .sessionTimeoutMs(1000 * 60)

                .connectionTimeoutMs(1000 * 15)

                .connectString("192.168.242.101:2181")

                .retryPolicy(new ExponentialBackoffRetry(3000, 10))

                .namespace("nmNode") // 指定在一个节点下进行操作

                .build();

        curatorFramework.start();

    }
为便于操作Zookeeper,使用Junit的前置调用和后置调用注解:
创建资源和释放资源
    CuratorFramework zookeeperClient;


    @Before

    public void prepareConnection() {

        zookeeperClient = CuratorFrameworkFactory

                .builder()

                .sessionTimeoutMs(1000 * 60)

                .connectionTimeoutMs(1000 * 15)

                .connectString("192.168.242.101:2181")

                .retryPolicy(new ExponentialBackoffRetry(3000, 10))

                .namespace("nmNode") // 指定在一个节点下进行操作

                .build();

        zookeeperClient.start();

    }

    @After

    public void afterSettleConnection() {

        if (zookeeperClient != null) zookeeperClient.close();

    }
创建ZK节点:
    /**

     * 创建节点操作

     *

     */

    @Test

    public void createNodeAPI() {

        String forPath = null;

        try {

            // 纯创建节点

            forPath = zookeeperClient.create().forPath("/node1");

            System.out.println(forPath);

            // 创建带数据的节点

            forPath = zookeeperClient.create().forPath("/node2", "node with data".getBytes(StandardCharsets.UTF_8));

            System.out.println(forPath);

            /**

             * 指定模式

             * CreateMode

             *  PERSISTENT(0, false, false, false, false),

             *     PERSISTENT_SEQUENTIAL    持久化顺序模式

             *     EPHEMERAL    临时模式

             *     EPHEMERAL_SEQUENTIAL     临时顺序模式

             *     CONTAINER    容器模式

             *     PERSISTENT_WITH_TTL  持久化超时模式

             *     PERSISTENT_SEQUENTIAL_WITH_TTL   持久化顺序超时模式

             */

            forPath = zookeeperClient

                    .create()

                    .withMode(CreateMode.PERSISTENT)

                    .forPath("/node2", "node with data".getBytes(StandardCharsets.UTF_8));

            System.out.println(forPath);

            /**

             * 创建多级节点

             *  .creatingParentsIfNeeded()

             */

            forPath = zookeeperClient

                    .create()

                    .creatingParentsIfNeeded()

                    .withMode(CreateMode.PERSISTENT)

                    .forPath("/node2/subNode1/subSubNode1", "node with data2".getBytes(StandardCharsets.UTF_8));

            System.out.println(forPath);

        } catch (Exception exception) {

            exception.printStackTrace();

        }

    }
查询ZK节点:
    /**

     * 查询节点

     */

    @Test

    public void queryNodes() {

        byte[] data = null;

        try {

            // 获取该节点下的数据

            data = zookeeperClient.getData().forPath("/node2");

            System.out.println(new String(data, StandardCharsets.UTF_8));

            /**

             * 获取该节点下的子节点

             *

             * 注意使用/根节点表示时,namespace("nmNode")的影响

             * zookeeperClient.getChildren().forPath("/")

             */

            List<String> strings = zookeeperClient.getChildren().forPath("/node1");

            System.out.println(strings);

            /**

             * ls -s 节点

             * 查询节点状态

             *

             * stat空参数表示 0 0 0 0 0 初始状态

             */

            Stat stat = new Stat();

            // 携带构造后会进行赋值操作

            zookeeperClient.getData().storingStatIn(stat).forPath("/node2");

            System.out.println(stat);  // 52,52,1635080231927,1635080231927,0,4,0,0,14,4,73

        } catch (Exception e) {

            e.printStackTrace();

        }

    }
修改节点:
    /**

     * 修改节点

     */

    @Test

    public void updateNode() {

        try {

            /**

             * 简单修改节点值

             */

            Stat stat = zookeeperClient.setData().forPath("/node1/subNode1", "changes Data".getBytes(StandardCharsets.UTF_8));

            /**

             * 乐观锁控制

             * getVersion

             */

            String subNode2 = "/node1/subNode1";

            Stat subStat = new Stat();

            zookeeperClient.getData().storingStatIn(subStat);

            zookeeperClient.setData().withVersion(subStat.getVersion()).forPath(subNode2, "changes Data2".getBytes(StandardCharsets.UTF_8));

        } catch (Exception exception) {

            exception.printStackTrace();

        }

    }
删除ZK节点
    /**

     * 删除节点

     *

     *

     */

    @Test

    public void deleteNode() {

        try {

            /**

             * 普通删除 /node1/subNode1

             *

             * 该节点带有子节点则报错,不能被删除

             * KeeperErrorCode = Directory not empty for /nmNode/node1

             * */

            // Void unused = zookeeperClient.delete().forPath("/node1");

            /**

             * 带节点全部删除

             *

             */

            // zookeeperClient.delete().deletingChildrenIfNeeded().forPath("/node2");

            // 带保证的删除? 防止网络抖动断开连接,会调用重试删除

            zookeeperClient.delete().guaranteed().forPath("delete success");

            // 删除成功的回调处理

            zookeeperClient.delete().guaranteed().inBackground(new BackgroundCallback() {

                // 操作成功时将执行回调

                @Override

                public void processResult(CuratorFramework client, CuratorEvent event) throws Exception {

                    System.out.println("delete success");

                }

            }).forPath("/node1");

        } catch (Exception exception) {

            exception.printStackTrace();

        }

    }
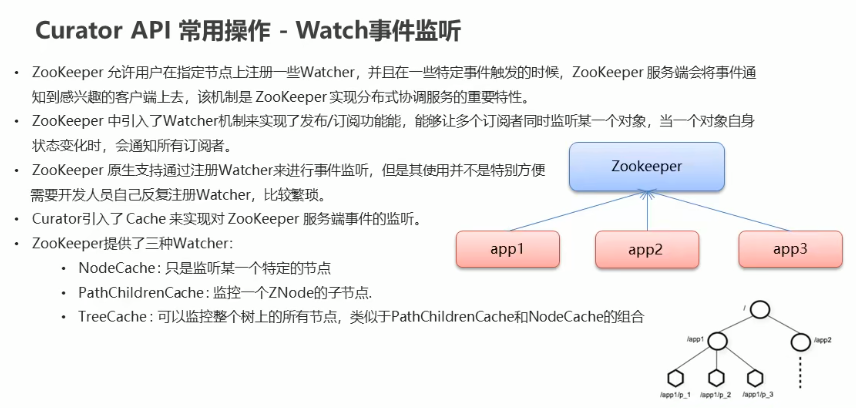
监听节点:
    @Test

    @SuppressWarnings("deprecation")

    public void listeningFeature() {

        // nodeCache 被标注为已过时方法

        NodeCache nodeCache = new NodeCache(zookeeperClient, "/node1");

        // Listenable<使用这个泛型只能声明一种监听类型> listenable = nodeCache.getListenable();

        Listenable listenable = nodeCache.getListenable();

        // 绑定监听事件

        listenable.addListener(new NodeCacheListener() {

            @Override

            public void nodeChanged() throws Exception {

                String path = nodeCache.getPath();

                System.out.println("this node changed: " + path);

                // 获取变化后的数据

                byte[] data = nodeCache.getCurrentData().getData();

                System.out.println("after change, data is " + new String(data, StandardCharsets.UTF_8));

            }

        });

        // 绑定子节点监听事件

        listenable.addListener(new PathChildrenCacheListener() {

            @Override

            public void childEvent(CuratorFramework client, PathChildrenCacheEvent pathChildrenCacheEvent) throws Exception {

                System.out.println("subNode changed, event -> " + pathChildrenCacheEvent);

                // 获取子节点事件类型

                PathChildrenCacheEvent.Type type = pathChildrenCacheEvent.getType();

                // 如果是修改事件触发,则开始执行XXX。。。

                if (PathChildrenCacheEvent.Type.CHILD_UPDATED .equals(type)) {

                    byte[] data = pathChildrenCacheEvent.getData().getData();

                    System.out.println("new Data -> " + new String(data, StandardCharsets.UTF_8));

                }

            }

        });

        // 绑定树节点监听事件 一般直接监听当前命名空间的全部节点

        TreeCache treeCache = new TreeCache(zookeeperClient, "/");

        Listenable<TreeCacheListener> listenable1 = treeCache.getListenable();

        listenable1.addListener(new TreeCacheListener() {

            @Override

            public void childEvent(CuratorFramework curatorFramework, TreeCacheEvent treeCacheEvent) throws Exception {

                System.out.println("changed");

                System.out.println(treeCacheEvent);

            }

        });

    }
【Zookeeper】Re02 CuratorAPI的更多相关文章
- 【Zookeeper】源码分析目录
Zookeeper源码分析目录如下 1. [Zookeeper]源码分析之序列化 2. [Zookeeper]源码分析之持久化(一)之FileTxnLog 3. [Zookeeper]源码分析之持久化 ...
- 【Zookeeper】基础学习概览【汇总】
一.概述 1.1 简介 1.2 Zookeeper集群机制 1.3 Zookeeper特性 二.Zookeeper应用场景 三.Zookeeper数据结构 四.Zookeeper安装 五.Java操作 ...
- 【Zookeeper】 在Java中的操作
一.基本功能演示 1.1 Maven依赖信息 1.2 代码演示 方法说明 1.3 创建Zookeeper节点信息 二.Watcher 2.1 什么是Watcher接口 2.2 Watcher代码 一. ...
- 【Zookeeper】编程实战之Zookeeper分布式锁实现秒杀
1. Zookeeper简述 我们要了解一样技术,首先应该要到它的官网,因为官网的信息一般都是最准确的,如下图是Zookeeper官网对它的介绍. 从官网的介绍中,可以总结出,Zookeeper是一个 ...
- 【Zookeeper】源码之序列化
一.前言 在完成了前面的理论学习后,现在可以从源码角度来解析Zookeeper的细节,首先笔者想从序列化入手,因为在网络通信.数据存储中都用到了序列化,下面开始分析. 二.序列化 序列化主要在zook ...
- 【Zookeeper】源码分析之持久化--FileTxnLog
一.前言 前一篇已经分析了序列化,这篇接着分析Zookeeper的持久化过程源码,持久化对于数据的存储至关重要,下面进行详细分析. 二.持久化总体框架 持久化的类主要在包org.apache.zook ...
- 【Zookeeper】源码分析之持久化--FileTxnSnapLog
一.前言 前面分析了FileSnap,接着继续分析FileTxnSnapLog源码,其封装了TxnLog和SnapShot,其在持久化过程中是一个帮助类. 二.FileTxnSnapLog源码分析 2 ...
- 【Zookeeper】源码分析之Watcher机制(一)
一.前言 前面已经分析了Zookeeper持久话相关的类,下面接着分析Zookeeper中的Watcher机制所涉及到的类. 二.总体框图 对于Watcher机制而言,主要涉及的类主要如下. 说明: ...
- 【Zookeeper】源码分析之Watcher机制(二)
一.前言 前面已经分析了Watcher机制中的第一部分,即在org.apache.zookeeper下的相关类,接着来分析org.apache.zookeeper.server下的WatchManag ...
- 【Zookeeper】源码分析之Watcher机制(三)之Zookeeper
一.前言 前面已经分析了Watcher机制中的大多数类,本篇对于ZKWatchManager的外部类Zookeeper进行分析. 二.Zookeeper源码分析 2.1 类的内部类 Zookeeper ...
随机推荐
- tomcat部署Jenkins
安装环境 jdk 1.8 tomcat 9.0 jenkins 2.290 准备工作 安装好Tomcat,8080端口启动 安装好jdk,配置好环境变量 ECS服务器安全组放开8080端口 关闭防火墙 ...
- idea中vue的启动方式
1.选取 2.添加 3.配置 4.启动 启动前先 在终端 执行 npm install 命令 再启动
- 如何生成war包
pom.xml <packaging>war</packaging> 引入tomcat <dependency> <groupId>org.spring ...
- python重拾第十二天-sqlalchemy ORM
本节内容 ORM介绍 sqlalchemy安装 sqlalchemy基本使用 多外键关联 多对多关系 表结构设计作业 1. ORM介绍 orm英文全称object relational mapping ...
- Android 耳机驱动知识
Android 耳机驱动知识 2015-03-06 工作以后接手的第一个驱动就是android平台下耳机的插拔检测和按键检测.这部分涉及的硬件知识比较简单,但是软件上对中断的处理,软件检测的鲁棒性,都 ...
- 基于 Termux 和 ipv6 把手机打造成公网服务器
Termux 安装与配置 安装 从这下载: https://f-droid.org/en/packages/com.termux/ 初始化 授权读写手机储存 termux-setup-storage ...
- 《DNK210使用指南 -CanMV版 V1.0》第一章 本书学习方法
第一章 本书学习方法 1)实验平台:正点原子DNK210开发板 2)章节摘自[正点原子]DNK210使用指南 - CanMV版 V1.0 3)购买链接:https://detail.tmall.com ...
- Mybatis 二级缓存的使用
Mybatis二级缓存 简介:二级缓存是namesace级别的,多个SqlSession去操作同个namespace下的Mapper的sql语句,多个SqlSession可以共用二级缓存,如果两个ma ...
- Mac Mysql初始化密码
初始化密码 step1 苹果->系统偏好设置->最下面一行上点击mysql图标, 在弹出页面中 关闭mysql服务(点击stop mysql server) step2 登录终端:comm ...
- 原创软件 | 系统服务工具箱原创软件(587KB)--基于aardio开发的第一个程序
1 系统服务工具箱简介 该软件是我使用aardio开发的第一个程序,它集成了多个系统常用的快捷键,无需记住各种命令就能快捷使用cmd管理员.计算机管理.控制面板.组策略.注册表.服务.任务管理.卸载程 ...