
Go runtime 调度器精讲(三):main goroutine 创建
原创文章,欢迎转载,转载请注明出处,谢谢。
0. 前言
回顾下 上一讲 的内容。主线程 m0 蓄势待发,准备干活。g0 为 m0 提供了执行环境,P 和 m0 绑定,为 m0 提供活,也就是 goroutine。那么问题来了,活呢?哪里有活给 m0 干?
这一讲我们将介绍 m0 执行的第一个活,也就是 main goroutine。main gouroutine 就是执行 main 函数的 goroutine,有别于用 go 关键字创建的 goroutine,它们在执行过程中有一些区别(后续会讲)。
1. main goroutine 创建
接着上一讲的内容,调度器初始化之后,执行到 asm_amd64.s/rt0_go:352:
TEXT runtime·rt0_go(SB),NOSPLIT|NOFRAME|TOPFRAME,$0

		...

	    // create a new goroutine to start program

352 	MOVQ	$runtime·mainPC(SB), AX		// entry

353 	PUSHQ	AX

354 	CALL	runtime·newproc(SB)

355 	POPQ	AX

// dlv 进入到指令执行处

dlv exec ./hello

Type 'help' for list of commands.

(dlv) b /usr/local/go/src/runtime/asm_amd64.s:352

Breakpoint 1 set at 0x45433c for runtime.rt0_go() /usr/local/go/src/runtime/asm_amd64.s:352

(dlv) c

(dlv) si

> runtime.rt0_go() /usr/local/go/src/runtime/asm_amd64.s:353 (PC: 0x454343)

Warning: debugging optimized function

		asm_amd64.s:349 0x454337        e8e4290000      call $runtime.schedinit

        asm_amd64.s:352 0x45433c*       488d05659d0200  lea rax, ptr [rip+0x29d65]

=>      asm_amd64.s:353 0x454343        50              push rax
结合 CPU 执行指令和 Go plan9 汇编代码一起分析。
首先,将 $runtime·mainPC(SB) 地址传给 AX 寄存器,CPU 执行的指令是 mov qword ptr [rsp+0x8], rax。使用 regs 可以看到 rax 的值,也就是 $runtime·mainPC(SB) 的地址:
(dlv) regs

    Rip = 0x0000000000454343

    Rsp = 0x00007ffd58324080

    Rax = 0x000000000047e0a8        // rax = $runtime.mainPC(SB) = [rsp+0x8]
那么 $runtime.mainPC(SB) 的地址指的是什么呢?我们看 $runtime.mainPC(SB) 的定义:
// mainPC is a function value for runtime.main, to be passed to newproc.

// The reference to runtime.main is made via ABIInternal, since the

// actual function (not the ABI0 wrapper) is needed by newproc.

DATA	runtime·mainPC+0(SB)/8,$runtime·main<ABIInternal>(SB)

GLOBL	runtime·mainPC(SB),RODATA,$8
$runtime.mainPC(SB) 是一个为了执行 runtime.main 的函数值。
继续执行 PUSH AX 将 runtime.mainPC(SB) 放到栈上。注意,这里的栈是 g0 栈,也就是主线程 m0 运行的栈。
接着往下走:
=>      asm_amd64.s:354 0x45ca64        e8f72a0000              call $runtime.newproc

        asm_amd64.s:355 0x45ca69        58                      pop rax
调用 $runtime.newproc 函数,newproc 就是创建 goroutine 的函数。我们使用 go 关键字创建的 goroutine 都经编译器转换最终调用到 newproc 创建 goroutine。可想而知,这个函数是非常重要的。
进入这个函数我们的操作还是在 g0 栈。
// Create a new g running fn.

// Put it on the queue of g's waiting to run.

// The compiler turns a go statement into a call to this.

func newproc(fn *funcval) {

	gp := getg()                            // gp = g0

	pc := getcallerpc()                     // 获取调用者的指令地址,也就是调用 newproc 时由 call 指令压栈的函数返回地址

	systemstack(func() {

		newg := newproc1(fn, gp, pc)        // 创建 g

		...

	})

}
newproc 调用 newproc1 创建 goroutine,分别介绍传入 newproc1 的参数 fn,gp 和 pc。
首先 fn 是包含 runtime.main 的函数值,打印 fn 如下:
(dlv) print fn

(*runtime.funcval)(0x47e0a8)

*runtime.funcval {fn: 4386432}
可以看到,fn 是一个指向结构体 funcval 的地址(也就是前面介绍的 $runtime.mainPC(SB),地址 0x47e0a8),该结构体内装的 fn 才是实际执行的 runtime.main 函数的地址:
type funcval struct {

	fn uintptr

	// variable-size, fn-specific data here

}
第二个参数 gp 等于 g0,g0 为主线程 m0 提供运行时环境,pc 是调用 newproc 时由 call 指令压栈的函数返回地址。
参数讲完了,在看下 systemstack 函数。systemstack 会将 goroutine 运行的 fn 调用到系统栈(g0 栈)运行,这里 m0 已经在 g0 栈上运行了,不用调用。如果不是 g0 栈的 goroutine,比如 m0 运行 g1 栈,则 systemstack 会先将 g1 栈切到 g0 栈,接着运行完 fn 在返回到 g1 栈。详细内容可以参考 这里。
现在进入 newproc1(fn, gp, pc) 查看 newproc1 是如何创建新 goroutine 的。
func newproc1(fn *funcval, callergp *g, callerpc uintptr) *g {

	mp := acquirem()						// acquirem 获取当前 goroutine 绑定的线程,这里是 m0

	pp := mp.p.ptr()						// 获取该线程绑定的 P,这里 pp = allp[0]

	// 从 P 的本地队列 gFree 或者全局 gFree 队列中获取空闲的 goroutine,如果拿不到则返回 nil

	// 这里是创建 main goroutine 阶段,无空闲的 goroutine

	newg := gfget(pp)

	if newg == nil {

		newg = malg(stackMin)				// malg 创建新的 goroutine

		casgstatus(newg, _Gidle, _Gdead)	// 创建的 goroutine 初始状态是 _Gidle,这里更新 goroutine 状态为 _Gdead

		allgadd(newg) 						// 增加新 goroutine 到全局变量 allgs

	}

	...

}
首先调用 gfget 获取当前线程 P 或全局空闲队列中空闲的 goroutine,如果没有则调用 malg(stackMin) 创建新 goroutine。malg(stackMin) 中的 stackMin 等于 2048,也就是 2K。查看 malg 做了什么:
func malg(stacksize int32) *g {

	newg := new(g)													// new 创建 g

	if stacksize >= 0 {												// stacksize = 2048

		stacksize = round2(stackSystem + stacksize)					// stackSystem = 0, stacksize = 2048

		systemstack(func() {

			newg.stack = stackalloc(uint32(stacksize))				// 调用 stackalloc 获得新 goroutine 的栈,新 goroutine 的栈大小为 2K

		})

		newg.stackguard0 = newg.stack.lo + stackGuard

		newg.stackguard1 = ^uintptr(0)

		// Clear the bottom word of the stack. We record g

		// there on gsignal stack during VDSO on ARM and ARM64.

		*(*uintptr)(unsafe.Pointer(newg.stack.lo)) = 0

	}

	return newg

}
malg 创建一个新的 goroutine,并且 goroutine 的栈大小为 2KB。
接着调用 casgstatus 更新 goroutine 的状态为 _Gdead。然后调用 allgadd 函数将创建的 goroutine 和全局变量 allgs 关联:
func allgadd(gp *g) {

	lock(&allglock)																// allgs 是全局变量,给全局变量加锁

	allgs = append(allgs, gp)													// 将 newg:gp 添加到 allgs

	if &allgs[0] != allgptr {													// allgptr 是一个指向 allgs[0] 的指针,这里是 nil

		atomicstorep(unsafe.Pointer(&allgptr), unsafe.Pointer(&allgs[0]))		// allgptr = &allgs[0]

	}

	atomic.Storeuintptr(&allglen, uintptr(len(allgs)))							// 更新全局变量 allglen = len(allgs)

	unlock(&allglock)															// 解锁

}
继续往下看 newproc1 的执行过程:
func newproc1(fn *funcval, callergp *g, callerpc uintptr) *g {

	...

	totalSize := uintptr(4*goarch.PtrSize + sys.MinFrameSize) 	// extra space in case of reads slightly beyond frame

	totalSize = alignUp(totalSize, sys.StackAlign)

	sp := newg.stack.hi - totalSize								// sp 是栈顶指针

	// 设置 newg.sched 的所有成员为 0,后续要对它们重新赋值

	memclrNoHeapPointers(unsafe.Pointer(&newg.sched), unsafe.Sizeof(newg.sched))

	newg.sched.sp = sp

	newg.stktopsp = sp

	// newg.sched.pc 表示当 newg 被调度起来运行时从这个地址开始执行指令

	newg.sched.pc = abi.FuncPCABI0(goexit) + sys.PCQuantum // +PCQuantum so that previous instruction is in same function

	newg.sched.g = guintptr(unsafe.Pointer(newg))

	gostartcallfn(&newg.sched, fn)
这段代码主要是给 newg.sched 赋值,newg.sched 的结构体如下:
type gobuf struct {

	sp   uintptr				// goroutine 的 栈顶指针

	pc   uintptr				// 执行 goroutine 的指令地址

	g    guintptr				// goroutine 地址

	ctxt unsafe.Pointer			// 包装 goroutine 执行函数的结构体 funcval 的地址

	ret  uintptr				// 返回地址

	lr   uintptr

	bp   uintptr

}
newg.sched 主要的成员如注释所示,线程通过该结构体就能知道要从哪里运行代码。
在赋值 newg.sched 时,这段代码很有意思:
newg.sched.pc = abi.FuncPCABI0(goexit) + sys.PCQuantum
它是将 goexit 函数的地址 + 1 在传给 newg.sched.pc,查看此时 newg.sched.pc 的值:
  4530:         newg.sched.pc = abi.FuncPCABI0(goexit) + sys.PCQuantum // +PCQuantum so that previous instruction is in same function

=>4531:         newg.sched.g = guintptr(unsafe.Pointer(newg))

(dlv) print newg.sched

runtime.gobuf {sp: 824633976800, pc: 4540513, g: 0, ctxt: unsafe.Pointer(0x0), ret: 0, lr: 0, bp: 0}

(dlv) print unsafe.Pointer(4540513)

unsafe.Pointer(0x454861)
实际是将 0x454861 传给了 newg.sched.pc,我们先不管这个 0x454861,接着往下看。调用 gostartcallfn(&newg.sched, fn) 函数:
func gostartcallfn(gobuf *gobuf, fv *funcval) {

	var fn unsafe.Pointer

	if fv != nil {

		fn = unsafe.Pointer(fv.fn)								// 将 funcval.fn 赋给 fn,实际是 runtime.main 的地址值

	} else {

		fn = unsafe.Pointer(abi.FuncPCABIInternal(nilfunc))

	}

	gostartcall(gobuf, fn, unsafe.Pointer(fv))

}

func gostartcall(buf *gobuf, fn, ctxt unsafe.Pointer) {

	sp := buf.sp												// 取 g1 的栈顶指针

	sp -= goarch.PtrSize										// 栈顶指针向下减 1 个字节

	*(*uintptr)(unsafe.Pointer(sp)) = buf.pc					// 减的 1 个字节空间用来放 abi.FuncPCABI0(goexit) + sys.PCQuantum

	buf.sp = sp													// 将减了 1 个字节的 sp 作为新栈顶

	buf.pc = uintptr(fn)										// 重新将 pc 指向 fn

	buf.ctxt = ctxt												// 将 buf.ctxt 指向 funcval

}
看到这里我们明白了,为什么要加一层 goexit 并且将栈顶指针往下减 1 作为新栈顶了。因为新栈顶在返回时会执行到 goexit,这也是调度器希望每个 goroutine 都要做的,在执行完执行 goexit 才能真正退出。
好了我们回到 newproc1 继续往下看:
func newproc1(fn *funcval, callergp *g, callerpc uintptr) *g {

	...

	newg.parentGoid = callergp.goid					// newg 的 父 id,newg.parentGoid = 0

	newg.gopc = callerpc							// 调用者的 pc

	newg.startpc = fn.fn							// newg.startpc = funcval.fn = &runtime.main

	...

	casgstatus(newg, _Gdead, _Grunnable)			// 更新 newg 的状态为 _Grunnable

	newg.goid = pp.goidcache						// 通过 goidcache 获得新的 newg.goid,这里 main goroutine 的 goid 是 1

	...

	releasem(mp)

	return newg

}
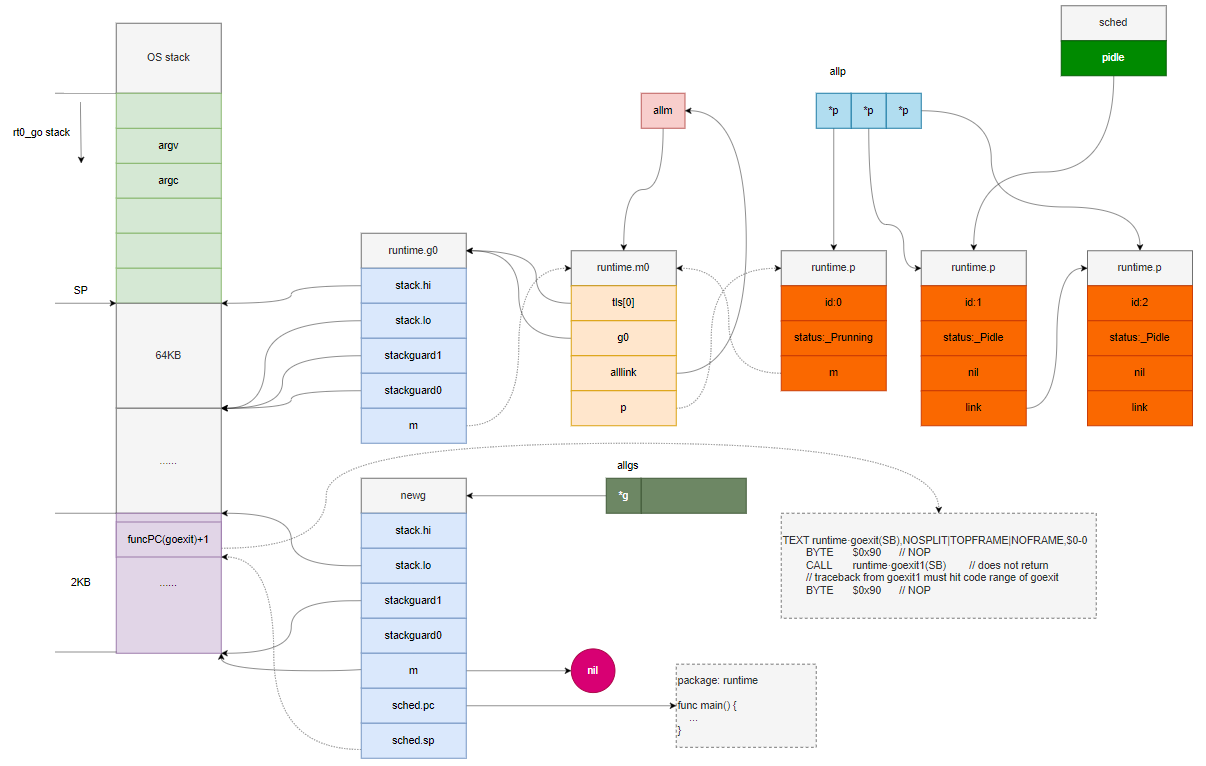
至此我们的新的 goroutine 就创建出来了。回顾下,首先给新 goroutine 申请 2KB 的栈空间,接着在新 goroutine 中创建执行 goroutine 的环境 newg.sched,线程根据 newg.sched 就可以运行 goroutine。最后,设置 goroutine 的状态为 _Grunnable,表示 goroutine 状态就绪可以运行了。
我们根据上述分析画出内存分布如下图:
2. 小结
到这里创建 main goroutine 的逻辑基本介绍完了。下一讲,将继续介绍 main gouroutine 是怎么运行起来的。
Go runtime 调度器精讲(三):main goroutine 创建的更多相关文章
- 第三百四十四节,Python分布式爬虫打造搜索引擎Scrapy精讲—craw母版l创建自动爬虫文件—以及 scrapy item loader机制
第三百四十四节,Python分布式爬虫打造搜索引擎Scrapy精讲—craw母版l创建自动爬虫文件—以及 scrapy item loader机制 用命令创建自动爬虫文件 创建爬虫文件是根据scrap ...
- Golang源码学习:调度逻辑(二)main goroutine的创建
接上一篇继续分析一下runtime.newproc方法. 函数签名 newproc函数的签名为 newproc(siz int32, fn *funcval) siz是传入的参数大小(不是个数):fn ...
- mybatis精讲(三)--标签及TypeHandler使用
目录 话引 XML配置标签 概览 properties 子标签property resource 程序注入 settings 别名 TypeHandler 自定义TypeHandler EnumTyp ...
- Python_装饰器精讲_33
from functools import wraps def wrapper(func): #func = holiday @wraps(func) def inner(*args,**kwargs ...
- 二十三 Python分布式爬虫打造搜索引擎Scrapy精讲—craw母版l创建自动爬虫文件—以及 scrapy item loader机制
用命令创建自动爬虫文件 创建爬虫文件是根据scrapy的母版来创建爬虫文件的 scrapy genspider -l 查看scrapy创建爬虫文件可用的母版 Available templates: ...
- kubernetes 调度器
调度器 kube-scheduler 是 kubernetes 的核心组件之一,主要负责整个集群资源的调度功能,根据特定的调度算法和策略,将 Pod 调度到最优的工作节点上面去,从而更加合理.更加充分 ...
- Go语言调度器之调度main goroutine(14)
本文是<Go语言调度器源代码情景分析>系列的第14篇,也是第二章的第4小节. 上一节我们通过分析main goroutine的创建详细讨论了goroutine的创建及初始化流程,这一节我们 ...
- [翻译] 深入浅出Go语言调度器:第一部分 - 系统调度器
目录 译者序 序 介绍 系统调度器 执行指令 Figure 1 Listing 1 Listing 2 Listing 3 线程状态 任务侧重 上下文切换 少即是多 寻找平衡 缓存行 Figure 2 ...
- Golang调度器GMP原理与调度全分析(转 侵 删)
该文章主要详细具体的介绍Goroutine调度器过程及原理,包括如下几个章节. 第一章 Golang调度器的由来 第二章 Goroutine调度器的GMP模型及设计思想 第三章 Goroutine调度 ...
- FreeRTOS 任务与调度器(1)
前言: Task.c和Task.h文件内是FreeRTOS的核心内容,所有任务和调度器相关的API函数都在这个文件中,它包括下图这些内容FreeRTOS文件如下: Task.c和Task.h文件内是F ...
随机推荐
- thinkphp模型hasOne、hasMany、belongsTo详解
在ThinkPHP框架中,hasOne.hasMany和belongsTo是用于定义模型间一对多(1:n).一对一(1:1)和多对一(n:1)关联关系的方法.以下是一些简单的示例来解释这些关系: 1. ...
- oeasy教您玩转vim - 79 - # 编码格式encoding
- `help encoding-name`  的入门使用 在类的继承中,如果重定义某个方法,该方法会覆盖父类的同名方法,但有时,我们希望能同时实现父类的功能,这时,我们就需要调用父类的方法了. 调用父类同名方法有两种方式: 1.调 ...
- go 环境搭建
下载go 编辑器 https://www.jetbrains.com.cn/go/ 激活工具可以留言,我看到就回复.(保存在阿里云盘) 编辑器配置 GOPROXY=https://goproxy.cn ...
- 加压测试TPS上不去的性能分析
加压测试TPS上不去的性能分析 阶梯式加压测试接口异常可能存在的原因: 压力机本身性能测试的瓶颈 分析:单机负载能力有限,如果需要模拟的用户请求数超过其负载极限,也会间接影响TPS ,可以通过进行分布 ...
- 【Forza Horizon 5】频繁断网解决办法
参考自文章: https://www.acfun.cn/a/ac32056183_2 简而言之就是玩地平线5的时候不要挂着腾讯的QQ.TIM.微信
- 【SpringBoot】整合Swagger 接口文档
前言 可能运用的开发模式: SSM -> SpringMVC + Spring + Mybatis SSMP -> SpringMVC + Spring + MybatisPlus SM ...
- java模拟并发请求工具类(测试专用)
1.背景 实际生产中,我们开发好接口后可能会简单的压力测试一下,也就是说模拟并发测试,测试工具类如下: 2.工具类 package tentative.normal.other; import cn. ...
- [USACO22FEB] Paint by Rectangles P 题解
前言 没用线段树的小常数.小短码. 题目链接:洛谷. 题意简述 给出 \(n\) 个平行于坐标轴的矩形,各边所在直线互不重合,钦定最外面为白色,对这个平面图黑白染色,分别求黑色块数和白色块数. 题目分 ...
- 位移运算符 1<<4
转载自 https://www.cnblogs.com/ljangle/p/13036992.html 位运算 1 << 4 static final int DEFAULT_INIT ...