
iOS边练边学--自定义等高的cell
一、storyboard自定义cell
<1>创建一个继承自UITableViewCell的子类,比如ChaosDealCell

<2>在storyboard中
<2.1>往cell里面增加需要用到的子控件

<2.2>设置cell的重用标识
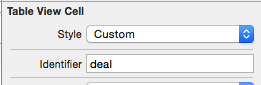
<2.3>设置cell的class为ChaosDealCell
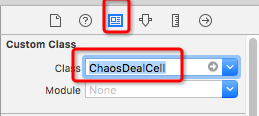
<3>在控制器中
<3.1>利用重用标识找到cell并且给cell传递模型数据
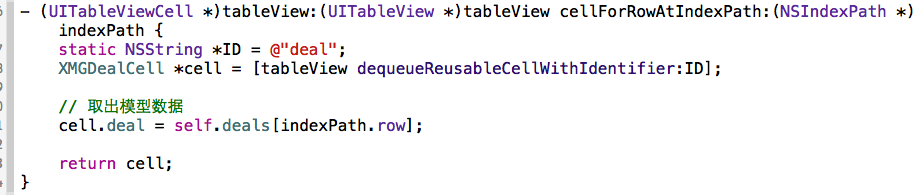
<4>在ChaosDealCell中
<4.1>将storyboard中的子控件连线到类扩展中
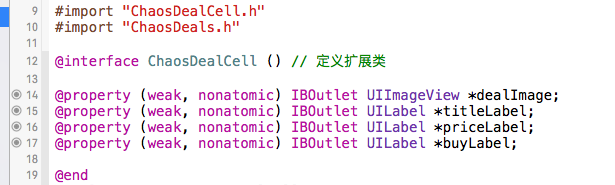
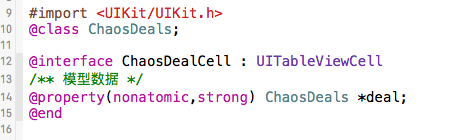
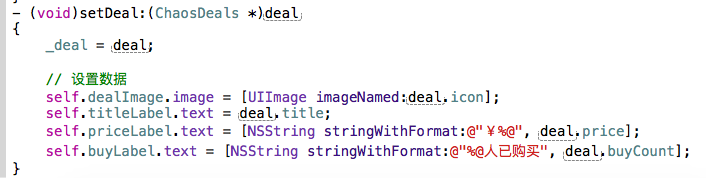
<4.2>需要提供一个模型属性,重写模型的set方法,在这个方法中设置模型数据到子控件上
二、Xib自定义cell
<1>创建一个继承自UITableViewCell的子类,比如ChaosDealCell
<2>创建一个xib文件(文件名建议跟cell的类名一样),比如ChaosDealCell.xib
<2.1>拖拽一个UITableViewCell出来
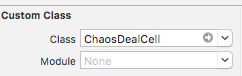
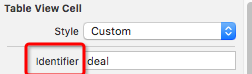
<2.2>修改cell的class为ChaosDealCell,,设置cell的重用标识
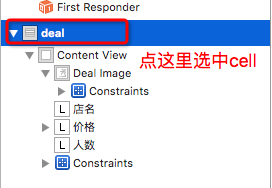
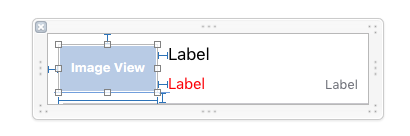
<2.3>往cell中添加需要用到的子控件
<3>在控制器中,别忘了给cell传递模型数数据
<方法一:>利用registerNib...方法注册xib文件
 - (void)viewDidLoad {

     [super viewDidLoad];

 //    [self.tableView registerNib:[UINib nibWithNibName:NSStringFromClass([ChaosDealCell class]) bundle:nil] forCellReuseIdentifier:@"deal"];

     // 分成两步写

     // 1.加载Nib

     UINib *nib = [UINib nibWithNibName:NSStringFromClass([ChaosDealCell class]) bundle:[NSBundle mainBundle]];

     // 注册cell

     [self.tableView registerNib:nib forCellReuseIdentifier:@"deal"];

 }
<方法二:>利用重用标识找到cell(如果没有注册xib文件,就需要手动加载xib文件)
 // 告诉tableView返回什么样的cell

 - (UITableViewCell *)tableView:(UITableView *)tableView cellForRowAtIndexPath:(NSIndexPath *)indexPath

 {

     // 获取对应行的数据

 //    ChaosDeals *deal = self.deals[indexPath.row];

     // 根据tableView从缓存池中拿cell

     ChaosDealCell *cell = [tableView dequeueReusableCellWithIdentifier:@"deal"];

     if (cell == nil) {

         cell = [[[NSBundle mainBundle] loadNibNamed:NSStringFromClass([ChaosDealCell class]) owner:nil options:nil] lastObject];

     }

     cell.deal = self.deals[indexPath.row];

     return cell;

 }
<4>在ChaosDealCell中
<4.1>将xib中的子控件连线到类扩展中
<4.2>需要提供一个模型属性,重写模型的set方法,在这个方法中设置模型数据到子控件上
<4.3>也可以将创建获得cell的代码封装起来(比如cellWithTableView:方法)
 + (instancetype)cellWithTableView:(UITableView *)tableView

 {

     ChaosDealCell *cell = [tableView dequeueReusableCellWithIdentifier:@"deal"];

     if (cell == nil) {

         cell = [[[NSBundle mainBundle] loadNibNamed:NSStringFromClass([ChaosDealCell class]) owner:nil options:nil] lastObject];

     }

     return cell;

 }
三、代码自定义cell(使用frame)
<1>创建一个集成自UITableViewCell的子类,比如ChaosDealCell
<1.1>在initWithStyle:reuseIdentifier:方法中
*添加子控件
*设置子空间的初始化属性(比如文字颜色、字体)
<1.2>在layoutSubviews方法中设置子控件的frame
<1.3>需要提供一个模型属性,重写模型的set方法,在这个方法中设置模型数据到子控件
<2>在控制器中
<2.1>利用registerClass...方法注册ChaosDealCell类
<2.2>利用重用标识找到cell(如果没有注册类,就需要手动创建cell)
<2.3>给cell传递模型数据
<2.4>也可以将创建获得cell的代码封装起来(比如cellWithTableView:方法)
 #import "XMGDealCell.h"

 #import "XMGDeal.h"

 @interface XMGDealCell()

 @property (weak, nonatomic) UIImageView *iconView;

 @property (weak, nonatomic) UILabel *titleLabel;

 @property (weak, nonatomic) UILabel *priceLabel;

 @property (weak, nonatomic) UILabel *buyCountLabel;

 @end

 @implementation XMGDealCell

 + (instancetype)cellWithTableView:(UITableView *)tableView

 {

     static NSString *ID = @"deal";

     // 创建cell

     XMGDealCell *cell = [tableView dequeueReusableCellWithIdentifier:ID];

 //    if (cell == nil) {

 //        cell = [[XMGDealCell alloc] initWithStyle:UITableViewCellStyleDefault reuseIdentifier:ID];

 //    }

     return cell;

 }

 // 1.在initWithStyle:reuseIdentifier:方法中添加子控件

 - (instancetype)initWithStyle:(UITableViewCellStyle)style reuseIdentifier:(NSString *)reuseIdentifier

 {

     if (self = [super initWithStyle:style reuseIdentifier:reuseIdentifier]) {

         UIImageView *iconView = [[UIImageView alloc] init];

         [self.contentView addSubview:iconView];

         self.iconView = iconView;

         UILabel *titleLabel = [[UILabel alloc] init];

         [self.contentView addSubview:titleLabel];

         self.titleLabel = titleLabel;

         UILabel *priceLabel = [[UILabel alloc] init];

         priceLabel.textColor = [UIColor orangeColor];

         [self.contentView addSubview:priceLabel];

         self.priceLabel = priceLabel;

         UILabel *buyCountLabel = [[UILabel alloc] init];

         buyCountLabel.textAlignment = NSTextAlignmentRight;

         buyCountLabel.font = [UIFont systemFontOfSize:];

         buyCountLabel.textColor = [UIColor lightGrayColor];

         [self.contentView addSubview:buyCountLabel];

         self.buyCountLabel = buyCountLabel;

     }

     return self;

 }

 // 2.在layoutSubviews方法中设置子控件的frame

 - (void)layoutSubviews

 {

     [super layoutSubviews];

     CGFloat contentH = self.contentView.frame.size.height;

     CGFloat contentW = self.contentView.frame.size.width;

     CGFloat margin = ;

     CGFloat iconX = margin;

     CGFloat iconY = margin;

     CGFloat iconW = ;

     CGFloat iconH = contentH -  * iconY;

     self.iconView.frame = CGRectMake(iconX, iconY, iconW, iconH);

     // titleLabel

     CGFloat titleX = CGRectGetMaxX(self.iconView.frame) + margin;

     CGFloat titleY = iconY;

     CGFloat titleW = contentW - titleX - margin;

     CGFloat titleH = ;

     self.titleLabel.frame = CGRectMake(titleX, titleY, titleW, titleH);

 //    CGRectMake(titleX, titleY, titleW, titleH);

     // priceLabel

     CGFloat priceX = titleX;

     CGFloat priceH = ;

     CGFloat priceY = contentH - margin - priceH;

     CGFloat priceW = ;

     self.priceLabel.frame = CGRectMake(priceX, priceY, priceW, priceH);

     // buyCountLabel

     CGFloat buyCountH = priceH;

     CGFloat buyCountY = priceY;

     CGFloat buyCountX = CGRectGetMaxX(self.priceLabel.frame) + margin;

     CGFloat buyCountW = contentW - buyCountX - margin;

     self.buyCountLabel.frame = CGRectMake(buyCountX, buyCountY, buyCountW, buyCountH);

 }

 // 3.重写模型的set方法

 - (void)setDeal:(XMGDeal *)deal

 {

     _deal = deal;

     // 设置数据

     self.iconView.image = [UIImage imageNamed:deal.icon];

     self.titleLabel.text = deal.title;

     self.priceLabel.text = [NSString stringWithFormat:@"¥%@", deal.price];

     self.buyCountLabel.text = [NSString stringWithFormat:@"%@人已购买", deal.buyCount];

 }

 @end
四、代码自定义cell(使用autolayout)
<1>创建一个集成自UITableViewCell的子类,比如ChaosDealCell
<1.1>在initWithStyle:reuseIdentifier:方法中
*添加子控件
*添加子控件的约束(建议使用Masonry)
*设置子空间的初始化属性(比如文字颜色、字体)
<1.2>在layoutSubviews方法中设置子控件的frame
<1.3>需要提供一个模型属性,重写模型的set方法,在这个方法中设置模型数据到子控件
<2>在控制器中
<2.1>利用registerClass...方法注册ChaosDealCell类
<2.2>利用重用标识找到cell(如果没有注册类,就需要手动创建cell)
<2.3>给cell传递模型数据
<2.4>也可以将创建获得cell的代码封装起来(比如cellWithTableView:方法)
 // 1.在initWithStyle:reuseIdentifier:方法中添加子控件

 - (instancetype)initWithStyle:(UITableViewCellStyle)style reuseIdentifier:(NSString *)reuseIdentifier

 {

     if (self = [super initWithStyle:style reuseIdentifier:reuseIdentifier]) {

         CGFloat margin = ;

         UIImageView *iconView = [[UIImageView alloc] init];

         [self.contentView addSubview:iconView];

         self.iconView = iconView;

         [iconView makeConstraints:^(MASConstraintMaker *make) {

             make.width.equalTo();

             make.left.top.offset(margin);

             make.bottom.offset(-margin);

         }];

         UILabel *titleLabel = [[UILabel alloc] init];

         [self.contentView addSubview:titleLabel];

         self.titleLabel = titleLabel;

         [titleLabel makeConstraints:^(MASConstraintMaker *make) {

             make.top.equalTo(iconView);

             make.left.equalTo(iconView.right).offset(margin);

             make.right.offset(-margin);

         }];

         UILabel *priceLabel = [[UILabel alloc] init];

         priceLabel.textColor = [UIColor orangeColor];

         [self.contentView addSubview:priceLabel];

         self.priceLabel = priceLabel;

         [priceLabel makeConstraints:^(MASConstraintMaker *make) {

             make.left.equalTo(titleLabel);

             make.bottom.equalTo(iconView);

             make.width.equalTo();

         }];

         UILabel *buyCountLabel = [[UILabel alloc] init];

         buyCountLabel.textAlignment = NSTextAlignmentRight;

         buyCountLabel.font = [UIFont systemFontOfSize:];

         buyCountLabel.textColor = [UIColor lightGrayColor];

         [self.contentView addSubview:buyCountLabel];

         self.buyCountLabel = buyCountLabel;

         [buyCountLabel makeConstraints:^(MASConstraintMaker *make) {

             make.bottom.equalTo(priceLabel);

             make.right.equalTo(titleLabel);

             make.left.equalTo(priceLabel.right).offset(margin);

         }];

     }

     return self;

 }
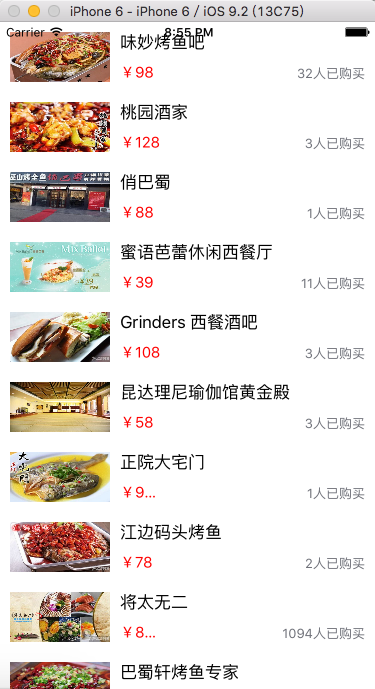
练习效果图
iOS边练边学--自定义等高的cell的更多相关文章
- iOS边练边学--自定义非等高的cell
一.使用xib或者storyboard自定义非等高的cell实现方式差不多,这里简单介绍一下通过xib文件实现的方法 <1.1>创建一个继承自UITableViewCell的子类,比如Ch ...
- iOS开发——UI进阶篇(二)自定义等高cell,xib自定义等高的cell,Autolayout布局子控件,团购案例
一.纯代码自定义等高cell 首先创建一个继承UITableViewCell的类@interface XMGTgCell : UITableViewCell在该类中依次做一下操作1.添加子控件 - ( ...
- iOS-UI控件之UITableView(三)- 自定义不等高的cell
Storyboard_不等高 对比自定义等高cell,需要几个额外的步骤(iOS8开始才支持) 添加子控件和contentView之间的间距约束 设置tableViewCell的真实行高和估算行高 / ...
- iOS-UI控件之UITableView(二)- 自定义不等高的cell
不等高的cell 给模型增加frame数据 所有子控件的frame cell的高度 @interface XMGStatus : NSObject /**** 文字\图片数据 ****/ // ... ...
- iOS边练边学--(Quartz2D)基本图形的绘制#附加自定义进度控件的练习
一.Quartz2D使用须知 Quartz2D的API是纯C语言的 Quartz2D的API来自于Core Graphics框架 二.<1>通过原始的方法(C语言)绘制简单图形--了解 & ...
- iOS边练边学--父子控制器之自定义控制器的切换
一.如图所示的界面,按钮One.Two.Three分别对应三个控制器的view,点击实现切换.个人感觉父子控制器的重点在于,控制器的view们之间建立了父子关系,控制器不建立的话,发生在view上面的 ...
- iOS边练边学--CALayer,非根层隐式动画,钟表练习
一.CALayer UIView之所以能显示在屏幕上,完全是因为他内部的一个图层 在创建UIView对象时,UIView内部会自动创建一个图层(即CALayer对象),通过UIView的layer属性 ...
- iOS边练边学--应用数据存储的常用方式(plist,Preference,NSKeyedArchiver)其中的三种
iOS应用数据存储的常用方式: XML属性列表(plist)归档 Preference(偏好设置) NSKeyedArchiver归档(NSCoding) SQLite3--这里暂且不讲 Core D ...
- iOS边练边学--Http网络再学习,简单介绍
一.URL 什么是URL URL中常见的协议 二.Http Http的基本通信过程 发送Http请求的方法 GET 和 POST 对比 GET 和 POST 的选择 三.iOS中的Http学习 iOS ...
随机推荐
- 堆 C语言实现
1.基本概念 堆分为小根堆和大根堆,对于一个小根堆,它是具有如下特性的一棵完全二叉树: (1)若树根结点存在左孩子或右孩子,则根结点的值(或某个域的值)小于等于左右孩子结点的值(或某个域的值) (2) ...
- SecureCRT 快捷键总结 设置快捷键
http://oldboy.blog.51cto.com/2561410/907098 自己整理的一些 查看 Alt + Enter 全屏 菜单 Alt + f + n 克隆会话窗 ...
- HDU 2604 Queuing (矩阵乘法)
Queuing Time Limit: 10000/5000 MS (Java/Others) Memory Limit: 32768/32768 K (Java/Others)Total Su ...
- 如何查看USB方式连接Android设备的外接设备信息
1,USB存储设备(如:U盘,移动硬盘): //USB存储设备 插拔监听与 SD卡插拔监听一致. private USBBroadCastReceiver mBroadcastReceiver; In ...
- C# partial 关键字详解
我们新建一个Windows Form时,后台代码都会自动添加如下代码: public partial class Form1 : Form { public Form1() { InitializeC ...
- nginx实战四
nginx负载均衡 Nginx通过upstream和proxy_pass实现了负载均衡.本质上也是Nginx的反向代理功能,只不过后端的server为多个. 1.简单的轮询 upstream www ...
- 使用SplashScreenManager控件定制程序加载页面
需要devexpress版本在12.0及以上才支持 https://www.cnblogs.com/wuhuacong/p/6112461.html 在DevExpress程序中使用SplashScr ...
- laravel5的Bcrypt加密方式对系统保存密码
laravel5文档介绍 //对 A 密码使用Bcrypt 加密 $password = Hash::make('mima'); //你也可直接使用 bcrypt 的 function $passwo ...
- How to kill a process on a port on linux 怎么杀死 关掉一个端口
sudo kill `sudo lsof -t -i:9001`
- hadoop详细了解5个进程的作用
1.job的本质是什么?2.任务的本质是什么?3.文件系统的Namespace由谁来管理,Namespace的作用是什么?4.Namespace 镜像文件(Namespace image)和操作日志文 ...