vue 整合雪碧图功能
1、通过命令新建一个vue项目
环境要求:  安装有 Node.js、 vue、 vue-cli 。

创建项目:

vue init webpack tx_demo

cd  tx_demo

进入项目,下载依赖:

// 最新版已经无需安装依赖初始化,可直接运行下面的命令 npm install 或者 cnpm install

运行项目:

npm run dev
2、由于我用的是sass样式,所以安装sass依赖
npm install node-sass sass-loader
3、配置雪碧图功能
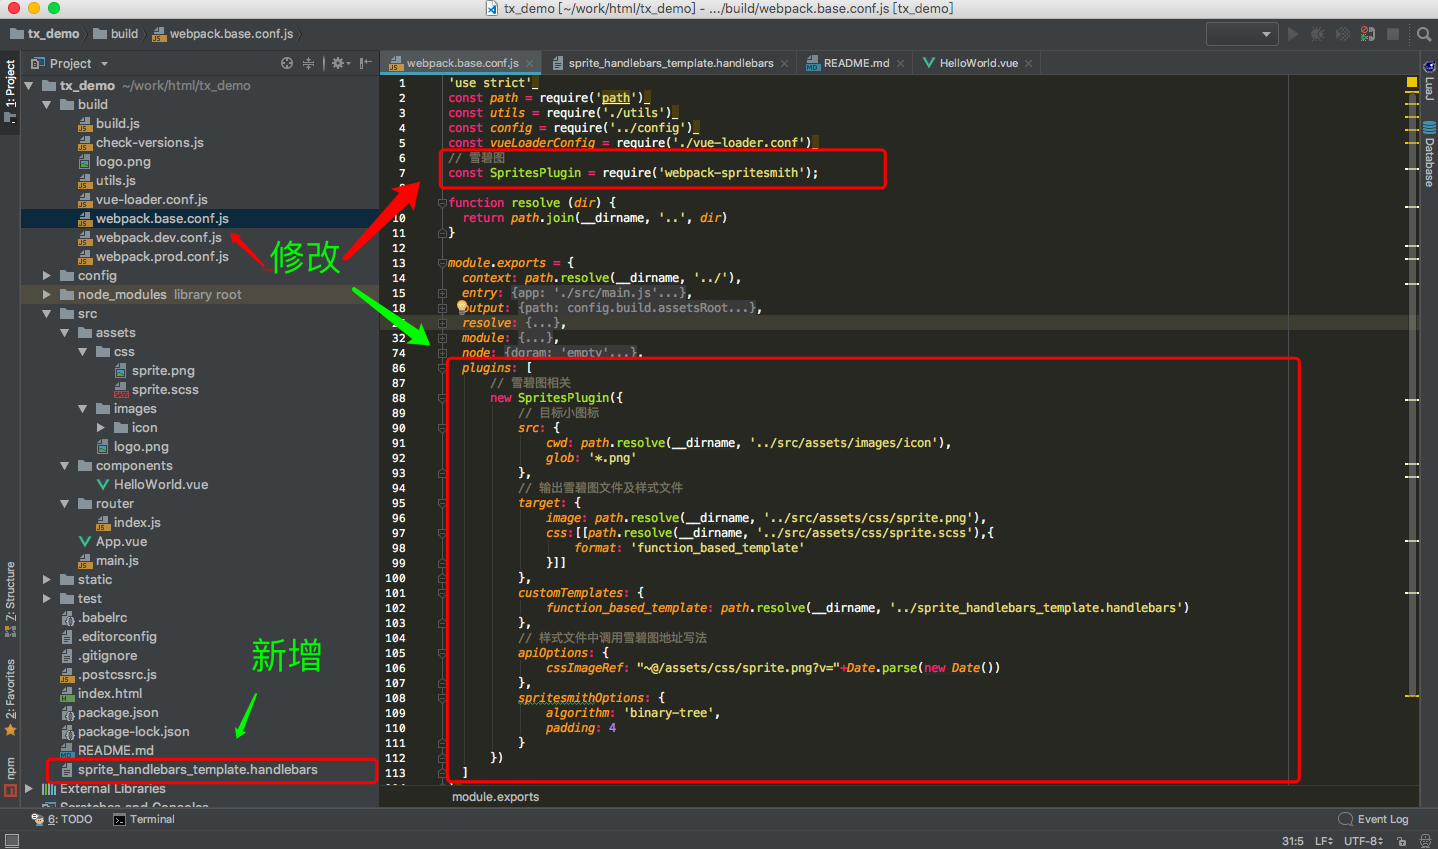
先安装依赖

npm install webpack-spritesmith

配置webpack配置文件,由于开发和生产环境都需要用到雪碧图,所以我们在base(webpack.base.conf.js)配置中添加

// 雪碧图
const SpritesPlugin = require('webpack-spritesmith');
①:注意plugins这块代码,没有plugins就自己新建一个
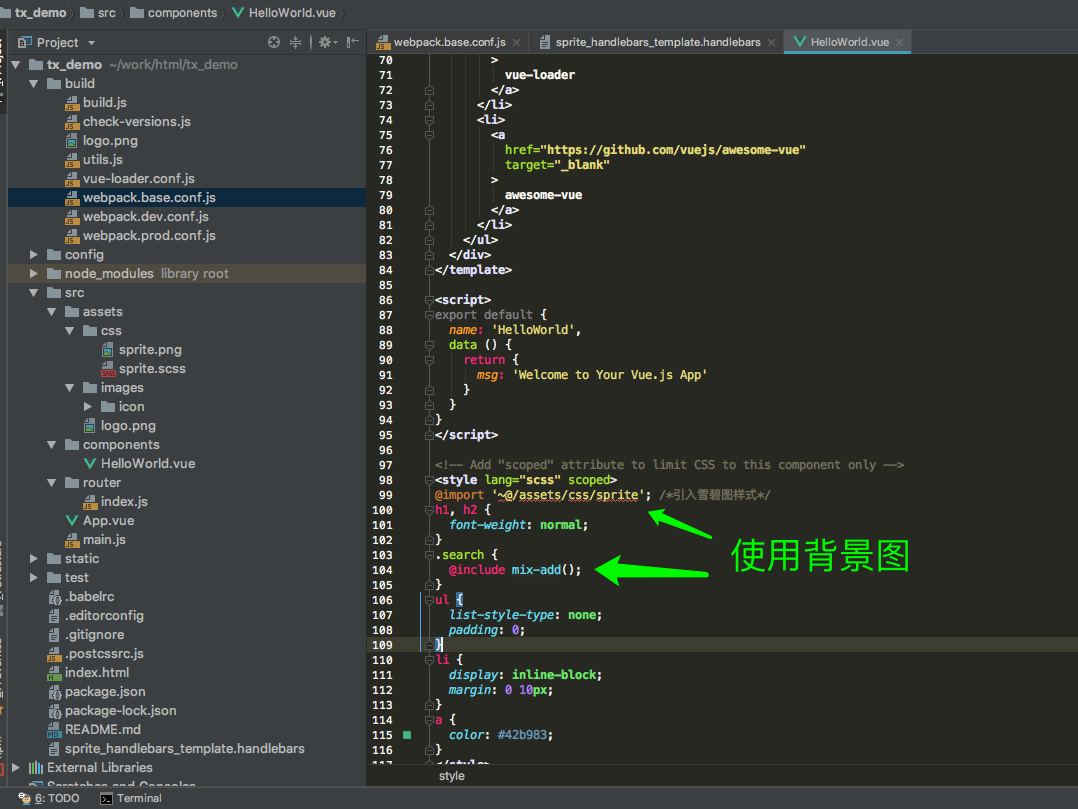
②:在配置中,用到了别名(~@ :@前面需要加波浪线),这样在生成的sprite.scss就不会存在在不到图片资源的问题了
  plugins: [

      // 雪碧图相关

      new SpritesPlugin({

          // 目标小图标

          src: {

              cwd: path.resolve(__dirname, '../src/assets/images/icon'),

              glob: '*.png'

          },

          // 输出雪碧图文件及样式文件

          target: {

              image: path.resolve(__dirname, '../src/assets/css/sprite.png'),

              css:[[path.resolve(__dirname, '../src/assets/css/sprite.scss'),{

                  format: 'function_based_template'

              }]]

          },

          customTemplates: {

              function_based_template: path.resolve(__dirname, '../sprite_handlebars_template.handlebars')

          },

          // 样式文件中调用雪碧图地址写法

          apiOptions: {

              cssImageRef: "~@/assets/css/sprite.png?v="+Date.parse(new Date())

          },

          spritesmithOptions: {

              algorithm: 'binary-tree',

              padding:

          }

      })

  ]
生成 sprite.scss 个规则模板为项目根目录下 sprite_handlebars_template.handlebars//随机数字
@function parse-random($value) {
@return round(random() * $value);
}
$randomId: parse-random(); $spriteSrc: "{{{spritesheet.image}}}";
$spriteWidth: {{{spritesheet.width}}}px;
$spriteHeight: {{{spritesheet.height}}}px;
{{#items}}
${{name}}: {{px.offset_x}} {{px.offset_y}} {{px.width}} {{px.height}};
{{/items}} @function px2rem ($px) {
@if (type-of($px) == "number") {
@return $px / 75px * 1rem;
}
@if (type-of($px) == "list") {
@if (nth($px, ) == and nth($px, ) != ) {
@return nth($px, ) / 75px * 1rem;
} @else if (nth($px, ) == and nth($px, ) == ) {
@return ;
} @else if (nth($px, ) != and nth($px, ) == ) {
@return nth($px, ) / 75px * 1rem ;
} @else {
@return nth($px, ) / 75px *1rem nth($px, ) / 75px * 1rem;
}
}
} @function strip-units($number){
@return $number / ($number * + );
} @function format-zero($number){
@if $number == {
@return ;
}@else{
@return $number;
}
} @mixin sprite-width($sprite, $precision) {
@if $precision {
width: px2rem(nth($sprite, ));
}@else{
width: px2rem(nth($sprite, ) + 2px);
} } @mixin sprite-height($sprite, $precision) {
@if $precision {
height: px2rem(nth($sprite, ));
}@else{
height: px2rem(nth($sprite, ) + 2px);
}
} @mixin sprite-position($sprite, $precision) {
@if $precision {
background-position: strip-units(nth($sprite, )) / strip-units(nth($sprite, ) - $spriteWidth) * % strip-units(nth($sprite, )) / format-zero(strip-units(nth($sprite, ) - $spriteHeight)) * %;
}@else{
background-position: strip-units(nth($sprite, )) / strip-units(nth($sprite, ) + - $spriteWidth) * % strip-units(nth($sprite, )) / format-zero(strip-units(nth($sprite, ) + - $spriteHeight)) * %;
}
} @mixin sprite($sprite, $precision) {
@include sprite-position($sprite, $precision);
@include sprite-width($sprite, $precision);
@include sprite-height($sprite, $precision);
background-image: url('#{$spriteSrc}');
background-repeat: no-repeat;
background-size: px2rem(($spriteWidth, $spriteHeight));
display: inline-block;
} {{#sprite}}
{{class}} {
background-repeat: no-repeat;
overflow: hidden;
border: none;
background: url('#{$spriteSrc}');
@include inline-block();
vertical-align: middle;
font-style: normal;
color:$icon-font-color;
}
{{/sprite}} {{#items}}
@mixin mix-{{name}}() {
@include sprite(${{name}}, $precision: false);
}
{{/items}}
整个工程结构图及配置图如下:
4、使用方法如下(直接使用 sprite.scss 中的 @mixin方法):
效果如下

vue 整合雪碧图功能的更多相关文章
- gulp-css-spriter 雪碧图合成
一.配置 gulp的雪碧图功能没有grunt那么强大,但是类似功能也支持,功能稍微弱一些,但是也很棒 npm地址:https://www.npmjs.com/package/gulp-css-spri ...
- CSS Sprites的原理(图片整合技术)(CSS精灵)/雪碧图
CSS Sprites的原理(图片整合技术)(CSS精灵)/雪碧图 一.将导航背景图片,按钮背景图片等有规则的合并成一张背景图,即将多张图片合为一张整图,然后用background-positio ...
- vue-cli3使用webpack-spritesmith配置雪碧图
一.背景问题 项目中如果有大量的小图标,如果不使用阿里的iconfont.UI给一个加一个,加一个引用一个,每个图标虽然很小,但是也是一次请求,每次请求都是消耗性能资源的. 二.解决思路 使用webp ...
- CSS Sprite、CSS雪碧图应用实例
CSS Sprites技术被国内一些人称为CSS雪碧图,其实就是把网页中一些背景图片整合到一张图片文件中,再利用CSS的“background-image”,“background- repeat”, ...
- 原创:CSS3技术-雪碧图自适应缩放与精灵动画方案
花了一个礼拜完成了慕课网定制的七夕主题效果,其中有一个没实现好的功能,就是雪碧图的自适应缩放 ps: 以下实现都是基于移动端的处理 原图如下: 人物是采用的是雪碧图,通过坐标绝对数据取值 问题很明显, ...
- 图标字体 VS 雪碧图——图标字体应用实践
本文介绍使用图标字体和SVG取代雪碧图的方法.雪碧图是很多网站经常用到的一种技术,但是它有缺点:高清屏会模糊.无法动态变化如hover时候反色.而使用图标字体可以完美解决上述问题,同时具备兼容性好,生 ...
- V4.0到来了,css雪碧图生成工具4.0更新啦
V3.0介绍 http://www.cnblogs.com/wang4517/p/4476758.html V4.0更新内容 V4.0下载地址:http://download.csdn.net/det ...
- css sprite,css雪碧图生成工具V3.0更新
V3.0主要改进 1.增加了单独添加单张图片以及删除单张图片的功能 2.增加了生成.sprite文件用以保存雪碧图信息 3.增加了打开.sprite文件功能 什么是css sprite CSS spr ...
- CSS3与页面布局学习笔记(五)——Web Font与CSS Sprites(又称CSS精灵、雪碧图)技术
一.web font web font是应用在web中的一种字体技术,在CSS中使用font-face定义新的字体.先了解操作系统中的字体: a).安装好操作系统后,会默认安装一些字体,这些字体文件描 ...
随机推荐
- 2018-2019-1 20189215 《Linux内核原理与分析》第六周作业
<庖丁解牛>第五章书本知识总结 system_call并不是一个普通的函数,只是一段汇编代码的起点,且内部没有严格遵守函数调用堆栈机制. 通过set_system_trap_gate函数绑 ...
- 20145325张梓靖 《Java程序设计》第8周学习总结
20145325张梓靖 <Java程序设计>第8周学习总结 教材学习内容总结 Logger java.util.logging包提供了日志功能相关类与接口,使用日志的起点是logger类, ...
- Hadoop运维手记
1.处理hadoop的namenode宕机 处理措施:进入hadoop的bin目录,重启namenode服务 操作命令:cd path/to/hadoop/bin ./hadoop-daemon.sh ...
- linux下递归删除指定后缀名的文件
以删除当前目录到所有子目录下的后缀名为rej的文件为例: find . -name "*.rej" |xargs rm -f
- 操作数据库的时候,使用自带的DbProviderFactory类 (涉及抽象工厂和工厂方法)
微软自带的DbProviderFactory https://msdn.microsoft.com/en-us/library/system.data.common.dbproviderfactory ...
- Codeforces Round #394 (Div. 2) B. Dasha and friends(暴力)
http://codeforces.com/contest/761/problem/B 题意: 有一个长度为l的环形跑道,跑道上有n个障碍,现在有2个人,给出他们每过多少米碰到障碍,判断他们跑的是不是 ...
- UVa 10655 n次方之和(矩阵快速幂)
https://vjudge.net/problem/UVA-10655 题意: 输入非负整数p,q,n,求a^n+b^n的值,其中a和b满足a+b=p,ab=q. 思路: 递推式转化成矩阵的规律: ...
- BZOJ 3876 【AHOI2014】 支线剧情
题目链接:支线剧情 这道题就是一道裸裸的上下界网络流……只不过这道题边带了权,那么建出图之后跑费用流即可. 首先需要新建超级源\(S\)和超级汇\(T\).对于这道题,对于一条边\((u,v,z)\) ...
- Qt5编译error01
1.Qt551x86 vs2013 1.1.“error: C2001: 常量中有换行符” 问题还原:源码:“QString str = tr("已接收 %1MB (%2MB/s) \n共% ...
- JAVA-随机生成四则运算
代码如下: package jiajianchengchu; import java.util.*; public class jisuan { public static String yuefen ...