Asp.net Core认证和授权:JWT认证和授权
JWT验证一般用户移动端,因为它不像cookie验证那样,没有授权跳转到登陆页面
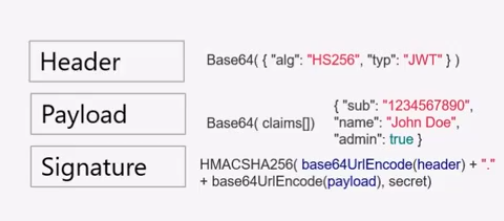
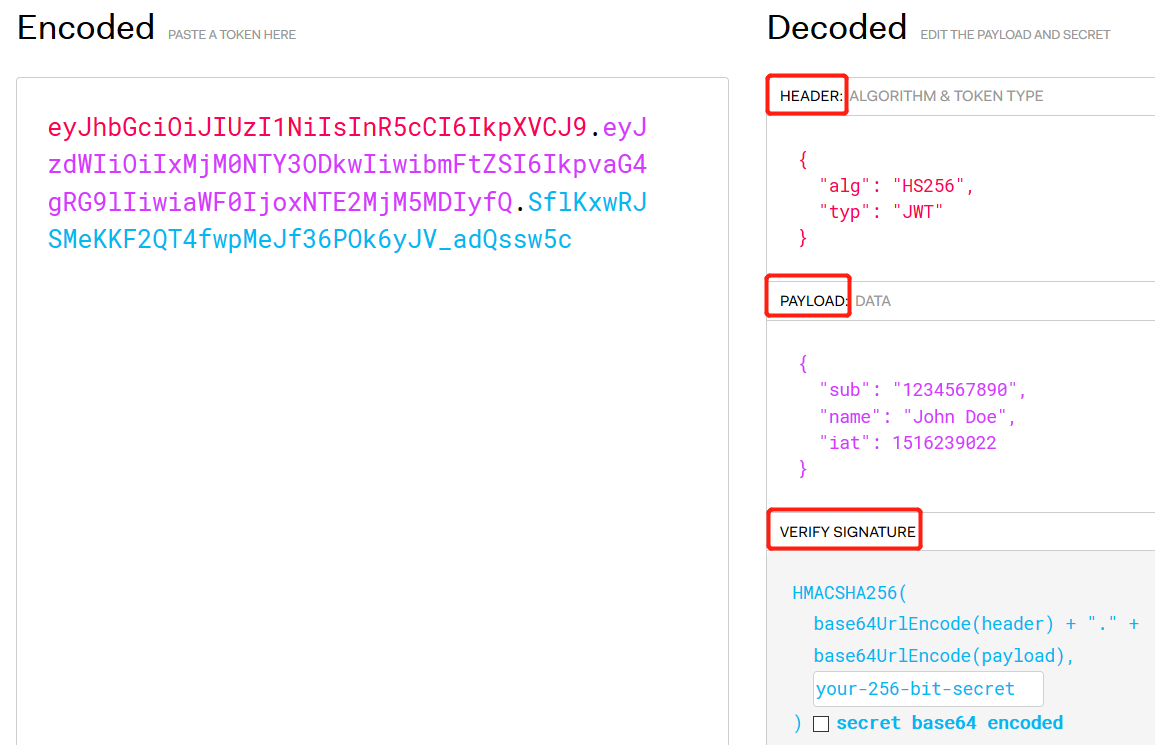
JWT是json web token的简称,在 jwt.io 网址可以看到
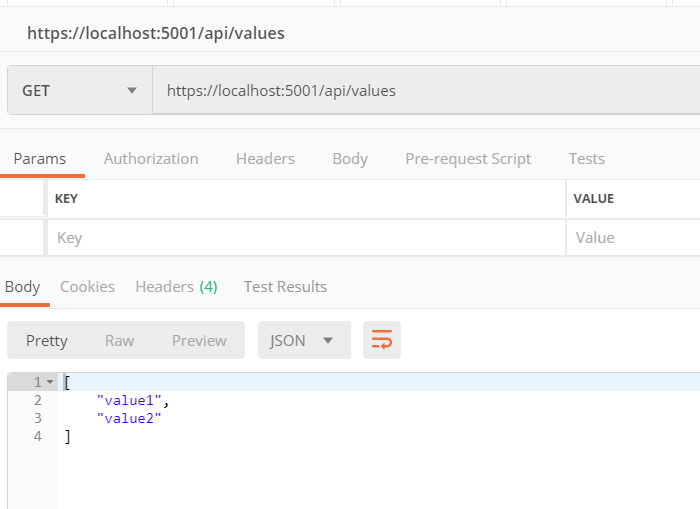
新建一个API项目,通过postman 可以访问:
JWT在命名空间:using Microsoft.AspNetCore.Authentication.JwtBearer;
添加JWT实体类
using System;

using System.Collections.Generic;

using System.Linq;

using System.Threading.Tasks;

namespace Api.Models

{

    public class JwtSettings

    {

        /// <summary>

        /// Token是谁颁发的

        /// </summary>

        public string Issuer { get; set; }

        /// <summary>

        /// Token给那些客户端去使用

        /// </summary>

        public string Audience { get; set; }

        /// <summary>

        /// 用于加密的key 必须是16个字符以上,要大于128个字节

        /// </summary>

        public string SecetKey { get; set; }

    }

}
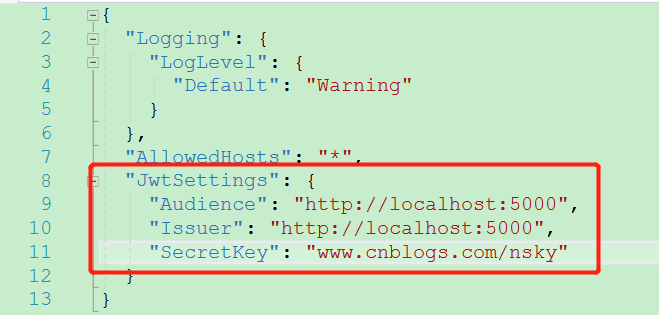
添加配置文件
添加JWT认证
public void ConfigureServices(IServiceCollection services)

        {

            services.AddMvc().SetCompatibilityVersion(CompatibilityVersion.Version_2_2);

            services.Configure<JwtSettings>(Configuration);

            var jwtSettings = new JwtSettings();

            Configuration.Bind("JwtSettings", jwtSettings);

            services.AddAuthentication(option => {

                option.DefaultAuthenticateScheme = JwtBearerDefaults.AuthenticationScheme;

                option.DefaultChallengeScheme = JwtBearerDefaults.AuthenticationScheme;

            })

            .AddJwtBearer(option=> {

                option.TokenValidationParameters = new TokenValidationParameters {

                    ValidIssuer = jwtSettings.Issuer,

                    ValidAudience = jwtSettings.Audience,

                    IssuerSigningKey=new SymmetricSecurityKey(Encoding.UTF8.GetBytes(jwtSettings.SecetKey))

 /***********************************TokenValidationParameters的参数默认值***********************************/
                    // RequireSignedTokens = true,
                    // SaveSigninToken = false,
                    // ValidateActor = false,
                    // 将下面两个参数设置为false,可以不验证Issuer和Audience,但是不建议这样做。
                    // ValidateAudience = true,
                    // ValidateIssuer = true,
                    // ValidateIssuerSigningKey = false,
                    // 是否要求Token的Claims中必须包含Expires
                    // RequireExpirationTime = true,
                    // 允许的服务器时间偏移量
                    // ClockSkew = TimeSpan.FromSeconds(300),
                    // 是否验证Token有效期,使用当前时间与Token的Claims中的NotBefore和Expires对比
                    // ValidateLifetime = true

                };

            });

        }
添加中间件(Middleware)
app.UseAuthentication();
API接口打上标签:
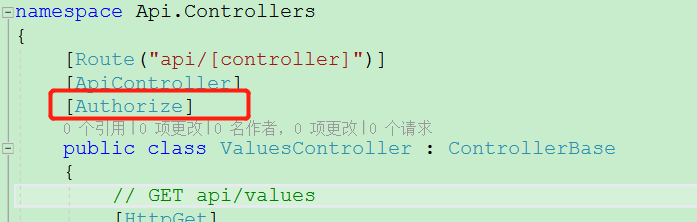
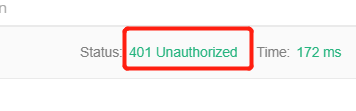
然后在postman访问 就是401 未授权
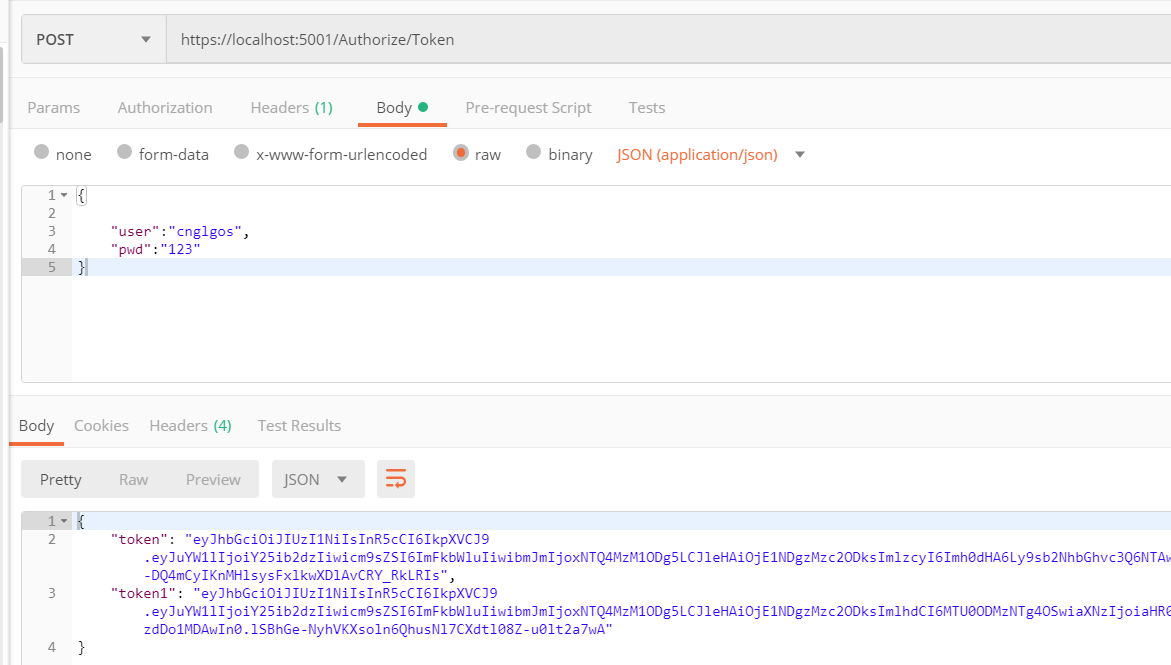
接下来需要给用户颁发Token
当用户登陆成功后,颁发token
创建登陆API和实体类
namespace Api.Models

{

    public class LoginViewModel

    {

        [Required]

        public string user { get; set; }

        [Required]

        public string pwd { get; set; }

    }

}
using Api.Models;

using Microsoft.AspNetCore.Mvc;

using Microsoft.Extensions.Options;

using Microsoft.IdentityModel.Tokens;

using System;

using System.IdentityModel.Tokens.Jwt;

using System.Security.Claims;

using System.Text;

namespace Api.Controllers

{

    //[Route("api/[controller]")]

    //[ApiController]

    public class AuthorizeController : ControllerBase

    {

        private JwtSettings _jwtSettings;

        public AuthorizeController(IOptions<JwtSettings> jwtSetting)

        {

            _jwtSettings = jwtSetting.Value;

        }

        [HttpPost]

        public IActionResult Token([FromBody]LoginViewModel login)

        {

            if (ModelState.IsValid)

            {

                if (!(login.user == "cnglgos" && login.pwd == ""))

                {

                    return BadRequest();

                }

                var claim = new Claim[] {

                    new Claim("name","cnbogs"),

                    new Claim("role","admin")

                };

                var key = new SymmetricSecurityKey(Encoding.UTF8.GetBytes(_jwtSettings.SecretKey));

                var creds = new SigningCredentials(key, SecurityAlgorithms.HmacSha256);

                //neget包:Microsoft.AspNetCore.Authentication.JwtBearer

                //命名空间: System.IdentityModel.Tokens.Jwt;

                //第一种方式

                var token = new JwtSecurityToken(

                    _jwtSettings.Issuer,// Issuer 颁发者,通常为STS服务器地址

                    _jwtSettings.Audience,// Audience Token的作用对象,也就是被访问的资源服务器授权标识

                    claim,

                    DateTime.Now,  //Token生效时间,在此之前不可用

                    DateTime.Now.AddMinutes(), //Token过期时间,在此之后不可用

                    creds);

                //第二种方式

                var descriptor = new SecurityTokenDescriptor

                {

                    Issuer = _jwtSettings.Issuer,

                    Audience = _jwtSettings.Audience,// Audience Token的作用对象,也就是被访问的资源服务器授权标识

                    Subject = new ClaimsIdentity(claim),

                    NotBefore = DateTime.Now, //Token生效时间,在此之前不可用

                    Expires = DateTime.Now.AddMinutes(), //Token过期时间,在此之后不可用

                    SigningCredentials = creds,

                    IssuedAt=DateTime.Now //Token颁发时间

                };

                var handler = new JwtSecurityTokenHandler();

                JwtSecurityToken token1 = handler.CreateJwtSecurityToken(descriptor);

                return Ok(new

                {

                    token = new JwtSecurityTokenHandler().WriteToken(token),

                    token1 = handler.WriteToken(token1)

                });

            }

            return BadRequest();

        }

        public IActionResult Index()

        {

            return Ok();

        }

    }

}
Postman请求
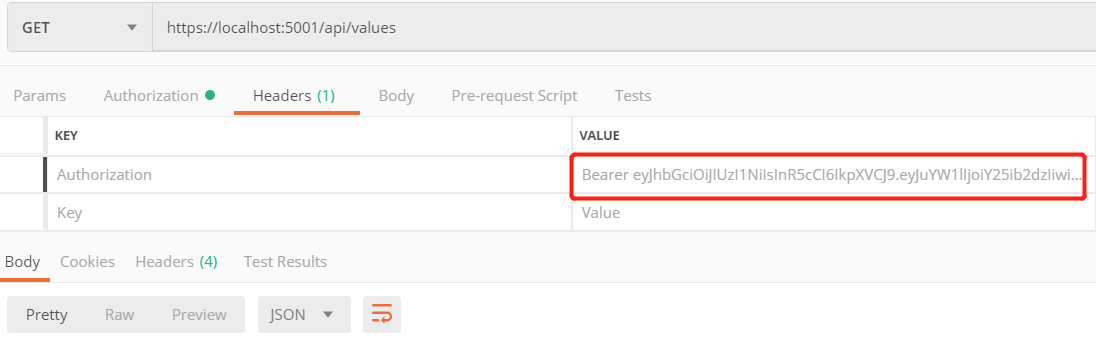
然后上面的Token 请求 https://localhost:5001/api/values
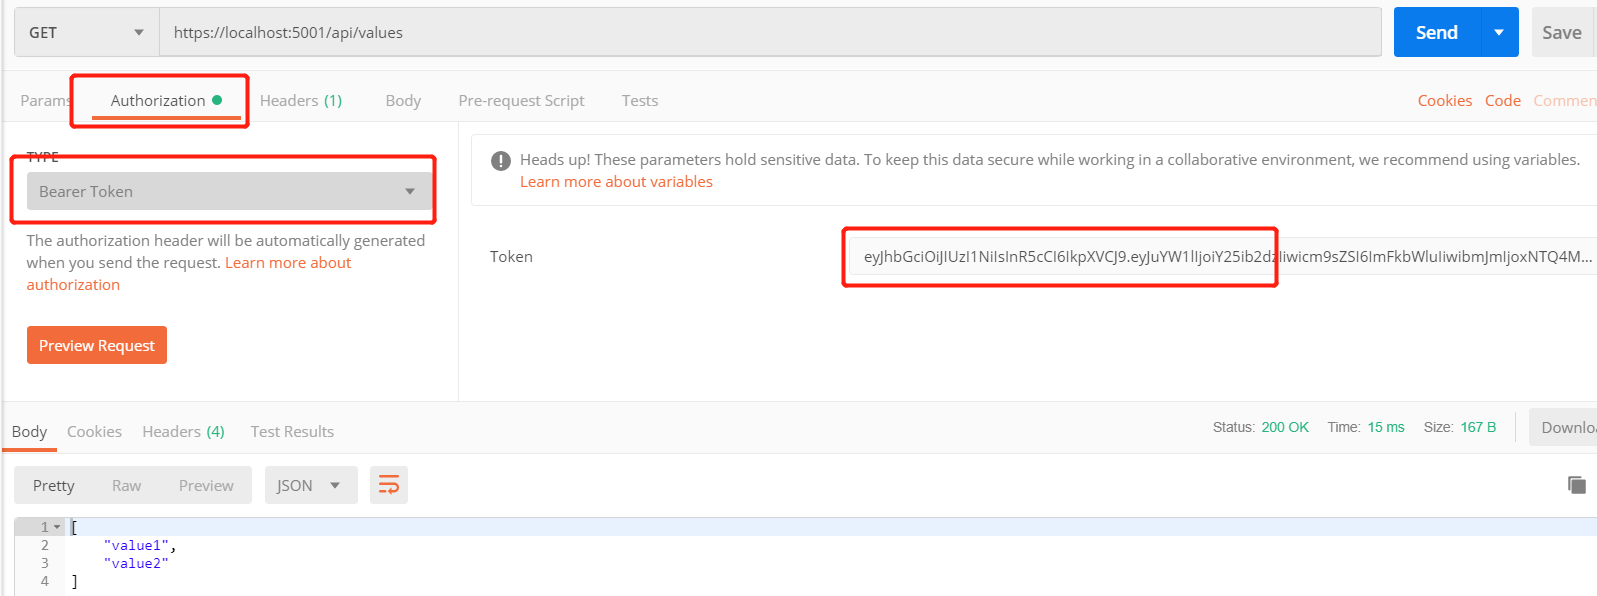
从headers可以看到,前缀必须是Bearer
我们可以自定义Token,必须继承接口:ISecurityTokenValidator
using Microsoft.AspNetCore.Authentication.JwtBearer;
using Microsoft.IdentityModel.Tokens;
using System.Collections.Generic;
using System.Security.Claims;
namespace Api.Models
{
public class TokenValidtor : ISecurityTokenValidator
{
public bool CanValidateToken => true; public int MaximumTokenSizeInBytes { get; set; } public bool CanReadToken(string securityToken)
{
return true;
} public ClaimsPrincipal ValidateToken(string securityToken, TokenValidationParameters validationParameters, out SecurityToken validatedToken)
{
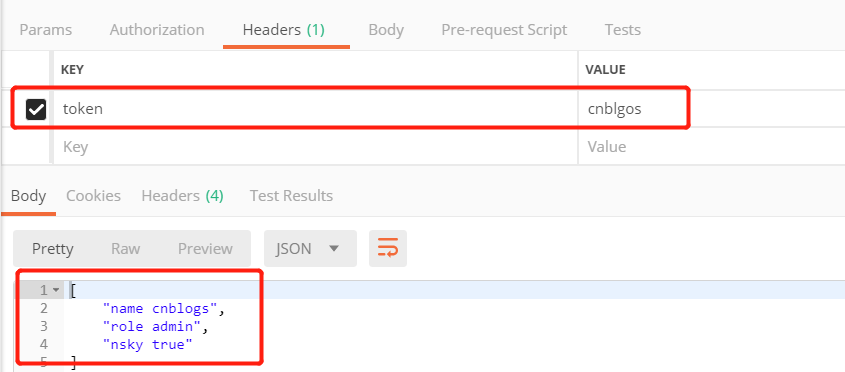
validatedToken = null; var identity = new ClaimsIdentity(JwtBearerDefaults.AuthenticationScheme); if (securityToken == "cnblgos")
{
var claim = new List<Claim> {
new Claim("name","cnblogs"),
new Claim("role","admin")
};
identity.AddClaims(claim);
} var principal = new ClaimsPrincipal(identity);
return principal;
}
}
}
然后在StartUp中修改:
  public void ConfigureServices(IServiceCollection services)

        {

            services.AddMvc().SetCompatibilityVersion(CompatibilityVersion.Version_2_2);

            /*

             appsettings.json文件中JwtSettings是单独的一节,

             所以要GetSection方法获取

             */

            services.Configure<JwtSettings>(Configuration.GetSection("JwtSettings"));

            //services.Configure<JwtSettings>(Configuration);

            var jwtSettings = new JwtSettings();

            Configuration.Bind("JwtSettings", jwtSettings);

            services.AddAuthentication(option =>

            {

                option.DefaultAuthenticateScheme = JwtBearerDefaults.AuthenticationScheme;

                option.DefaultChallengeScheme = JwtBearerDefaults.AuthenticationScheme;

            })

            .AddJwtBearer(option =>

            {

                //option.TokenValidationParameters = new TokenValidationParameters {

                //    ValidIssuer = jwtSettings.Issuer,

                //    ValidAudience = jwtSettings.Audience,

                //    IssuerSigningKey=new SymmetricSecurityKey(Encoding.UTF8.GetBytes(jwtSettings.SecretKey))

                option.SecurityTokenValidators.Clear();

                option.SecurityTokenValidators.Add(new TokenValidtor());

                option.Events = new JwtBearerEvents

                {

                    OnMessageReceived = context =>

                    {

                        var token = context.Request.Headers["token"];

                        context.Token = token.FirstOrDefault();

                        return Task.CompletedTask;

                    }

                };

            });

        }
//添加Policy和Claim授权
services.AddAuthorization(options => {
options.AddPolicy("nsky", policy => policy.RequireClaim("nsky")); });

Token可以去jwt.io 网站验证
参考大神的文章:https://www.cnblogs.com/RainingNight/p/jwtbearer-authentication-in-asp-net-core.html
Asp.net Core认证和授权:JWT认证和授权的更多相关文章
- ASP.NET Core 6.0 添加 JWT 认证和授权
序言 本文将分别介绍 Authentication(认证) 和 Authorization(授权). 并以简单的例子在 ASP.NET Core 6.0 的 WebAPI 中分别实现这两个功能. 相关 ...
- ASP.NET Core 3.1使用JWT认证Token授权 以及刷新Token
传统Session所暴露的问题 Session: 用户每次在计算机身份认证之后,在服务器内存中会存放一个session,在客户端会保存一个cookie,以便在下次用户请求时进行身份核验.但是这样就暴露 ...
- 【ASP.NET Core学习】使用JWT认证授权
概述 认证授权是很多系统的基本功能 , 在以前PC的时代 , 通常是基于cookies-session这样的方式实现认证授权 , 在那个时候通常系统的用户量都不会很大, 所以这种方式也一直很好运行, ...
- ASP.NET Core 3.0 一个 jwt 的轻量角色/用户、单个API控制的授权认证库
目录 说明 一.定义角色.API.用户 二.添加自定义事件 三.注入授权服务和中间件 三.如何设置API的授权 四.添加登录颁发 Token 五.部分说明 六.验证 说明 ASP.NET Core 3 ...
- 关于ASP.Net Core Web及API身份认证的解决方案
6月15日,在端午节前的最后一个工作日,想起有段日子没有写过文章了,倒有些荒疏了.今借夏日蒸蒸之气,偷得浮生半日悠闲.闲话就说到这里吧,提前祝大家端午愉快(屈原听了该不高兴了:))!.NetCore自 ...
- 理解ASP.NET Core - 基于Cookie的身份认证(Authentication)
注:本文隶属于<理解ASP.NET Core>系列文章,请查看置顶博客或点击此处查看全文目录 概述 通常,身份认证(Authentication)和授权(Authorization)都会放 ...
- 【ASP.NET Core】运行原理[3]:认证
本节将分析Authentication 源代码参考.NET Core 2.0.0 HttpAbstractions Security 目录 认证 AddAuthentication IAuthenti ...
- ASP.NET CORE中使用Cookie身份认证
大家在使用ASP.NET的时候一定都用过FormsAuthentication做登录用户的身份认证,FormsAuthentication的核心就是Cookie,ASP.NET会将用户名存储在Cook ...
- ASP.NET Core如何使用WSFederation身份认证集成ADFS
如果要在ASP.NET Core项目中使用WSFederation身份认证,首先需要在项目中引入NuGet包: Microsoft.AspNetCore.Authentication.WsFedera ...
- ASP.NET Core编程实现基本身份认证
概览 在HTTP中,基本认证(Basic access authentication,简称BA认证)是一种用来允许网页浏览器或其他客户端程序在请求资源时提供用户名和口令形式的身份凭证的一种登录验证方式 ...
随机推荐
- 【转载】多模式串匹配之AC自动机
原文地址:https://www.cnblogs.com/codeape/p/3845375.html 目录 [隐藏] 一.概述 二.AC算法思想 三.字典树tire的构造 四.搜索路径的确定 附录: ...
- dockerd启动配置_修改IP和systemd管理
docker采用CS架构,dockerd是管理后台进程,默认的配置文件为/etc/docker/daemon.json(--config-file可以指定非默认位置). 一个完整的daemon.jso ...
- 如何将本地项目上传至GitHub(so easy!!!)
如何将本地项目上传至GitHub 首先你需要一个github账号,所有还没有的话先去注册吧! https://github.com/ 我们使用git需要先安装git工具,这里给出下载地址,下载后一路直 ...
- java模式:建造者模式
我发现很多源码很喜欢用这个模式,比如spring cloud,spring framework. 建造者模式(Builder)用以构建各种各样的对象,主要功能就是代替对象的构造函数,更加自由化. 举个 ...
- 判断当前viewcontroller是push还是present的方式显示的
网上的姿势,反正我用着不管用 最正确的姿势 NSArray *viewcontrollers = self.navigationController.viewControllers; if (view ...
- (转)x264的一些参数设置对编码效率的影响
转自:http://www.cnblogs.com/wainiwann/p/5647521.html i_luma_deadzone[0]和i_luma_deadzone[1]分别对应inter和in ...
- [原]win10下编译lua5.3.4
1.下载lua源码http://www.lua.org/ftp/ 2.打开vs2012工具命令提示 3.cd 到lua源码的src目录 4.依次执行以下代码 cl /MD /O2 /c /DLUA_B ...
- python使用requests发送text/xml报文数据
def client_post_xmldata_requests(request_url,requestxmldata): #功能说明:发送请求报文到指定的地址并获取请求响应报文 #输入参数说明:接收 ...
- 如何优雅的选择字体(font-family)
大家都知道,在不同操作系统.不同游览器里面默认显示的字体是不一样的,并且相同字体在不同操作系统里面渲染的效果也不尽相同,那么如何设置字体显示效果会比较好呢?下面我们逐步的分析一下: 一.首先我们看看各 ...
- java.io.UTFDataFormatException: encoded string too long:
java.io.UTFDataFormatException: encoded string too long: 259553 bytes 按如下修改可避开此问题. - output.writeUTF ...