
Netty自娱自乐之类Dubbo RPC 框架设计构想 【上篇】
之前在前一篇的《Netty自娱自乐之协议栈设计》,菜鸟我已经自娱自乐了设计协议栈,gitHub地址为https://github.com/vOoT/ncustomer-protocal。先这一篇中,准备接着自娱去实现一个RPC框架,现在公司共的是Dubbo,那么先不看其代码,先自行实现一下吧。
dubbo 包括 注册和服务调用,细节我们先不管,然后,我先先实现一个如下的简单模型

哈哈哈,第一个版本就是这么简单,粗暴。说到自定义配置,首先想到的是Spring 自定义标签,利用标签进行配置服务。而我设计的标签页非常的简单,使用如下:
    <rpc:provider id="helloServiceImpl" class="com.qee.rpc.HelloServiceImpl"/>

    <rpc:cumsumer id="helloService" interface="com.qee.rpc.HelloService"/>
看到了没,非常像dubbo,那么如何实现一个自定义标签呢,从网上可以了解搜索的到,现在我就简单说明一下,如何编写和测试自己自定义的Spring 标签。
一、 定义xsd 文件,该文件是xml文件的 schema 定义。从上面的例子中,我们知道xsd文件里面应该有2个节点,1个provider节点和1个cumsumer节点定义。然后制定provider节点有id 和classs属性,而cumsumer节点有 id和 interface属性。定义文件如下(该文件名为light-weight-rpc.xsd):
<?xml version="1.0" encoding="UTF-8"?>

<xsd:schema xmlns="http://www.qee.com/schema/rpc"

            xmlns:xsd="http://www.w3.org/2001/XMLSchema"

            xmlns:beans="http://www.springframework.org/schema/beans"

            targetNamespace="http://www.qee.com/schema/rpc"

            elementFormDefault="qualified"

            attributeFormDefault="unqualified">

    <xsd:import namespace="http://www.springframework.org/schema/beans"/>

    <xsd:element name="provider" type="rpc-provider-type"></xsd:element>

    <xsd:element name="cumsumer" type="rpc-cumsumer-type"></xsd:element>

    <xsd:complexType name="rpc-provider-type">

        <xsd:attribute name="id" type="xsd:string" use="required"></xsd:attribute>

        <xsd:attribute name="class" type="xsd:string" use="required"></xsd:attribute>

    </xsd:complexType>

    <xsd:complexType name="rpc-cumsumer-type">

        <xsd:attribute name="id" type="xsd:string" use="required"></xsd:attribute>

        <xsd:attribute name="interface" type="xsd:string" use="required"></xsd:attribute>

    </xsd:complexType>

</xsd:schema>
上面,画上红线的地方需要注意和主要的关注点,首先需要说明这个文件的name space 为 xmlns="http://www.qee.com/schema/rpc 。其他的具体如何写可以到网上搜索。有了这个文件,我们需要在xml的文件引入他,比如如下test.xml文件如何引用该文件
<?xml version="1.0" encoding="UTF-8"?>

<beans xmlns="http://www.springframework.org/schema/beans"

       xmlns:xsi="http://www.w3.org/2001/XMLSchema-instance"
       xmlns:rpc="http://www.qee.com/schema/rpc"

       xsi:schemaLocation="http://www.springframework.org/schema/beans http://www.springframework.org/schema/beans/spring-beans.xsd

        http://www.qee.com/schema/rpc http://www.qee.com/schema/rpc/light-weight-rpc.xsd">

    <rpc:provider id="helloServiceImpl" class="com.qee.rpc.HelloServiceImpl"/>

    <rpc:cumsumer id="helloService" interface="com.qee.rpc.HelloService"/>

</beans>
上面就是一个spring xml 文件,主要关注的是花黄线的部分,这样就可以使用<rpc:provider> 和<rpc:cumsumer>。
二、组织文件,即要把文件放到合适的地方,让Spring能够识别。第一步,需要把light-weight-rpc.xsd文件放到META-INF的文件夹下,然后在META-INF文件创建2个新的文件,名字固定。
文件1:spring.schemes ,该文件里面直有一行数据,如下
http\://www.qee.com/schema/rpc/light-weight-rpc.xsd=META-INF/light-weight-rpc.xsd
该行告诉Spring容器,http://www.qee.com/schema/rpc/light-weight-rpc.xsd ,之前定义命名空间的light-weight-rpc.xsd文件是META-INF下的light-weight-rpc.xsd
文件2:spring.handlers,该文件里面也只有一行数据,如下
http\://www.qee.com/schema/rpc=com.qee.rpc.config.support.LightWeightRpcNamespaceHandlerSupport
该行告诉Spring容器,命名空间http://www.qee.com/schema/rpc的解析处理器是 com.qee.rpc.config.support.LightWeightRpcNamespaceHandlerSupport。这个例子的目录如下

好了到现在我们基本把文件的位置放置正确了。之后就是需要编写com.qee.rpc.config.support.LightWeightRpcNamespaceHandlerSupport。
三、编写com.qee.rpc.config.support.LightWeightRpcNamespaceHandlerSupport,该类需要继承NamespaceHandlerSupport,重写init()方法。主要的目的就是注册,节点解析处理器。
代码如下:
public class LightWeightRpcNamespaceHandlerSupport extends NamespaceHandlerSupport {

    @Override

    public void init() {

        //注册用于解析<rpc>的解析器

        registerBeanDefinitionParser("provider", new LightWeightRpcBeanDefinitionParser());

        registerBeanDefinitionParser("cumsumer", new LightWeightRpcBeanDefinitionParser());

    }

}
从代码上我们只要,就是把解析xml文件provider和cumsumer节点进行BeanDefinition转化解析。
因为这2个节点非常的类型。所以我就只想用痛一个解析处理器,LightWeightRpcBeanDefinitionParser,该转化器继承org.springframework.beans.factory.xml.AbstractSingleBeanDefinitionParser。具体代码如下:
public class LightWeightRpcBeanDefinitionParser extends AbstractSingleBeanDefinitionParser {

    protected Class getBeanClass(Element element) {

        return LightWeightRPCElement.class;

    }

    protected void doParse(Element element, BeanDefinitionBuilder bean) {

        String interfaces = element.getAttribute("interface");

        String clazz = element.getAttribute("class");

        String id = element.getAttribute("id");

        bean.addPropertyValue("id", id + "Config");

        if (StringUtils.hasText(id)) {

            bean.addPropertyValue("beanName", id);

        }

        if (StringUtils.hasText(clazz)) {

            bean.addPropertyValue("clazz", clazz);

        }

        if (StringUtils.hasText(interfaces)) {

            bean.addPropertyValue("interfaces", interfaces);

        }

    }

}
我们把xml的id 放到 bean 的beanName,把id+"Config"放到 id上,因为这个 BeanDefinitionBuilder 最终生成的对象是 LightWeightRPCElement,不是我们需要的代码对象。
@Data

@ToString

public class LightWeightRPCElement {
  private String id;

  private String beanName;

  private String clazz;

  private String interfaces;
}
是不是非常的简单,到目前为止,我们已经完成了所有的自定义标签工作,下一步当然就是测试一下啦,代码如下:
public class RPCTest {

    public static void main(String[] args) {

        ApplicationContext ctx = new ClassPathXmlApplicationContext("test.xml");

        LightWeightRPCElement p1= (LightWeightRPCElement)ctx.getBean("helloServiceImplConfig");

        LightWeightRPCElement p2= (LightWeightRPCElement)ctx.getBean("helloServiceConfig");

        System.out.println(p1);

        System.out.println(p2);

    }

}
执行结果是:

四、这一步的话,我们需要处理之前已经注册到Spring的 LightWeightRPCElement 的对象,在上面的例子中,这两个的Bean Id分别是helloServiceImplConfig、helloServiceConfig,之后我们需要通过这2个对象来产生我们需要代理对象。首先我们来看一下JDK的生成代理对象的方法:
public static Object newProxyInstance(ClassLoader loader, Class<?>[] interfaces,InvocationHandler invocationHandler);

从上面的代码中,我们知道生产一个代理对象需要一个类加载器loader,和代理接口的字节码interfaces,和代理处理具柄invocationHandler。那么我程序定义了一个名为InterfaceProxyHandler的代理处理具柄,它继承InvocationHandler。代码如下:
@Data

public class InterfaceProxyHandler implements InvocationHandler {

    private CallBackExcuteHandler excuteHandler;

    public InterfaceProxyHandler(CallBackExcuteHandler excuteHandler) {

        this.excuteHandler = excuteHandler;

    }

    @Override

    public Object invoke(Object proxy, Method method, Object[] args) throws Throwable {

        MessageCallback callback = ExcuteManager.invoke(excuteHandler);

        .......//这里代码还没写,其实就是处理返回结果,准备下章解决。

    }

}
从上面的代码,我们知道,它具体的执行逻辑是invoke方法。具体内容就是通过一个ExcuteManager来处理逻辑,该ExcuteManager就是一个封装了ExecutorService的线程池管理类。其意思是每个代理对象去执行方法时,都是通过线程池的一个线程去执行,而这个线程池管理类的执行方法invoke需要一个Callable任务,所以程序自定义了一个CallBackExcuteHandler类。代码如下:
public class CallBackExcuteHandler implements Callable<MessageCallback> {

    private String beanName;

    private List<InetSocketAddress> remoteAddresses;

    private LoadBalancedStrategy loadBalancedStrategy;

    public CallBackExcuteHandler(String beanName) {

        this.beanName = beanName;

    }

    public CallBackExcuteHandler(String beanName, List<InetSocketAddress> remoteAddresses) {

        this.beanName = beanName;

        this.remoteAddresses = remoteAddresses;

    }

    public CallBackExcuteHandler(String beanName, List<InetSocketAddress> remoteAddresses, LoadBalancedStrategy loadBalancedStrategy) {

        this.beanName = beanName;

        this.remoteAddresses = remoteAddresses;

        this.loadBalancedStrategy = loadBalancedStrategy;

    }

    public CallBackExcuteHandler() {

    }

    /**

     * 线程执行

     *

     * @return

     * @throws Exception

     */

    @Override

    public MessageCallback call() throws Exception {

        if (CollectionUtils.isEmpty(remoteAddresses)) {

            List<ServiceAddressConfig> remoteUrls = ServiceRemoteUrlContext.getInstance().getRemoteUrls(beanName);

            if (CollectionUtils.isEmpty(remoteUrls)) {

                throw new RuntimeException("服务 [" + beanName + " ]远程地址错误");

            }

        }

        int size = remoteAddresses.size();

        int idx = loadBalancedStrategy.strategy(size);

        InetSocketAddress inetSocketAddress = remoteAddresses.get(idx);

        System.out.println("返回的地址" + inetSocketAddress + "  idx=" + idx);

        MessageCallback messageCallback = new MessageCallback();

        return messageCallback;

    }

}
具体逻辑就是看call,这里就是处理的具体逻辑,这个逻辑其实就是处理Netty网络通信的内容,等下章开始讲解,这一章主要通过搭建具体的框架,之后补充细节。这里远程地址为空的话,去远程地址管理上下文获取,接着通过一个负载均衡策略对象,返回其中一个地址的index。通过这种方式实现负载均衡调用。
远程地址管理上下文对象代码如下:
public class ServiceRemoteUrlContext {

    private Map<String, List<ServiceAddressConfig>> remoteUrls;

    private volatile static ServiceRemoteUrlContext context;

    private ServiceRemoteUrlContext() {

    }

    public static ServiceRemoteUrlContext getInstance() {

        if (context == null) {

            synchronized (ServiceRemoteUrlContext.class) {

                if (context == null) {

                    context = new ServiceRemoteUrlContext();

                    context.remoteUrls = new HashMap<>();

                }

            }

        }

        return context;

    }

    /**

     * 添加一个远程地址,地址从service-url.properties 获取

     *

     * @param beanName

     * @param serviceAddressConfig

     * @return

     */

    public boolean addServiceAddress(String beanName, ServiceAddressConfig serviceAddressConfig) {

        if (StringUtils.isEmpty(beanName) || serviceAddressConfig == null) {

            return false;

        }

        synchronized (remoteUrls) {

            if (remoteUrls.get(beanName) == null) {

                List<ServiceAddressConfig> remoteAddress = new ArrayList<>();

                remoteAddress.add(serviceAddressConfig);

                remoteUrls.put(beanName, remoteAddress);

            } else {

                List<ServiceAddressConfig> serviceAddressConfigs = remoteUrls.get(beanName);

                if (serviceAddressConfigs.contains(serviceAddressConfig)) {

                    return false;

                }

                serviceAddressConfigs.add(serviceAddressConfig);

                return true;

            }

        }

        return false;

    }

    /**

     * 获取一个服务的远程地址 ,beanName like "com.qee.rpc.config.test.HelloService"

     *

     * @param beanName

     * @return

     */

    public List<ServiceAddressConfig> getRemoteUrls(String beanName) {

        return remoteUrls.get(beanName);

    }

}
负载均衡的接口,代码如下:
public interface LoadBalancedStrategy {

    /**

     * 从 0 -size-1 获取一个值

     *

     * @param size

     * @return

     */

    int strategy(int size);

}
现在只实现了1中,轮询方法,之后可以写成可配置,代码如下:
public class RollPolingStrategy implements LoadBalancedStrategy {

    private int currentValue = 0;

    private Class<?> clazz;

    public RollPolingStrategy(Class<?> clazz) {

        this.clazz = clazz;

    }

    @Override

    public int strategy(int size) {

        synchronized (clazz) {

            int nextValue = (currentValue + 1) % size;

            currentValue = nextValue;

            if (currentValue > size) {

                nextValue = 0;

            }

            return currentValue;

        }

    }

}
接着,我们需要看一下简单的ExcuteManager类,代码如下:
public class ExcuteManager {

    /**

     * 默认是200个线程

     */

    private static final int DEFAULT_THRED_NUM = 200;

    /**

     * 超时时间为1秒

     */

    private static final int DEFAULT_TIME_OUT_TIME = 1000;

    private static ExecutorService executorService = Executors.newFixedThreadPool(DEFAULT_THRED_NUM);

    public static MessageCallback invoke(Callable<MessageCallback> call) {

        Future<MessageCallback> submit = executorService.submit(call);

        try {

            return submit.get(DEFAULT_TIME_OUT_TIME, TimeUnit.MILLISECONDS);

        } catch (InterruptedException e) {

            submit.cancel(true);

            throw new RuntimeException("the method is interupted ", e);

        } catch (ExecutionException e) {

            submit.cancel(true);

            throw new RuntimeException("the method cal excute exception", e);

        } catch (TimeoutException e) {

            System.out.println(Thread.currentThread().getName());

            submit.cancel(true);

            throw new RuntimeException("the method call is time out  ", e);

        }

    }

    public static void shutdown() {

        executorService.shutdown();

    }

    public static void shutdownNow() {

        executorService.shutdownNow();

    }

}
这些参数,在后面都做成可配置的。
最后一步了,就是需要生产一个代理对象,并把代理对象注册到Spring容器里面。那么Spring的 BeanPostProcessor可以为我们解决问题,看代码如下:
@Component

public class RegisterRpcProxyBeanProcessor implements BeanPostProcessor, BeanFactoryAware {

    private BeanFactory beanFactory;

    @Override

    public Object postProcessBeforeInitialization(Object bean, String beanName) throws BeansException {

        return bean;

    }

    @Override

    public Object postProcessAfterInitialization(Object bean, String beanName) throws BeansException {

        Object target = bean;

        if (bean instanceof LightWeightRPCElement) {

        //如果是LightWeightRPCElement,则强转,否则不处理

            LightWeightRPCElement rpcElement = (LightWeightRPCElement) bean;

           // 接着就是获取 之前XML 的属性值

            Class<?> clazz = null;

            if (!StringUtils.isEmpty(rpcElement.getInterfaces())) {

                try {

                    clazz = Class.forName(rpcElement.getInterfaces());

                } catch (ClassNotFoundException e) {

                    throw new RuntimeException("获取 [" + rpcElement.getInterfaces() + " ] class字节码失败");

                }

            }

             //通过ServiceRemoteUrlContext得到这个接口的远程端口和地址

            List<ServiceAddressConfig> remoteUrls = ServiceRemoteUrlContext.getInstance().getRemoteUrls(rpcElement.getInterfaces());

            List<InetSocketAddress> remoteAddressList = ExtractUtil.extractList(remoteUrls, "remoteAddress", ServiceAddressConfig.class);

            CallBackExcuteHandler callBackExcuteHandler = new CallBackExcuteHandler(rpcElement.getInterfaces(), remoteAddressList,new RollPolingStrategy(clazz));

            InterfaceProxyHandler interfaceProxyHandler = new InterfaceProxyHandler(callBackExcuteHandler);

            //这里之后可以优化为各种方式产生动态代理,如cglib等

            target = Proxy.newProxyInstance(bean.getClass().getClassLoader(), new Class[]{clazz}, interfaceProxyHandler);

            if (beanFactory instanceof DefaultListableBeanFactory) {

                //这里就是动态注册对象,把动态代理对象注册到Spring上

                DefaultListableBeanFactory defaultFactory = (DefaultListableBeanFactory) beanFactory;

                defaultFactory.registerSingleton(rpcElement.getBeanName(), target);

            }

        }

        return target;

    }

    @Override

    public void setBeanFactory(BeanFactory beanFactory) throws BeansException {

        this.beanFactory = beanFactory;

    }
从上面的注释大家应该也非常的清楚了,现在只剩下最后一步了,如何获取该接口的远程服务地址和端口,dubbo是通过注册中心zookeeper,而这里的简单的采用配置,例子如下:
com.qee.rpc.config.test.HelloService 127.0.0.1:8888,127.0.0.1:7777,127.0.0.1:9999
对,就是在一个properties文件上 通过服务接口全称 和指定远程服务主机和端口。之后可以改为有注册中心的方式。现在我们来看一下读取这个配置的类,代码如下:
@Component

public class ServiceRemoteUrlsInit implements InitializingBean {

    /**

     * 远程服务配置地址路径,默认

     */

    @Value("${remote-urls-path:classpath:service-urls.properties}")

    private String remoteUrlsPropertyPath;

    @Override

    public void afterPropertiesSet() throws Exception {

        Properties pps = new Properties();

        if (!remoteUrlsPropertyPath.startsWith("classpath")) {

            throw new RuntimeException(remoteUrlsPropertyPath + "不存在");

        }

        String[] filePath = remoteUrlsPropertyPath.split(":");

        if (filePath == null || filePath.length != 2) {

            throw new RuntimeException(remoteUrlsPropertyPath + "内容配置错误");

        }

        ClassPathResource resource = new ClassPathResource(filePath[1]);

        InputStream in = new BufferedInputStream(resource.getInputStream());

        pps.load(in);

        Enumeration en = pps.propertyNames();

        while (en.hasMoreElements()) {

            String beanName = (String) en.nextElement();

            String strRemoteUrls = pps.getProperty(beanName);

            String[] remoteUrls = strRemoteUrls.split(",");

            if (remoteUrls == null || remoteUrls.length == 0) {

                break;

            }

            for (String remoteUrl : remoteUrls) {

                String[] hostPort = remoteUrl.split(":");

                if (hostPort == null || hostPort.length != 2) {

                    throw new RuntimeException(remoteUrlsPropertyPath + " 配置内容错误");

                }

                ServiceAddressConfig serviceAddressConfig = new ServiceAddressConfig();

                serviceAddressConfig.setBeanName(beanName);

                serviceAddressConfig.setHostName(hostPort[0]);

                serviceAddressConfig.setRemotePort(Integer.valueOf(hostPort[1]));

                InetSocketAddress socketAddress = new InetSocketAddress(serviceAddressConfig.getHostName(), serviceAddressConfig.getRemotePort());

                serviceAddressConfig.setRemoteAddress(socketAddress);

                ServiceRemoteUrlContext.getInstance().addServiceAddress(beanName, serviceAddressConfig);

            }

        }

    }

}
代码比较简单,就是实现 InitializingBean这个Spring接口,Spring启动在Bean创建后,初始化 afterPropertiesSet()这个配置,在这个方法里面读取类路径的配置文件。最后我们来运行一个例子。还是HelloService.我们有一个Invoker类,需要注入HelloService 对象调用。代码如下:
@Component

public class Invoker {

    @Autowired

    private HelloService helloService;

    @Resource(name = "helloService")

    private HelloService helloService2;

    public void print() {

        helloService.hello("123");

        helloService2.hello("122344");

    }

}
然后通过SpringBoot 启动测试:
@ComponentScan(basePackages = "com.qee.rpc")

@EnableAutoConfiguration

public class App {

    private static ExecutorService executorService = Executors.newCachedThreadPool();

    private static final CountDownLatch cd = new CountDownLatch(1);

    public static void main(String[] args) {

        try {

            SpringApplication.run(App.class, args);

            System.out.println("the main Thread :" + Thread.currentThread().getName());

            final Invoker invoker = (Invoker) ApplicationContextUtils.getBean("invoker");

            for (int i = 0; i < 300; i++) {

                executorService.execute(new Runnable() {

                    @Override

                    public void run() {

                        try {

                            cd.await();

                        } catch (InterruptedException e) {

                            e.printStackTrace();

                        }

                        invoker.print();

                    }

                });

            }

            cd.countDown();

            Thread.sleep(100000);

        } catch (InterruptedException e) {

            e.printStackTrace();

        } finally {

            ExcuteManager.shutdown();

            executorService.shutdown();

        }

    }
有300个线程去调这个 invoker.print();修改一下 InterfaceProxyHandler的invoke方法,因为我们底层的通信还没完成。所以以
System.out.println("在InterfaceProxyHandler上调用invoke方法,参数是=" + args[0]);
以这个语句来测试一下代码,其中这个大致框架已经上传到gitHub:https://github.com/vOoT/light-weight-rpc, 有什么建议和问题,大家一起讨论吧。最后贴一下执行结果:
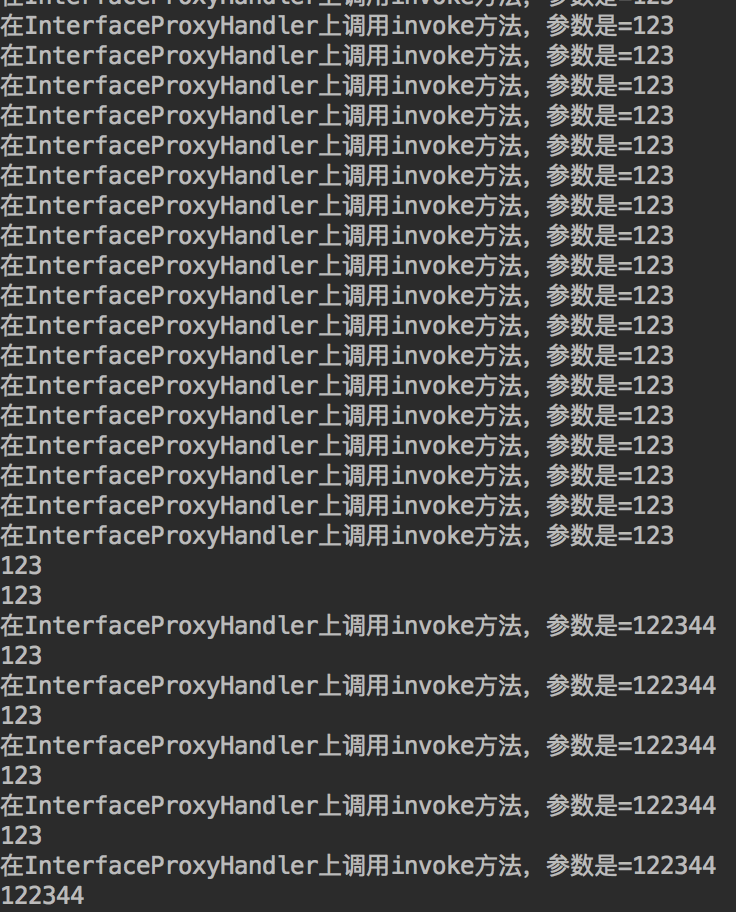
哈哈哈,这样我们是不是就是可以通过Spring注解 @Autowired 和 @Resource 来注入动态对象。
Netty自娱自乐之类Dubbo RPC 框架设计构想 【上篇】的更多相关文章
- SpringCloud Alibaba (四):Dubbo RPC框架
Dubbo简介 Apache Dubbo |ˈdʌbəʊ| 是一款高性能.轻量级的开源Java RPC框架,它提供了三大核心能力:面向接口的远程方法调用,智能容错和负载均衡,以及服务自动注册和发现.致 ...
- 房产基于Swoole的PHP RPC框架设计
房产基于Swoole的PHP RPC框架设计 https://mp.weixin.qq.com/s/XSrKEQ-0q4DvjOGTIwYYzg
- RPC 框架设计
RPC 框架设计 初识 RPC 服务化有什么好处? 防止代码拷贝 防止底层复杂性的扩散 防止公共库的耦合 保证 SQL 的质量,能够解除数据库的耦合 什么是 RPC RPC:Remote Proced ...
- 手把手教你基于Netty实现一个基础的RPC框架(通俗易懂)
阅读这篇文章之前,建议先阅读和这篇文章关联的内容. [1]详细剖析分布式微服务架构下网络通信的底层实现原理(图解) [2][年薪60W的技巧]工作了5年,你真的理解Netty以及为什么要用吗?(深度干 ...
- 从零开始手写 dubbo rpc 框架
rpc rpc 是基于 netty 实现的 java rpc 框架,类似于 dubbo. 主要用于个人学习,由渐入深,理解 rpc 的底层实现原理. 前言 工作至今,接触 rpc 框架已经有很长时间. ...
- Netty + Spring + ZooKeeper搭建轻量级RPC框架
本文参考 本篇文章主要参考自OSCHINA上的一篇"轻量级分布式 RPC 框架",因为原文对代码的注释和讲解较少,所以我打算对这篇文章的部分关键代码做出一些详细的解释 在本篇文章中 ...
- RPC框架设计思路
RPC是指远程过程调用 1.要解决通讯的问题,主要是通过在客户端和服务器之间建立TCP连接,远程过程调用的所有交换的数据都在这个连接里传输.连接可以是按需连接,调用结束后就断掉,也可以是长连接,多个远 ...
- Netty自娱自乐之协议栈设计
---恢复内容开始--- 俺工作已经一年又6个月了,想想过的真快,每天写业务,写业务,写业务.......然后就是祈祷着,这次上线不要出现线上bug.继续这每天无聊的增删改查,学习学习一下自己感兴趣的 ...
- 全图文分析:如何利用Google的protobuf,来思考、设计、实现自己的RPC框架
目录 一.前言 二.RPC 基础概念 1. RPC 是什么? 2. 需要解决什么问题? 3. 有哪些开源实现? 三.protobuf 基本使用 1. 基本知识 2. 使用步骤 四.libevent 1 ...
随机推荐
- 1. 数字根(Digital Root)
数字根(Digital Root)就是把一个自然数的各位数字相加,再将所得数的各位数字相加,直到所得数为一位数字为止.而这个一位数便是原来数字的数字根.例如: 198的数字根为9(1+9+8=18,1 ...
- 压缩[SCOI2007]
题目描述 给一个由小写字母组成的字符串,我们可以用一种简单的方法来压缩其中的重复信息.压缩后的字符串除了小写字母外还可以(但不必)包含大写字母R与M,其中M标记重复串的开始,R重复从上一个M(如果当前 ...
- mysql索引 索引优缺点
mysql索引索引优化 1.什么是索引?索引是对数据库表中一列或多列的值进行排序的一种结构,使用索引可快速访问数据库表中的特定信息. 2.作用是什么?索引的作用相当于图书的目录,可以根据目录中的页码快 ...
- c++ static用法总结【转载】
static关键字是C, C++中都存在的关键字.static从字面理解,是“静态的“的 意思,与此相对应的,应该是“动态的“. static的作用主要有以下3个: 1.扩展生存期: 2.限制作用域: ...
- 推荐两款Windows管理工具
1.babun(cgywin) 一款包含cgywin的类似linux shell的软件,熟练linux脚本的小伙伴们,一定会在她身上找到快感. 2.pslist 微软官方的一款很强大的bat脚本,很实 ...
- maven系列小技巧之Top3 MVQ(most valuable question)
首先声明,文章系个人原创 ,欢迎转载,转载请注明出处. 对于maven,有大神曾说过:如果你爱他,就请让他用Maven,因为那里是天堂,如果你恨他,就请让他用Maven,因为那里是地狱.尤其是mave ...
- 易云捷讯MySQL云数据库上线,推进IaaS与PaaS融合战略布局
日前宣布,其基于MySQL的关系型云数据库已经正式上线公测,用户可通过易云管理控制台创建.监控与管理mysql数据库.此服务包括在线扩容.自动备份.灵活配置和监控告警等功能,旨在帮助用户实现便捷的运维 ...
- 前端到后台ThinkPHP开发整站(7)
今晚我继续这个项目的前台开发,把前台的做出来了,现在项目进行一个收尾工作了,还有栏目页和一个文章页的开发,做完这两个算是完成了.说到这里感觉有点松懈了,把剩下两个功能页面做完在吹吧,先看看今天弄的代码 ...
- 局部加权回归LOWESS
1. LOWESS 用kNN做平均回归: \[ \hat{f(x)} = Ave(y_i | x_i \in N_k(x)) \] 其中,\(N_k(x)\)为距离点x最近k个点组成的邻域集合(nei ...
- 17个新手常见Python运行时错误
当初学 Python 时,想要弄懂 Python 的错误信息的含义可能有点复杂.这里列出了常见的的一些让你程序 crash 的运行时错误. 1)忘记在 if , elif , else , for , ...