上传jar包到nexus私服
摘要
1通过网页上传
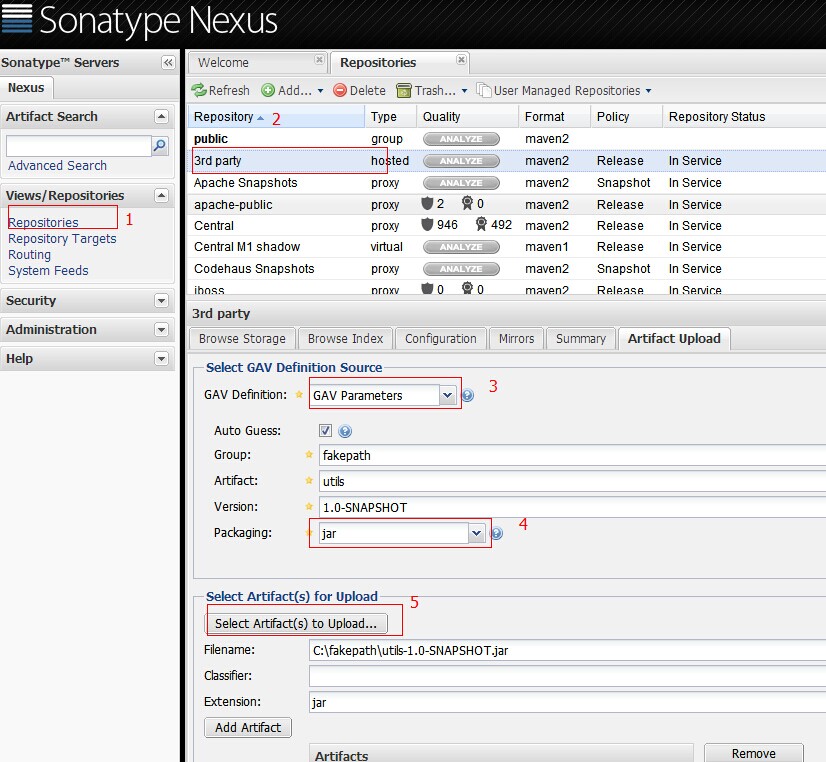
这种方法只是上传了jar包。通过maven引用当前jar,不能取得jar的依赖

from pom的方式,选择pom文件,以及jar。通过maven引入jar时,会自动加载jar的依赖
2通过maven的方式depoly
在maven的conf/setting.xml 配置nexus私服的管理账号
在servers标签下添加server
<server>
<id>nexus-snapshots</id>
<username>repouser</username>
<password>repopwd</password>
</server>
id可自己定义一个名称 以及私服的管理管的账号密码
在mirrors和profiles下配置nexus私服
<mirrors>
<mirror>
<!--This sends everything else to /public -->
<id>nexus</id>
<mirrorOf>*</mirrorOf>
<url>http://192.168.10.8:18080/nexus/content/repositories/releases/</url>
</mirror></mirrors><profiles>
<profile>
<id>nexus</id>
<!--Enable snapshots for the built in central repo to direct -->
<!--all requests to nexus via the mirror -->
<repositories>
<repository>
<id>nexus</id>
<name>local private nexus</name>
<url>http://192.168.10.8:18080/nexus/content/groups/public</url>
<releases><enabled>true</enabled><updatePolicy>always</updatePolicy>
<checksumPolicy>warn</checksumPolicy></releases>
<snapshots><enabled>false</enabled></snapshots>
</repository>
</repositories>
<pluginRepositories>
<pluginRepository>
<id>nexus</id>
<name>local private nexus</name>
<url>http://192.168.10.8:18080/nexus/content/groups/public</url>
<releases><enabled>true</enabled><updatePolicy>always</updatePolicy>
<checksumPolicy>warn</checksumPolicy></releases>
<snapshots><enabled>false</enabled></snapshots>
</pluginRepository>
</pluginRepositories>
</profile></profiles><activeProfiles>
<!--make the profile active all the time -->
<activeProfile>nexus</activeProfile></activeProfiles>
在项目的pom.xml中配置
<distributionManagement>
<repository>
<id>nexus-releases</id>
<name>Nexus Release Repository</name>
<url>http://192.168.10.8:18080/nexus/content/repositories/releases/</url>
</repository>
<snapshotRepository>
<id>nexus-snapshots</id>
<name>Nexus Snapshot Repository</name>
<url>http://192.168.10.8:18080/nexus/content/repositories/snapshots/</url>
</snapshotRepository>
</distributionManagement>
id与settings.xml中的server的id对应
当项目package后
mvn deploy
就可以将jar上传到nexus私服
上传jar包到nexus私服的更多相关文章
- maven上传jar包到nexus私服后的存放路径 以及 使用IDEA上传jar包的步骤
maven上传jar包到nexus私服的方法,网上大神详解很多,那么上传后的jar包存放到哪里了呢? 在下使用nexus3.2.1版本,在本地搭建了私服,使用maven上传jar包.最后结果如下: 点 ...
- (转)上传jar包到nexus私服
场景:在使用私服Nexus时候经常需要上传jar包,但是对上传jar包的方式不是很熟悉,所以很有必要学习下. 1 通过网页上传 GAV Definition:选择GAV Parameters 输入JA ...
- 【转】上传jar包到nexus私服
原文:https://my.oschina.net/lujianing/blog/297128 1通过网页上传 这种方法只是上传了jar包.通过maven引用当前jar,不能取得jar的依赖 from ...
- Maven第四篇【私有仓库、上传jar包、引用私服jar包、上传本地项目到私服】
搭建私有服务器 前面已经说过了,我们使用Maven的使用,如果需要导入相对应的jar包,Maven首先会在我们的本地仓库中寻找->私有仓库->中心仓库- 然而,我们的本地仓库常常没有想要的 ...
- 上传jar包至nexus
上传命令: mvn deploy:deploy-file -DgroupId=com.xxx -DartifactId=xxx-pdf -Dversion=16.10.0 -Dpackaging=ja ...
- 上传jar包至maven私服
1.maven环境变量配置(新建系统变量,编辑Path) 2.修改maven的setting文件 2.1 私服的用户配置 2.2 私服镜像配置 2.3 (我也不知道是啥) <profile> ...
- 上传jar包到nexus
注释掉: org.springframework.boot.autoconfigure.EnableAutoConfiguration=com.meeno.boot.oa.OaAutoConfigur ...
- Nexus3.0搭建私服上传JAR包 Windows10
背景 近期换了一个项目组,用的是公司自研产品,涉及到很多内部JAR包引用,版本号很多,每次更新都是产品部给出jar包,项目组成员各自复制一套本地替换,来了新人各种安装配置,复杂度太高,这不,我一来,又 ...
- 实测Maven上传jar包到私服的方法归纳
Hello,各位小伙伴大家好,我是小栈君.好久不见,最近因为工作的缘故,导致了更新变慢,但是小栈君也在积极的做素材的规划,毕竟学习知识点的归纳和提炼需要一定的时间. 所以还请大家多多见谅,下一期的分享 ...
随机推荐
- Best Practices for Using Alpha
Alpha是图形界面开发中常用的特效,通常我们会使用以下代码来实现Alpha特效: view.setAlpha(0.5f); View.ALPHA.set(view, 0.5f); ObjectAni ...
- CKFinder 2.4 ASP.NET 破解
网上的破解教程对于2.4版本来说已经过时了. 以下是CKFinder 2.4 ASP.NET的亲测可用破解方法,经测试,只需修改两处代码. 打开ckfinder.js, 步骤1. 搜索替换如下代码: ...
- windows 挂载windows 共享盘为本地磁盘
我们在设置数据库自动备份时,为了数据的安全往往需要直接将数据备份到远程服务器上.在Linux可以通过NFS挂载来实现,在Windows平台可以直接通过net use+subst来实现将远程服务器的目录 ...
- StringHelpers
public class StringHelpers { public const char QUERY_STRING_DELIMITER = '&'; private static Rijn ...
- c++通过jnihelper调用java方法刷新androidUI的注意事项
2dx android项目需接入第三方sdk完成支付,玩家点击充值界面,通过jnihelper来调用java的方法并弹出android组件界面,之前采用直调的简单方法,顺利的把参数传到java层,但后 ...
- Linux Mono Asp.net 部署方案
1.Jexus 国内的 官网:http://www.jexus.org 2.Apache 官网:http://mono-project.com/Mod_mono 3.Nginx 官网:http://m ...
- 开发服务器端——工程配置
概述: 服务器开发,一般分为 主程序类Project(主函数main) 流程控制类Kernel(处理收到的数据) 网络类Network(数据的收发) 公共类Common(定义一些常量和结构体,自 ...
- [Unix.C]Files and Directories
stat, fstat, and lstat Functions 本部分讨论的内容主要围绕3个stat函数及其返回值. #include <sys/stat.h> int stat(co ...
- man命令
man,这个命令,非常好!后续,更新
- hdoj 1896 Stones【优先队列】
Stones Time Limit: 5000/3000 MS (Java/Others) Memory Limit: 65535/32768 K (Java/Others)Total Subm ...