iOS自定义拍照框拍照&裁剪(一)
卡片机时代
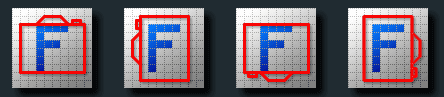
很重要的一点是,相机本身是没有方向概念的,它不理解拍摄的内容,只会以相机自己的坐标系去保存数据,下图展示了相机对“F”进行四个角度拍摄时返回的图片数据。

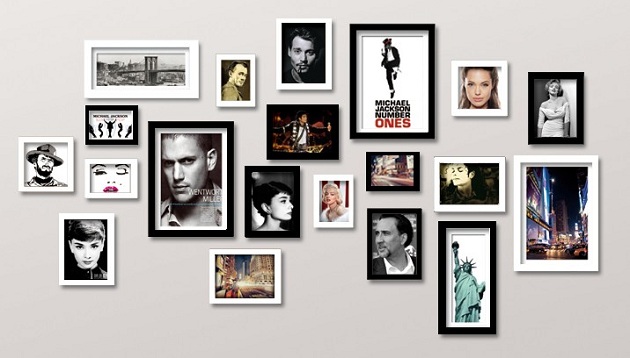
最初的卡片机时代,照片都会经由底片洗出来,那时不存在照片的方向问题,我们总可以把洗出来的照片通过简单的旋转来进行观看。比如这张照片墙中的照片,你能否说哪些照片是横着?哪些颠倒着?你甚至都无法判断每张照片相机是以何种角度拍摄的,因为每张都已经旋转至适合观看的角度。
数码时代
可是到了数码时代,不再需要底片,照片需要被存成一个图像文件。对于上面的拍摄角度,存储方式并没有变化,所有的场景仍然是以相机的坐标系来保存。于是这些照片仍像上面一样,原封不动的保存了下来。

虽然存储方式不变,和卡机机时代的实体相片不同的是,由于电子设备可不知道照片应该如何旋转,只能够以它存储于磁盘中的方向来展示。这便是为何照片传到电脑上之后,会出现横了,或者颠倒的情况。
方向传感器
为了克服这一情况,让照片可以真实的反应人们拍摄时看到的场景,现在很多相机中就加入了方向传感器,它能够记录下拍摄时相机的方向,并将这一信息保存在照片中。照片的存储方式还是没有任何改变,它仍然是以相机的坐标系来保存,只是当相机来浏览这些照片时,相机可以根据照片中的方向信息,结合此时相机的方向,对照片进行旋转,从而转到适合人们观看的角度。
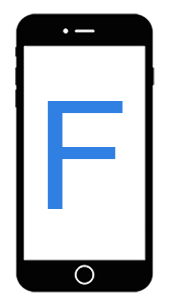
iPhone上的情况
在iOS的设备中也包含了方向传感器,它但是它默认的照片方向并不是竖着拿手机时的情况,而是横向,即Home键在右侧,如下:
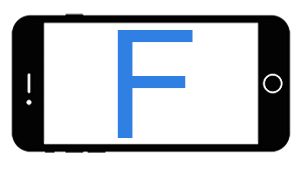
如此一来,如果竖着拿手机拍摄时,就相当于对手机顺时针旋转了90度,也即上面相机图片中的最后一幅
iPhone拍照方向问题处理
iPhone通过API获取到的是图片内容数据,不带方向信息,此时,我们需要手动的根据传感器方向将方向信息填充进去,并且根据方向信息对照片进行相应的旋转,得到人类视角正向的图片。代码如下:
//iOS11以上支持AVCapturePhotoOutput代理

- (void)captureOutput:(AVCapturePhotoOutput *)output didFinishProcessingPhoto:(AVCapturePhoto *)photo

                error:(NSError *)error {

    if (error) {

            NSLog(@"获取图片错误 --- %@",error.localizedDescription);

        }

        if (photo) {

           UIImageOrientation orient = UIImageOrientationUp;

            //后置摄像头

            if (self.shootingOrientation == UIDeviceOrientationLandscapeRight){

                orient = UIImageOrientationDown;

            }else if(self.shootingOrientation == UIDeviceOrientationPortrait){

                orient = UIImageOrientationRight;

            }else if(self.shootingOrientation == UIDeviceOrientationLandscapeLeft){

                orient = UIImageOrientationUp;

            }else if(self.shootingOrientation == UIDeviceOrientationPortraitUpsideDown){

                orient = UIImageOrientationLeft;

            }

            //前置摄像头

            AVCaptureDevice *currentDevice = [self.videoWriterManager.videoInput device];

            AVCaptureDevicePosition currentPosition = [currentDevice position];

            if (currentPosition == AVCaptureDevicePositionFront){

                //前置摄像头

                if (self.shootingOrientation == UIDeviceOrientationLandscapeRight){

                    orient = UIImageOrientationUp;

                }else if(self.shootingOrientation == UIDeviceOrientationLandscapeLeft){

                    orient = UIImageOrientationDown;

                }

            }

            UIImage *image = [UIImage imageWithCGImage:photo.CGImageRepresentation scale:1 orientation:orient];

            //图片修正为人类视角看起来正向的图片

            //[self fixOrientation:image];

        }

}

//将原始图片数据调整为 人类视角正向的图片

- (UIImage *)fixOrientation:(UIImage *)image{

    // No-op if the orientation is already correct

    if (image.imageOrientation == UIImageOrientationUp) return image;

    // We need to calculate the proper transformation to make the image upright.

    // We do it in 2 steps: Rotate if Left/Right/Down, and then flip if Mirrored.

    CGAffineTransform transform = CGAffineTransformIdentity;

    CGFloat imageWidth = CGImageGetWidth(image.CGImage);

    CGFloat imageHeight = CGImageGetHeight(image.CGImage);

    //创建的位图宽高

    CGFloat contextWidth = imageWidth < imageHeight ? imageWidth : imageHeight;

    CGFloat contextHeight = imageWidth > imageHeight ? imageWidth : imageHeight;

    switch (image.imageOrientation) {

        case UIImageOrientationDown:

        case UIImageOrientationDownMirrored:{

                //创建横着显示的位图上下文,宽大于高

                CGFloat temp = contextWidth;

                contextWidth = contextHeight;

                contextHeight = temp;

                //旋转180度

                transform = CGAffineTransformTranslate(transform, contextWidth, contextHeight);

                transform = CGAffineTransformRotate(transform, M_PI);

            }

            break;

        case UIImageOrientationLeft:

        case UIImageOrientationLeftMirrored:

            //逆时针旋转90度

            transform = CGAffineTransformTranslate(transform, contextWidth, 0);

            transform = CGAffineTransformRotate(transform, M_PI_2);

            break;

        case UIImageOrientationRight:

        case UIImageOrientationRightMirrored:

            //顺时针90度

            transform = CGAffineTransformTranslate(transform, 0, contextHeight);

            transform = CGAffineTransformRotate(transform, -M_PI_2);

            break;

        default:

            break;

    }

    switch (image.imageOrientation) {

        case UIImageOrientationUpMirrored:

        case UIImageOrientationDownMirrored:

            //镜像图片Y轴翻转坐标系

            transform = CGAffineTransformTranslate(transform, contextWidth, 0);

            transform = CGAffineTransformScale(transform, -1, 1);

            break;

        case UIImageOrientationLeftMirrored:

        case UIImageOrientationRightMirrored:

            //镜像图片Y轴翻转坐标系

            transform = CGAffineTransformTranslate(transform, contextHeight, 0);

            transform = CGAffineTransformScale(transform, -1, 1);

            break;

        default:

            break;

    }

    //创建竖直显示的画布

    CGContextRef ctx = CGBitmapContextCreate(NULL, contextWidth, contextHeight,

                                             CGImageGetBitsPerComponent(image.CGImage), 0,

                                             CGImageGetColorSpace(image.CGImage),

                                             CGImageGetBitmapInfo(image.CGImage));

    CGContextConcatCTM(ctx, transform);

    CGContextDrawImage(ctx, CGRectMake(0, 0, imageWidth, imageHeight), image.CGImage);

    // And now we just create a new UIImage from the drawing context

    CGImageRef cgimg = CGBitmapContextCreateImage(ctx);

    UIImage *img = [UIImage imageWithCGImage:cgimg];

    CGContextRelease(ctx);

    CGImageRelease(cgimg);

    return img;

}
图片来源于(https://feihu.me/blog/2015/how-to-handle-image-orientation-on-iOS/)
参考 https://feihu.me/blog/2015/how-to-handle-image-orientation-on-iOS/
iOS自定义拍照框拍照&裁剪(一)的更多相关文章
- iOS Swift WisdomScanKit二维码扫码SDK,自定义全屏拍照SDK,系统相册图片浏览,编辑SDK
iOS Swift WisdomScanKit 是一款强大的集二维码扫码,自定义全屏拍照,系统相册图片编辑多选和系统相册图片浏览功能于一身的 Framework SDK [1]前言: 今天给大家 ...
- 如何用uniapp+vue开发自定义相机插件——拍照+录像功能
调用手机的相机功能并实现拍照和录像是很多APP与插件都必不可少的一个功能,今天智密科技就来分享一下如何基于uniapp + vue实现自定义相机界面,并且实现: 1: 自定义拍照 2: 自定义录像 3 ...
- Android Camera开发系列(下)——自定义Camera实现拍照查看图片等功能
Android Camera开发系列(下)--自定义Camera实现拍照查看图片等功能 Android Camera开发系列(上)--Camera的基本调用与实现拍照功能以及获取拍照图片加载大图片 上 ...
- ios手机竖屏拍照图片旋转90°问题解决方法
手机拍照会给图片添加一个Orientaion信息(即拍照方向),如下: 用ios手机拍照,系统会给图片加上一个方向的属性, ios相机默认的拍照方向是后摄Home键在右为正,前摄Home键在左为正. ...
- iOS开发UI篇 -- UISearchBar 属性、方法详解及应用(自定义搜索框样式)
很多APP都会涉及到搜索框,苹果也为我们提供了默认的搜索框UISearchBar.但实际项目中我们通常需要更改系统默认搜索框的样式.为了实现这一目标,我们需要先搞懂 UISearchBar 的属性及方 ...
- iOS自定义的UISwitch按钮
UISwitch开关控件 开关代替了点选框.开关是到目前为止用起来最简单的控件,不过仍然可以作一定程度的定制化. 一.创建 UISwitch* mySwitch = [[ UISwitchalloc] ...
- vue3系列:vue3.0自定义弹框组件V3Popup|vue3.x手机端弹框组件
基于Vue3.0开发的轻量级手机端弹框组件V3Popup. 之前有分享一个vue2.x移动端弹框组件,今天给大家带来的是Vue3实现自定义弹框组件. V3Popup 基于vue3.x实现的移动端弹出框 ...
- 【iOS自定义键盘及键盘切换】详解
[iOS自定义键盘]详解 实现效果展示: 一.实现的协议方法代码 #import <UIKit/UIKit.h> //创建自定义键盘协议 @protocol XFG_KeyBoardDel ...
- 在ASP.NET中引用自定义提示框
在html网页中自定义提示框 正文: 在一般的B/S架构中项目,与用户的交互信息是非常重要的.在一般的情况下,设计人员都在把用户信息呈现在html中,用div和span去弹出相关信息.对于一般的情况而 ...
随机推荐
- Flink与Strom两个框架的对比分析
一.Flink与Storm两个框架的对比 二.Flink 的特性 1.高吞吐.低延迟.高性能 2.支持带事件的窗口(window) 操作:time.count.session.data-driven ...
- 查询ES6兼容的网站
http://kangax.github.io/compat-table/es6/ 查询es6兼容的网站
- Ubuntu16.04 Linux 下无痛安装、配置Gogs
本文在Win7+VMware的ubuntu 16.04中测试,安装Gogs,Install from binary. 准备工作: sudo apt-get install git sudo addus ...
- 浅析 Dapr 里的云计算设计模式
Dapr 实际上是把分布式系统 与微服务架构实践的挑战以及k8s 这三个主题的全方位的设计组合,特别是Kubernetes设计模式 一书作者Bilgin Ibryam 提出的Multi-Runtime ...
- 从一个跨二十年的glibc bug说起
1. 缘起 这几天调gcc 7.5.0 +glibc 2.23的交叉编译工具链,由于gcc 7.5.0的默认打开Werr,偶然发现了glibc一个隐藏了二十年的世纪大bug. 这个bug在glibc ...
- Identity角色管理二(显示角色)
需要将目前所有角色名显示出来,方法同用户管理 一.创建Index acction public async Task<ActionResult> Index() { var roles = ...
- python库--tensorflow--RNN(循环神经网络相关)
类/方法 返回值类型 参数 说明 tf.contrib.rnn① / tf.nn.rnn_cell② .RNNCell() 实例r 看不懂 trainable=True name=None d ...
- PHP中一个好玩的性别判断扩展
今天我们来学习的一个扩展同时它也是非常小众的一个扩展,其实说白了,或许是根本没什么人用过得扩展.当然,我们也只是出于学习的目的来看看这个扩展到底是什么东西,有什么好玩的地方. 扩展说明 Gender ...
- PHP中的PDO操作学习(三)预处理类及绑定数据
要说 PDO 中最强大的功能,除了为不同的数据库提供了统一的接口之外,更重要的就是它的预处理能力,也就是 PDOStatement 所提供的功能.因为它的存在,才让我们可以安心地去使用而不用操心 SQ ...
- css 限制字数
text-overflow: ellipsis; overflow: hidden; 不过需设置宽高