Spring Security + OAuth2 + JWT 基本使用
Spring Security + OAuth2 + JWT 基本使用
前面学习了 Spring Security 入门,现在搭配 oauth2 + JWT 进行测试。
1、什么是 OAuth2
OAuth 是一个关于授权(authorization)的开放网络标准,使得第三方应用可以使用该令牌在限定时间、限定范围访问指定资源。在全世界得到广泛应用,目前的版本是2.0版。
1.1、关于 OAuth2 的几个重要概念:
resource owner: 拥有被访问资源的用户user-agent: 一般来说就是浏览器client: 第三方应用Authorization server: 认证服务器,用来进行用户认证并颁发tokenResource server:资源服务器,拥有被访问资源的服务器,需要通过token来确定是否有权限访问
1.2、握手流程
明确概念后,就可以看 OAuth2 的协议握手流程,摘自RFC6749
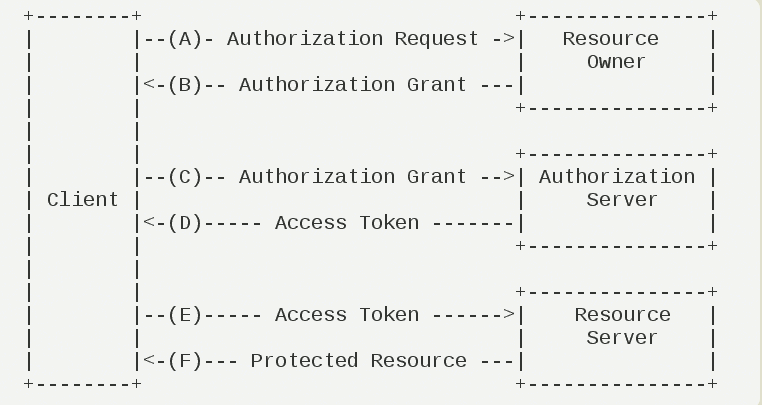
(A)用户打开客户端以后,客户端要求用户给予授权。
(B)用户同意给予客户端授权。
(C)客户端使用上一步获得的授权,向认证服务器申请令牌。
(D)认证服务器对客户端进行认证以后,确认无误,同意发放令牌。
(E)客户端使用令牌,向资源服务器申请获取资源。
(F)资源服务器确认令牌无误,同意向客户端开放资源
1.3、授权模式
oauth2根据使用场景不同,分成了4种模式
- 授权码模式(authorization code)
- 简化模式(implicit)
- 密码模式(resource owner password credentials)
- 客户端模式(client credentials)
授权码模式使用到了回调地址,是最为复杂的方式,通常网站中经常出现的微博,qq第三方登录,都会采用这个形式。简化模式不常用。
2、配置
使用oauth2保护你的应用,可以分为简易的分为三个步骤
- 配置资源服务器
- 配置授权服务器
- 配置spring security
2.1、maven 依赖配置
这里直接引入 spring-cloud oauth2,更加方便之后的拓展。
<!--spring boot-->

<parent>

    <groupId>org.springframework.boot</groupId>

    <artifactId>spring-boot-starter-parent</artifactId>

    <version>2.2.13.RELEASE</version>

    <relativePath/> <!-- lookup parent from repository -->

</parent>

<dependencies>

    <!--spring cloud oauth2-->

    <dependency>

        <groupId>org.springframework.cloud</groupId>

        <artifactId>spring-cloud-starter-oauth2</artifactId>

    </dependency>

    <!--spring cloud security-->

    <dependency>

        <groupId>org.springframework.cloud</groupId>

        <artifactId>spring-cloud-starter-security</artifactId>

    </dependency>

    <!--JWT-->

    <dependency>

        <groupId>io.jsonwebtoken</groupId>

        <artifactId>jjwt</artifactId>

        <version>0.9.1</version>

    </dependency>

</dependencies>

<!--spring cloud-->

<dependencyManagement>

    <dependencies>

        <dependency>

            <groupId>org.springframework.cloud</groupId>

            <artifactId>spring-cloud-dependencies</artifactId>

            <version>Greenwich.SR2</version>

            <type>pom</type>

            <scope>import</scope>

        </dependency>

    </dependencies>

</dependencyManagement>
2.2、配置授权服务器
这里需要进行访问客户端的配置,并配置授权类型和access_token转jwtToken。
@Configuration

@EnableAuthorizationServer

public class AuthorizationServerConfig extends AuthorizationServerConfigurerAdapter {

    @Autowired

    private BCryptPasswordEncoder bCryptPasswordEncoder;

    @Autowired

    private AuthenticationManager authenticationManager;

    @Autowired

    private UserDetailServiceImpl userDetailService;

    @Autowired

    @Qualifier("jwtTokenStore")

    private TokenStore tokenStore;

    @Autowired

    private JwtAccessTokenConverter jwtAccessTokenConverter;

    @Autowired

    private JwtTokenEnhancer jwtTokenEnhancer;

    /**

     * 配置授权类型

     *

     * @param endpoints

     * @throws Exception

     */

    @Override

    public void configure(AuthorizationServerEndpointsConfigurer endpoints) throws Exception {

        //设置Jwt内容增强

        TokenEnhancerChain tokenEnhancerChain = new TokenEnhancerChain();

        List<TokenEnhancer> list = new ArrayList<>();

        list.add(jwtTokenEnhancer);

        list.add(jwtAccessTokenConverter);

        tokenEnhancerChain.setTokenEnhancers(list);

        endpoints

                //密码模式必须配置

                .authenticationManager(authenticationManager)

                //密码模式必须配置

                .userDetailsService(userDetailService)

                //accessToken转JwtToken

                .tokenStore(tokenStore)

                .accessTokenConverter(jwtAccessTokenConverter)

                //jwt内容增强

                .tokenEnhancer(tokenEnhancerChain);

    }

    /**

     * 配置客户端详情信息

     *

     * @param clients

     * @throws Exception

     */

    @Override

    public void configure(ClientDetailsServiceConfigurer clients) throws Exception {

        clients.

                //基于内存配置

                inMemory()

                //客户端ID

                .withClient("client")

                //密钥

                .secret(bCryptPasswordEncoder.encode("112233"))

                //重定向地址

                .redirectUris("http://www.baidu.com")

                //授权范围

                .scopes("all")

                //accessToken有效时间

                .accessTokenValiditySeconds(60)

                //refreshToken有效时间

                .refreshTokenValiditySeconds(3600)

                /**

                 * 授权类型

                 * authorization_code:授权码模式

                 * password:密码模式

                 * refresh_token:刷新令牌

                 */

                .authorizedGrantTypes("authorization_code", "password", "refresh_token");

    }

}
2.3、配置资源服务器
继承 ResourceServerConfigurerAdapter并添加 @EnableResourceServer注解
@Configuration

@EnableResourceServer

public class ResourceServerConfig extends ResourceServerConfigurerAdapter {

    @Override

    public void configure(HttpSecurity http) throws Exception {

        http.authorizeRequests()

                //拦截所有请求

                .anyRequest()

                .authenticated()

                .and()

                //spring secuity提供了requestMatchers接口,等价于http.authorizeRequests().anyRequest().access("permitAll");

                //提供资源,访问/user需要权限认证

                .requestMatchers()

                .antMatchers("/user/**");

    }

}
2.4、JWT 配置
2.4.1、accessToken 转 JwtToken 配置类
主要工作是创建 JwtAccessTokenConverter并设置密钥,并注入到 Bean 管理容器中。
/**

 * accessToken转JwtToken配置

 */

@Configuration

public class JwtTokenStoreConfig {

    @Bean

    public JwtTokenStore jwtTokenStore() {

        return new JwtTokenStore(jwtAccessTokenConverter());

    }

    @Bean

    public JwtAccessTokenConverter jwtAccessTokenConverter() {

        JwtAccessTokenConverter jwtAccessTokenConverter = new JwtAccessTokenConverter();

        //设置jwt密钥

        jwtAccessTokenConverter.setSigningKey("test_key");

        return jwtAccessTokenConverter;

    }

    @Bean

    public JwtTokenEnhancer jwtTokenEnhancer() {

        return new JwtTokenEnhancer();

    }

}
2.4.2、JwtToken内容拓展配置类
当 accessToken 转 jwtToken时,如果想往令牌中加入自定义用户信息,例如登录时间点,可以配置以下类:
/**

 * JwtToken内容拓展配置类

 * @author Lin

 */

public class JwtTokenEnhancer implements TokenEnhancer {

    @Override

    public OAuth2AccessToken enhance(OAuth2AccessToken oAuth2AccessToken, OAuth2Authentication oAuth2Authentication) {

        Map<String, Object> map = new HashMap<>();

        map.put("enhance", "enhance info");

        ((DefaultOAuth2AccessToken)oAuth2AccessToken).setAdditionalInformation(map);

        return oAuth2AccessToken;

    }

}
2.5、配置 spring security
/**

 * spring security配置类

 */

@Configuration

@EnableWebSecurity

public class SecurityConfig extends WebSecurityConfigurerAdapter {

    /**

     * 密码加密

     *

     * @return

     */

    @Bean

    public BCryptPasswordEncoder getPasswordEncode() {

        return new BCryptPasswordEncoder();

    }

    /**

     * 接口请求授权

     *

     * @param http

     * @throws Exception

     */

    @Override

    protected void configure(HttpSecurity http) throws Exception {

        http.authorizeRequests()

                .antMatchers("/oauth/**", "/login/**","/logout/**")

                .permitAll()

                .anyRequest()

                .authenticated()

                .and()

                .formLogin()

                .permitAll()

                .and()

                .csrf().disable();

    }

    @Override

    @Bean

    protected AuthenticationManager authenticationManager() throws Exception {

        return super.authenticationManager();

    }

}
2.6、实现 UserDetailsService
实现 UserDetailService 用于登录验证,以及密码模式下需要用到。
@Service

public class UserDetailServiceImpl implements UserDetailsService {

    @Autowired

    private BCryptPasswordEncoder bCryptPasswordEncoder;

    @Override

    public UserDetails loadUserByUsername(String username) throws UsernameNotFoundException {

        String password = bCryptPasswordEncoder.encode("123456");

        return new User(username, password, AuthorityUtils.commaSeparatedStringToAuthorityList("permission1"));

    }

}
创建 User实体类如下(非必须):
public class User implements UserDetails {

    private String username;

    private String password;

    private List<GrantedAuthority> authorities;

    public User(String username, String password, List<GrantedAuthority> authorities) {

        this.username = username;

        this.password = password;

        this.authorities = authorities;

    }

    @Override

    public Collection<? extends GrantedAuthority> getAuthorities() {

        return authorities;

    }

    @Override

    public String getPassword() {

        return password;

    }

    @Override

    public String getUsername() {

        return username;

    }

    @Override

    public boolean isAccountNonExpired() {

        return true;

    }

    @Override

    public boolean isAccountNonLocked() {

        return true;

    }

    @Override

    public boolean isCredentialsNonExpired() {

        return true;

    }

    @Override

    public boolean isEnabled() {

        return true;

    }

}
3、运行测试
3.1、获取授权码
直接访问 /oauth/authorize? 接口可以获得授权码
在我的项目中访问路径如下:
浏览器访问,跳转到http://localhost:8080/login.html默认登录页,点击登录,授权:
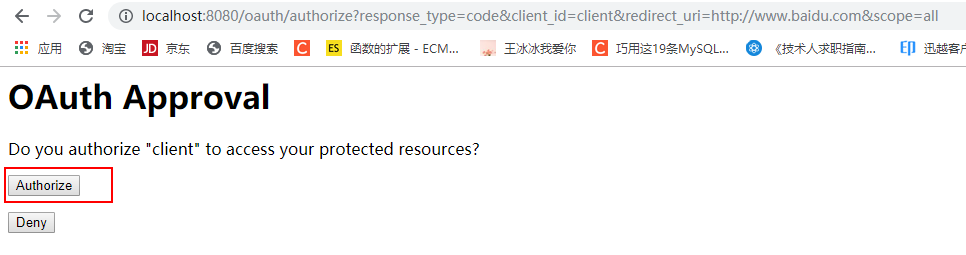
跳转到https://www.baidu.com/?code=XKee3V页面,XKee3v就是获得的授权码。
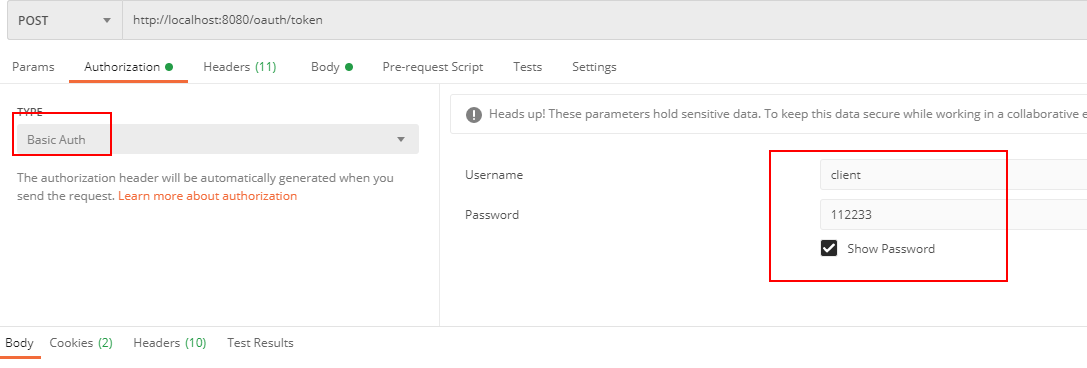
3.2、根据授权码模式获得令牌
利用 postman 测试,访问
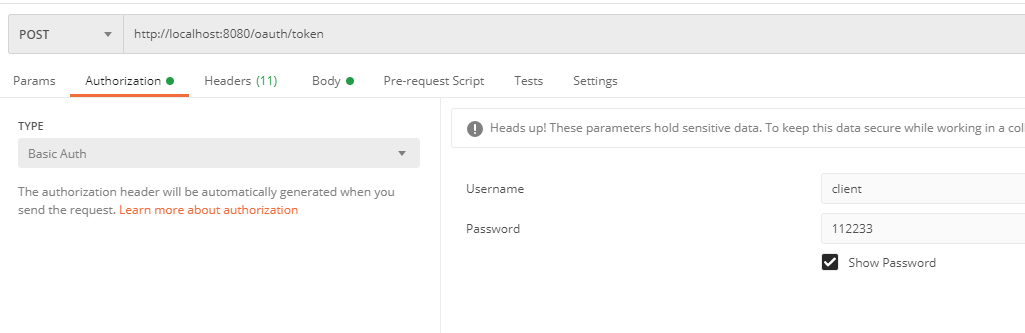
配置 Authorization 信息,即登录客户端的账号和密码;
配置 Body 信息,grant_type的参数值是 authorization_code,authorization_code即为授权码模式,code即为上文获得的授权码。
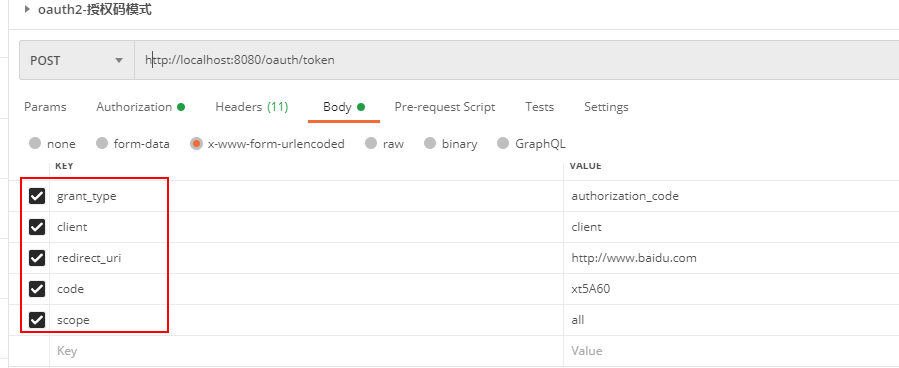
配置完后运行测试,返回 access_token和 refresh_token,看到 access_token成功转为JwtToken。

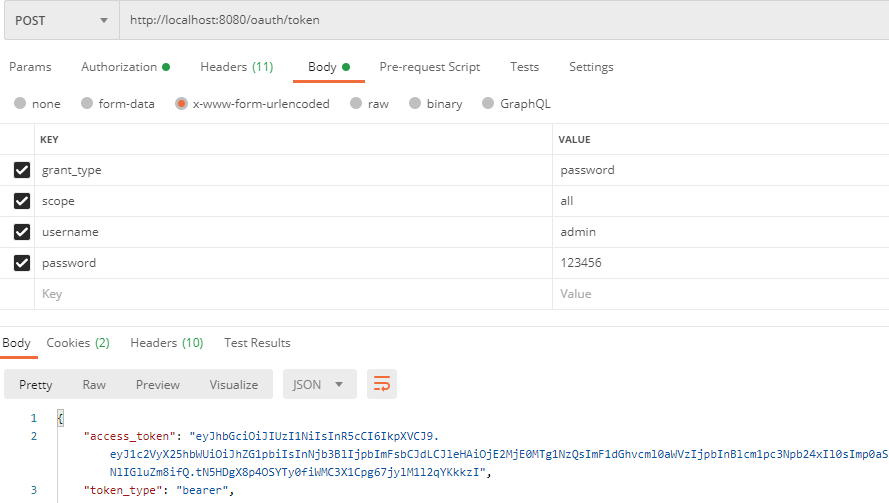
3.3、密码模式
密码模式比授权码模式简单一点,不需要获得授权码,直接忽略上文获取授权码的操作,只需稍微改动配置信息。
Authorization 信息无需改动,修改 Body 信息, grant_type的参数值改为 password,代表密码模式,填写登录 spring security 的账号和密码。
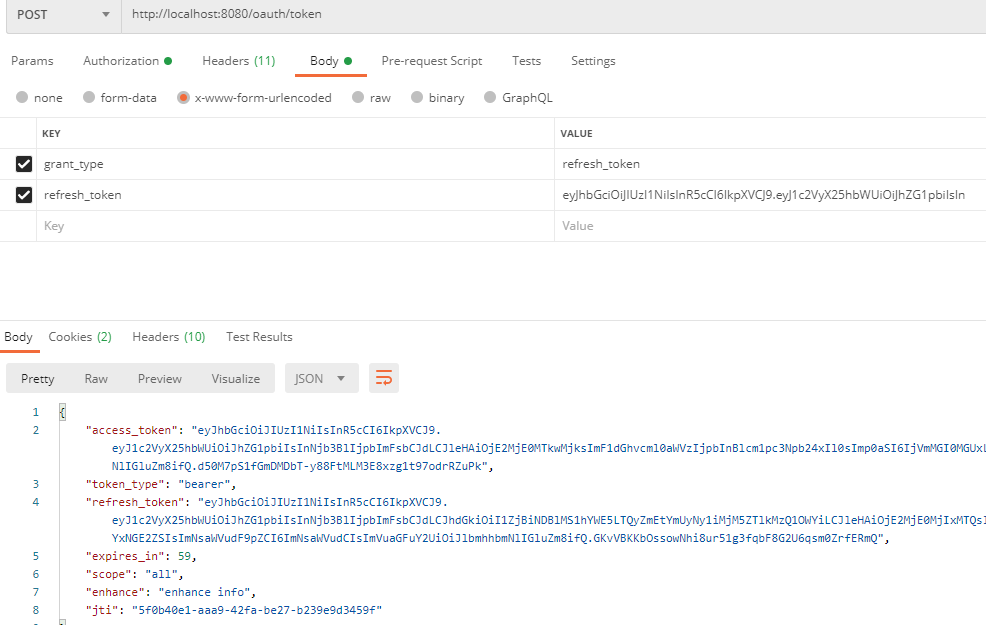
3.4、刷新令牌
在上文中我设置了 access_token的时效性为60秒,当access_token失效时,需要根据refresh_token获取新的令牌。
访问路径如下:
Authorization 配置信息如下:
Body 需要配置 grant_type的参数值为 refresh_token,代表刷新令牌,并填写refresh_token的参数值。访问后即可获得新的 access_token。
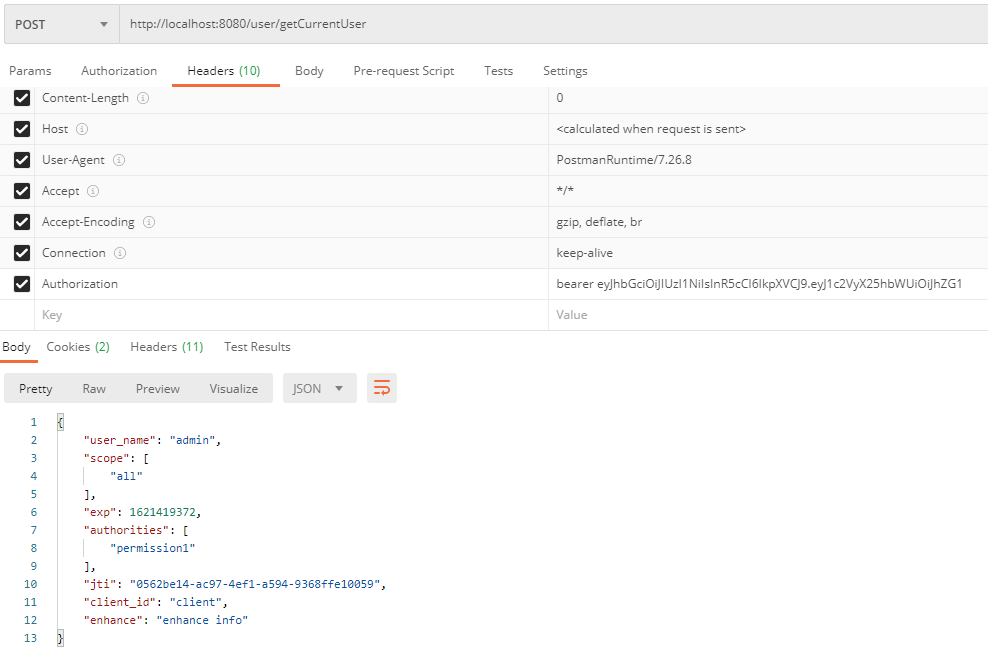
3.5、根据 access_token获得资源
访问路径如下:
Header 请求头添加 Authorization 参数,并设置参数值为 bearer+空格+ access_token,即可获得接口返回值。
4、参考资料
Spring Security + OAuth2 + JWT 基本使用的更多相关文章
- 【Spring Cloud & Alibaba 实战 | 总结篇】Spring Cloud Gateway + Spring Security OAuth2 + JWT 实现微服务统一认证授权和鉴权
一. 前言 hi,大家好~ 好久没更文了,期间主要致力于项目的功能升级和问题修复中,经过一年时间的打磨,[有来]终于迎来v2.0版本,相较于v1.x版本主要完善了OAuth2认证授权.鉴权的逻辑,结合 ...
- spring security oauth2 jwt 认证和资源分离的配置文件(java类配置版)
最近再学习spring security oauth2.下载了官方的例子sparklr2和tonr2进行学习.但是例子里包含的东西太多,不知道最简单最主要的配置有哪些.所以决定自己尝试搭建简单版本的例 ...
- [Spring Cloud实战 | 第六篇:Spring Cloud Gateway+Spring Security OAuth2+JWT实现微服务统一认证授权
一. 前言 本篇实战案例基于 youlai-mall 项目.项目使用的是当前主流和最新版本的技术和解决方案,自己不会太多华丽的言辞去描述,只希望能勾起大家对编程的一点喜欢.所以有兴趣的朋友可以进入 g ...
- Spring Cloud 学习 (十) Spring Security, OAuth2, JWT
通过 Spring Security + OAuth2 认证和鉴权,每次请求都需要经过 OAuth Server 验证当前 token 的合法性,并且需要查询该 token 对应的用户权限,在高并发场 ...
- SpringBoot 整合 spring security oauth2 jwt完整示例 附源码
废话不说直接进入主题(假设您已对spring security.oauth2.jwt技术的了解,不懂的自行搜索了解) 依赖版本 springboot 2.1.5.RELEASE spring-secu ...
- Spring Cloud实战 | 最终篇:Spring Cloud Gateway+Spring Security OAuth2集成统一认证授权平台下实现注销使JWT失效方案
一. 前言 在上一篇文章介绍 youlai-mall 项目中,通过整合Spring Cloud Gateway.Spring Security OAuth2.JWT等技术实现了微服务下统一认证授权平台 ...
- Spring Cloud实战 | 最八篇:Spring Cloud +Spring Security OAuth2+ Axios前后端分离模式下无感刷新实现JWT续期
一. 前言 记得上一篇Spring Cloud的文章关于如何使JWT失效进行了理论结合代码实践的说明,想当然的以为那篇会是基于Spring Cloud统一认证架构系列的最终篇.但关于JWT另外还有一个 ...
- Spring Cloud实战 | 第九篇:Spring Cloud整合Spring Security OAuth2认证服务器统一认证自定义异常处理
本文完整代码下载点击 一. 前言 相信了解过我或者看过我之前的系列文章应该多少知道点我写这些文章包括创建 有来商城youlai-mall 这个项目的目的,想给那些真的想提升自己或者迷茫的人(包括自己- ...
- Spring Boot 中使用 Spring Security, OAuth2 跨域问题 (自己挖的坑)
使用 Spring Boot 开发 API 使用 Spring Security + OAuth2 + JWT 鉴权,已经在 Controller 配置允许跨域: @RestController @C ...
随机推荐
- 《C++反汇编与逆向分析技术揭秘》--认识启动函数,找到用户入口
<C++反汇编与逆向分析>和<程序员的自我修养>都是以VC6的代码作为例子讲解的.这里是在vs2017下,CRT代码有些区别,但整体流程上都是初始化环境,设置参数,最后转到用户 ...
- FFmpeg API的简单实践应用
0. 前言 利用 FFmpeg 编译链接生成的可执行程序本身可以实现很多特定的功能,但如果我们有自己的个性化需求,想要在自己开发的项目中使用 ffmpeg 的一些功能,就需要理解并应用其已经实现好的A ...
- Python | random 模块:Python 中如何生成随机数和随机抽样?
random 是平时开发过程中常用的一个模块,该模块实现了各种分布的伪随机数生成器,以及和随机数相关的各种实用函数.基本函数 random() 在区间 [0.0, 1.0) 内均匀生成随机浮点数,是模 ...
- C语言const是如何保证变量不被修改的?
这小段文章要理清楚的是,在C语言中,$const$是如何保证变量不被修改的? 我们可以想到两种方式: 第一种,由编译器来阻止修改$const$变量的语句,让这种程序不能通过编译: 第二种,由操作系统来 ...
- Shell prompt(PS1) 与 Carriage Return(CR) 的关系?-- Shell十三问<第二问>
Shell prompt(PS1) 与 Carriage Return(CR) 的关系?-- Shell十三问<第二问> 当你成功登录进一个文字界面之后,大部份情形下,你会在荧幕上看到一个 ...
- SQL语句练习(进阶版)
学生数据库中有三个基本表(关系)如下: 学生表S(Sno,Sname,Age,Sex,SD) 课程表C(Cno,Cname, Teacher) 选课表SC(Sno,Cno,Grade) 请用SQL语言 ...
- 3步安装Python虚拟环境virtualenv
1. pip安装必要库 pip install virtualenv -i https://pypi.douban.com/simple pip install virtualenvwrapper - ...
- 华为联运游戏或应用审核驳回:HMS Core升级提示语言类型错误
问题描述 最近项目组应用集成华为的HMS Core SDK相关能力后,发布地区选择中国大陆,提交审核,华为审核驳回:在低于2.5.3版本的华为移动服务手机上启动时或调出支付时拉起升级提示为英文,正确的 ...
- 结合k8s和pipeline的流水线,并通过k8s接口完成镜像升级
现在这家单位的CICD比较的混乱,然后突发奇想,想改造下,于是就用pipeline做了一个简单的流水线,下面是关于它的一些介绍 写一个简单的流水线 大概就是这么个流程简单来说就是:拉代码---> ...
- 【笔记】《Redis设计与实现》chapter20 Lua脚本
chapter20 Lua脚本 Redis从2.6版本开始引入对Lua脚本的支持,通过在服务器中嵌入Lua环境,Redis客户端可以使用Lua脚本,直接在服务器端原子地执行多个Redis命令 20.1 ...