利用Wireshark抓取并分析OpenFlow协议报文
OpenFlow 交换机与控制器交互步骤
1. 利用Mininet仿真平台构建如下图所示的网络拓扑,配置主机h1和h2的IP地址(h1:10.0.0.1,h2:10.0.0.2),测试两台主机之间的网络连通性
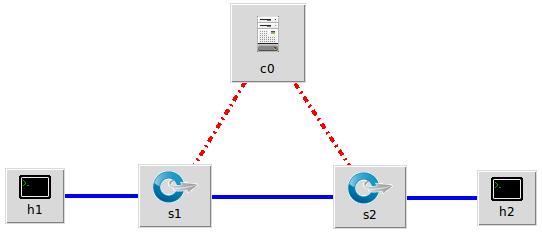
- miniedit.py设置
- start CLI
- 支持OpenFlow 1.0 1.1 1.2 1.3
- 其他使用默认设置(Controller选择默认的openflow reference)
2. 利用Wireshark工具,捕获拓扑中交换机与控制器之间的通信数据,对OpenFlow协议类型的各类报文进行分析,写出你的分析内容。
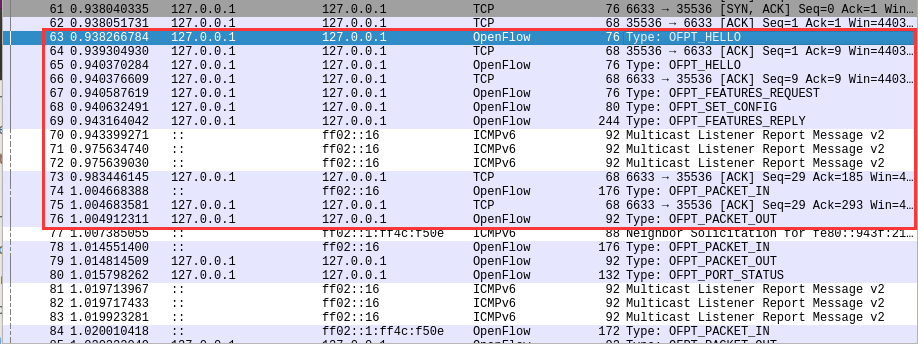
hello
控制器6633端口(我最高能支持OpenFlow 1.0) ---> 交换机35534端口
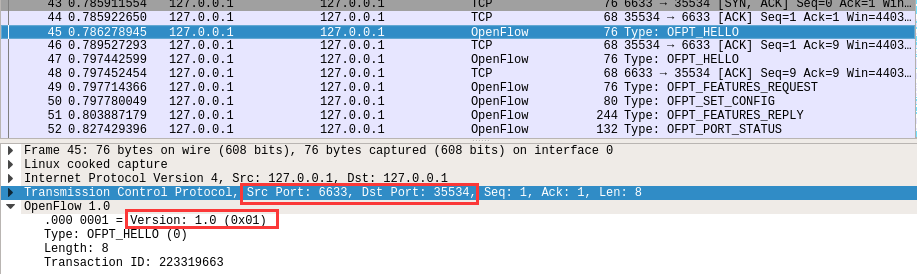
交换机35534端口(我最高能支持OpenFlow 1.3)---> 控制器6633端口

于是双方建立连接,并使用OpenFlow 1.0Features Request
控制器6633端口(我需要你的特征信息) ---> 交换机35534端口

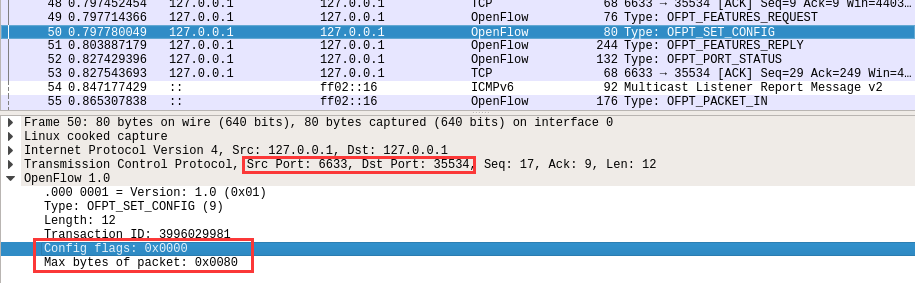
Set Config
控制器6633端口(请按照我给你的flag和max bytes of packet进行配置) ---> 交换机35534端口
Features Reply
交换机35534端口(这是我的特征信息,请查收)--- 控制器6633端口
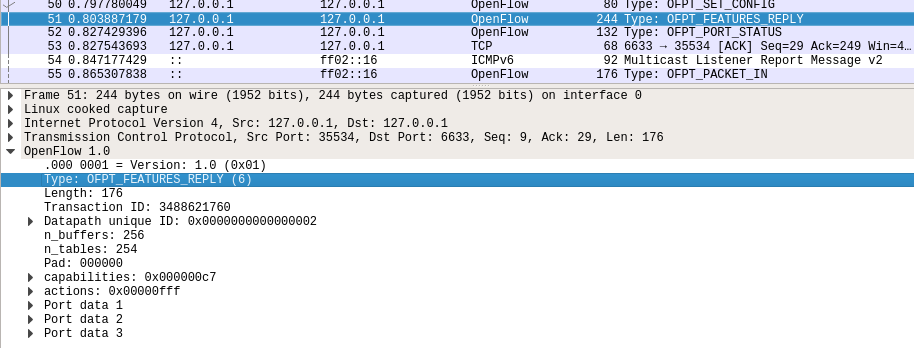
Features 消息包括 OpenFlow Header 和 Features Reply Message
对照Features Reply Message结构
struct ofp_switch_features{

    struct ofp_header header;

    uint64_t datapath_id; /*唯一标识 id 号*/

    uint32_t n_buffers; /*交缓冲区可以缓存的最大数据包个数*/

    uint8_t n_tables; /*流表数量*/

    uint8_t pad[3]; /*align to 64 bits*/

    uint32_t capabilities; /*支持的特殊功能,具体见 ofp_capabilities*/

    uint32_t actions; /*支持的动作,具体见 ofp_actions_type*/

    struct ofp_phy_port ports[0]; /*物理端口描述列表,具体见 ofp_phy_port*/

};
对应到抓取到的报文,逐项查看报文内容
OpenFlow 1.0

    .000 0001 = Version: 1.0 (0x01)

    Type: OFPT_FEATURES_REPLY (6)

    Length: 176

    Transaction ID: 3488621760

    Datapath unique ID: 0x0000000000000002

        MAC addr: 00:00:00_00:00:00 (00:00:00:00:00:00)

        Implementers part: 0x0002

    n_buffers: 256

    n_tables: 254

    Pad: 000000

    capabilities: 0x000000c7

        .... .... .... .... .... .... .... ...1 = Flow statistics: True

        .... .... .... .... .... .... .... ..1. = Table statistics: True

        .... .... .... .... .... .... .... .1.. = Port statistics: True

        .... .... .... .... .... .... .... 0... = Group statistics: False

        .... .... .... .... .... .... ..0. .... = Can reassemble IP fragments: False

        .... .... .... .... .... .... .1.. .... = Queue statistics: True

        .... .... .... .... .... ...0 .... .... = Switch will block looping ports: False

    actions: 0x00000fff

        .... .... .... .... .... .... .... ...1 = Output to switch port: True

        .... .... .... .... .... .... .... ..1. = Set the 802.1q VLAN id: True

        .... .... .... .... .... .... .... .1.. = Set the 802.1q priority: True

        .... .... .... .... .... .... .... 1... = Strip the 802.1q header: True

        .... .... .... .... .... .... ...1 .... = Ethernet source address: True

        .... .... .... .... .... .... ..1. .... = Ethernet destination address: True

        .... .... .... .... .... .... .1.. .... = IP source address: True

        .... .... .... .... .... .... 1... .... = IP destination address: True

        .... .... .... .... .... ...1 .... .... = IP ToS (DSCP field, 6 bits): True

        .... .... .... .... .... ..1. .... .... = TCP/UDP source port: True

        .... .... .... .... .... .1.. .... .... = TCP/UDP destination port: True

        .... .... .... .... .... 1... .... .... = Output to queue: True

    Port data 1

        Port number: 65534

        HW Address: e6:73:a1:3c:74:c0 (e6:73:a1:3c:74:c0)

        Port Name: s2

        Config flags: 0x00000001

            .... .... .... .... .... .... .... ...1 = Port is administratively down: True

            .... .... .... .... .... .... .... ..0. = Disable 802.1D spanning tree on port: False

            .... .... .... .... .... .... .... .0.. = Drop all packets except 802.1D spanning tree packets: False

            .... .... .... .... .... .... .... 0... = Drop received 802.1D STP packets: False

            .... .... .... .... .... .... ...0 .... = Do not include this port when flooding: False

            .... .... .... .... .... .... ..0. .... = Drop packets forwarded to port: False

            .... .... .... .... .... .... .0.. .... = Do not send packet-in msgs for port: False

        State flags: 0x00000001

            .... .... .... .... .... .... .... ...1 = No physical link present: True

        Current features: 0x00000000

            .... .... .... .... .... .... .... ...0 = 10 Mb half-duplex rate support: False

            .... .... .... .... .... .... .... ..0. = 10 Mb full-duplex rate support: False

            .... .... .... .... .... .... .... .0.. = 100 Mb half-duplex rate support: False

            .... .... .... .... .... .... .... 0... = 100 Mb full-duplex rate support: False

            .... .... .... .... .... .... ...0 .... = 1 Gb half-duplex rate support: False

            .... .... .... .... .... .... ..0. .... = 1 Gb full-duplex rate support: False

            .... .... .... .... .... .... .0.. .... = 10 Gb full-duplex rate support: False

            .... .... .... .... .... .... 0... .... = Copper medium: False

            .... .... .... .... .... ...0 .... .... = Fiber medium: False

            .... .... .... .... .... ..0. .... .... = Auto-negotiation: False

            .... .... .... .... .... .0.. .... .... = Pause: False

            .... .... .... .... .... 0... .... .... = Asymmetric pause: False

        Advertised features: 0x00000000

        Features supported: 0x00000000

        Features advertised by peer: 0x00000000

    Port data 2

        Port number: 1

        HW Address: 2a:ca:66:29:0e:ae (2a:ca:66:29:0e:ae)

        Port Name: s2-eth1

        Config flags: 0x00000000

            .... .... .... .... .... .... .... ...0 = Port is administratively down: False

            .... .... .... .... .... .... .... ..0. = Disable 802.1D spanning tree on port: False

            .... .... .... .... .... .... .... .0.. = Drop all packets except 802.1D spanning tree packets: False

            .... .... .... .... .... .... .... 0... = Drop received 802.1D STP packets: False

            .... .... .... .... .... .... ...0 .... = Do not include this port when flooding: False

            .... .... .... .... .... .... ..0. .... = Drop packets forwarded to port: False

            .... .... .... .... .... .... .0.. .... = Do not send packet-in msgs for port: False

        State flags: 0x00000000

            .... .... .... .... .... .... .... ...0 = No physical link present: False

        Current features: 0x000000c0

            .... .... .... .... .... .... .... ...0 = 10 Mb half-duplex rate support: False

            .... .... .... .... .... .... .... ..0. = 10 Mb full-duplex rate support: False

            .... .... .... .... .... .... .... .0.. = 100 Mb half-duplex rate support: False

            .... .... .... .... .... .... .... 0... = 100 Mb full-duplex rate support: False

            .... .... .... .... .... .... ...0 .... = 1 Gb half-duplex rate support: False

            .... .... .... .... .... .... ..0. .... = 1 Gb full-duplex rate support: False

            .... .... .... .... .... .... .1.. .... = 10 Gb full-duplex rate support: True

            .... .... .... .... .... .... 1... .... = Copper medium: True

            .... .... .... .... .... ...0 .... .... = Fiber medium: False

            .... .... .... .... .... ..0. .... .... = Auto-negotiation: False

            .... .... .... .... .... .0.. .... .... = Pause: False

            .... .... .... .... .... 0... .... .... = Asymmetric pause: False

        Advertised features: 0x00000000

        Features supported: 0x00000000

        Features advertised by peer: 0x00000000

    Port data 3

        Port number: 2

        HW Address: 66:01:64:ad:24:89 (66:01:64:ad:24:89)

        Port Name: s2-eth2

        Config flags: 0x00000000

            .... .... .... .... .... .... .... ...0 = Port is administratively down: False

            .... .... .... .... .... .... .... ..0. = Disable 802.1D spanning tree on port: False

            .... .... .... .... .... .... .... .0.. = Drop all packets except 802.1D spanning tree packets: False

            .... .... .... .... .... .... .... 0... = Drop received 802.1D STP packets: False

            .... .... .... .... .... .... ...0 .... = Do not include this port when flooding: False

            .... .... .... .... .... .... ..0. .... = Drop packets forwarded to port: False

            .... .... .... .... .... .... .0.. .... = Do not send packet-in msgs for port: False

        State flags: 0x00000000

            .... .... .... .... .... .... .... ...0 = No physical link present: False

        Current features: 0x000000c0

            .... .... .... .... .... .... .... ...0 = 10 Mb half-duplex rate support: False

            .... .... .... .... .... .... .... ..0. = 10 Mb full-duplex rate support: False

            .... .... .... .... .... .... .... .0.. = 100 Mb half-duplex rate support: False

            .... .... .... .... .... .... .... 0... = 100 Mb full-duplex rate support: False

            .... .... .... .... .... .... ...0 .... = 1 Gb half-duplex rate support: False

            .... .... .... .... .... .... ..0. .... = 1 Gb full-duplex rate support: False

            .... .... .... .... .... .... .1.. .... = 10 Gb full-duplex rate support: True

            .... .... .... .... .... .... 1... .... = Copper medium: True

            .... .... .... .... .... ...0 .... .... = Fiber medium: False

            .... .... .... .... .... ..0. .... .... = Auto-negotiation: False

            .... .... .... .... .... .0.. .... .... = Pause: False

            .... .... .... .... .... 0... .... .... = Asymmetric pause: False

        Advertised features: 0x00000000

        Features supported: 0x00000000

        Features advertised by peer: 0x00000000
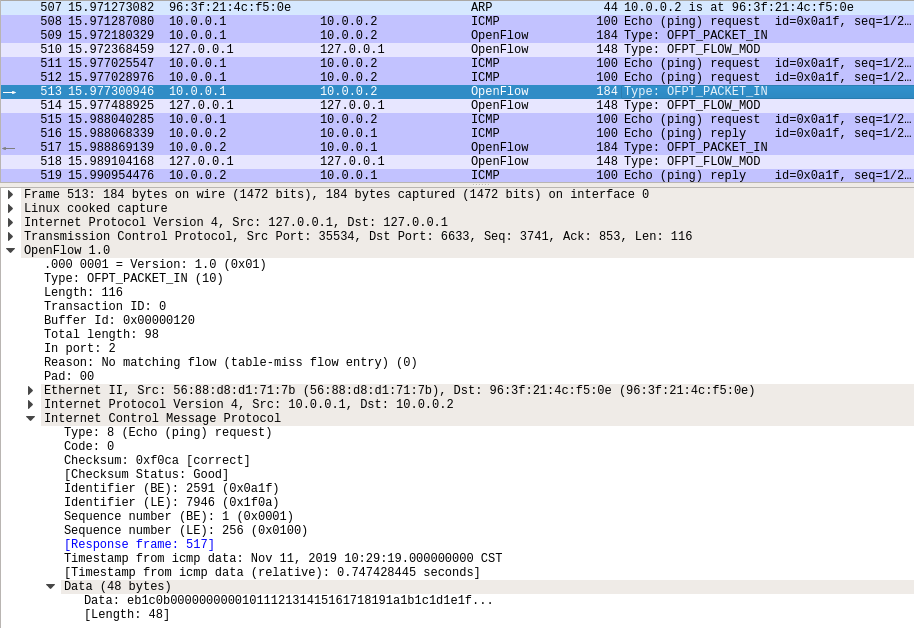
- Packet_in
交换机35534端口(有数据包进来,请指示)--- 控制器6633端口

结合Packet_in的结构
struct ofp_packet_in {

    struct ofp_header header;

    uint32_t buffer_id; /*Packet-in消息所携带的数据包在交换机缓存区中的ID*/

    uint16_t total_len; /*data字段的长度*/

    uint16_t in_port; /*数据包进入交换机时的端口号*/

    uint8_t reason; /*发送Packet-in消息的原因,具体见 ofp_packet_in_reason*/

    uint8_t pad;

    uint8_t data[0]; /*携带的数据包*/

};
分析抓取的数据包,可以发现是因为交换机发现此时自己并没有匹配的流表(Reason: No matching flow (table-miss flow entry) (0)),所以要问控制器如何处理
OpenFlow 1.0

    .000 0001 = Version: 1.0 (0x01)

    Type: OFPT_PACKET_IN (10)

    Length: 108

    Transaction ID: 0

    Buffer Id: 0x00000100

    Total length: 90

    In port: 1

    Reason: No matching flow (table-miss flow entry) (0)

    Pad: 00

    Ethernet II, Src: 96:3f:21:4c:f5:0e (96:3f:21:4c:f5:0e), Dst: IPv6mcast_16 (33:33:00:00:00:16)

        Destination: IPv6mcast_16 (33:33:00:00:00:16)

            Address: IPv6mcast_16 (33:33:00:00:00:16)

            .... ..1. .... .... .... .... = LG bit: Locally administered address (this is NOT the factory default)

            .... ...1 .... .... .... .... = IG bit: Group address (multicast/broadcast)

        Source: 96:3f:21:4c:f5:0e (96:3f:21:4c:f5:0e)

            Address: 96:3f:21:4c:f5:0e (96:3f:21:4c:f5:0e)

            .... ..1. .... .... .... .... = LG bit: Locally administered address (this is NOT the factory default)

            .... ...0 .... .... .... .... = IG bit: Individual address (unicast)

        Type: IPv6 (0x86dd)

    Internet Protocol Version 6, Src: ::, Dst: ff02::16

        0110 .... = Version: 6

        .... 0000 0000 .... .... .... .... .... = Traffic Class: 0x00 (DSCP: CS0, ECN: Not-ECT)

            .... 0000 00.. .... .... .... .... .... = Differentiated Services Codepoint: Default (0)

            .... .... ..00 .... .... .... .... .... = Explicit Congestion Notification: Not ECN-Capable Transport (0)

        .... .... .... 0000 0000 0000 0000 0000 = Flow Label: 0x00000

        Payload Length: 36

        Next Header: IPv6 Hop-by-Hop Option (0)

        Hop Limit: 1

        Source: ::

        Destination: ff02::16

        IPv6 Hop-by-Hop Option

            Next Header: ICMPv6 (58)

            Length: 0

            [Length: 8 bytes]

            Router Alert

                Type: Router Alert (0x05)

                    00.. .... = Action: Skip and continue (0)

                    ..0. .... = May Change: No

                    ...0 0101 = Low-Order Bits: 0x05

                Length: 2

                Router Alert: MLD (0)

            PadN

                Type: PadN (0x01)

                    00.. .... = Action: Skip and continue (0)

                    ..0. .... = May Change: No

                    ...0 0001 = Low-Order Bits: 0x01

                Length: 0

                PadN: <none>

    Internet Control Message Protocol v6

        Type: Multicast Listener Report Message v2 (143)

        Code: 0

        Checksum: 0x7a2f [correct]

        [Checksum Status: Good]

        Reserved: 0000

        Number of Multicast Address Records: 1

        Multicast Address Record Changed to exclude: ff02::1:ff4c:f50e

            Record Type: Changed to exclude (4)

            Aux Data Len: 0

            Number of Sources: 0

            Multicast Address: ff02::1:ff4c:f50e
- Packet_out
控制器6633端口(请按照我给你的action进行处理) ---> 交换机35534端口

结合Packet_out的结构
struct ofp_packet_out {

    struct ofp_header header;

    uint32_t buffer_id; /*交换机缓存区id,如果为-1则指定的为packet-out消息携带的data字段*/

    uint16_t in_port; /*如果buffer_id为‐1,并且action列表中指定了Output=TABLE的动作,in_port将作为data段数据包的额外匹配信息进行流表查询*/

    uint16_t actions_len; /*action列表的长度,可以用来区分actions和data段*/

    struct ofp_action_header actions[0]; /*动作列表*/

    uint8_t data[0]; /*数据缓存区,可以存储一个以太网帧,可选*/

}
告诉输出到交换机的65531端口
OpenFlow 1.0

    .000 0001 = Version: 1.0 (0x01)

    Type: OFPT_PACKET_OUT (13)

    Length: 24

    Transaction ID: 0

    Buffer Id: 0x00000100

    In port: 1

    Actions length: 8

    Actions type: Output to switch port (0)

    Action length: 8

    Output port: 65531

    Max length: 0
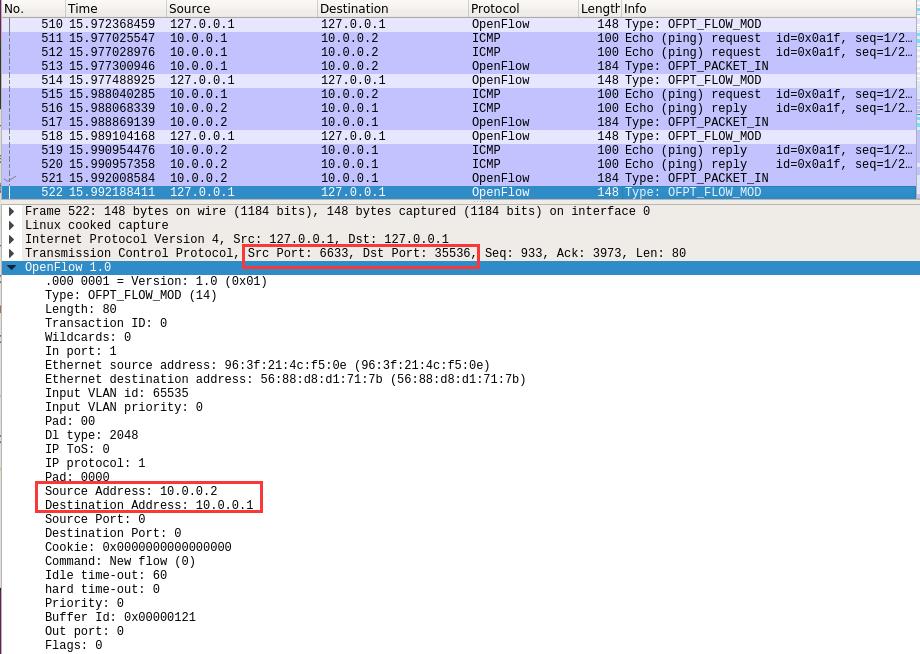
接下来是另一台交换机(端口35536)与控制器(端口6633)的交互过程
h1 ping h2
- packet_in
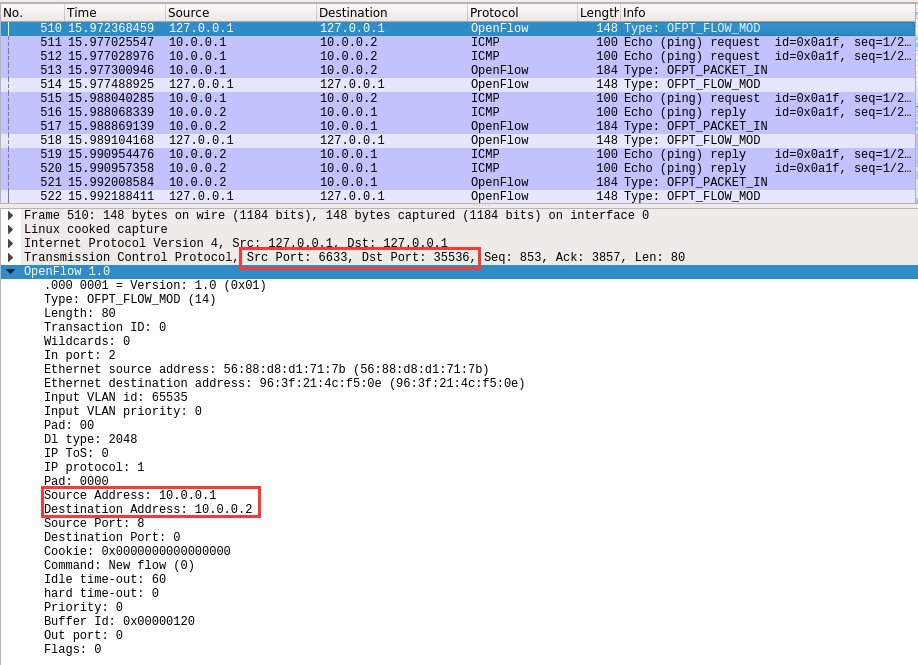
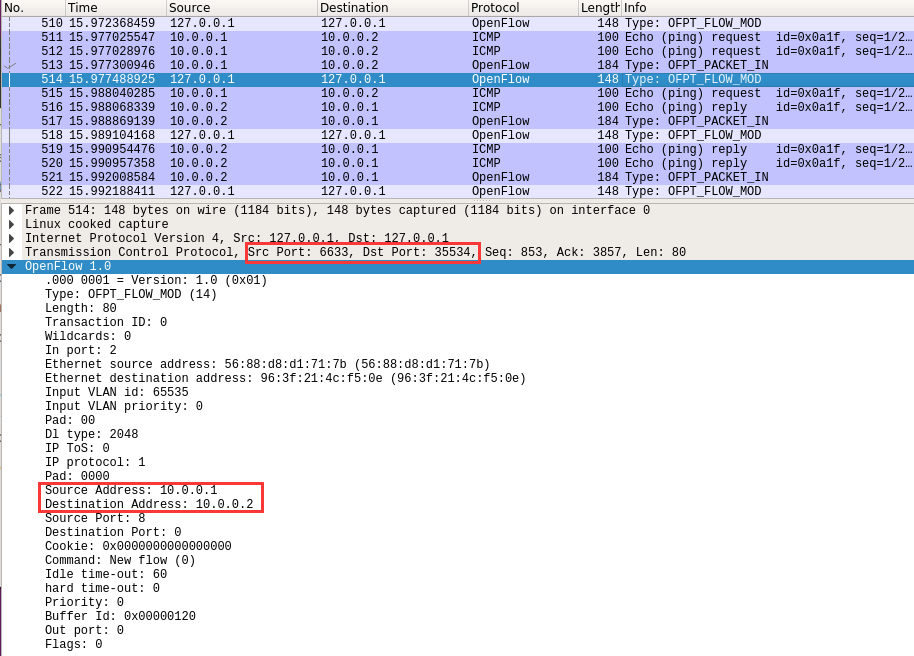
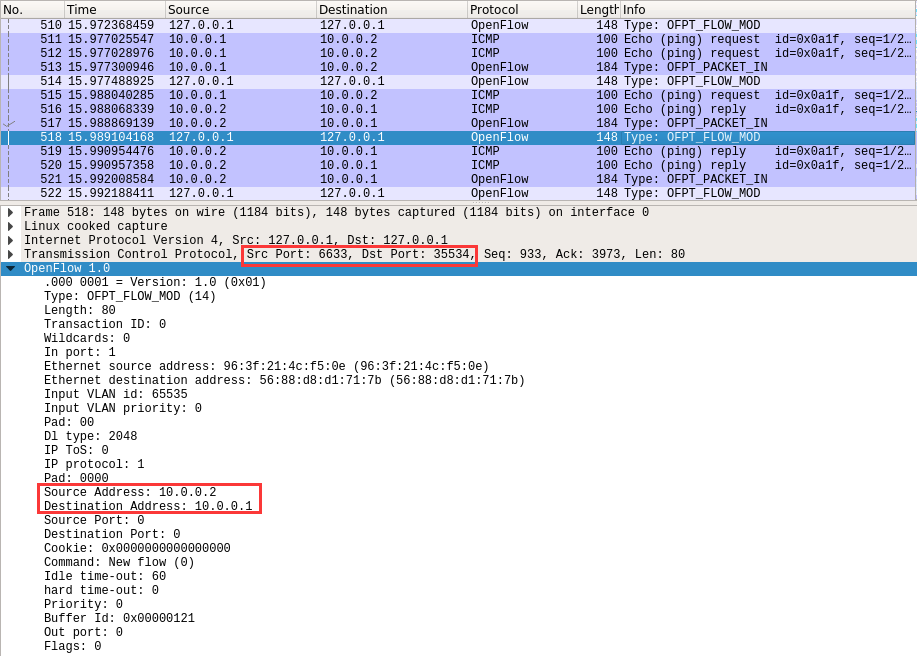
- flow_mod
结合flow_mod结构
struct ofp_flow_mod {

    struct ofp_header header;

    struct ofp_match match; /*流表的匹配域*/

    uint64_t cookie; /*流表项标识符*/

    uint16_t command; /*可以是ADD,DELETE,DELETE-STRICT,MODIFY,MODIFY-STRICT*/

    uint16_t idle_timeout; /*空闲超时时间*/

    uint16_t hard_timeout; /*最大生存时间*/

    uint16_t priority; /*优先级,优先级高的流表项优先匹配*/

    uint32_t buffer_id; /*缓存区ID ,用于指定缓存区中的一个数据包按这个消息的action列表处理*/

    uint16_t out_port; /*如果这条消息是用于删除流表则需要提供额外的匹配参数*/

    uint16_t flags; /*标志位,可以用来指示流表删除后是否发送flow‐removed消息,添加流表时是否检查流表重复项,添加的流表项是否为应急流表项。*/

    struct ofp_action_header actions[0]; /*action列表*/

};
分析抓取的flow_mod数据包,控制器通过6633端口向交换机35334端口、交换机35336端口下发流表项,指导数据的转发处理
PS.把控制器从openflow reference改成ovs controller
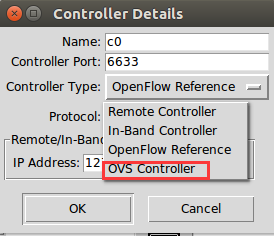
在hello报文中可以发现控制器支持的OpenFlow版本从1.0变成了1.3,因此,经过协商交换机和控制器之间将通过1.3版本的OpenFlow协议进行通信

- flow_mod

利用Wireshark抓取并分析OpenFlow协议报文的更多相关文章
- 利用wireshark抓取远程linux上的数据包
原文发表在我的博客主页,转载请注明出处. 前言 因为出差,前后准备总结了一周多,所以博客有所搁置.出差真是累人的活计,不过确实可以学习到很多东西,跟着老板学习做人,学习交流的技巧.入正题~ wires ...
- 利用wireshark抓取Telnet的用户名和密码
使用wireshark抓取Telnet 目标ip地址(telnet 192.168.88.1 ) 1,首先打开wireshark,然后选择网卡,点击开始. 2,为了在filter中输入telne ...
- 利用wireshark抓取TCP的整个过程分析。
原文地址:https://www.cnblogs.com/NickQ/p/9226579.html 最近,已经很久都没有更新博客了.看看时间,想想自己做了哪些事情,突然发现自己真的是太贪心,到头来却一 ...
- SNMP报文抓取与分析(二)
SNMP报文抓取与分析(二) SNMP报文抓取与分析(二) 1.SNMP报文表示简介 基本编码规则BER 标识域Tag表示 长度域length表示 2.SNMP报文详细分析(以一个get-respon ...
- Android利用tcpdump和wireshark抓取网络数据包
Android利用tcpdump和wireshark抓取网络数据包 主要介绍如何利用tcpdump抓取andorid手机上网络数据请求,利用Wireshark可以清晰的查看到网络请求的各个过程包括三次 ...
- 使用wireshark抓取TCP包分析1
使用wireshark抓取TCP包分析1 前言 介绍 目的 准备工作 传输 创建连接 握手 生成密钥 发送数据 断开连接 结论 前言 介绍 本篇文章是使用wireshrak对某个https请求的tcp ...
- Ubuntu下用wireshark抓取802.11封包并进行过滤分析
要用wireshark抓802.11的包 需要在linux下进行. 要在linux下抓802.11的包 需要在linux下安装无线网卡驱动. 所以 在正式抓取之前先把这两样东西搞起来. *没有特殊说明 ...
- 使用wireshark 抓取 http https tcp ip 协议进行学习
使用wireshark 抓取 http https tcp ip 协议进行学习 前言 本节使用wireshark工具抓包学习tcp ip http 协议 1. tcp 1.1 tcp三次握手在wire ...
- 深入理解USB流量数据包的抓取与分析
0x01 问题提出 在一次演练中,我们通过wireshark抓取了一个如下的数据包,我们如何对其进行分析? 0x02 问题分析 流量包是如何捕获的? 首先我们从上面的数据包分析可以知道,这是个USB的 ...
随机推荐
- LifeGame
LifeGame 用例说明&用例图 用例名: 设置细胞颜色 说明 用户可以根据自己的喜好来设置细胞的颜色 主事件流 在菜单出点击需要的颜色游戏检测到菜单的返回的颜色更改细胞的颜色,最后显示出来 ...
- Sbase数据库自动截断日志
http://infocenter.sybase.com/help/index.jsp?topic=/com.sybase.infocenter.dc36273.1550/html/sprocs/X3 ...
- flashdevelop调用ios方法
来源:http://blog.csdn.net/zu12jing/article/details/7331397 flash开发工具用的是flashdevelop(由于flashdevelop还能直接 ...
- 【转】简易剖析Hadoop作业工作机制
原文地址:https://www.cnblogs.com/duma/p/10666269.html 建议:结合第四版Hadoop权威指南阅读,更有利于理解 运行机制 运行一个 MR 程序主要涉及以下 ...
- 【转】CCS5.5从硬盘读入.dat数据格式的单张图像
首页 博客 学院 CSDN学院 下载 论坛 APP CSDN 问答 商城 活动 VIP会员 ...
- 45 个常用Linux 命令,让你轻松玩转Linux!
Linux 的命令确实非常多,然而熟悉 Linux 的人从来不会因为 Linux 的命令太多而烦恼.因为我们仅仅只需要掌握常用命令,就完全可以驾驭 Linux. 接下来,让我们一起来看看都有那些常用的 ...
- mysql数据库备份,主从复制及半同步复制
1.使用mysqldump备份数据库并通过备份及二进制日志还原数据(备份完后再写入数据,然后再删库) mysqldump -A --single-transaction -F --master-dat ...
- 解决Centos7安装python3后pip工具无法使用
问题描述: Centos7安装python3,正常流程全部配置完成,python3,pip3的软链接也建立了 但是python3可以正常使用,而pip3报错,无法找到文件或目录 解决方法: which ...
- 学会github管理项目与VS单元测试——第二次作业
GIT地址 https://github.com/Bing-Fairy/AchaoCalculator GIT用户名 Bing—Fairy 学号后五位 62502 博客地址 https://home. ...
- SecurityProtocolType 枚举
地址:https://docs.microsoft.com/zh-cn/dotnet/api/system.net.securityprotocoltype?redirectedfrom=MSDN&a ...