
tensorflow 2.0 学习(四)
这次的mnist学习加入了测试集,看看学习的准确率,代码如下
# encoding: utf-8

import tensorflow as tf

import matplotlib.pyplot as plt

#加载下载好的mnist数据库 60000张训练 10000张测试 每一张维度(28,28)

path = r'G:\2019\python\mnist.npz'

(x_train, y_train), (x_test, y_test) = tf.keras.datasets.mnist.load_data(path)

#第一层输入256, 第二次输出128, 第三层输出10

#第一,二,三层参数w,b

w1 = tf.Variable(tf.random.truncated_normal([784, 256], stddev=0.1))    #正态分布的一种

b1 = tf.Variable(tf.zeros([256]))

w2 = tf.Variable(tf.random.truncated_normal([256, 128], stddev=0.1))

b2 = tf.Variable(tf.zeros([128]))

w3 = tf.Variable(tf.random.truncated_normal([128, 10], stddev=0.1))

b3 = tf.Variable(tf.zeros([10]))

#两种数据预处理的方法

#(一)预处理训练数据

x = tf.convert_to_tensor(x_train, dtype = tf.float32)/255.    #0:1  ;   -1:1(不适合训练,准确度不高)

x = tf.reshape(x, [-1, 28*28])

y = tf.convert_to_tensor(y_train, dtype=tf.int32)

y = tf.one_hot(y, depth=10)

#将60000组训练数据切分为600组,每组100个数据

train_db = tf.data.Dataset.from_tensor_slices((x, y))

train_db = train_db.shuffle(60000)      #尽量与样本空间一样大

train_db = train_db.batch(100)          #

#(二)自定义预处理测试函数

def preprocess(x, y):

    x = tf.cast(x, dtype=tf.float32) / 255.     #先将类型转化为float32,再归一到0-1

    x = tf.reshape(x, [-1, 28*28])              #不知道x数量,用-1代替,转化为一维784个数据

    y = tf.cast(y, dtype=tf.int32)              #转化为整型32

    y = tf.one_hot(y, depth=10)                 #训练数据所需的one-hot编码

    return x, y

#将10000组测试数据预处理

test_db = tf.data.Dataset.from_tensor_slices((x_test, y_test))

test_db = test_db.shuffle(10000)

test_db = test_db.batch(100)        #

test_db = test_db.map(preprocess)

lr = 0.001      #学习率

losses = []     #储存每epoch的loss值,便于观察学习情况

acc = []        #准确率

for epoch in range(30):     #

    #一次性处理100组(x, y)数据

    for step, (x, y) in enumerate(train_db):    #遍历切分好的数据step:0->599

        with tf.GradientTape() as tape:

            #向前传播第一,二,三层

            h1 = x@w1 + tf.broadcast_to(b1, [x.shape[0], 256])  #可以直接写成 +b1

            h1 = tf.nn.relu(h1)

            h2 = h1@w2 + b2

            h2 = tf.nn.relu(h2)

            out = h2@w3 + b3

            #计算mse

            loss = tf.square(y - out)

            loss = tf.reduce_mean(loss)

        #计算参数的梯度,tape.gradient为自动求导函数,loss为目标数据,目的使它越来越接近真实值

        grads = tape.gradient(loss, [w1, b1, w2, b2, w3, b3])

        #更新w,b

        w1.assign_sub(lr*grads[0])  #原地减去给定的值,实现参数的自我更新

        b1.assign_sub(lr*grads[1])

        w2.assign_sub(lr*grads[2])

        b2.assign_sub(lr*grads[3])

        w3.assign_sub(lr*grads[4])

        b3.assign_sub(lr*grads[5])

        #观察学习情况

        if step%100 == 0:

            print('训练第 ',epoch,'轮',', 第',step,'步, ','loss:', float(loss))

            losses.append(float(loss))          #将每100step后的loss情况储存起来,最后观察

        if step%500 == 0:

            total, total_correct = 0., 0.

            for x, y in test_db:

                h1 = x @ w1 + b1

                h1 = tf.nn.relu(h1)

                h2 = h1 @ w2 + b2

                h2 = tf.nn.relu(h2)

                out = h2 @ w3 + b3

                pred = tf.argmax(out, axis=1)  # 选取概率最大的类别

                y = tf.argmax(y, axis=1)  # 类似于one-hot逆编码

                correct = tf.equal(pred, y)  # 比较真实值和预测值是否相等

                total += x.shape[0]

                # 统计正确的个数

                total_correct += tf.reduce_sum(tf.cast(correct, dtype=tf.int32)).numpy()

            print('训练第 ',epoch,'轮',', 第',step,'步, ', 'Evaluate Acc:', total_correct/total)

            acc.append(total_correct/total)

#plt.subplot(121)

x1 = [i*100 for i in range(len(losses))]

plt.plot(x1, losses, marker='s', label='training')

plt.xlabel('Step')

plt.ylabel('MSE')

plt.legend()

#plt.savefig('exam_mnist_forward.png')

#plt.show()

#plt.subplot(122)

plt.figure()

x2 = [i for i in range(len(acc))]

plt.plot(x2, acc, 'r',marker='d', label='testing')

plt.xlabel('Step')

plt.ylabel('Accuracy')

plt.legend()

#plt.savefig('test_mnist_forward.png')

plt.show()
误差何准确率如下
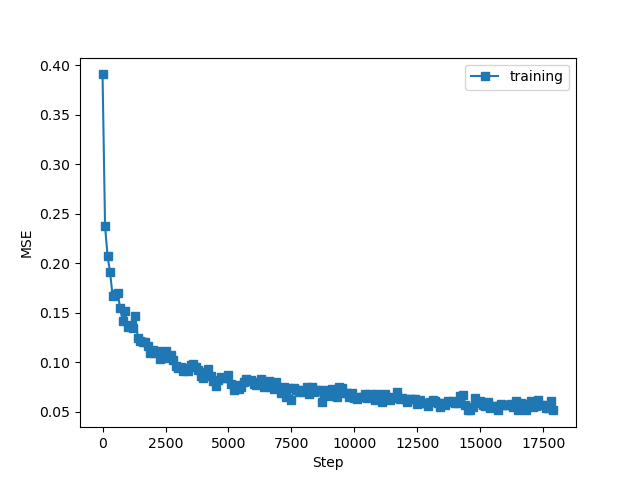
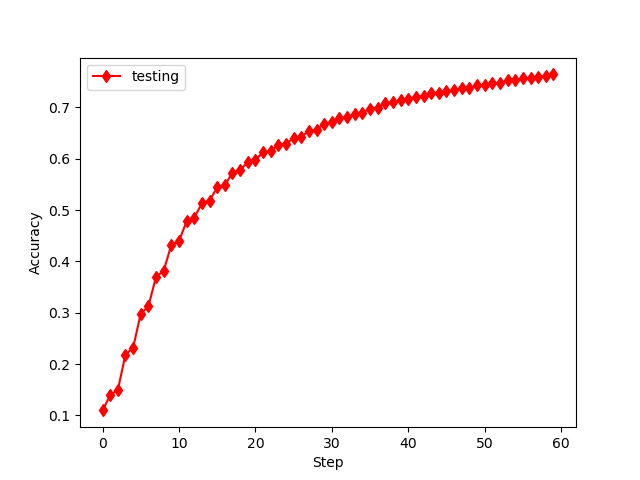
发现和书中类似,但要注意的如下:
(1)数据预处理时,打散值选择和数据空间一样大;
(2)数据处理选择0-1之间,而不用(-1 :1),是因为后者学习效率不理想!
(3)代码还可以进行优化处理!
总的来说,代码还是容易理解,使用也更加简洁!
下一次更新,全连接网络,关于汽车油耗的预测。
tensorflow 2.0 学习(四)的更多相关文章
- tensorflow 1.0 学习:用CNN进行图像分类
tensorflow升级到1.0之后,增加了一些高级模块: 如tf.layers, tf.metrics, 和tf.losses,使得代码稍微有些简化. 任务:花卉分类 版本:tensorflow 1 ...
- tensorflow 1.0 学习:十图详解tensorflow数据读取机制
本文转自:https://zhuanlan.zhihu.com/p/27238630 在学习tensorflow的过程中,有很多小伙伴反映读取数据这一块很难理解.确实这一块官方的教程比较简略,网上也找 ...
- tensorflow 1.0 学习:参数和特征的提取
在tf中,参与训练的参数可用 tf.trainable_variables()提取出来,如: #取出所有参与训练的参数 params=tf.trainable_variables() print(&q ...
- tensorflow 1.0 学习:参数初始化(initializer)
CNN中最重要的就是参数了,包括W,b. 我们训练CNN的最终目的就是得到最好的参数,使得目标函数取得最小值.参数的初始化也同样重要,因此微调受到很多人的重视,那么tf提供了哪些初始化参数的方法呢,我 ...
- Tensorflow 2.0 学习资源
我从换了新工作才开始学习使用Tensorflow,感觉实在太难用了,sess和graph对 新手很不友好,各种API混乱不堪,这些在tf2.0都有了重大改变,2.0大量使用keras的 api,初步使 ...
- tensorflow 1.0 学习:用别人训练好的模型来进行图像分类
谷歌在大型图像数据库ImageNet上训练好了一个Inception-v3模型,这个模型我们可以直接用来进来图像分类. 下载地址:https://storage.googleapis.com/down ...
- tensorflow 1.0 学习:模型的保存与恢复(Saver)
将训练好的模型参数保存起来,以便以后进行验证或测试,这是我们经常要做的事情.tf里面提供模型保存的是tf.train.Saver()模块. 模型保存,先要创建一个Saver对象:如 saver=tf. ...
- tensorflow 1.0 学习:池化层(pooling)和全连接层(dense)
池化层定义在 tensorflow/python/layers/pooling.py. 有最大值池化和均值池化. 1.tf.layers.max_pooling2d max_pooling2d( in ...
- tensorflow 1.0 学习:卷积层
在tf1.0中,对卷积层重新进行了封装,比原来版本的卷积层有了很大的简化. 一.旧版本(1.0以下)的卷积函数:tf.nn.conv2d conv2d( input, filter, strides, ...
随机推荐
- Django框架(十一)--cookie和session
cookie和session组件 cookie 1.cookie的由来 大家都知道HTTP协议是无状态的. 无状态的意思是每次请求都是独立的,它的执行情况和结果与前面的请求和之后的请求都无直接关系,它 ...
- STM32串口复用关系&printf重定义
串口复用 什么是普通功能输入输出?普通功能输入输出类似于:大厅<—>门<—>室外的关系,大厅只需要经过大门即可到室外,从室外经过门也可以到达大厅. 什么是复用工功能输入输出?复 ...
- ZYNQ笔记(0):C语言基础知识复习
ZYNQ的SDK是用C语言进行开发的,C语言可以说是当今理工类大学生的必备技能.我本科学C语言时就是对付考试而已,导致现在学ZYNQ是一脸懵逼.现在特开一帖,整理一下C语言的基础知识. 一.定义 1. ...
- Delphi中AssignFile函数
procedure TForm1.SaveLog(sFlag:string;MSG:string);var QF1:Textfile; ----声明文本文件类型 Qfiletmp,sP ...
- ASP.NET SignalR 系列(五)之群组推送
在上一章介绍了 一对一推送的方式,这章重点介绍下群组推送和多人推送 群组主要就是用到了方法:Groups.Add(Context.ConnectionId, groupName); 将不同的连接id加 ...
- Java 之 Cookie
Cookie 一.会话概述 1.会话:一次会话中包含多次请求和响应. 一次会话:浏览器第一次给服务器资源发送请求,会话建立,直到有一方断开为止. 2.功能: 在一次会话的范围内的多次请求间 ...
- IntelliJ IDEA快速自动生成Junit测试类
1.背景 测试是保证代码必不可少的环节,自己构建测试方法太慢,并且命名也不规范,idea中提供了,一键构建测试结构的功能...废话不多说,直接写步骤 2.步骤 1.在需要做测试的类的当前窗口,直接按快 ...
- layui加载显示问题
1.layui.config({ base: '../layuiadmin/' //静态资源所在路径 }).extend({ index: 'lib/index' //主入口模块 }).use(['i ...
- DELL R720针对磁盘故障面板信息误报解决
现象: 面板报警信息显示 PDR1101 fault detected on drive 0. Check drive... 经查资料是磁盘故障的原因,而r720的idrac似乎我们没有安装,我不能通 ...
- golang中逗号ok模式_转
,ok,第一个参数是一个值或者nil,第二个参数是true/false或者一个错误error.在一个需要赋值的if条件语句中,使用这种模式去检测第二个参数值会让代码显得优雅简洁.这种模式在go语言编码 ...