element ui改写实现两棵树
使用element ui组件库实现一个table的两棵树的效果
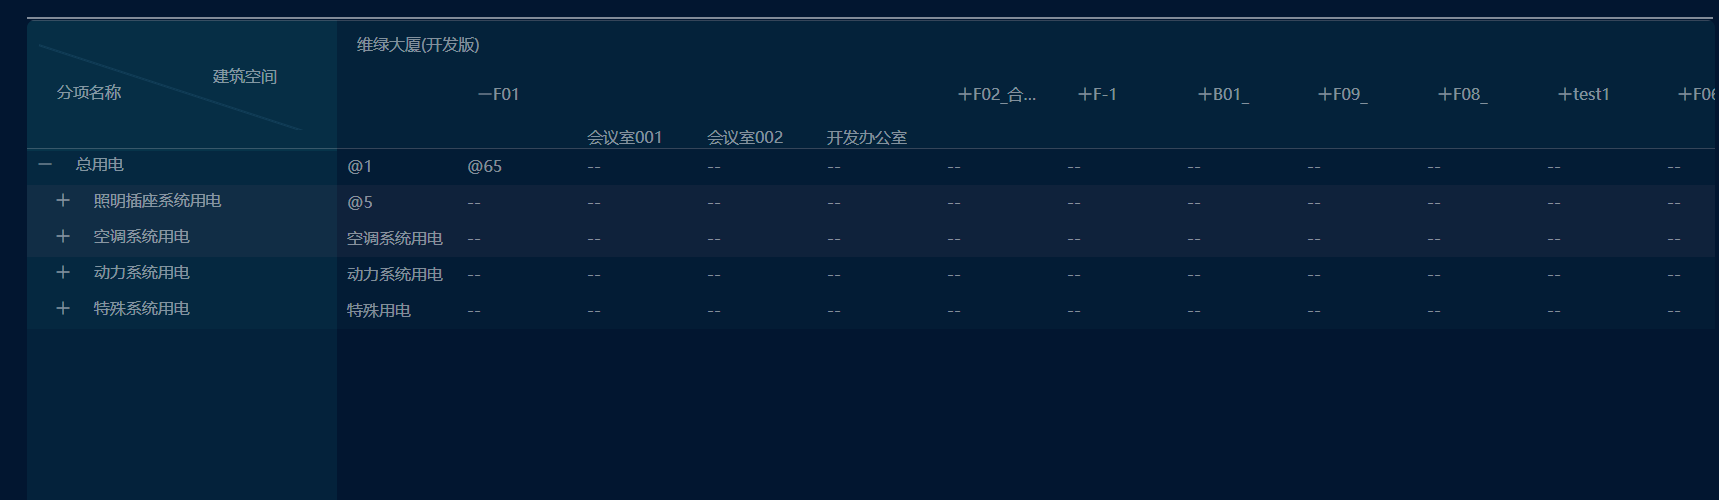
效果如下,左边树自动展开一级,右边树默认显示楼层,然后可以一个个展开
代码如下
 <el-table :data="relativeData"

              :fit="isFit"

              height="700px"

              :row-style="showTr"

              :row-class-name="tableRowClassName"

              :header-row-class-name="tableRowClassName"

              size="small"

              highlight-current-row>

      <el-table-column fixed

                       width=""

                       show-overflow-tooltip

                       style="max-width:310px;">

        <template slot="header">

          <div class="monitor_header">

            <div class="monitor_item">分项名称</div>

            <div class="line_item"></div>

            <div class="building_item">建筑空间</div>

          </div>

        </template>

        <template slot-scope="scope">

          <template v-if="spaceIconShow()">

            <span v-for="(space, levelIndex) in scope.row._level"

                  class="ms-tree-space"

                  :key="levelIndex"></span>

          </template>

          <span class="button"

                v-if="toggleIconShow(scope.row)"

                @click="toggle(scope.$index)">

            <i v-if="!scope.row._expanded"

               class="el-icon-plus"

               aria-hidden="true"></i>

            <i v-if="scope.row._expanded"

               class="el-icon-minus"

               aria-hidden="true"></i>

          </span>

          <span class="ms-tree-space"></span>

          {{scope.row.name}}

          <div class="table_tree_icons">

            <i class="plus_icon"

               @click.stop="addMonitorDailog(scope.row,$event)"></i>

            <i class="edit_icon"

               @click.stop="updateMonitorDailog(scope.row,$event)"></i>

            <i class="delete_icon"

               v-if="scope.row.parentNodeId!='0'"

               @click.stop="

                   deleteMonitor(scope.row,$event)"></i></div>

        </template>

      </el-table-column>

      <el-table-column v-for="(building,index) in spaceTreeData2"

                       :key="index"

                       show-overflow-tooltip

                       :label="building.name">

        <template slot="header">

          <!-- <i class="el-icon-plus"

                   style="color:#ddd;margin-right:5px;cursor:pointer"

                   @click="toggleExpandFloor(building.id,$event)"></i> -->

          <div>{{building.name}}</div>

        </template>

        <el-table-column width=""

                         show-overflow-tooltip>

          <el-table-column width=""

                           show-overflow-tooltip>

            <template slot-scope="scope">

              <template v-if="!(scope.row.relatives.some(item => {if(item.spaceId==building.id){return true;}}))">

                <span class="row-column-express"

                      @click.stop="addExpress(scope.row,building.id,$event)">--</span>

              </template>

              <template v-for=" (item,index) in scope.row.relatives">

                <span class="row-column-express"

                      :key="index"

                      v-if="item.spaceId==building.id"

                      @click.stop="updateExpress(item,$event)">{{ item.expression }}</span>

              </template>

            </template>

          </el-table-column>

        </el-table-column>

        <template v-if="showFloor &&building.children&& building.children.length>0">

          <!--  :render-header="renderHeaderSecond" -->

          <el-table-column v-for="(floor,findex) in building.children"

                           :key="findex"

                           show-overflow-tooltip

                           :label="floor.name"

                           width="">

            <template slot="header"

                      slot-scope="scope">

              <div><i class="el-icon-plus"

                   @click="expandFloorInfo(scope,floor,$event)"></i><span>{{floor.name}}</span></div>

            </template>

            <el-table-column width=""

                             show-overflow-tooltip>

              <template slot-scope="scope">

                <template v-if="!(scope.row.relatives.some(item => {if(item.spaceId==floor.id){return true;}}))">

                  <span class="row-column-express"

                        @click.stop="addExpress(scope.row,floor.id,$event)">--</span>

                </template>

                <template v-for=" (item,index3) in scope.row.relatives">

                  <span class="row-column-express"

                        :key="index3"

                        v-if="item.spaceId==floor.id"

                        @click.stop="updateExpress(item,$event)">{{ item.expression }}</span>

                </template>

              </template>

            </el-table-column>

            <template v-if="floor.children && floor.children.length>0">

              <el-table-column v-for="(room,index2) in floor.children"

                               show-overflow-tooltip

                               :key="index2"

                               :label="room.name"

                               width="">

                <template slot-scope="scope">

                  <template v-if="!(scope.row.relatives.some(item => {if(item.spaceId==room.id){return true;}}))">

                    <span class="row-column-express"

                          @click.stop="addExpress(scope.row,room.id,$event)">--</span>

                  </template>

                  <template v-for=" (item,index4) in scope.row.relatives">

                    <span class="row-column-express"

                          :key="index4"

                          v-if="item.spaceId==room.id"

                          @click.stop="updateExpress(item,$event)">{{ item.expression }}</span>

                  </template>

                </template>

              </el-table-column>

            </template>

          </el-table-column>

        </template>

      </el-table-column>

    </el-table>
数据层
  props: {

    //左边分项树的内容

    monitorRelativeData: {

      type: Array

    },

   //头部空间树的数据

    spaceTreeData: {

      type: Array

    }

  },

data() {

    return {

      expandRowKeys: [], //默认展开的节点

      isFit: false, //table是否自适应

      roomList: []//为了控制房间的显示,存储房间集合

    }

  },

computed: {

    //数据的处理,每条数据是否展开,父节点信息等

    relativeData() {

      let data = MSDataTransfer.treeToArray(this.monitorRelativeData, null, null, true)

      return data

    },

    //只存储楼层,房间另外存储

    spaceTreeData2() {

      var res = this.spaceTreeData

      var roomList = []

      if (res.length ==  || !res[].children) {

        return []

      }

      res[].children = this.spaceTreeData[].children.map(function(item) {

        item.len = item.children ? item.children.length :

        if (item.len > ) {

          roomList = roomList.concat(item.children)

        }

        item.children = []

        return item

      })

      this.roomList = roomList

      return res

    },

    buildingId() {

      return this.$store.getters.buildingId

    }

  },
MSDataTransfer.treeToArray是把tree的层级关系进行处理 加入 _expanded属性,_parent父节点属性,_level层级关系
// 数据转换

DataTransfer.treeToArray = function(data, parent, level, expandedAll) {

  let tmp = [];

  Array.from(data).forEach(function(record) {

    if (record._expanded === undefined) {

      Vue.set(record, "_expanded", expandedAll);

    }

    if (parent) {

      Vue.set(record, "_parent", parent);

    }

    let _level = ;

    if (level !== undefined && level !== null) {

      _level = level + ;

    }

    Vue.set(record, "_level", _level);

    tmp.push(record);

    if (record.children && record.children.length > ) {

      let children = DataTransfer.treeToArray(

        record.children,

        record,

        _level,

        expandedAll

      );

      tmp = tmp.concat(children);

    }

  });

  return tmp;

};
MSDataTransfer.treeToArray处理左边树的时候是,默认展开所有,然后在每次操作的时候,都对树的是否展开状态进行更改
 updated() {

    this.toggleAll()

  },

  methods: {

    //test add

    spaceIconShow(index) {

      return true

    },

    toggleIconShow(record) {

      if (record.children && record.children.length > ) {

        return true

      }

      return false

    },

    toggle(trIndex) {

      let record = this.relativeData[trIndex]

      record._expanded = !record._expanded

      //展开的数据节点

      if (record._expanded) {

        this.expandRowKeys.push(record.id)

      } else {

        var expandRowKeys = []

        this.expandRowKeys.forEach(function(item) {

          if (item != record.id) {

            expandRowKeys.push(item)

          }

        })

        this.expandRowKeys = expandRowKeys

      }

    },

    showTr(rows, index) {

      let row = rows.row

      let show = row._parent ? row._parent._expanded && row._parent._show : true

      row._show = show

      return show ? '' : 'display:none;'

    },

    toggleAll() {

      /**

       * i 从1开始,不收起第一级节点

       */

      for (let i = ; i < this.relativeData.length; i++) {

        let record = this.relativeData[i]

        if (this.expandRowKeys.indexOf(record.id) == -) {

          record._expanded = false

        }

      }

      console.log('toggleAll', this.relativeData)

    },/**关闭房间 */

    expandFloorInfo(row, floor, event) {

      if (floor.len >  && floor.children.length == ) {

        var roomList = this.roomList

        for (var i = ; i < roomList.length; i++) {

          if (roomList[i].parentNodeId && roomList[i].parentNodeId == floor.nodeId) {

            floor.children.push(roomList[i])

            if (floor.len == floor.children.length) {

              break

            }

          }

        }

        this.expandFloorInfo(row, floor, event)

        return

      }

      var column = row.column

      console.log('column', column)

      var len = floor.children.length

      var columnArr = column.id.split('_')

      var num = columnArr[columnArr.length - ]

      columnArr.pop()

      columnArr.pop()

      var tableClass = columnArr.join('_')

      console.log('tableClass', tableClass)

      num++

      //展开

      if (event.target.className == 'el-icon-plus') {

        event.target.className = 'el-icon-minus'

        event.target.parentNode.parentNode.parentNode.colSpan = len +

        JQuery('.' + tableClass)[].colSpan += len

        JQuery('.el-table table.el-table__header').css('cssText', 'width:310px !important')

        JQuery('.el-table table.el-table__body').css('cssText', 'width:310px!important')

        JQuery('[name^=' + column.id + '_]').show()

        JQuery('[class^=' + column.id + '_]').show()

      } else {

        //收缩

        event.target.className = 'el-icon-plus'

        JQuery('[name^=' + column.id + '_]').hide()

        JQuery('[class^=' + column.id + '_]').hide()

        JQuery('[name^=' + column.id + '_column_' + num + ']').show()

        JQuery('[class^=' + column.id + '_column_' + num + ']').show()

        event.target.parentNode.parentNode.parentNode.colSpan =

        JQuery('.' + tableClass)[].colSpan -= len

        JQuery('.el-table table.el-table__body').css('cssText', 'width:310px !important')

        JQuery('.el-table table.el-table__header').css('cssText', 'width:310px !important')

      }

    },
}
element ui改写实现两棵树的更多相关文章
- WPF的两棵树与绑定
原文:WPF的两棵树与绑定 先建立测试基类 public class VisualPanel : FrameworkElement { protected VisualCollection Chi ...
- LeetCode——Same Tree(判断两棵树是否相同)
问题: Given two binary trees, write a function to check if they are equal or not. Two binary trees are ...
- [51nod1325]两棵树的问题
description 题面 solution 点分治+最小割. 点分必选的重心,再在树上dfs判交,转化为最大权闭合子图. 可以做\(k\)棵树的情况. code #include<iostr ...
- 51 NOD 1325 两棵树的问题
Discription 对于 100% 的数据, N<=50. solution: 发现N比较小,所以我们可以花O(N^2)的代价枚举两颗树的联通块的LCA分别是哪个点,然后现在问题就变成了:选 ...
- 51nod 1325 两棵树的问题(最大权闭合子图)
首先如果点权全都为正,就可以直接选所有的点. 活在梦里.. 考虑枚举一个点\(i\),作为我们选择的集合中的一个点. 然后我们把另一个点\(j\)选入集合的时候必须把两棵树中\(i\)和\(j\)路径 ...
- HDU 6315.Naive Operations-线段树(两棵树合并)(区间单点更新、区间最值、区间求和)+思维 (2018 Multi-University Training Contest 2 1007)
6315.Naive Operations 题意很好理解,但是因为区间求和求的是向下取整的a[i]/b[i],所以直接分数更新区间是不对的,所以反过来直接当a[i]==b[i]的时候,线段树对应的位置 ...
- 判断两棵树是否相等 leecode
很简单 提交代码 https://oj.leetcode.com/problems/same-tree/ iven two binary trees, write a function to chec ...
- hdu-3015 Disharmony Trees---离散化+两个树状数组
题目链接: http://acm.hdu.edu.cn/showproblem.php?pid=3015 题目大意: 有一些树,这些树的高度和位置给出.现在高度和位置都按从小到大排序,对应一个新的ra ...
- LeetCode——1305. 两棵二叉搜索树中的所有元素
给你 root1 和 root2 这两棵二叉搜索树. 请你返回一个列表,其中包含 两棵树 中的所有整数并按 升序 排序.. 示例 1: 输入:root1 = [2,1,4], root2 = [1,0 ...
随机推荐
- 剑指offer:构建乘积数组
题目描述: 给定一个数组A[0,1,...,n-1],请构建一个数组B[0,1,...,n-1],其中B中的元素B[i]=A[0]*A[1]*...*A[i-1]*A[i+1]*...*A[n-1]. ...
- 数据库sql优化总结之4--SQL优化总结
一.问题的提出 在应用系统开发初期,由于开发数据库数据比较少,对于查询SQL语句,复杂视图的的编写等体会不出SQL语句各种写法的性能优劣,但是如果将应用系统提交实际应用后,随着数据库中数据的增加,系统 ...
- primer express 注册
xp的
- index row size 2720 exceeds maximum 2712 for index "xxx" ,Values larger than 1/3 of a buffer page cannot be indexed.
记录一个bug情况: 我有个表NewTable,复合主键(slaveid,resid,owner) CREATE TABLE "public"."NewTable&quo ...
- ABS函数 去掉金额字段值为负数问题
)) from OrderDetail
- 学习使用Lombok生成代码
一.介绍 Lombok官网:https://projectlombok.org/ Lombok的功能简单一点说,就是可以帮我们生成一些代码,这些代码并不是在源码(source code)体现出来的,而 ...
- python限定方法参数类型、返回值类型、变量类型等
typing模块的作用 自python3.5开始,PEP484为python引入了类型注解(type hints) 类型检查,防止运行时出现参数和返回值类型.变量类型不符合. 作为开发文档附加说明,方 ...
- 基于Wiremock创建Mock Service平台(转)
本文链接:https://blog.csdn.net/liuchunming033/article/details/52399397 ...
- jQuery fancy box 移除close "X" button
version: fancybox 2.1.4 <div id="reloadPagePopup" class="div-fancy-box"> & ...
- [LeetCode] 80. Remove Duplicates from Sorted Array II 有序数组中去除重复项 II
Given a sorted array nums, remove the duplicates in-place such that duplicates appeared at most twic ...