ThinkPHP整合cropper剪裁图片上传功能
1.先下载核心文件:https://github.com/fengyuanchen/cropper

2.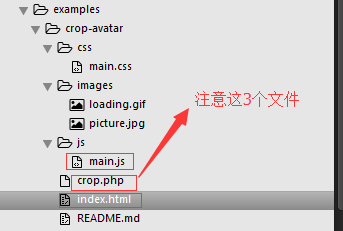
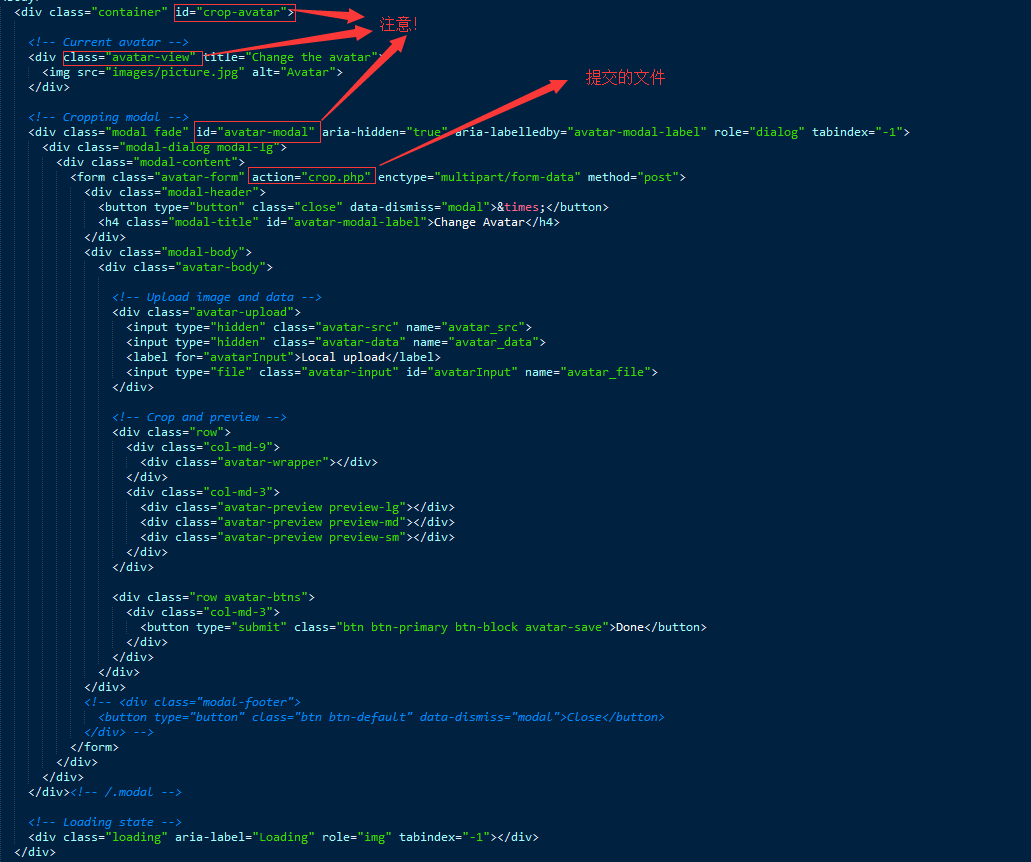
3.对于index.html文件
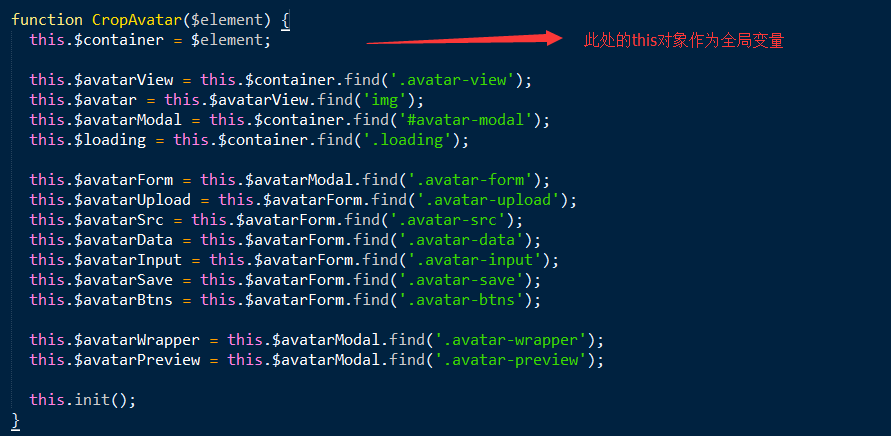
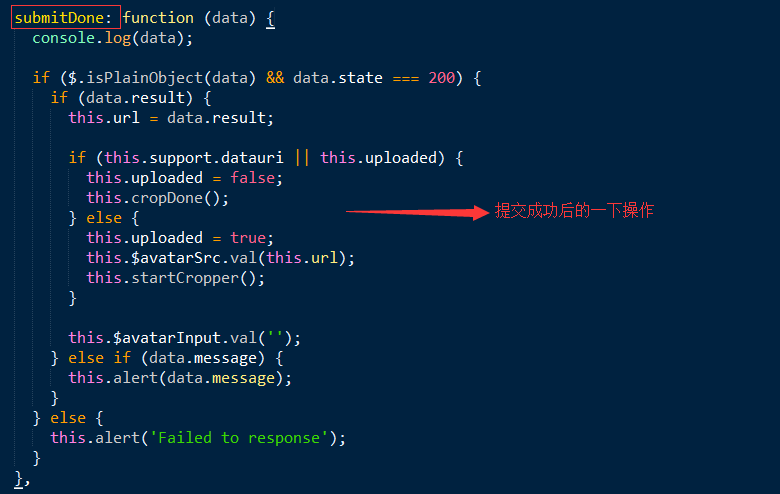
4.对于main.js文件


5.对于crop.php文件
<?php

class CropAvatar {

  private $src;

  private $data;

  private $dst;

  private $type;

  private $extension;

  private $msg;

  function __construct($src, $data, $file) {

    $this -> setSrc($src);

    $this -> setData($data);

    $this -> setFile($file);

    $this -> crop($this -> src, $this -> dst, $this -> data);

  }

  private function setSrc($src) {

    if (!empty($src)) {

      $type = exif_imagetype($src);

      if ($type) {

        $this -> src = $src;

        $this -> type = $type;

        $this -> extension = image_type_to_extension($type);

        $this -> setDst();

      }

    }

  }

  private function setData($data) {

    if (!empty($data)) {

      $this -> data = json_decode(stripslashes($data));

    }

  }

  private function setFile($file) {

    $errorCode = $file['error'];

    if ($errorCode === UPLOAD_ERR_OK) {

      $type = exif_imagetype($file['tmp_name']);

      if ($type) {

        $extension = image_type_to_extension($type);

        $src = 'images/' . date('YmdHis') . '.original' . $extension;

        if ($type == IMAGETYPE_GIF || $type == IMAGETYPE_JPEG || $type == IMAGETYPE_PNG) {

          if (file_exists($src)) {

            unlink($src);

          }

          $result = move_uploaded_file($file['tmp_name'], $src);

          if ($result) {

            $this -> src = $src;

            $this -> type = $type;

            $this -> extension = $extension;

            $this -> setDst();

          } else {

             $this -> msg = 'Failed to save file';

          }

        } else {

          $this -> msg = 'Please upload image with the following types: JPG, PNG, GIF';

        }

      } else {

        $this -> msg = 'Please upload image file';

      }

    } else {

      $this -> msg = $this -> codeToMessage($errorCode);

    }

  }

  private function setDst() {

    $this -> dst = 'images/' . date('YmdHis') . '.png';

  }

  private function crop($src, $dst, $data) {

    if (!empty($src) && !empty($dst) && !empty($data)) {

      switch ($this -> type) {

        case IMAGETYPE_GIF:

          $src_img = imagecreatefromgif($src);

          break;

        case IMAGETYPE_JPEG:

          $src_img = imagecreatefromjpeg($src);

          break;

        case IMAGETYPE_PNG:

          $src_img = imagecreatefrompng($src);

          break;

      }

      if (!$src_img) {

        $this -> msg = "Failed to read the image file";

        return;

      }

      $size = getimagesize($src);

      $size_w = $size[0]; // natural width

      $size_h = $size[1]; // natural height

      $src_img_w = $size_w;

      $src_img_h = $size_h;

      $degrees = $data -> rotate;

      // Rotate the source image

      if (is_numeric($degrees) && $degrees != 0) {

        // PHP's degrees is opposite to CSS's degrees

        $new_img = imagerotate( $src_img, -$degrees, imagecolorallocatealpha($src_img, 0, 0, 0, 127) );

        imagedestroy($src_img);

        $src_img = $new_img;

        $deg = abs($degrees) % 180;

        $arc = ($deg > 90 ? (180 - $deg) : $deg) * M_PI / 180;

        $src_img_w = $size_w * cos($arc) + $size_h * sin($arc);

        $src_img_h = $size_w * sin($arc) + $size_h * cos($arc);

        // Fix rotated image miss 1px issue when degrees < 0

        $src_img_w -= 1;

        $src_img_h -= 1;

      }

      $tmp_img_w = $data -> width;

      $tmp_img_h = $data -> height;

      $dst_img_w = 220;

      $dst_img_h = 220;

      $src_x = $data -> x;

      $src_y = $data -> y;

      if ($src_x <= -$tmp_img_w || $src_x > $src_img_w) {

        $src_x = $src_w = $dst_x = $dst_w = 0;

      } else if ($src_x <= 0) {

        $dst_x = -$src_x;

        $src_x = 0;

        $src_w = $dst_w = min($src_img_w, $tmp_img_w + $src_x);

      } else if ($src_x <= $src_img_w) {

        $dst_x = 0;

        $src_w = $dst_w = min($tmp_img_w, $src_img_w - $src_x);

      }

      if ($src_w <= 0 || $src_y <= -$tmp_img_h || $src_y > $src_img_h) {

        $src_y = $src_h = $dst_y = $dst_h = 0;

      } else if ($src_y <= 0) {

        $dst_y = -$src_y;

        $src_y = 0;

        $src_h = $dst_h = min($src_img_h, $tmp_img_h + $src_y);

      } else if ($src_y <= $src_img_h) {

        $dst_y = 0;

        $src_h = $dst_h = min($tmp_img_h, $src_img_h - $src_y);

      }

      // Scale to destination position and size

      $ratio = $tmp_img_w / $dst_img_w;

      $dst_x /= $ratio;

      $dst_y /= $ratio;

      $dst_w /= $ratio;

      $dst_h /= $ratio;

      $dst_img = imagecreatetruecolor($dst_img_w, $dst_img_h);

      // Add transparent background to destination image

      imagefill($dst_img, 0, 0, imagecolorallocatealpha($dst_img, 0, 0, 0, 127));

      imagesavealpha($dst_img, true);

      $result = imagecopyresampled($dst_img, $src_img, $dst_x, $dst_y, $src_x, $src_y, $dst_w, $dst_h, $src_w, $src_h);

      if ($result) {

        if (!imagepng($dst_img, $dst)) {

          $this -> msg = "Failed to save the cropped image file";

        }

      } else {

        $this -> msg = "Failed to crop the image file";

      }

      imagedestroy($src_img);

      imagedestroy($dst_img);

    }

  }

  private function codeToMessage($code) {

    $errors = array(

      UPLOAD_ERR_INI_SIZE =>'The uploaded file exceeds the upload_max_filesize directive in php.ini',

      UPLOAD_ERR_FORM_SIZE =>'The uploaded file exceeds the MAX_FILE_SIZE directive that was specified in the HTML form',

      UPLOAD_ERR_PARTIAL =>'The uploaded file was only partially uploaded',

      UPLOAD_ERR_NO_FILE =>'No file was uploaded',

      UPLOAD_ERR_NO_TMP_DIR =>'Missing a temporary folder',

      UPLOAD_ERR_CANT_WRITE =>'Failed to write file to disk',

      UPLOAD_ERR_EXTENSION =>'File upload stopped by extension',

    );

    if (array_key_exists($code, $errors)) {

      return $errors[$code];

    }

    return 'Unknown upload error';

  }

  public function getResult() {

    return !empty($this -> data) ? $this -> dst : $this -> src;

  }

  public function getMsg() {

    return $this -> msg;

  }

}

$crop = new CropAvatar(

  isset($_POST['avatar_src']) ? $_POST['avatar_src'] : null,

  isset($_POST['avatar_data']) ? $_POST['avatar_data'] : null,

  isset($_FILES['avatar_file']) ? $_FILES['avatar_file'] : null

);

$response = array(

  'state'  => 200,

  'message' => $crop -> getMsg(),

  'result' => $crop -> getResult()

);

echo json_encode($response);
ThinkPHP整合cropper剪裁图片上传功能的更多相关文章
- thinkphp达到UploadFile.class.php图片上传功能
片上传在站点里是非经常常使用的功能.ThinkPHP里也有自带的图片上传类(UploadFile.class.php) 和图片模型类(Image.class.php).方便于我们去实现图片上传功能,以 ...
- Spring+SpringMVC+MyBatis+easyUI整合优化篇(七)图片上传功能
日常啰嗦 前一篇文章<Spring+SpringMVC+MyBatis+easyUI整合优化篇(六)easyUI与富文本编辑器UEditor整合>讲了富文本编辑器UEditor的整合与使用 ...
- springboot整合ueditor实现图片上传和文件上传功能
springboot整合ueditor实现图片上传和文件上传功能 写在前面: 在阅读本篇之前,请先按照我的这篇随笔完成对ueditor的前期配置工作: springboot+layui 整合百度富文本 ...
- PHP语言学习之php做图片上传功能
本文主要向大家介绍了PHP语言学习之php做图片上传功能,通过具体的内容向大家展示,希望对大家学习php语言有所帮助. 今天来做一个图片上传功能的插件,首先做一个html文件:text.php < ...
- [Ting's笔记Day8]活用套件carrierwave gem:(3)Deploy图片上传功能到Heroku网站
前情提要: 身为Ruby新手村民,创造稳定且持续的学习步调很重要,我用的方法就是一周在IT邦写三篇笔记,希望藉由把笔记和遇到的bug记录下来的过程,能帮助到未来想用Ruby on Rails架站的新手 ...
- H5 利用vue实现图片上传功能。
H5的上传图片如何实现呢? 以下是我用vue实现的图片上传功能,仅供参考. <!DOCTYPE html> <html> <head> <meta chars ...
- 给DEDECMS广告管理中增加图片上传功能
dedecms的广告管理功能稍微有点次,本文就是在dedecms广告管理原有的基础上增加广告图片上传功能. 安装方法,对应自己的dedecms版本下载对应的编码然后解压把里面的文件放在后台目录覆盖即可 ...
- vue 图片上传功能
这次做了vue页面的图片上传功能,不带裁剪功能的! 首先是html代码,在input框上添加change事件,如下: <ul class="clearfix"> ...
- 前端丨如何使用 tcb-js-sdk 实现图片上传功能
前言 tcb-js-sdk 让开发者可以在网页端使用 JavaScript 代码服务访问云开发的服务,以轻松构建自己的公众号页面或者独立的网站等 Web 服务.本文将以实现图片上传功能为例,介绍 tc ...
随机推荐
- nginx根据token做频率限制
在 nginx.conf 文件添加配置 limit_conn_log_level error; limit_conn_status ; limit_conn_zone $cookie_gray_DF_ ...
- 【LeetCode】102. Binary Tree Level Order Traversal (2 solutions)
Binary Tree Level Order Traversal Given a binary tree, return the level order traversal of its nodes ...
- C语言实现http get请求程序
1.客户端程序: 向指定URL发送http请求, http://files.cnblogs.com/files/yyx1-1/httpclient01.7z 源码程序 2.服务器程序: 接收URL请求 ...
- 使用xftp连接VirtualBox中的centos6.5
首先要在windows上安装xftp软件,这个是傻瓜式操作就不说了 安装完毕之后,在centos上查看是否装了xftpd服务. [root@centos Desktop]# rpm -qa | gre ...
- php类自动载入
在编写面向对象(OOP) 程序时,很多开发者为每个类新建一个 PHP 文件. 这会带来一个烦恼:每个脚本的开头,都需要包含(include)一个长长的列表(每个类都有个文件). 在 PHP 5 中,已 ...
- 再谈RESTAPI最佳实践
近一年半,我参与了两到三个项目的工作,这些项目涉及到大量供“外部”使用的REST API,稍后我们会看到为什么要将“外部”这个词放在引号之中.在项目工作期间,我不得不对这些API进行反复地设计,再设计 ...
- Redis(十四):主从复制
当数据量变得庞大的时候,读写分离还是很有必要的.同时避免一个redis服务宕机,导致应用宕机的情况,我们启用sentinel(哨兵)服务,实现主从切换的功能. 主从复制 Redis 支持简单且易用的主 ...
- CYQ学习主要摘要2
数据库配置假设如下: <connectionStrings> <add name="Conn" connectionString="Se ...
- etcd+calico集群的部署
etcd单机模式 设置环境变量 1 export HostIP="192.168.12.50" 执行如下命令,打开etcd的客户端连接端口4001和2379.etcd互联端口238 ...
- cocos2d-x 之 CCProgressTimer
--绕圆心转动的进度动画 local function SpriteProgressToRadial() local leftProgress = CCProgressTimer:create(CCS ...