02.Redis主从集群的Sentinel配置
1.集群环境
192.168.110.100192.168.110.101192.168.110.102192.168.110.103
192.168.110.100启动多个Redis sentinel服务,构成Redis sentinel集群192.168.110.101启动Redis服务,设置成主节点192.168.110.102启动Redis服务,设置成192.168.110.101的从节点192.168.110.103启动Redis服务,设置成192.168.110.101的从节点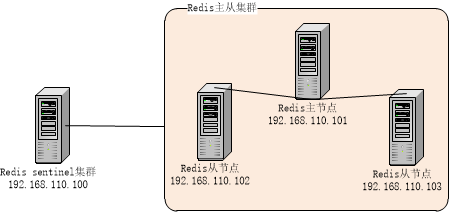
2.配置并启动Redis主从集群
# Master-Slave replication. Use slaveof to make a Redis instance a copy of# another Redis server. A few things to understand ASAP about Redis replication.## 1) Redis replication is asynchronous, but you can configure a master to# stop accepting writes if it appears to be not connected with at least# a given number of slaves.# 2) Redis slaves are able to perform a partial resynchronization with the# master if the replication link is lost for a relatively small amount of# time. You may want to configure the replication backlog size (see the next# sections of this file) with a sensible value depending on your needs.# 3) Replication is automatic and does not need user intervention. After a# network partition slaves automatically try to reconnect to masters# and resynchronize with them.## 主从同步。通过 slaveof 配置来实现Redis实例的备份。# 注意,这里是本地从远端复制数据。也就是说,本地可以有不同的数据库文件、绑定不同的IP、监听不同的端口。## slaveof <masterip> <masterport>slaveof 192.168.110.1016379
[wch@localhost bin]$ ./redis-server
./redis-server redis.conf
[wch@localhost bin]$ ./redis-cli -h 192.168.110.101 info Replication# Replicationrole:masterconnected_slaves:2slave0:ip=192.168.110.102,port=6379,state=online,offset=659,lag=1slave1:ip=192.168.110.103,port=6379,state=online,offset=659,lag=0master_repl_offset:659repl_backlog_active:1repl_backlog_size:1048576repl_backlog_first_byte_offset:2repl_backlog_histlen:658
[wch@localhost bin]$ ./redis-cli -h 192.168.110.102 info Replication# Replicationrole:slavemaster_host:192.168.110.101master_port:6379master_link_status:upmaster_last_io_seconds_ago:3master_sync_in_progress:0slave_repl_offset:701slave_priority:100slave_read_only:1connected_slaves:0master_repl_offset:0repl_backlog_active:0repl_backlog_size:1048576repl_backlog_first_byte_offset:0repl_backlog_histlen:0
[wch@localhost bin]$ ./redis-cli -h 192.168.110.103 info Replication# Replicationrole:slavemaster_host:192.168.110.101master_port:6379master_link_status:upmaster_last_io_seconds_ago:9master_sync_in_progress:0slave_repl_offset:715slave_priority:100slave_read_only:1connected_slaves:0master_repl_offset:0repl_backlog_active:0repl_backlog_size:1048576repl_backlog_first_byte_offset:0repl_backlog_histlen:0
3.配置sentinel集群并启动
port 26379# sentinel announce-ip <ip># sentinel announce-port <port>dir /tmp################################# master001 #################################sentinel monitor master001 192.168.110.10163792# sentinel auth-pass <master-name> <password>sentinel down-after-milliseconds master001 30000sentinel parallel-syncs master001 1sentinel failover-timeout master001 180000# sentinel notification-script <master-name> <script-path># sentinel client-reconfig-script <master-name> <script-path># 可以配置多个master节点################################# master002 #################################
./redis-sentinel sentinel001.conf./redis-sentinel sentinel002.conf./redis-sentinel sentinel003.conf
[7743]01Oct06:20:38.162# Sentinel runid is ba6c42e1accc31290e11d5876275e1562564295d[7743]01Oct06:20:38.162# +monitor master master001 192.168.110.101 6379 quorum 2[7743]01Oct06:20:39.110*+slave slave 192.168.110.102:6379192.168.110.1026379@ master001 192.168.110.1016379[7743]01Oct06:20:39.111*+slave slave 192.168.110.103:6379192.168.110.1036379@ master001 192.168.110.1016379[7743]01Oct06:25:07.595*+sentinel sentinel 192.168.110.100:36379192.168.110.10036379@ master001 192.168.110.1016379[7743]01Oct06:26:11.170*+sentinel sentinel 192.168.110.100:46379192.168.110.10046379@ master001 192.168.110.1016379
[7795]01Oct06:25:05.538# Sentinel runid is 52c14768b15837fb601b26328acf150c6bd30682[7795]01Oct06:25:05.538# +monitor master master001 192.168.110.101 6379 quorum 2[7795]01Oct06:25:06.505*+slave slave 192.168.110.102:6379192.168.110.1026379@ master001 192.168.110.1016379[7795]01Oct06:25:06.515*+slave slave 192.168.110.103:6379192.168.110.1036379@ master001 192.168.110.1016379[7795]01Oct06:25:07.557*+sentinel sentinel 192.168.110.100:26379192.168.110.10026379@ master001 192.168.110.1016379[7795]01Oct06:26:11.168*+sentinel sentinel 192.168.110.100:46379192.168.110.10046379@ master001 192.168.110.1016379
[7828]01Oct06:26:09.076# Sentinel runid is c8509594be4a36660b2122b3b81f4f74060c9b04[7828]01Oct06:26:09.076# +monitor master master001 192.168.110.101 6379 quorum 2[7828]01Oct06:26:10.063*+slave slave 192.168.110.102:6379192.168.110.1026379@ master001 192.168.110.1016379[7828]01Oct06:26:10.071*+slave slave 192.168.110.103:6379192.168.110.1036379@ master001 192.168.110.1016379[7828]01Oct06:26:11.516*+sentinel sentinel 192.168.110.100:26379192.168.110.10026379@ master001 192.168.110.1016379[7828]01Oct06:26:11.674*+sentinel sentinel 192.168.110.100:36379192.168.110.10036379@ master001 192.168.110.1016379
4.测试sentinel集群
[wch@localhost bin]$ ./redis-cli -h 192.168.110.101 info ReplicationCould not connect to Redis at 192.168.110.101:6379:Connection refused[wch@localhost bin]$ ./redis-cli -h 192.168.110.102 info Replication# Replicationrole:slavemaster_host:192.168.110.103master_port:6379master_link_status:upmaster_last_io_seconds_ago:1master_sync_in_progress:0slave_repl_offset:29128slave_priority:100slave_read_only:1connected_slaves:0master_repl_offset:0repl_backlog_active:0repl_backlog_size:1048576repl_backlog_first_byte_offset:0repl_backlog_histlen:0[wch@localhost bin]$ ./redis-cli -h 192.168.110.103 info Replication# Replicationrole:masterconnected_slaves:1slave0:ip=192.168.110.102,port=6379,state=online,offset=30456,lag=1master_repl_offset:30456repl_backlog_active:1repl_backlog_size:1048576repl_backlog_first_byte_offset:2repl_backlog_histlen:30455[wch@localhost bin]$
### 启动脚本,仍然使用默认配置[wch@localhost bin]$ ./redis-server[wch@localhost bin]$ ./redis-cli -h 192.168.110.101 info Replication# Replicationrole:slavemaster_host:192.168.110.103master_port:6379master_link_status:upmaster_last_io_seconds_ago:1master_sync_in_progress:0slave_repl_offset:57657slave_priority:100slave_read_only:1connected_slaves:0master_repl_offset:0repl_backlog_active:0repl_backlog_size:1048576repl_backlog_first_byte_offset:0repl_backlog_histlen:0[wch@localhost bin]$ ./redis-cli -h 192.168.110.102 info Replication# Replicationrole:slavemaster_host:192.168.110.103master_port:6379master_link_status:upmaster_last_io_seconds_ago:0master_sync_in_progress:0slave_repl_offset:60751slave_priority:100slave_read_only:1connected_slaves:0master_repl_offset:0repl_backlog_active:0repl_backlog_size:1048576repl_backlog_first_byte_offset:0repl_backlog_histlen:0[wch@localhost bin]$ ./redis-cli -h 192.168.110.103 info Replication# Replicationrole:masterconnected_slaves:2slave0:ip=192.168.110.102,port=6379,state=online,offset=63247,lag=1slave1:ip=192.168.110.101,port=6379,state=online,offset=63247,lag=1master_repl_offset:63393repl_backlog_active:1repl_backlog_size:1048576repl_backlog_first_byte_offset:2repl_backlog_histlen:63392[wch@localhost bin]$
[wch@localhost bin]$ ./redis-cli -h 192.168.110.101 info Replication# Replicationrole:slavemaster_host:192.168.110.103master_port:6379master_link_status:downmaster_last_io_seconds_ago:-1master_sync_in_progress:0slave_repl_offset:184231master_link_down_since_seconds:43slave_priority:100slave_read_only:1connected_slaves:0master_repl_offset:0repl_backlog_active:0repl_backlog_size:1048576repl_backlog_first_byte_offset:0repl_backlog_histlen:0[wch@localhost bin]$ ./redis-cli -h 192.168.110.102 info Replication# Replicationrole:slavemaster_host:192.168.110.103master_port:6379master_link_status:downmaster_last_io_seconds_ago:-1master_sync_in_progress:0slave_repl_offset:184231master_link_down_since_seconds:52slave_priority:100slave_read_only:1connected_slaves:0master_repl_offset:0repl_backlog_active:0repl_backlog_size:1048576repl_backlog_first_byte_offset:0repl_backlog_histlen:0[wch@localhost bin]$ ./redis-cli -h 192.168.110.103 info ReplicationCould not connect to Redis at 192.168.110.103:6379:Connection refused
02.Redis主从集群的Sentinel配置的更多相关文章
- Redis主从集群的Sentinel配置
http://www.cnblogs.com/LiZhiW/p/4851631.html
- docker搭建redis主从集群和sentinel哨兵集群,springboot客户端连接
花了两天搭建redis主从集群和sentinel哨兵集群,讲一下springboot客户端连接测试情况 redis主从集群 从网上查看说是有两种方式:一种是指定配置文件,一种是不指定配置文件 引用地址 ...
- Redis主从集群以及Sentinel的配置
安装完redis后,修改几个redis从节点的配置文件redis.conf,主要是加入主节点位置 slaveof 另外需要修改的地方包括,这样允许其他的从节点连入 bind 0.0.0.0 prote ...
- 一、全新安装搭建redis主从集群
前言· 这里分为三篇文章来写我是如何重新搭建redis主从集群和哨兵集群的及原本服务器上有单redis如何通过升级脚本来实现redis集群.(redis结构:主-从(备)-从(备)) 至于为什么要搭建 ...
- redis主从集群搭建及容灾部署(哨兵sentinel)
Redis也用了一段时间了,记录一下相关集群搭建及配置详解,方便后续使用查阅. 提纲 Redis安装 整体架构 Redis主从结构搭建 Redis容灾部署(哨兵sentinel) Redis常见问题 ...
- Redis主从集群及哨兵模式
本次实验环境准备用一台服务器模拟3台redis服务器,1主2从 主从集群搭建 第一步:安装Redis 安装Redis,参考前面安装Redis文章,保证单机使用没有问题. 第二步:配置服务器文件 定位到 ...
- Redis Cluster集群搭建与配置
Redis Cluster是一种服务器sharding分片技术,关于Redis的集群方案应该怎么做,请参考我的另一篇博客http://www.cnblogs.com/xckk/p/6134655.ht ...
- Redis 主从集群搭建及哨兵模式配置
最近搭建了redis集群及哨兵模式,为方便以后查看特此记录下来: 1.Redis安装 2.主从架构 2.1 Redis主从架构图 2.2Redis主从结构搭建 Redis集群不用安装多个Redis,只 ...
- Redis主从,集群部署及迁移
工作中有时会遇到需要把原Redis集群下线,迁移到另一个新的Redis集群的需求(如机房迁移,Redis上云等原因).此时原Redis中的数据需要如何操作才可顺利迁移到一个新的Redis集群呢? 本节 ...
随机推荐
- ThinkPHP之中利用commom被继承控制器控制访问每一个控制器方法都需要验证是否已经登录!
防止 <?php namespace Home\Controller; use Think\Controller; class CommonController extends Controll ...
- MySQL: ON DUPLICATE KEY UPDATE 用法 避免重复插入数据
INSERT INTO osc_visit_stats(stat_date,type,id,view_count) VALUES (?,?,?,?) ON DUPLICATEKEY UPDATE vi ...
- php 获取文件后缀名
$file_ext = strtolower(substr(strrchr($upload_file, '.'), 1)); strrchr:查找指定字符在字符串中的最后一次出现 string str ...
- Windows7下CHM电子书打开不能正常显示内容
Author:KillerLegend Date:2014.1.28 Welcome to my blog:http://www.cnblogs.com/killerlegend/ 今日下载一个CHM ...
- onMeasure 出现java.lang.NullPointerException
直接在xml中使用自定义的布局.如自定义了一个view的onMeasure方法,如果此时引用Application就容易发生NullPointExecption异常.
- CentOS 7上的redis搭建
http://www.cnblogs.com/shanyou/archive/2012/07/14/2591881.html
- ASP.NET中前台调用后台的方法
学习文章:http://www.cnblogs.com/kingteach/archive/2010/11/12/1875633.html 练习代码: 前台: <html xmlns=" ...
- WebService到底是什么?(转)
一.序言 大家或多或少都听过WebService(Web服务),有一段时间很多计算机期刊.书籍和网站都大肆的提及和宣传WebService技术,其中不乏很多吹嘘和做广告的成分.但是不得不承认的是Web ...
- MySQL 的数值数据类型
MySQL 的数值数据类型可以大致划分为两个类别,一个是整数,另一个是浮点数或小数.许多不同的子类型对这些类别中的每一个都是可用的,每个子类型支持不同大小的数据,并且 MySQL 允许我们指定数值字段 ...
- oracle 查询今天哪个表增加的数据多
一.创建一个表 create table A( TABLE_NAME VARCHAR2(200), COUNT_NUM NUMBER) 二.创建一个存储过程create or replace ...