MySQL主从数据库的安装
安装环境
操作系统 :CentOS 6.5

数据库版本:MySQL 5.6.27

主机A:192.168.1.1 (Master)

主机B:192.168.1.2 (Slave)- 1
- 2
- 3
- 4
这里强调的数据库的版本,是因为MySQL在5.6之前和之后的安装方式是不一样的。
本人在进行配置的时候,也遇到了这个坑,这里提前说明,希望大家不要采坑。
注:这里有一篇CentOS安装MySQL的文章,在这里引出,过程亲测,希望对大家有帮助:http://blog.csdn.net/xlgen157387/article/details/49964557
基本环境配置
首先,要保证防火墙对3306端口的开启,(开启方式,请参考:[http://blog.csdn.net/xlgen157387/article/details/49964557]),如果只是为了学习数据库的主从配置,可以使用service iptables stop 命令直接关闭防火墙。
然后可以在两台机子之间进行 ping操作,确保两台机器之间能够相同。
Master的配置
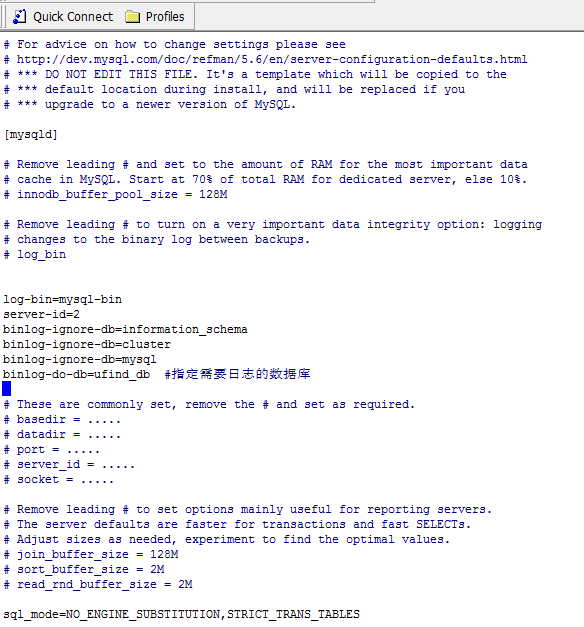
在Linux环境下MySQL的配置文件的位置是在 /etc/my.cnf ,在该文件下指定Master的配置如下:
log-bin=mysql-bin

server-id=2

binlog-ignore-db=information_schema

binlog-ignore-db=cluster

binlog-ignore-db=mysql

binlog-do-db=ufind_db - 1
- 2
- 3
- 4
- 5
- 6
这里的server-id用于标识唯一的数据库,这里设置为2,在设置从库的时候就需要设置为其他值。
binlog-ignore-db:表示同步的时候ignore的数据库
binlog-do-db:指定需要同步的数据库
完整配置截图如下:
1、然后重启mysql:service mysqld restart
2、进入mysql:[root@VM_221_4_centos ~]# mysql -u root -p 回车,输入mysql密码进入。
3、 赋予从库权限帐号,允许用户在主库上读取日志,赋予192.168.1.2也就是Slave机器有File权限,只赋予Slave机器有File权限还不行,还要给它REPLICATION SLAVE的权限才可以。
在Master数据库命令行中输入:
 >GRANT FILE ON *.* TO 'root'@'192.168.1.2' IDENTIFIED BY 'mysql password';

 >GRANT REPLICATION SLAVE ON *.* TO 'root'@'192.168.1.2' IDENTIFIED BY 'mysql password';

>FLUSH PRIVILEGES- 1
- 2
- 3
- 4
这里使用的仍是 root 用户作为同步的时候使用到的用户,可以自己设定。
4、重启mysql,登录mysql,显示主库信息
mysql> show master status;- 1
mysql> show master status;

+------------------+----------+--------------+----------------------------------+-------------------+

| File             | Position | Binlog_Do_DB | Binlog_Ignore_DB                 | Executed_Gtid_Set |

+------------------+----------+--------------+----------------------------------+-------------------+

| mysql-bin.000004 |    28125 | ufind_db     | information_schema,cluster,mysql |                   |

+------------------+----------+--------------+----------------------------------+-------------------+

1 row in set (0.00 sec)

mysql> - 1
- 2
- 3
- 4
- 5
- 6
- 7
- 8
- 9

这里的 File 、Position 是在配置Salve的时候要使用到的,Binlog_Do_DB表示要同步的数据库,Binlog_Ignore_DB 表示Ignore的数据库,这些都是在配置的时候进行指定的。
另外:如果执行这个步骤始终为Empty set(0.00 sec),那说明前面的my.cnf没配置对。
Slave的配置
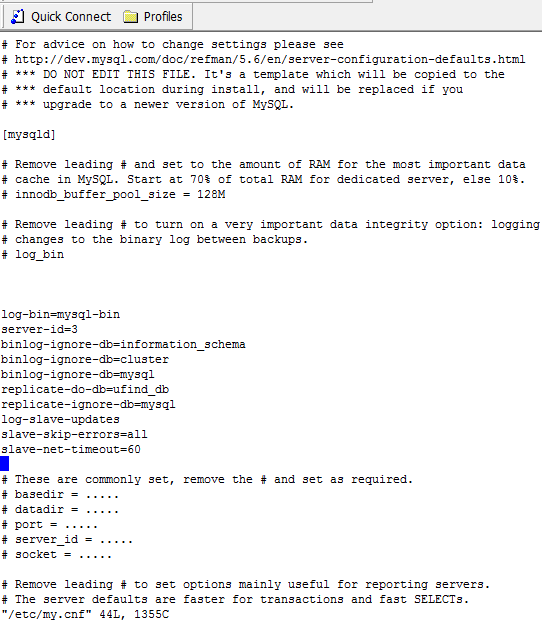
1、从库的配置,首先也是修改配置文件:/etc/my.cnf 如下:
log-bin=mysql-bin

server-id=3

binlog-ignore-db=information_schema

binlog-ignore-db=cluster

binlog-ignore-db=mysql

replicate-do-db=ufind_db

replicate-ignore-db=mysql

log-slave-updates

slave-skip-errors=all

slave-net-timeout=60- 1
- 2
- 3
- 4
- 5
- 6
- 7
- 8
- 9
- 10
2、这里可以看到,在MySQL5.6之后的版本中没有指定:
master-host=192.168.1.1 #Master的主机IP

master-user=root

master-password=mysql password #Master的MySQL密码- 1
- 2
- 3
3、这也是在网上很多搜索的配置过程,他们也都指定了数据库的版本,但是并没有说出来新版本的配置这种方式是不适用的。
4、如果,你在MySQL5.6和之后的版本中配置从库的时候,设置到了上边的内容,即指定了master-host、master-user等信息的话,重启MySQL的时候就回报错,错误信息如下:
[root@VM_128_194_centos bin]# service mysqld restart

Shutting down MySQL... SUCCESS!

Starting MySQL... ERROR! The server quit without updating PID file (/data/mysqldb/VM_128_194_centos.pid).

[root@VM_128_194_centos bin]# - 1
- 2
- 3
- 4
此时,查看数据库的报错信息(数据库的目录, /data/mysqldb/VM_128_194_centos.err ),可以看到:
2016-05-06 13:12:04 13345 [Note] InnoDB: Waiting for purge to start

2016-05-06 13:12:04 13345 [Note] InnoDB: 5.6.27 started; log sequence number 2850211

2016-05-06 13:12:04 13345 [ERROR] /data/home/server/mysql-5.6.27/bin/mysqld: unknown variable 'master-host=192.168.1.1'

2016-05-06 13:12:04 13345 [ERROR] Aborting
- 1
- 2
- 3
- 4
- 5
可以看出master-host 被检测数是一个未知的变量,因此会出现错误。
5、在5.6以及后续版本的配置如下:
修改完/etc/my.cnf 文件之后,重启一下MySQL(service mysqld restart)
进入Slave mysql控制台,执行:

mysql> stop slave;  #关闭Slave

mysql> change master to master_host='192.168.1.1',master_user='root',master_password='123456',master_log_file='mysql-bin.000004', master_log_pos=28125;

mysql> start slave; #开启Slave- 1
- 2
- 3
- 4
- 5
在这里指定Master的信息,master_log_file是在配置Master的时候的File选项, master_log_pos是在配置Master的Position 选项,这里要进行对应。
然后可以通过mysql> show slave status; 查看配置的信息:
mysql> show slave status \G;

*************************** 1. row ***************************

               Slave_IO_State: Waiting for master to send event

                  Master_Host: 192.167.1.1

                  Master_User: root

                  Master_Port: 3306

                Connect_Retry: 60

              Master_Log_File: mysql-bin.000004

          Read_Master_Log_Pos: 28125

               Relay_Log_File: VM_128_194_centos-relay-bin.000004

                Relay_Log_Pos: 26111

        Relay_Master_Log_File: mysql-bin.000004

             Slave_IO_Running: Yes

            Slave_SQL_Running: Yes

              Replicate_Do_DB: ufind_db

          Replicate_Ignore_DB: mysql

           Replicate_Do_Table:

       Replicate_Ignore_Table:

      Replicate_Wild_Do_Table:

  Replicate_Wild_Ignore_Table:

                   Last_Errno: 0

                   Last_Error:

                 Skip_Counter: 0

          Exec_Master_Log_Pos: 28125

              Relay_Log_Space: 26296

              Until_Condition: None

               Until_Log_File:

                Until_Log_Pos: 0

           Master_SSL_Allowed: No

           Master_SSL_CA_File:

           Master_SSL_CA_Path:

              Master_SSL_Cert:

            Master_SSL_Cipher:

               Master_SSL_Key:

        Seconds_Behind_Master: 0

Master_SSL_Verify_Server_Cert: No

                Last_IO_Errno: 0

                Last_IO_Error:

               Last_SQL_Errno: 0

               Last_SQL_Error:

  Replicate_Ignore_Server_Ids:

             Master_Server_Id: 2

                  Master_UUID: 8ac3066a-9680-11e5-a2ec-5254007529fd

             Master_Info_File: /data/mysqldb/master.info

                    SQL_Delay: 0

          SQL_Remaining_Delay: NULL

      Slave_SQL_Running_State: Slave has read all relay log; waiting for the slave I/O thread to update it

           Master_Retry_Count: 86400

                  Master_Bind:

      Last_IO_Error_Timestamp:

     Last_SQL_Error_Timestamp:

               Master_SSL_Crl:

           Master_SSL_Crlpath:

           Retrieved_Gtid_Set:

            Executed_Gtid_Set:

                Auto_Position: 0

1 row in set (0.00 sec)

ERROR:

No query specified

mysql>
- 1
- 2
- 3
- 4
- 5
- 6
- 7
- 8
- 9
- 10
- 11
- 12
- 13
- 14
- 15
- 16
- 17
- 18
- 19
- 20
- 21
- 22
- 23
- 24
- 25
- 26
- 27
- 28
- 29
- 30
- 31
- 32
- 33
- 34
- 35
- 36
- 37
- 38
- 39
- 40
- 41
- 42
- 43
- 44
- 45
- 46
- 47
- 48
- 49
- 50
- 51
- 52
- 53
- 54
- 55
- 56
- 57
- 58
- 59
- 60
- 61
- 62
- 63
可以看到,已经配置成功。
添加需要同步的从库Slave
由于种种原因,测试的时候使用test库,这里我按照上述的方式,修改Master的my.cnf的配置文件,新增同步的数据库test,重启MySQL,执行Master的:show master status如下:

相应的,要修改Slave从库的信息在my.cnf 增加 replicate-do-db=test,重启Mysql,根据上述的show master status,在Slave从库中执行下边的内容:
>stop slave

>change master to master_host='192.168.1.1',master_user='root',master_password='123456',master_log_file='mysql-bin.000005', master_log_pos=120;

>start slave- 1
- 2
- 3
- 4
然后使用:show slave status;
mysql> show slave status\G;

*************************** 1. row ***************************

               Slave_IO_State: Waiting for master to send event

                  Master_Host: 192.168.1.1

                  Master_User: root

                  Master_Port: 3306

                Connect_Retry: 60

              Master_Log_File: mysql-bin.000005

          Read_Master_Log_Pos: 1422

               Relay_Log_File: VM_128_194_centos-relay-bin.000004

                Relay_Log_Pos: 283

        Relay_Master_Log_File: mysql-bin.000005

             Slave_IO_Running: Yes

            Slave_SQL_Running: Yes

              Replicate_Do_DB: ufind_db,test

          Replicate_Ignore_DB: mysql

           Replicate_Do_Table:

       Replicate_Ignore_Table:

      Replicate_Wild_Do_Table:

  Replicate_Wild_Ignore_Table:

                   Last_Errno: 0

                   Last_Error:

                 Skip_Counter: 0

          Exec_Master_Log_Pos: 1422

              Relay_Log_Space: 468

              Until_Condition: None

               Until_Log_File:

                Until_Log_Pos: 0

           Master_SSL_Allowed: No

           Master_SSL_CA_File:

           Master_SSL_CA_Path:

              Master_SSL_Cert:

            Master_SSL_Cipher:

               Master_SSL_Key:

        Seconds_Behind_Master: 0

Master_SSL_Verify_Server_Cert: No

                Last_IO_Errno: 0

                Last_IO_Error:

               Last_SQL_Errno: 0

               Last_SQL_Error:

  Replicate_Ignore_Server_Ids:

             Master_Server_Id: 2

                  Master_UUID: 8ac3066a-9680-11e5-a2ec-5254007529fd

             Master_Info_File: /data/mysqldb/master.info

                    SQL_Delay: 0

          SQL_Remaining_Delay: NULL

      Slave_SQL_Running_State: Slave has read all relay log; waiting for the slave I/O thread to update it

           Master_Retry_Count: 86400

                  Master_Bind:

      Last_IO_Error_Timestamp:

     Last_SQL_Error_Timestamp:

               Master_SSL_Crl:

           Master_SSL_Crlpath:

           Retrieved_Gtid_Set:

            Executed_Gtid_Set:

                Auto_Position: 0

1 row in set (0.00 sec)

ERROR:

No query specified

mysql>
- 1
- 2
- 3
- 4
- 5
- 6
- 7
- 8
- 9
- 10
- 11
- 12
- 13
- 14
- 15
- 16
- 17
- 18
- 19
- 20
- 21
- 22
- 23
- 24
- 25
- 26
- 27
- 28
- 29
- 30
- 31
- 32
- 33
- 34
- 35
- 36
- 37
- 38
- 39
- 40
- 41
- 42
- 43
- 44
- 45
- 46
- 47
- 48
- 49
- 50
- 51
- 52
- 53
- 54
- 55
- 56
- 57
- 58
- 59
- 60
- 61
- 62
- 63
已经新增加了test。
真正的测试
在主库中新增数据库表,user,观察从库变化如下:
创建数据库的时候:

新增数据的时候:
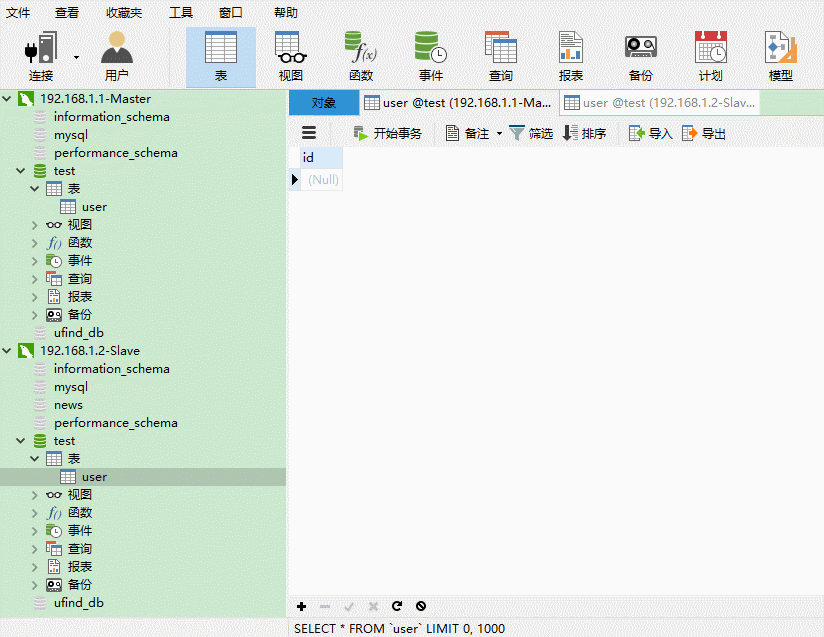
删除Master数据库表的时候:

配置过程,到此为止,希望能够帮助大家,如有疑问 欢迎留言。
MySQL主从数据库的安装的更多相关文章
- MySQL主从数据库同步延迟问题解决(转)
最近在做MySQL主从数据库同步测试,发现了一些问题,其中主从同步延迟问题是其中之一,下面内容是从网上找到的一些讲解,记录下来以便自己学习: MySQL的主从同步是一个很成熟的架构,优点为:①在从服务 ...
- Windows系统环境下创建mysql主从数据库方法(双向主从复制)
创建mysql主从数据库方法(双向主从复制) (一)Windows系统下的MySQL主从复制(单向复制) (1)环境说明: 1,Mysql版本:mysql5.7.20(主从机mysql版本必须一致) ...
- Mysql 主从数据库
MYSQL主从数据库同步备份配置 一.准备 用两台服务器做测试: Master Server: 172.16.0.180/Linux/MYSQL 5.1.41 Slave Server: 172.16 ...
- Mysql主从数据库架构的复制原理及配置详解
1 复制概述 Mysql内建的复制功能是构建大型,高性能应用程序的基础.将Mysql的数据分布到多个系统上去,这种分布的机制,是通过将Mysql的某一台主机的数据复制到其它主机(slaves)上,并重 ...
- MySQL 主从数据库设置
1.复制的介绍 MySQL 支持单向.异步复制,复制过程中一个服务器充当主服务器,而一个或多个其它服务器充当从服务器.主服务器将更新写入二进制日志文件,并维护文件的一个索引 以跟踪日志循环.这些日志可 ...
- 数据字符集mysql主从数据库,分库分表等笔记
文章结束给大家来个程序员笑话:[M] 1.mysql的目录:在rpm或者yum安装时:/var/lib/mysql 在编译安装时默许目录:/usr/local/mysql 2.用rpm包安装的MyS ...
- mysql主从数据库
Mysql主从配置,实现读写分离 大型网站为了软解大量的并发访问,除了在网站实现分布式负载均衡,远远不够.到了数据业务层.数据访问层,如果还是传统的数据结构,或者只是单单靠一台服务器扛,如此多的数据库 ...
- 配置mysql主从数据库
来源地址:https://www.cnblogs.com/alvin_xp/p/4162249.html Mysql主从配置,实现读写分离 大型网站为了软解大量的并发访问,除了在网站实现分布式负载均衡 ...
- 【linux】【mysql】mysql主从数据库
系统环境:Centos7 主:192.168.8.162 从:192.168.8.127 前提条件 a.关闭防火墙 systemctl stop firewalld 关闭防火墙开机自启 system ...
随机推荐
- The Carbon driver has not been ported to 64bits, and very few parts of Windows.Forms will work properly, or at all Stacktrace
解决地址:https://stackoverflow.com/questions/45776247/mono32-wont-work-mono64-throws-errors 应该是电脑的位与安装的m ...
- execve函数的介绍与使用
#include<stdio.h> #include<unistd.h> int main() { char *filename[]={"./BP",NUL ...
- CSS Overrides: Friend or Foe?
转自:http://www.callumhart.com/blog/css-overrides-friend-or-foe Anyone familiar with CSS will know how ...
- What's New In Zeebe: Scaling Zeebe, New Client APIs, Faster Requests, Timestamps, NodeJS Client, and Default Topic is Back!
Written by Daniel Meyer on May 16 2018 in the What's New In Zeebe category. Welcome to the first-eve ...
- 最新apache多域名多站点配置
httpd.conf===> Listen Listen ServerName 用IP地址作为servername LoadModule rewrite_module modules/mod_r ...
- Python高阶函数_map/reduce/filter函数
本篇将开始介绍python高阶函数map/reduce/filter的用法,更多内容请参考:Python学习指南 map/reduce Python内建了map()和reduce()函数. 如果你读过 ...
- h5新增内容
1.新的input type值 email url search tel color range number date month week time datetime datetime-local ...
- ML(5)——神经网络2(BP反向传播)
上一章的神经网络实际上是前馈神经网络(feedforward neural network),也叫多层感知机(multilayer perceptron,MLP).具体来说,每层神经元与下一层神经元全 ...
- 使用cmake编译luabind
编写了一下cmakelists.txt文件 根目录 cmake_minimum_required(VERSION 2.8)project (Test) add_definitions( "/ ...
- [转]一个故事讲清楚NIO
假设某银行只有10个职员.该银行的业务流程分为以下4个步骤: 1) 顾客填申请表(5分钟): 2) 职员审核(1分钟): 3) 职员叫保安去金库取钱(3分钟): 4) 职员打印票据,并将钱和票据返回给 ...