
[UGUI]图文混排(六):点击区域
点击区域可以分成两部分来分析:
0.Rect
搜索api:Rect和Rect.Rect,可以知道:
在GUI和GUILayout中,Rect的原点在左上角,向右为x轴正方向,向下为y轴正方向;
除此之外,其他情况下Rect的原点在左下角,向右为x轴正方向,向上为y轴正方向。
1.区域的判定
a.图片的可点击区域:整张图片
b.文字的可点击区域:下划线上的文字
2.点击响应
计算出区域后,因为这个区域是局部坐标系的,再将点击坐标转换为text中的局部坐标,判定该坐标是否在区域内,即可完成点击响应。
综上,可以得出如下的代码:
RichTextEvent.cs
 using UnityEngine;

 public class RichTextEvent {

     public Rect rect;//触发事件的判定区域

     public string name;//事件名

     public string parameter;//事件参数

 }
RichText.cs
 using System.Collections.Generic;

 using System.Text.RegularExpressions;

 using System.Text;

 using UnityEngine.EventSystems;

 using System;

 using UnityEngine;

 using UnityEngine.UI;

 //图片<icon name=*** w=1 h=1 n=*** p=***/>

 //下划线<material=underline c=#ffffff h=1 n=*** p=***>blablabla...</material>

 public class RichText : Text, IPointerClickHandler {

     private FontData fontData = FontData.defaultFontData;

     //--------------------------------------------------------图片 start

     private static readonly string replaceStr = "\u00A0";

     private static readonly Regex imageTagRegex = new Regex(@"<icon name=([^>\s]+)([^>]*)/>");//(名字)(属性)

     private static readonly Regex imageParaRegex = new Regex(@"(\w+)=([^\s]+)");//(key)=(value)

     private List<RichTextImageInfo> imageInfoList = new List<RichTextImageInfo>();

     private bool isImageDirty = false;

     //--------------------------------------------------------图片 end

     //--------------------------------------------------------文字 start

     private RichTextParser richTextParser = new RichTextParser();

     //--------------------------------------------------------文字 end

     //--------------------------------------------------------事件 start

     private Action<string, string> clickAction;

     private List<RichTextEvent> eventList = new List<RichTextEvent>();

     //--------------------------------------------------------事件 end

     //--------------------------------------------------------调试 start

     private bool isShowClickArea = true;//是否显示可点击区域

     //--------------------------------------------------------调试 end

     protected RichText()

     {

         fontData = typeof(Text).GetField("m_FontData", System.Reflection.BindingFlags.NonPublic | System.Reflection.BindingFlags.Instance).GetValue(this) as FontData;

     }

     readonly UIVertex[] m_TempVerts = new UIVertex[];

     protected override void OnPopulateMesh(VertexHelper toFill)

     {

         if (font == null)

             return;

         // We don't care if we the font Texture changes while we are doing our Update.

         // The end result of cachedTextGenerator will be valid for this instance.

         // Otherwise we can get issues like Case 619238.

         m_DisableFontTextureRebuiltCallback = true;

         //处理事件

         eventList.Clear();

         //处理图片标签

         string richText = text;

         IList<UIVertex> verts = null;

         richText = CalculateLayoutWithImage(richText, out verts);

         //处理文字标签

         List<RichTextTag> tagList = null;

         richTextParser.Parse(richText, out tagList);

         for (int i = ; i < tagList.Count; i++)

         {

             RichTextTag tag = tagList[i];

             switch (tag.tagType)

             {

                 case RichTextTagType.None:

                     break;

                 case RichTextTagType.Underline:

                     ApplyUnderlineEffect(tag as RichTextUnderlineTag, verts);

                     break;

                 default:

                     break;

             }

         }

         //Vector2 extents = rectTransform.rect.size;

         //var settings = GetGenerationSettings(extents);

         //cachedTextGenerator.Populate(text, settings);

         Rect inputRect = rectTransform.rect;

         // get the text alignment anchor point for the text in local space

         Vector2 textAnchorPivot = GetTextAnchorPivot(fontData.alignment);

         Vector2 refPoint = Vector2.zero;

         refPoint.x = Mathf.Lerp(inputRect.xMin, inputRect.xMax, textAnchorPivot.x);

         refPoint.y = Mathf.Lerp(inputRect.yMin, inputRect.yMax, textAnchorPivot.y);

         // Determine fraction of pixel to offset text mesh.

         Vector2 roundingOffset = PixelAdjustPoint(refPoint) - refPoint;

         // Apply the offset to the vertices

         //IList<UIVertex> verts = cachedTextGenerator.verts;

         float unitsPerPixel =  / pixelsPerUnit;

         //Last 4 verts are always a new line...

         int vertCount = verts.Count - ;

         toFill.Clear();

         if (roundingOffset != Vector2.zero)

         {

             for (int i = ; i < vertCount; ++i)

             {

                 int tempVertsIndex = i & ;

                 m_TempVerts[tempVertsIndex] = verts[i];

                 m_TempVerts[tempVertsIndex].position *= unitsPerPixel;

                 m_TempVerts[tempVertsIndex].position.x += roundingOffset.x;

                 m_TempVerts[tempVertsIndex].position.y += roundingOffset.y;

                 if (tempVertsIndex == )

                     toFill.AddUIVertexQuad(m_TempVerts);

             }

         }

         else

         {

             //Debug.Log(unitsPerPixel);

             for (int i = ; i < vertCount; ++i)

             {

                 int tempVertsIndex = i & ;

                 m_TempVerts[tempVertsIndex] = verts[i];

                 m_TempVerts[tempVertsIndex].position *= unitsPerPixel;

                 if (tempVertsIndex == )

                     toFill.AddUIVertexQuad(m_TempVerts);

                 //Debug.LogWarning(i + "_" + tempVertsIndex + "_" + m_TempVerts[tempVertsIndex].position);

             }

         }

         m_DisableFontTextureRebuiltCallback = false;

     }

     protected string CalculateLayoutWithImage(string richText, out IList<UIVertex> verts)

     {

         Vector2 extents = rectTransform.rect.size;

         var settings = GetGenerationSettings(extents);

         float unitsPerPixel =  / pixelsPerUnit;

         float spaceWidth = cachedTextGenerator.GetPreferredWidth(replaceStr, settings) * unitsPerPixel;

         float fontSize2 = fontSize * 0.5f;

         //解析图片标签,并将标签替换为空格

         imageInfoList.Clear();

         Match match = null;

         StringBuilder builder = new StringBuilder();

         while ((match = imageTagRegex.Match(richText)).Success)

         {

             RichTextImageInfo imageInfo = new RichTextImageInfo();

             imageInfo.name = match.Groups[].Value;

             string paras = match.Groups[].Value;

             if (!string.IsNullOrEmpty(paras))

             {

                 var keyValueCollection = imageParaRegex.Matches(paras);

                 for (int i = ; i < keyValueCollection.Count; i++)

                 {

                     string key = keyValueCollection[i].Groups[].Value;

                     string value = keyValueCollection[i].Groups[].Value;

                     imageInfo.SetValue(key, value);

                 }

             }

             imageInfo.size = new Vector2(fontSize2 * imageInfo.widthScale, fontSize2 * imageInfo.heightScale);

             imageInfo.startVertex = match.Index * ;

             int num = Mathf.CeilToInt(imageInfo.size.x / spaceWidth);//占据几个空格

             imageInfo.vertexLength = num * ;

             imageInfoList.Add(imageInfo);

             builder.Length = ;

             builder.Append(richText, , match.Index);

             for (int i = ; i < num; i++)

             {

                 builder.Append(replaceStr);

             }

             builder.Append(richText, match.Index + match.Length, richText.Length - match.Index - match.Length);

             richText = builder.ToString();

         }

         // Populate charaters

         cachedTextGenerator.Populate(richText, settings);

         verts = cachedTextGenerator.verts;

         // Last 4 verts are always a new line...

         int vertCount = verts.Count - ;

         //换行处理

         //0 1|4 5|8  9

         //3 2|7 6|11 10

         //例如前两个字为图片标签,第三字为普通文字;那么startVertex为0,vertexLength为8

         for (int i = ; i < imageInfoList.Count; i++)

         {

             RichTextImageInfo imageInfo = imageInfoList[i];

             int startVertex = imageInfo.startVertex;

             int vertexLength = imageInfo.vertexLength;

             int maxVertex = Mathf.Min(startVertex + vertexLength, vertCount);

             //如果最边缘顶点超过了显示范围,则将图片移到下一行

             //之后的图片信息中的起始顶点都往后移

             if (verts[maxVertex - ].position.x * unitsPerPixel > rectTransform.rect.xMax)

             {

                 richText = richText.Insert(startVertex / , "\r\n");

                 for (int j = i; j < imageInfoList.Count; j++)

                 {

                     imageInfoList[j].startVertex += ;

                 }

                 cachedTextGenerator.Populate(richText, settings);

                 verts = cachedTextGenerator.verts;

                 vertCount = verts.Count - ;

             }

         }

         //计算位置

         for (int i = imageInfoList.Count - ; i >= ; i--)

         {

             RichTextImageInfo imageInfo = imageInfoList[i];

             int startVertex = imageInfo.startVertex;

             if (startVertex < vertCount)

             {

                 UIVertex uiVertex = verts[startVertex];

                 Vector2 pos = uiVertex.position;

                 pos *= unitsPerPixel;

                 pos += new Vector2(imageInfo.size.x * 0.5f, fontSize2 * 0.5f);

                 pos += new Vector2(rectTransform.sizeDelta.x * (rectTransform.pivot.x - 0.5f), rectTransform.sizeDelta.y * (rectTransform.pivot.y - 0.5f));

                 imageInfo.position = pos;

                 imageInfo.color = Color.white;

                 if (!string.IsNullOrEmpty(imageInfo.eventName))

                 {

                     //图片pos:

                     //x:起点x + 图片宽度的一半

                     //y:起点y + fontSize2 * 0.5f

                     RichTextEvent e = new RichTextEvent();

                     e.name = imageInfo.eventName;

                     e.parameter = imageInfo.eventParameter;

                     e.rect = new Rect(

                         verts[startVertex].position.x * unitsPerPixel,

                         verts[startVertex].position.y * unitsPerPixel + fontSize2 * 0.5f - imageInfo.size.y * 0.5f,

                         imageInfo.size.x,

                         imageInfo.size.y

                     );

                     eventList.Add(e);

                 }

             }

             else

             {

                 imageInfoList.RemoveAt(i);

             }

         }

         isImageDirty = true;

         return richText;

     }

     private void ApplyUnderlineEffect(RichTextUnderlineTag tag, IList<UIVertex> verts)

     {

         float fontSize2 = fontSize * 0.5f;

         float unitsPerPixel =  / pixelsPerUnit;

         //0 1|4 5|8  9 |12 13

         //3 2|7 6|11 10|14 15

         //<material=underline c=#ffffff h=1 n=1 p=2>下划线</material>

         //以上面为例:

         //tag.start为42,对应“>” | start对应“下”的左上角顶点

         //tag.end为44,对应“划”  | end对应“线”下一个字符的左上角顶点

         //Debug.Log(tag.start);

         //Debug.Log(tag.end);

         int start = tag.start * ;

         int end = Mathf.Min(tag.end *  + , verts.Count);

         UIVertex vt1 = verts[start + ];

         UIVertex vt2;

         float minY = vt1.position.y;

         float maxY = verts[start].position.y;

         //换行处理,如需换行,则将一条下划线分割成几条

         //顶点取样分布,如上图的2,6,10,其中end - 2表示最后一个取样点,即10

         //对应例子中的下、划、线的右下角顶点

         for (int i = start + ; i <= end - ; i += )

         {

             vt2 = verts[i];

             bool newline = Mathf.Abs(vt2.position.y - vt1.position.y) > fontSize2;

             if (newline || i == end - )

             {

                 RichTextImageInfo imageInfo = new RichTextImageInfo();

                 //计算宽高

                 int tailIndex = !newline && i == end -  ? i : i - ;

                 vt2 = verts[tailIndex];

                 minY = Mathf.Min(minY, vt2.position.y);

                 maxY = Mathf.Max(maxY, verts[tailIndex - ].position.y);

                 imageInfo.size = new Vector2((vt2.position.x - vt1.position.x) * unitsPerPixel, tag.height);

                 //计算位置

                 Vector2 vertex = new Vector2(vt1.position.x, minY);

                 vertex *= unitsPerPixel;

                 vertex += new Vector2(imageInfo.size.x * 0.5f, -tag.height * 0.5f);

                 vertex += new Vector2(rectTransform.sizeDelta.x * (rectTransform.pivot.x - 0.5f), rectTransform.sizeDelta.y * (rectTransform.pivot.y - 0.5f));

                 imageInfo.position = vertex;

                 imageInfo.color = tag.color;

                 imageInfoList.Add(imageInfo);

                 if (!string.IsNullOrEmpty(tag.eventName))

                 {

                     //下划线pos:

                     //x:vt1.x + 图片宽度的一半

                     //y:minY - tag.height * 0.5f

                     RichTextEvent e = new RichTextEvent();

                     e.name = tag.eventName;

                     e.parameter = tag.eventParameter;

                     e.rect = new Rect(

                         vt1.position.x * unitsPerPixel,

                         minY * unitsPerPixel,

                         imageInfo.size.x,

                         (maxY - minY) * unitsPerPixel

                     );

                     eventList.Add(e);

                 }

                 vt1 = verts[i + ];

                 minY = vt1.position.y;

                 if (newline && i == end - ) i -= ;

             }

             else

             {

                 minY = Mathf.Min(minY, verts[i].position.y);

                 maxY = Mathf.Max(maxY, verts[i - ].position.y);

             }

         }

     }

     public void SetListener(Action<string, string> action)

     {

         clickAction = action;

     }

     public void OnPointerClick(PointerEventData eventData)

     {

         Vector2 localPos;

         RectTransformUtility.ScreenPointToLocalPointInRectangle(rectTransform, eventData.position, eventData.pressEventCamera, out localPos);

         for (int i = eventList.Count - ; i >= ; i--)

         {

             RichTextEvent e = eventList[i];

             if (e.rect.Contains(localPos))

             {

                 clickAction.Invoke(e.name, e.parameter);

                 break;

             }

         }

     }

     protected void Update()

     {

         if (isImageDirty)

         {

             isImageDirty = false;

             //回收当前的图片

             Image[] images = GetComponentsInChildren<Image>(true);

             for (int i = ; i < images.Length; i++)

             {

                 RichTextResourceManager.Instance.SetPoolObject(RichTextResourceType.Image, images[i].gameObject);

             }

             //生成图片

             for (int i = ; i < imageInfoList.Count; i++)

             {

                 RichTextImageInfo imageInfo = imageInfoList[i];

                 var name = imageInfo.name;

                 var position = imageInfo.position;

                 var size = imageInfo.size;

                 var color = imageInfo.color;

                 GameObject go = RichTextResourceManager.Instance.GetPoolObject(RichTextResourceType.Image);

                 Image image = go.GetComponent<Image>();

                 RichTextResourceManager.Instance.SetSprite(name, image);

                 go.transform.SetParent(rectTransform);

                 go.transform.localScale = Vector3.one;

                 image.rectTransform.anchoredPosition = position;

                 image.rectTransform.sizeDelta = size;

                 image.color = color;

             }

             //点击区域

             if (isShowClickArea)

             {

                 for (int i = ; i < eventList.Count; i++)

                 {

                     RichTextEvent e = eventList[i];

                     GameObject go = RichTextResourceManager.Instance.GetPoolObject(RichTextResourceType.Image);

                     Image image = go.GetComponent<Image>();

                     RichTextResourceManager.Instance.SetSprite("", image);

                     go.transform.SetParent(rectTransform);

                     go.transform.localScale = Vector3.one;

                     image.rectTransform.anchoredPosition = e.rect.center;

                     image.rectTransform.sizeDelta = new Vector2(e.rect.width, e.rect.height);

                     image.color = Color.blue;

                 }

             }

         }

     }

     protected override void OnDestroy()

     {

         base.OnDestroy();

         //Debug.LogWarning("OnDestroy");

     }

 }
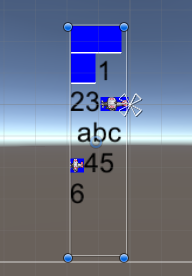
效果如下图。其中蓝色区域即为点击区域。绑定监听后,点击图片或下划线上的文字,即可看到事件被响应了。
[UGUI]图文混排(六):点击区域的更多相关文章
- Unity UGUI图文混排(六) -- 超链接
图文混排更新到超链接这儿,好像也差不多了,不过就在最后一点,博主也表现得相当不专业,直接整合了山中双木林同学提供的超链接的解决方案,博主甚至没来得及细看就直接复制了,但感觉还是挺好用的. 博主已经将超 ...
- CoreText实现图文混排之点击事件-b
CoreText实现图文混排之点击事件 主要思路 我们知道,CoreText是基于UIView去绘制的,那么既然有UIView,就有 -(void)touchesBegan:(NSSet<UIT ...
- CoreText实现图文混排之点击事件
今天呢,我们继续把CoreText图文混排的点击事件补充上,这样我们的图文混排也算是圆满了. 哦,上一篇的链接在这里 http://www.jianshu.com/p/6db3289fb05d Cor ...
- Unity琐碎(3) UGUI 图文混排解决方案和优化
感觉使用Unity之后总能看到各种各样解决混排的方案,只能说明Unity不够体恤下情啊.这篇文章主要讲一下个人在使用过程中方案选择和优化过程,已做记录.顺便提下,开源很多意味着坑,还是要开实际需求. ...
- Unity UGUI图文混排源码(三) -- 动态表情
这里是根据图文混排源码(二)进一步修改的,其他链接也不贴了,就贴一个链接就好了,第一次看这文章的同学可以先去看看其他几篇文章 Unity UGUI图文混排源码(二):http://blog.csdn. ...
- Unity UGUI图文混排源码(二)
Unity UGUI图文混排源码(一):http://blog.csdn.net/qq992817263/article/details/51112304 Unity UGUI图文混排源码(二):ht ...
- Unity UGUI图文混排源码(一)
Unity UGUI图文混排源码(一):http://blog.csdn.net/qq992817263/article/details/51112304 Unity UGUI图文混排源码(二):ht ...
- [UGUI]图文混排(二):Text源码分析
UGUI源码: https://bitbucket.org/Unity-Technologies/ui/downloads/?tab=tags 首先下载一份UGUI源码,这里我下载的版本是5.3.2f ...
- Unity UGUI图文混排(七) -- 下划线
之前更新超链接的时候,忘了搭配实现一个下划线的功能,这篇文章就是来补上这一个功能,时间有点长,一方面没有很好的思路,一方面也没多少时间. 先在网上收集了一下下划线的实现操作,一种是在文本下再创建一个文 ...
随机推荐
- 4G模块luci的配置及重连脚本
一.4G Luci配置 1. 新建一个wwan接口: 2. 上网方式为dhcp自动获取: 3. 物理设置选择wwan0: 4. 防火墙选择wan 二.重连脚本redial4g LogFile=/roo ...
- PHP性能监测的工具介绍 - XHProf -参考自https://jingyan.baidu.com/article/7082dc1c173359e40a89bd95.html
XHProf 这个软件本是Facebook内部的一个应用工具,2009年3月份开源,为PHP的性能监测提供了很好的工具.官方的介绍中提到: 方法/步骤 XHProf 这个软件本是Faceboo ...
- FastReport问题整理(http://129.sqdj.gov.cn/?p=77)
1.FastReport中如果访问报表中的对象?可以使用FindObject方法.TfrxMemoView(frxReport1.FindObject(’memo1′)).Text:=’FastRep ...
- js-signals学习以及应用
说在前面:写js时候,当一个变量一旦发生变化,就自动执行相应的程序,而不用手动执行,js-signals可以很方便的解决这个问题. 一.js-signals简介 js-signals是用于在JavaS ...
- 【Docker】docker常用指令
开启docker,并设置开机自启动 老式写法: service docker start chkconfig docker on 新式写法: systemctl start docker.servic ...
- Javascript之数组遍历
一.遍历数组的几种方式 1.for...in遍历数组,会遍历数组的索引和数组原型上的对象 2.for循环直接遍历 3.迭代器:forEach(遍历数组中所有的值,并忽略回 ...
- HashSet的自定义实现
package com.cy.collection; import java.util.HashMap; /** * HashSet自定义实现 * 是使用hashMap实现的 * 可以看一下HashS ...
- random 产生一个随机数的方法
import random print( random.randint(1,10) ) # 产生 1 到 10 的一个整数型随机数 print( random.random() ) # 产生 0 到 ...
- JVM异常之:方法区溢出OutOfMemoryError: PermGen space
1.方法区溢出(Perm持久代溢出) 在jdk1.6及之前的版本中,常量池放在Perm区也即是方法区中,所以在jdk1.6版本中,常量池溢出可以说是方法区溢出. 示例一: 方法区溢出的示例见<J ...
- C语言强化——链表(1)
目录 链表的增删(不带头结点) 链表相关面试题 合并两个有序链表 单链表原地逆置 找出链表的倒数第四个节点 找出链表的中间节点 判断单链表是否有环 求链表交点 删除有序单链表中重复的元素 链表按奇数. ...