
Springboot2.x整合Redis(一)
备注:
springboto整合redis依赖于spring-boot-starter-data-redis这个jar
一,项目环境和依赖
1.POM.xml配置
    <parent>

        <groupId>org.springframework.boot</groupId>

        <artifactId>spring-boot-starter-parent</artifactId>

        <version>2.0.1.RELEASE</version>

    </parent>

    <dependencies>

        <dependency>

            <groupId>org.springframework.boot</groupId>

            <artifactId>spring-boot-starter-web</artifactId>

        </dependency>

        <dependency>

            <groupId>org.springframework.boot</groupId>

            <artifactId>spring-boot-devtools</artifactId>

            <optional>true</optional>

        </dependency>

            <dependency>

                <groupId>org.springframework.boot</groupId>

                <artifactId>spring-boot-starter-data-redis</artifactId>

            </dependency>

        <dependency>

            <groupId>org.springframework.boot</groupId>

            <artifactId>spring-boot-starter-test</artifactId>

            <scope>test</scope>

        </dependency>
2.application.properties文件配置
#=========redis基础配置=========

spring.redis.database=0

spring.redis.host=127.0.0.1

spring.redis.port=6379

# 连接超时时间 单位 ms(毫秒)

spring.redis.timeout=3000

#=========redis线程池设置=========

# 连接池中的最大空闲连接,默认值也是8。

spring.redis.pool.max-idle=200

#连接池中的最小空闲连接,默认值也是0。

spring.redis.pool.min-idle=200

# 如果赋值为-1,则表示不限制;pool已经分配了maxActive个jedis实例,则此时pool的状态为exhausted(耗尽)。

spring.redis.pool.max-active=2000

# 等待可用连接的最大时间,单位毫秒,默认值为-1,表示永不超时

spring.redis.pool.max-wait=1000
二.测试代码
@RestController

@RequestMapping("/api/v1/redis")

public class RdisTestController {

    @Autowired

    private StringRedisTemplate redisTpl; //jdbcTemplate

    @Autowired

    private RedisClient redis;

    @GetMapping(value="add")

    public Object add(){

        //redisTpl.opsForValue().set("name", "xdclass2018");

        redis.set("username", "xddddddd");

        return JsonData.buildSuccess();

    }

    @GetMapping(value="get")

    public Object get(){

        //String value = redisTpl.opsForValue().get("name");

        String value = redis.get("username");

        return JsonData.buildSuccess(value);

    }

    @GetMapping(value="save_user")

    public Object saveUser(){

        User user = new User(1, "abc", "11", new Date());

        String userStr = JsonUtils.obj2String(user);

        //项目名:模块名:id/或者其他相关参数

        boolean flag = redis.set("base:user:11", userStr);

        return JsonData.buildSuccess(flag);

    }

    @GetMapping(value="find_user")

    public Object findUser(){

        String userStr = redis.get("base:user:11");

        User user = JsonUtils.string2Obj(userStr, User.class);

        return JsonData.buildSuccess(user);

    }

}
三:代码规范
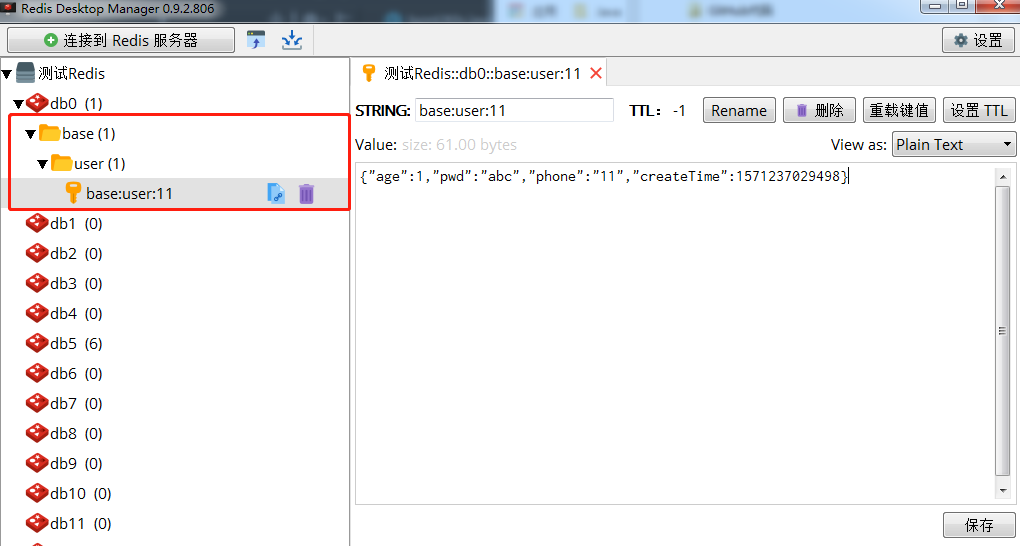
注意:使用Redis缓存数据时,key的命名规范建议:
项目名:模块名:特殊(标识) 例如 base:user:id
这样做的好处是可以在redis中直观的看到各个模块的缓存数据
例如:使用RDM工具观察到,按以上方式创建的key,会自动创建层级文件夹
代码地址:
Springboot2.x整合Redis(一)的更多相关文章
- SpringBoot2.x整合Redis实战 4节课
1.分布式缓存Redis介绍 简介:讲解为什么要用缓存和介绍什么是Redis,新手练习工具 1.redis官网 https://redis.io/download 2.新手 ...
- 小D课堂 - 零基础入门SpringBoot2.X到实战_第9节 SpringBoot2.x整合Redis实战_39、SpringBoot2.x整合redis实战讲解
笔记 3.SpringBoot2.x整合redis实战讲解 简介:使用springboot-starter整合reids实战 1.官网:https://docs.spring.io/spring-bo ...
- SpringBoot2.0 整合 Redis集群 ,实现消息队列场景
本文源码:GitHub·点这里 || GitEE·点这里 一.Redis集群简介 1.RedisCluster概念 Redis的分布式解决方案,在3.0版本后推出的方案,有效地解决了Redis分布式的 ...
- Springboot2.0整合Redis(注解开发)
一. pom.xm文件引入对应jar包 <dependency> <groupId>org.springframework.boot</groupId> <a ...
- SpringBoot2.0整合Redis
Spring Boot2.0在2018年3月份正式发布,相比1.0还是有比较多的改动,例如SpringBoot 自2.0起支持jdk1.8及以上的版本.第三方类库升级.响应式 Spring 编程支持等 ...
- 【SpringBoot】Springboot2.x整合Redis(一)
备注: springboto整合redis依赖于spring-boot-starter-data-redis这个jar 一,项目环境和依赖 1.POM.xml配置 <parent> < ...
- springboot2.x整合redis实现缓存(附github链接)
本文代码已提交github: https://github.com/LCABC777/Springboot-redis(1)Springboot中使用redis操作的两种方式:lettuce和j ...
- Springboot2.x整合Redis以及连接哨兵模式/集群模式
依赖: <!--spirngboot版本为2.x--><!-- 加载spring boot redis包,springboot2.0中直接使用jedis或者lettuce配置连接池, ...
- springboot2.0整合redis作为缓存以json格式存储对象
步骤1 <dependency> <groupId>org.springframework.boot</groupId> <artifactId>spr ...
随机推荐
- 2018-2-13-win10-UWP-RSS阅读器
title author date CreateTime categories win10 UWP RSS阅读器 lindexi 2018-2-13 17:23:3 +0800 2018-2-13 1 ...
- Kvm --01 虚拟化基础概念
目录 1. 虚拟化基础概念 01. 什么是虚拟化? 02. 为什么要用虚拟化? 03. 虚拟化在企业中的应用场景? 04. 虚拟化软件介绍 05. Kvm介绍 2. 安装部署Kvm 3. Kvm虚拟机 ...
- AGC002[BCDEF]题解
F是计数于是就做(kan ti jie)了= = B - Box and Ball 模拟一下 每个盒子开一个d表示有的球数 可能存在红球的打个标记 传递一下就行了 #include<cstdio ...
- webRTC脱坑笔记(二)— webRTC API之MediaStream(getUserMedia)
webRTC API WebRTC API包括媒体捕获.音频视频的编码和解码.传输层和会话管理. getUserMedia():捕获音频和视频. MediaRecorder:录制音频和视频. RTCP ...
- 25.Java锁的深度化
Java锁的深度化 悲观锁.乐观锁.排他锁 场景 当多个请求同时操作数据库时,首先将订单状态改为已支付,在金额加上200,在同时并发场景查询条件下,会造成重复通知. SQL: Update 悲观锁与乐 ...
- IO流 读写文件
读写文件 如前所述,一个流被定义为一个数据序列.输入流用于从源读取数据,输出流用于向目标写数据. 下图是一个描述输入流和输出流的类层次图. 下面将要讨论的两个重要的流是 FileInputStream ...
- Linux用户登出之后保持后台进程(nohup)
使用&可以将进程置于后台,但是用户从Shell登出之后,进程会自动结束.想要在登出之后保持进程运行,就要结合nohup命令使用. 例如: nohup find -size +100k > ...
- spark streaming简单示例
<?xml version="1.0" encoding="UTF-8"?> <project xmlns="http://mave ...
- Java Web学习总结(2)Servlet(一)
一,Servlet 简介 Java Servlet 是运行在 Web 服务器或应用服务器上的程序,它是作为来自 Web 浏览器或其他 HTTP 客户端的请求和 HTTP 服务器上的数据库或应用程序之间 ...
- delphi 程序嵌入桌面效果的实现
function Tform1.CreateRegion(wMask:TBitmap;wColor:TColor;hControl:THandle): HRGN; var dc, dc_c: HDC; ...