SpringBoot自定义Starter实现
自定义Starter:
Starter会把所有用到的依赖都给包含进来,避免了开发者自己去引入依赖所带来的麻烦。Starter 提供了一种开箱即用的理念,其中核心就是springboot的自动配置原理相关,调用相关的注解实现条件判断,进而进行Bean的注入管理。
基于SpringBoot自动配置原理的学习,现在我们来实现一下自定义starter。我们假设有一个格式化的,暂定两个实现,一个是Object-> String,一个是Object->JSON.
1.新建一个maven工程 format-spring-boot-starter,这里的命名在SpringBoot官网有建议:For example, assume that you are creating a starter for "acme" and that you name the auto-configure module acme-spring-boot-autoconfigure and the starter acme-spring-boot-starter. If you only have one module that combines the two, name it acme-spring-boot-starter. pom文件如下:
<dependencies>

    <dependency>

      <groupId>junit</groupId>

      <artifactId>junit</artifactId>

      <version>4.11</version>

      <scope>test</scope>

    </dependency>

    <dependency>

      <groupId>org.springframework.boot</groupId>

      <artifactId>spring-boot-starter</artifactId>

      <version>2.1..RELEASE</version>

    </dependency>

    <dependency>

      <groupId>com.alibaba</groupId>

      <artifactId>fastjson</artifactId>

      <version>1.2.</version>

      <optional>true</optional><!--可选-->

    </dependency>
   <!--支持ConfigurationProperties-->

    <dependency>

        <groupId>org.springframework.boot</groupId>

        <artifactId>spring-boot-configuration-processor</artifactId>

        <version>2.1..RELEASE</version>

      <optional>true</optional>

    </dependency>

  </dependencies>
2.构建格式化接口并且定义实现,咱们这里想实现动态注入的想过,定义两个实现以做对比:
public interface FormatProcessor {

    //定义一个格式化的方法

    <T> String format(T obj);

}

//实现1 JSON

public class JsonFormatProcessor implements FormatProcessor{

    @Override

    public <T> String format(T obj) {

        return "JsonFormatProcessor:"+ JSON.toJSONString(obj);

    }

}

//实现2 String

public class StringFormatProcessor implements FormatProcessor{

    @Override

    public <T> String format(T obj) {

        return "StringFormatProcessor:"+Objects.toString(obj);

    }

}
3.这里我们需要把这两个类根据 Conditional 注解动态注入到Spring 容器中,在springboot自动配置中我们说到有个 metadata 文件可以做过滤,而这里的 ConditionalOnClass 是一样的,只是方式不一样:
@Configuration

public class FormatAutoConfiguration {

    //metadata-auto....

    @ConditionalOnMissingClass("com.alibaba.fastjson.JSON")

    @Bean

    @Primary

    public FormatProcessor stringFormat(){

        return new StringFormatProcessor();

    }

    @ConditionalOnClass(name = "com.alibaba.fastjson.JSON")

    @Bean

    public FormatProcessor jsonFormat(){

        return new JsonFormatProcessor();

    }

}
4.我们这里参照着 jdbcTemplate 的模板来实现我们这个需求:
public class HelloFormatTemplate {

    private FormatProcessor formatProcessor;public HelloFormatTemplate(FormatProcessor formatProcessor) {this.formatProcessor = formatProcessor;

    }

   //定义一个格式化方法,具体的实现由FormatProcessor实现类实现

    public <T> String doFormat(T obj){

        StringBuilder stringBuilder=new StringBuilder();

        stringBuilder.append("begin:Execute format").append("<br/>");

        stringBuilder.append("Obj format result:").append(formatProcessor.format(obj)).append("<br/>");

        return stringBuilder.toString();

    }

}
5.然后我们需要动态的注入:
@Import(FormatAutoConfiguration.class)

@Configuration

public class HelloAutoConfiguration {

    @Bean

    public HelloFormatTemplate helloFormatTemplate(FormatProcessor formatProcessor){

        return new HelloFormatTemplate(formatProcessor);

    }

}
6.接下去需要在classpath下的META-INF文件夹下创建一个文件 spring.factories:
org.springframework.boot.autoconfigure.EnableAutoConfiguration=\

com.wuzz.starter.autoconfiguration.HelloAutoConfiguration
然后将该工程打成Jar,然后我们需要做的是在我们需要用到这个Starter的boot项目重中导入该starter
1.导入starter,我们会看到有些starter里面是空的,其实他做的仅仅是依赖传递,这样容器中存在某个类,这个时候符合另外一个类的加载,也能起到开箱即用的效果:
<dependency>

    <groupId>com.wuzz.starter</groupId>

    <artifactId>format-spring-boot-starter</artifactId>

    <version>1.0-SNAPSHOT</version>

</dependency>
2.定义一个实体类如下:
public class User {

    private String name;

    private int age;

   //省略 get set

    @Override

    public String toString() {

        return "User{" +

                "name='" + name + '\'' +

                ", age=" + age +

                '}';

    }

}
3.我们写一个controller来测试效果:
@RestController

public class FormatController {

    @Autowired

    HelloFormatTemplate helloFormatTemplate;

    @GetMapping("/format")

    public String format(){

        User user=new User();

        user.setAge();

        user.setName("wuzz-starter");

        return helloFormatTemplate.doFormat(user);

    }

}
其他无需任何配置,我们直接启动该项目,通过 localhost:8080/format 来访问会看到以下效果:

再来,我们导入以下依赖:
<dependency>

    <groupId>com.alibaba</groupId>

    <artifactId>fastjson</artifactId>

    <version>1.2.</version>

</dependency>
重启项目再去访问:

是不是很爽?这样子就实现了Starter的自定义,
SpringBoot外部配置:
这个时候我们还存在另外一个问题没有解决,就类似于我们导入了Eureka的starter,那么这个时候我们可以在 application.properties 中可以配置很多的信息,这个就是springboot的外部配置,取决于注解 @ConfigurationProperties。
我们是不是也能实现这样的效果呢?答案是当然咯,那么接下去我们就基于原来的工程进行再一次的改造。
1.增加我们自定义的Properties 类:
@ConfigurationProperties(prefix="wuzz.hello.format")

public class HelloProperties {

    private String appOwner;

    private Map<String,Object> info;

    public String getAppOwner() {

        return appOwner;

    }

    public void setAppOwner(String appOwner) {

        this.appOwner = appOwner;

    }

    public Map<String, Object> getInfo() {

        return info;

    }

    public void setInfo(Map<String, Object> info) {

        this.info = info;

    }

}
2.修改HelloTemplate 如下:
public class HelloFormatTemplate {

    private FormatProcessor formatProcessor;

    private HelloProperties helloProperties;

    public HelloFormatTemplate(HelloProperties helloProperties, FormatProcessor formatProcessor) {

        this.helloProperties = helloProperties;

        this.formatProcessor = formatProcessor;

    }

    public <T> String doFormat(T obj) {

        StringBuilder stringBuilder = new StringBuilder();

        stringBuilder.append("begin:Execute format").append("<br/>");

        stringBuilder.append("HelloProperties:").append(helloProperties.getAppOwner()).append("<br/>")

                .append(formatProcessor.format(helloProperties.getInfo())).append("<br/>");

        stringBuilder.append("Obj format result:").append(formatProcessor.format(obj)).append("<br/>");

        return stringBuilder.toString();

    }

}
3.修改HelloAutoConfiguration如下:
@Import(FormatAutoConfiguration.class)

@EnableConfigurationProperties(HelloProperties.class)

@Configuration

public class HelloAutoConfiguration {

    @Bean

    public HelloFormatTemplate helloFormatTemplate(HelloProperties helloProperties,FormatProcessor formatProcessor){

        return new HelloFormatTemplate(helloProperties,formatProcessor);

    }

}
然后我们重新打个包,再在需要依赖的那个工程中更新导入一下maven。然后我们在application.properties中就可以实现我们的配置:

配置两条配置项:wuzz.hello.format.app-owner=wuzz ,wuzz.hello.format.info.app=starter-demo
然后启动项目我们再次访问:
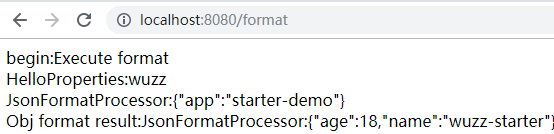
效果非常的好,在我们需要自定义的封装一些自定义组件的时候就可以使用这个拓展啦。
SpringBoot自定义Starter实现的更多相关文章
- SpringBoot --- 自定义 Starter
SpringBoot --- 自定义 Starter 创建 1.需要创建一个新的空工程 2.新的工程需要引入两个模块 一个Maven 模块 作为启动器 一个SpringBoot 模块 作为自动配置模块 ...
- SpringBoot自定义starter及自动配置
SpringBoot的核心就是自动配置,而支持自动配置的是一个个starter项目.除了官方已有的starter,用户自己也可以根据规则自定义自己的starter项目. 自定义starter条件 自动 ...
- springboot 自定义starter之AutoConfiguration【原】
八.自定义starter AutoConfiguration: 1.这个场景需要使用到的依赖是什么? 没有特别依赖的配置 2.如何编写自动配置 @Configuration //指定这个类是一个配置类 ...
- SpringBoot自定义starter开发分布式任务调度实践
概述 需求 在前面的博客<Java定时器演进过程和生产级分布式任务调度ElasticJob代码实战>中,我们已经熟悉ElasticJob分布式任务的应用,其核心实现为elasticjob- ...
- SpringBoot系列三:SpringBoot自定义Starter
在前面两章 SpringBoot入门 .SpringBoot自动配置原理 的学习后,我们对如何创建一个 SpringBoot 项目.SpringBoot 的运行原理以及自动配置等都有了一定的了解.如果 ...
- springboot自定义starter
1,创建一个空工程 2,new一个Modules ---------------- maven (启动器) : springboottest-spring-boot-starter 3,new一个M ...
- Springboot自定义starter打印sql及其执行时间
前面写到了通过实现mybatis提供的org.apache.ibatis.plugin.Interceptor接口实现了打印SQL执行时间,并格式化SQL及其参数,如果我们使用的是ssm还得再配置文件 ...
- Spring-Boot自定义Starter实践
此文已由作者王慎为授权网易云社区发布. 欢迎访问网易云社区,了解更多网易技术产品运营经验. disconf-spring-boot-starter 使用方法: 引入maven依赖: <depen ...
- SpringBoot之旅第六篇-启动原理及自定义starter
一.引言 SpringBoot的一大优势就是Starter,由于SpringBoot有很多开箱即用的Starter依赖,使得我们开发变得简单,我们不需要过多的关注框架的配置. 在日常开发中,我们也会自 ...
随机推荐
- h5页面ios键盘弹出收起后页面底部留白问题
<input placeholder="验证码" type="tel" v-model="verify" maxlength=&quo ...
- percon server5.7的配置版本
percon server5.7的配置版本 [root@tidb-db-backup mysql_3306]# cat my_3306.cnf # my_3306.cnf [client] port ...
- 【leetcode】689. Maximum Sum of 3 Non-Overlapping Subarrays
题目如下: In a given array nums of positive integers, find three non-overlapping subarrays with maximum ...
- vs2017 制作winfrom 安装包!
https://www.cnblogs.com/GuZhenYin/p/8176981.html 转载 前言 项目中有用到winfrom做配套的打印程序,直接给客户一个debug文件夹,当然不是很好. ...
- IdentityServer4
序言 IdentityServer4能做什么 Identity Server 4(以下简称ID4)是一个基于oauth2和OpenID的身份认证组件,基于这个组件可以快速开发自己的身份认证网站,支持单 ...
- Django 的 CBV&FBV
Django FBV, function base view 视图里使用函数处理请求 url 1 url(r‘^users/‘, views.users), views 1 2 3 4 5 from ...
- postgres select TOP X in group 查询每个组的前几名
参考: https://stackoverflow.com/questions/27415706/postgresql-select-top-three-in-each-group http://ch ...
- quartz的配置文件说明
# Default Properties file for use by StdSchedulerFactory # to create a Quartz Scheduler Instance, if ...
- springboot(四).配置FastJson自定义消息转化器
配置FastJson自定义消息转化器 一.fastJson简介 fastJson是阿里巴巴旗下的一个开源项目之一,顾名思义它专门用来做快速操作Json的序列化与反序列化的组件.它是目前json解析最快 ...
- 【转】C语言中数组名和指针的区别
注:本文转自http://www.cnblogs.com/furaibo/archive/2010/03/19/1689710.html 魔幻数组名 请看程序(本文程序在WIN32平台下编译): #i ...