
SpringBoot之旅第六篇-启动原理及自定义starter
一、引言
SpringBoot的一大优势就是Starter,由于SpringBoot有很多开箱即用的Starter依赖,使得我们开发变得简单,我们不需要过多的关注框架的配置。
在日常开发中,我们也会自定义一些Starter,特别是现在微服务框架,我们一个项目分成了多个单体项目,而这些单体项目中会引用公司的一些组件,这个时候我们定义Starter,可以使这些单体项目快速搭起,我们只需要关注业务开发。
在此之前我们再深入的了解下SpringBoot启动原理。而后再将如何自定义starter。
二、 启动原理
要想了解启动原理,我们可以Debug模式跟着代码一步步探究,我们从入口方法开始:
public static ConfigurableApplicationContext run(Class<?>[] primarySources,

      String[] args) {

   return new SpringApplication(primarySources).run(args);

}
这里是创建一个SpringApplication对象,并调用了run方法
2.1 创建SpringApplication对象
public SpringApplication(ResourceLoader resourceLoader, Class<?>... primarySources) {

    this.resourceLoader = resourceLoader;

    Assert.notNull(primarySources, "PrimarySources must not be null");

    //保存主配置类

    this.primarySources = new LinkedHashSet<>(Arrays.asList(primarySources));

    //确定web应用类型

    this.webApplicationType = WebApplicationType.deduceFromClasspath();

    //从类路径下找到META-INF/spring.factories配置的所有ApplicationContextInitializer;然后保存起来

    setInitializers((Collection) getSpringFactoriesInstances(

          ApplicationContextInitializer.class));

    //从类路径下找到ETA-INF/spring.factories配置的所有ApplicationListener

    setListeners((Collection) getSpringFactoriesInstances(ApplicationListener.class));

    //从多个配置类中找到有main方法的主配置类

    this.mainApplicationClass = deduceMainApplicationClass();

}
从这个方法中可以看出,这个
第一步:保存主配置类。
第二步:确定web应用类型。
第三步:setInitializers方法,这个方法走我们看带入的参数是getSpringFactoriesInstances(ApplicationContextInitializer.class),我们再往下查看getSpringFactoriesInstances
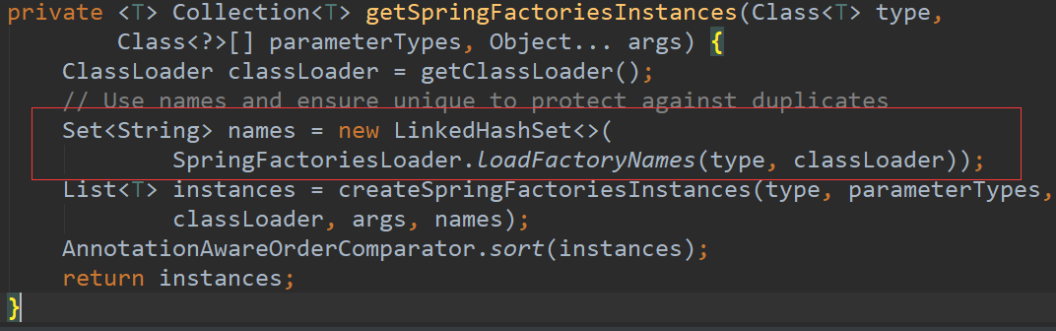
再进入这个方法:

这里就是从类路径下找到META-INF/spring.factories配置的所有ApplicationContextInitializer,然后再保存起来,放开断点,我们可以看到这个时候获取到的
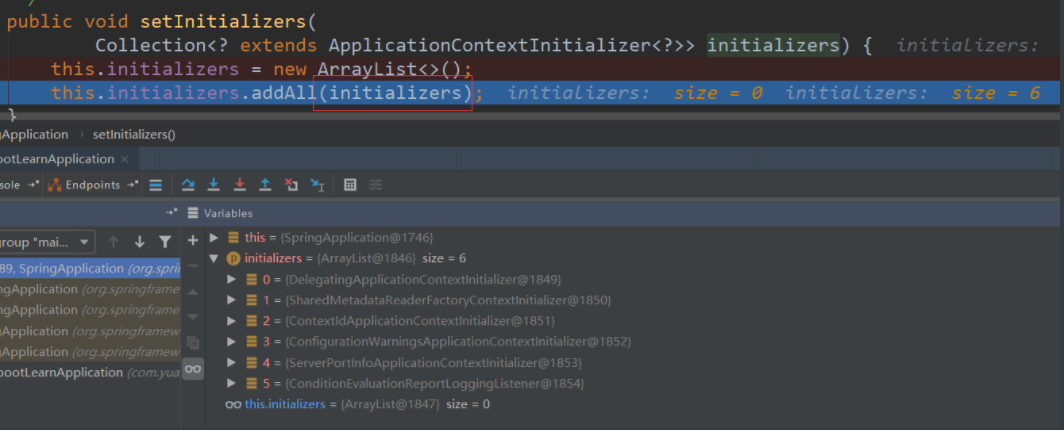
第四步:从类路径下找到ETA-INF/spring.factories配置的所有ApplicationListener,原理也基本类似,进入断点
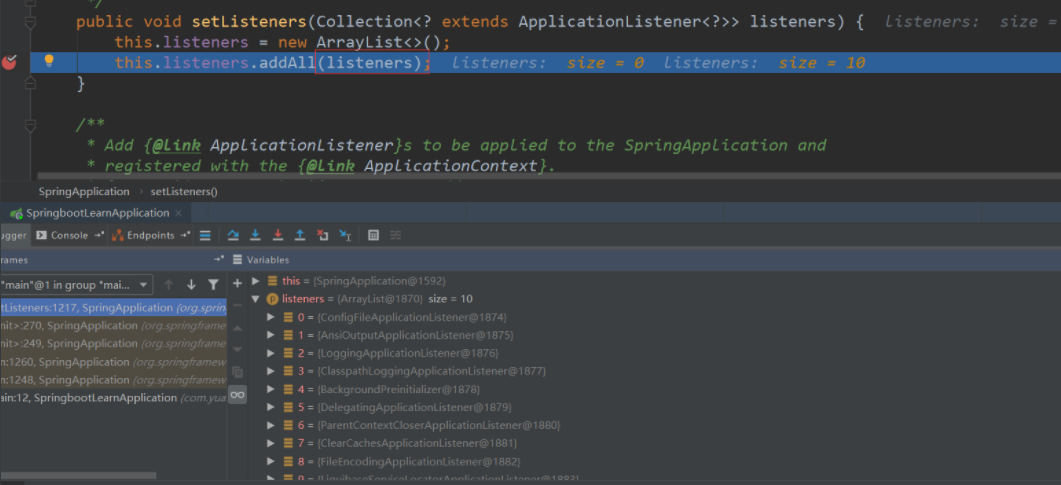
第五步:从多个配置类中找到有main方法的主配置类。这个执行完之后,SpringApplication就创建完成
2.2 run方法
先贴出代码
public ConfigurableApplicationContext run(String... args) {

   StopWatch stopWatch = new StopWatch();

   stopWatch.start();

   ConfigurableApplicationContext context = null;

   Collection<SpringBootExceptionReporter> exceptionReporters = new ArrayList<>();

   configureHeadlessProperty();

   //从类路径下META-INF/spring.factories获取SpringApplicationRunListeners

   SpringApplicationRunListeners listeners = getRunListeners(args);

   //回调所有的获取SpringApplicationRunListener.starting()方法

   listeners.starting();

   try {

      //封装命令行参数

      ApplicationArguments applicationArguments = new DefaultApplicationArguments(

            args);

       //准备环境

      ConfigurableEnvironment environment = prepareEnvironment(listeners,

            applicationArguments);//创建环境完成后回调SpringApplicationRunListener.environmentPrepared();表示环境准备完成

      configureIgnoreBeanInfo(environment);

      //打印Banner图

      Banner printedBanner = printBanner(environment);

      //创建ApplicationContext,决定创建web的ioc还是普通的ioc

      context = createApplicationContext();

       //异常分析报告

      exceptionReporters = getSpringFactoriesInstances(

            SpringBootExceptionReporter.class,

            new Class[] { ConfigurableApplicationContext.class }, context);

      //准备上下文环境,将environment保存到ioc中

      //applyInitializers():回调之前保存的所有的ApplicationContextInitializer的initialize方法

      //listeners.contextPrepared(context)

      //prepareContext运行完成以后回调所有的SpringApplicationRunListener的contextLoaded()

      prepareContext(context, environment, listeners, applicationArguments,

            printedBanner);

       //刷新容器,ioc容器初始化(如果是web应用还会创建嵌入式的Tomcat)

       //扫描,创建,加载所有组件的地方,(配置类,组件,自动配置)

      refreshContext(context);

      afterRefresh(context, applicationArguments);

      stopWatch.stop();

      if (this.logStartupInfo) {

         new StartupInfoLogger(this.mainApplicationClass)

               .logStarted(getApplicationLog(), stopWatch);

      }

      //所有的SpringApplicationRunListener回调started方法

      listeners.started(context);

      //从ioc容器中获取所有的ApplicationRunner和CommandLineRunner进行回调,

      //ApplicationRunner先回调,CommandLineRunner再回调

      callRunners(context, applicationArguments);

   }

   catch (Throwable ex) {

      handleRunFailure(context, ex, exceptionReporters, listeners);

      throw new IllegalStateException(ex);

   }

   try {

       //所有的SpringApplicationRunListener回调running方法

      listeners.running(context);

   }

   catch (Throwable ex) {

      handleRunFailure(context, ex, exceptionReporters, null);

      throw new IllegalStateException(ex);

   }

   //整个SpringBoot应用启动完成以后返回启动的ioc容器

   return context;

}
前面的代码不用分析,主要是准备对象,我们从 SpringApplicationRunListeners listeners = getRunListeners(args)开始分析,
第一步:是从类路径下META-INF/spring.factories获取SpringApplicationRunListeners,
这个方法跟前面分析的两个获取配置方法类似。
第二步:回调所有的获取SpringApplicationRunListener.starting()方法。
第三步: 封装命令行参数。
第四步:准备环境,调用prepareEnvironment方法。
第五步:打印Banner图(就是启动时的标识图)。
第六步:创建ApplicationContext,决定创建web的ioc还是普通的ioc。
第七步:异常分析报告。
第八步:准备上下文环境,将environment保存到ioc中,这个方法需要仔细分析下,我们再进入这个方法
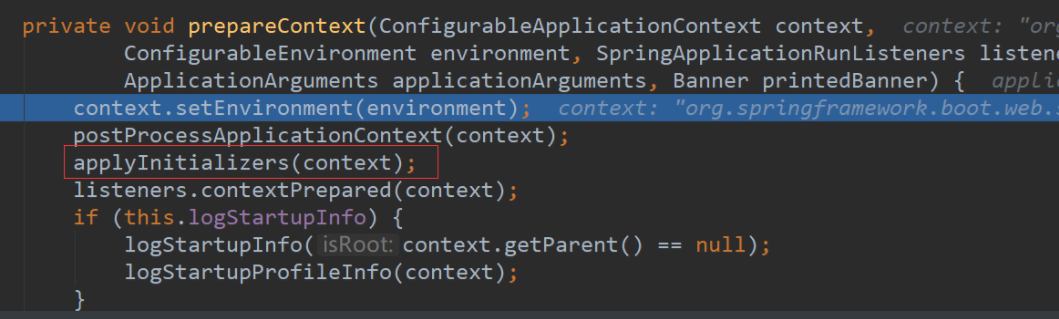
这里面有一个applyInitializers方法,这里是回调之前保存的所有的ApplicationContextInitializer的initialize方法
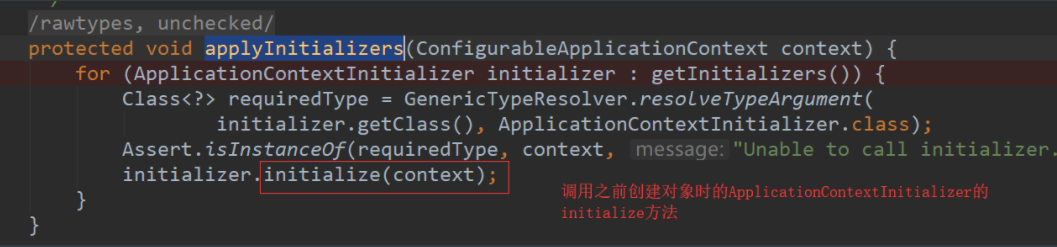
还有一个listeners.contextPrepared(context),这里是回调所有的SpringApplicationRunListener的contextPrepared(),
最后listeners.contextLoaded(context) 是prepareContext运行完成以后回调所有的SpringApplicationRunListener的contextLoaded()。
第九步:刷新容器,ioc容器初始化(如果是web应用还会创建嵌入式的Tomcat),这个就是扫描,创建,加载所有组件的地方,(配置类,组件,自动配置)。
第十步:所有的SpringApplicationRunListener回调started方法。
第十一步:从ioc容器中获取所有的ApplicationRunner和CommandLineRunner进行回调,ApplicationRunner先回调,CommandLineRunner再回调。
第十二步:所有的SpringApplicationRunListener回调running方法。
第十三步:整个SpringBoot应用启动完成以后返回启动的ioc容器。
这就是run的全部过程,想要更详细的了解还需自己去看源码。
三、自定义starter
自定义starter(场景启动器),我们要做的事情是两个:确定依赖和编写自动配置。我们重点要做的就是编写自动配置,我们之前写过一些自动配置,主要是注解配置的使用,主要的注解有:
@Configuration :指定这个类是一个配置类
@ConditionalOnXXX :在指定条件成立的情况下自动配置类生效
@AutoConfigureAfter:指定自动配置类的顺序
@Bean:给容器中添加组件
@ConfigurationPropertie:结合相关xxxProperties类来绑定相关的配置
@EnableConfigurationProperties:让xxxProperties生效加入到容器中
按照这些注解写好自动配置类后,我们还需要进行自动配置的加载,加载方式是将需要启动就加载的自动配置类,配置在META-INF/spring.factories,启动器的大致原理是如此,而启动器的实际设计是有一定模式的,就是启动器模块是一个空 JAR 文件,仅提供辅助性依赖管理,而自动配置模块应该再重新设计一个,然后启动器再去引用这个自动配置模块。Springboot就是如此设计的:
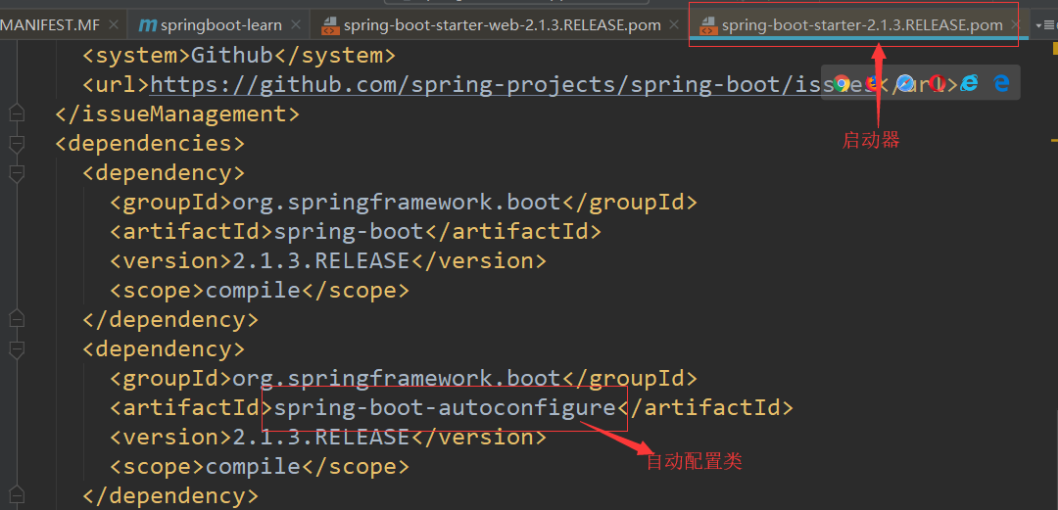
另外还有一个命名规则:
官方命名空间
– 前缀:“spring-boot-starter-”
– 模式:spring-boot-starter-模块名
– 举例:spring-boot-starter-web、spring-boot-starter-actuator、spring-boot-starter-jdbc
自定义命名空间
– 后缀:“-spring-boot-starter”
– 模式:模块-spring-boot-starter
– 举例:mybatis-spring-boot-starter
3.1 创建自定义starter
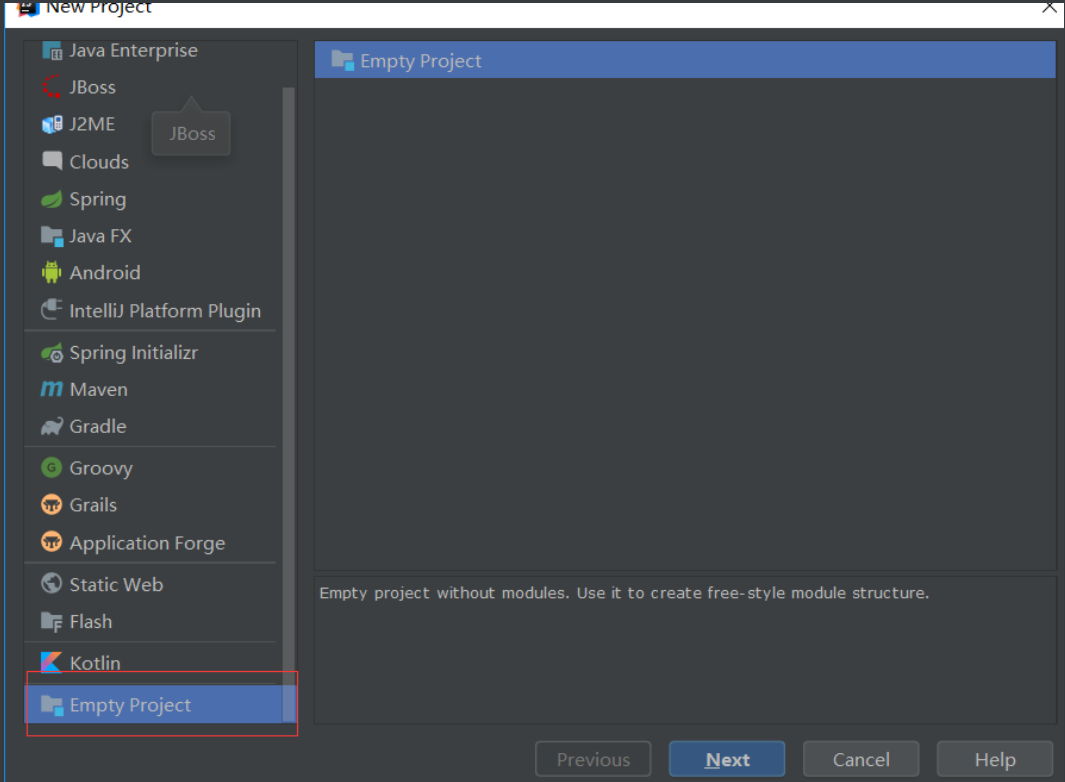
第一步:因为我们需要创建两个模块,所以先新建一个空的项目,然后以模块形式创建两个模块。
第二步:再创建两个模块,一个starter和一个自动配置模块
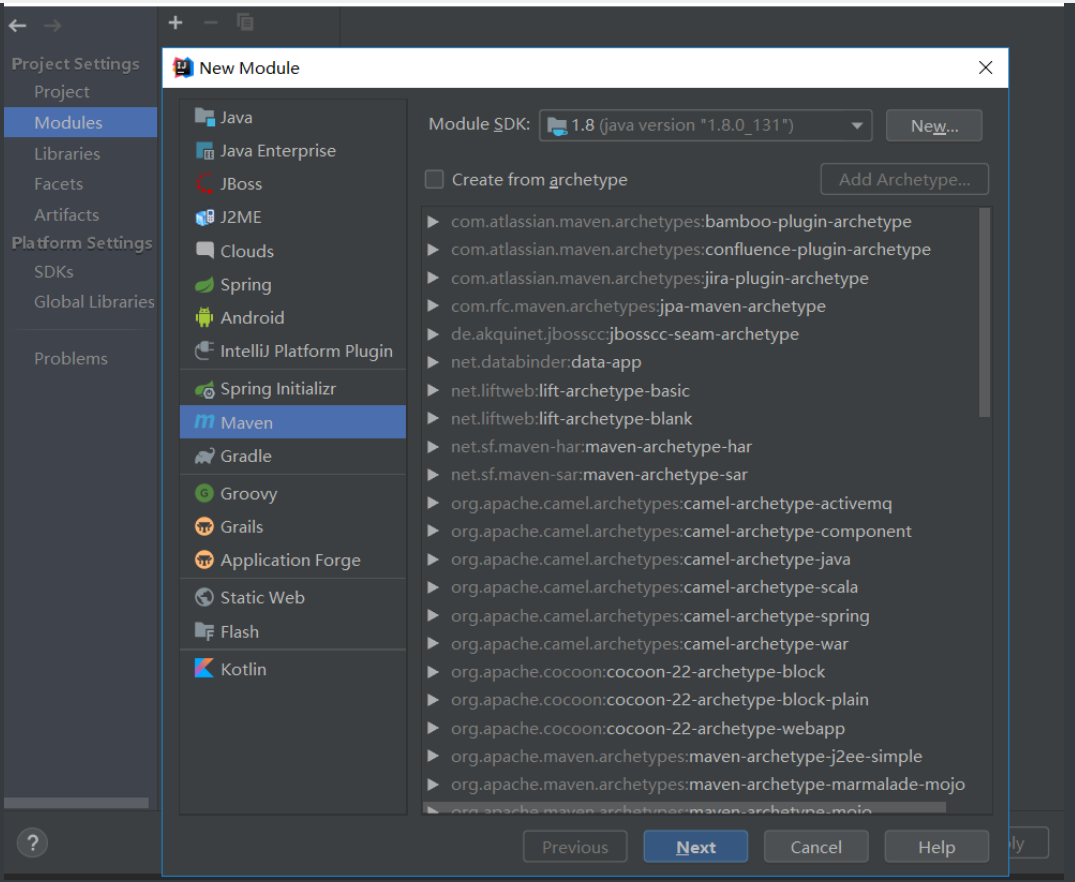
具体的创建过程就不赘述了,就是最简单的项目,去掉不需要的文件,创建完成结构如下:
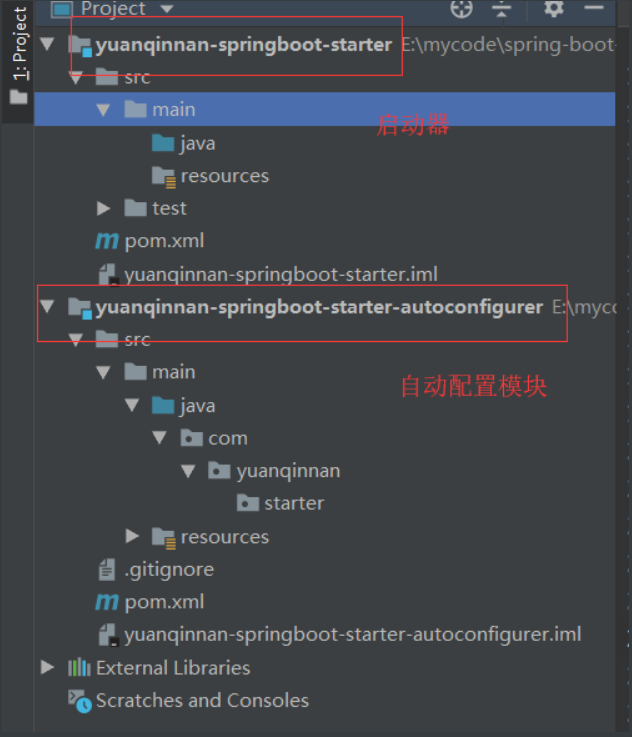
第三步:我们先将自动配置模块导入starter中,让启动模块依赖自动配置模块
启动模块的POM文件加入依赖
<dependencies>

    <!--引入自动配置模块-->

    <dependency>

        <groupId>com.yuanqinnan-starter</groupId>

        <artifactId>yuanqinnan-springboot-starter-autoconfigurer</artifactId>

        <version>0.0.1-SNAPSHOT</version>

    </dependency>

</dependencies>
自动配置模块的完整POM文件:
<?xml version="1.0" encoding="UTF-8"?>

<project xmlns="http://maven.apache.org/POM/4.0.0" xmlns:xsi="http://www.w3.org/2001/XMLSchema-instance"

         xsi:schemaLocation="http://maven.apache.org/POM/4.0.0 http://maven.apache.org/xsd/maven-4.0.0.xsd">

    <modelVersion>4.0.0</modelVersion>

    <parent>

        <groupId>org.springframework.boot</groupId>

        <artifactId>spring-boot-starter-parent</artifactId>

        <version>2.1.4.RELEASE</version>

        <relativePath/> <!-- lookup parent from repository -->

    </parent>

    <groupId>com.yuanqinnan-starter</groupId>

    <artifactId>yuanqinnan-springboot-starter-autoconfigurer</artifactId>

    <version>0.0.1-SNAPSHOT</version>

    <packaging>jar</packaging>

    <properties>

        <java.version>1.8</java.version>

    </properties>

    <dependencies>

        <!--引入spring-boot-starter;所有starter的基本配置-->

        <dependency>

            <groupId>org.springframework.boot</groupId>

            <artifactId>spring-boot-starter</artifactId>

        </dependency>

    </dependencies>

</project>
至此,两个项目基本创建完成,现在我们实现简单的配置。
第五步:对自动配置类进行自动配置代码编写
先编写一个配置类,用于配置:
@ConfigurationProperties(prefix = "yuanqinnan.hello")

public class HelloProperties {

    //前缀

    private String prefix;

    //后缀

    private String suffix;

    public String getPrefix() {

        return prefix;

    }

    public void setPrefix(String prefix) {

        this.prefix = prefix;

    }

    public String getSuffix() {

        return suffix;

    }

    public void setSuffix(String suffix) {

        this.suffix = suffix;

    }

}
再编写一个服务
public class HelloService {

    HelloProperties helloProperties;

    public HelloProperties getHelloProperties() {

        return helloProperties;

    }

    public void setHelloProperties(HelloProperties helloProperties) {

        this.helloProperties = helloProperties;

    }

    public String sayHello(String name) {

        return helloProperties.getPrefix() + "-" + name + helloProperties.getSuffix();

    }

}
然后再将这个服务注入组件:
@Configuration

@ConditionalOnWebApplication //web应用才生效

@EnableConfigurationProperties(HelloProperties.class)

public class HelloServiceAutoConfiguration {

    @Autowired

    HelloProperties helloProperties;

    @Bean

    public HelloService helloService(){

        HelloService service = new HelloService();

        service.setHelloProperties(helloProperties);

        return service;

    }

}
这个时候我们的自动配置以及写完,还差最后一步,因为SpringBoot读取自动配置是在META-INF的spring.factories文件中,所以我们还要将我们的自动配置类写入其中
org.springframework.boot.autoconfigure.EnableAutoConfiguration=\

  com.yuanqinnan.starter.HelloServiceAutoConfiguration
最后的结构如下:
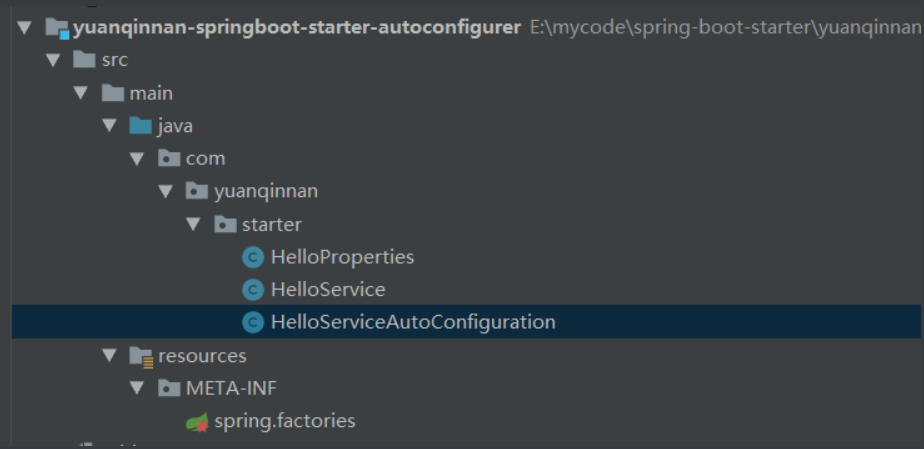
至此,代码以及编写完成,这个时候我们将其装入仓库中,让其他项目引用
3.2 使用自定义starter
创建一个web项目,然后在项目中引入依赖
<!--引入自定义starter-->

<dependency>

  <groupId>com.yuanqinnan.starter</groupId>

  <artifactId>yuanqinnan-springboot-starter</artifactId>

  <version>1.0-SNAPSHOT</version>

</dependency>
在application.properties 配置中加上配置:
yuanqinnan.hello.prefix=早安

yuanqinnan.hello.suffix=晚安
加入测试:
@Autowired
HelloService helloService;
@Test
public void contextLoads() {
System.out.println(helloService.sayHello("世界"));
}
这样自定义Starter和引用自定义都已完成,Springboot的核心知识已经总结完成,后面再进行Springboot的一些高级场景整合,如缓存、消息、检索、分布式等。
SpringBoot之旅第六篇-启动原理及自定义starter的更多相关文章
- 【SpringBoot1.x】SpringBoot1.x 启动配置原理 和 自定义starter
SpringBoot1.x 启动配置原理 和 自定义starter 启动配置原理 本节源码 启动过程主要为: new SpringApplication(sources) 创建 SpringAppli ...
- SpringBoot之旅第四篇-web开发
一.引言 有了自动配置,springboot使web开发变得简单,这个在springboot之旅中的第一篇中就有体现,实际的开发中当然不会这么简单,很多时候我们都需要自己去定制一些东西.web开发的东 ...
- java框架之SpringBoot(10)-启动流程及自定义starter
启动流程 直接从 SpringBoot 程序入口的 run 方法看起: public static ConfigurableApplicationContext run(Object source, ...
- SpringBoot源码学习系列之启动原理简介
本博客通过debug方式简单跟一下Springboot application启动的源码,Springboot的启动源码是比较复杂的,本博客只是简单梳理一下源码,浅析其原理 为了方便跟源码,先找个Ap ...
- SpringBoot之旅第五篇-数据访问
一.引言 大部分系统都离不开数据访问,数据库包括SQL和NOSQL,SQL是指关系型数据库,常见的有SQL Server,Oracle,MySQL(开源),NOSQL是泛指非关系型数据库,常见的有Mo ...
- SpringBoot非官方教程 | 第六篇:springboot整合mybatis
转载请标明出处: 原文首发于:https://www.fangzhipeng.com/springboot/2017/07/11/springboot-mybatis/ 本文出自方志朋的博客 本文主要 ...
- SpringBoot之旅第三篇-日志
一.前言 日志对于一个系统的重要性不言而喻,日志能帮我们快速定位线上问题,市场上存在非常多的日志框架,比较常见的有 JUL,JCL,Log4j,Log4j2,Logback.SLF4j.jboss-l ...
- Spring之旅第六篇-事务管理
一.什么是事务 什么是事务(Transaction)?事务是数据库中的概念,是指访问并可能更新数据库中各种数据项的一个程序执行单元(unit). 有个非常经典的转账问题:A向B转款1000元,A转出成 ...
- SpringBoot之旅第七篇-Docker
一.引言 记得上大三时,要给微机房电脑安装系统,除了原生的操作系统外,还要另外安装一些必要的开发软件,如果每台电脑都重新去安装的话工作量就很大了,这个时候就使用了windows镜像系统,我们将要安装的 ...
随机推荐
- Interface Development
- Python入门、练手、视频资源汇总,拿走别客气!
摘要:为方便朋友,重新整理汇总,内容包括长期必备.入门教程.练手项目.学习视频. 一.长期必备. 1. StackOverflow,是疑难解答.bug排除必备网站,任何编程问题请第一时间到此网站查找. ...
- Java中static关键字和final关键字
static: 1. 修饰变量,方法 表示静态方法,静态变量. 2. static修饰代码块 static{ } 此种形式为静态代码块,用于初始化同时被final static修饰的变量.(当然,更常 ...
- day07
放完了愚人节的假期后就忘记更新了,这样不好,学习的态度也有点懒散了,需要调整过来,这几天在做一个退款流程,想好了建表.逻辑设计和需求分析,然后就是写具体的代码了,有些东西还是要多学习,不然书到用时方恨 ...
- CSS学习笔记六:写原生导航栏
因为刚开始学习CSS时,只了解了一些基本样式,然后就跑去学习bootstrap.bootstrap是个不错的东西,挺好玩,起码让你写界面写的轻轻松松,几行引入代码,再来个复制粘贴就解决了,而且boot ...
- 在python中单线程,多线程,多进程对CPU的利用率实测以及GIL原理分析
首先关于在python中单线程,多线程,多进程对cpu的利用率实测如下: 单线程,多线程,多进程测试代码使用死循环. 1)单线程: 2)多线程: 3)多进程: 查看cpu使用效率: 开始观察分别执行时 ...
- EF Core Model更新迁移
EF Core 迁移 感觉就是以前EF Code First的自动同步数据库功能 内容:在你新增.更新TableModel后,如何自动化的更新DB中的真实Table.以及对这些更改进行一个版本控制. ...
- hdu-3071 Gcd & Lcm game---质因数分解+状态压缩+线段树
题目链接: http://acm.hdu.edu.cn/showproblem.php?pid=3071 题目大意: 给定一个长度为n的序列m次操作,操作的种类一共有三种 查询 L :查询一个区间的所 ...
- .NET开发微信小程序-Template模块开发
1.添加一个文件目录,里面放模板信息 例:我在根目录添加一个文件夹:template 然后在这个文件夹下面添加相应的页面.比如我添加一个promodel.wxml文件.主要是放商品相关的模块信息(注: ...
- FutureTask理解
一.概述 FutureTask包装器是一种非常便利的机制,同时实现了Future和Runnable接口. 类图如下: FutureTask是一种可以取消的异步的计算任务.它的计算是通过Callable ...