Orthanc+OHIF DICOM Viewer最佳Dicom解析、在线浏览实践指南(解决方案)
概念
DICOM identifiers
Very importantly, the DICOM standard specifies DICOM tags that allow to index each single DICOM resource:
- Patients are indexed with
PatientID (0x0010, 0x0020)(part of the patient module). - Studies are indexed with
StudyInstanceUID (0x0020, 0x000d)(part of the study module). - Series are indexed with
SeriesInstanceUID (0x0020, 0x000e)(part of the series module). - Instances are indexed with
SOPInstanceUID (0x0008, 0x0018)(part of the SOP module).
The DICOM standard orders StudyInstanceUID, SeriesInstanceUID and SOPInstanceUID to be globally unique. In other words, it is mandatory for two different imaging devices to never generate the same identifiers, even if they are manufactured by different vendors. Orthanc exploits this rule to derive its own unique identifiers.
Importantly, even if the PatientID must be unique inside a given hospital, it is not guaranteed to be globally unique. This means that different patients imaged in different hospitals might share the same PatientID. For this reason, you should always browse from the study level (and not from the patient level) as soon as you deal with an application that handles patients from different hospitals.
Configuration of Orthanc
Configuring Orthanc simply consists in copying and adapting the default configuration file. This file is in the JSON file format. You can generate a sample configuration file with the following call:
$ Orthanc --config=Configuration.json
Then, start Orthanc by giving it the path to the modified Configuration.json path as a command-line argument:
$ Orthanc ./Configuration.json
The default configuration file would:
- Create a DICOM server with the DICOM AET (Application Entity Title)
ORTHANCthat listens on the port 4242. - Create a HTTP server for the REST API that listens on the port 8042.
- Store the Orthanc database in a folder called
OrthancStorage.
Remark: When specifying paths under Microsoft Windows, backslashes (i.e. \) should be either escaped by doubling them (as in \\), or replaced by forward slashes (as in /).
To obtain more diagnostic, you can use the --verbose or the --trace options:
$ Orthanc ./Configuration.json --verbose

$ Orthanc ./Configuration.json --trace
Starting with Orthanc 0.9.1, you can also start Orthanc with the path to a directory. In such a case, Orthanc will load all the files with a .json extension in this directory, and merge them to construct the configuration file. This allows to split the global configuration into several files.
搭建
关闭防火墙
systemctl stop firewalld
安装orthanc-server
依赖环境
yum install unzip make automake gcc gcc-c++ python cmake curl-devel \

              libpng-devel sqlite-devel libuuid-devel openssl-devel \

              lua-devel mercurial patch tar
编译安装
解压Orthanc-1.4.2.tar.gz到 /opt/context/Orthanc-1.4.2,进入目录执行:
cmake -DALLOW_DOWNLOADS=ON \

        -DUSE_SYSTEM_JSONCPP=OFF \

        -DUSE_SYSTEM_MONGOOSE=OFF \

        -DUSE_SYSTEM_PUGIXML=OFF \

        -DUSE_SYSTEM_SQLITE=OFF \

        -DUSE_SYSTEM_BOOST=OFF \

        -DUSE_SYSTEM_DCMTK=OFF \

        -DUSE_SYSTEM_GOOGLE_TEST=OFF \

        -DUSE_SYSTEM_LIBJPEG=OFF \

        -DCMAKE_BUILD_TYPE=Release \

        /opt/context/Orthanc-1.4.2

cmake -DALLOW_DOWNLOADS=ON \

        -DUSE_SYSTEM_JSONCPP=OFF \

        -DUSE_SYSTEM_CIVETWEB=OFF \

        -DUSE_SYSTEM_PUGIXML=OFF \

        -DUSE_SYSTEM_SQLITE=OFF \

        -DUSE_SYSTEM_BOOST=OFF \

        -DUSE_SYSTEM_DCMTK=OFF \

        -DUSE_SYSTEM_GOOGLE_TEST=OFF \

        -DUSE_SYSTEM_LIBJPEG=OFF \

        -DCMAKE_BUILD_TYPE=Release \

        /opt/context/Orthanc-1.5.6

make
see:https://bitbucket.org/sjodogne/orthanc/src/default/LinuxCompilation.txt?fileviewer=file-view-default
其中/opt/context/Orthanc-1.4.2是解压到的目录,根据实际情况酌情修改。
如果Downloading http://www.orthanc-server.com/downloads/third-party/boost_1_67_0_bcpdigest-1.4.0.tar.gz下载不稳定,将出现file DOWNLOAD HASH mismatch错误,将残缺的文件从/opt/context/Orthanc-1.4.2/ThirdPartyDownloads/目录下删除,手动使用迅雷下载再上传到该目录下即可。
如果遇到文件不存在的问题,则手动解压ThirdPartyDownloads目录下对应的压缩包到Orthanc-1.4.2目录下。
如果遇到各种奇怪的错误,那么使用迅雷手动下载全部文件,然后上传即可。
编译OrthancDicomWeb插件
将OrthancDicomWeb-0.5.tar.gz解压到/opt/context/Orthanc-1.4.2-plugins/OrthancDicomWeb-0.5目录
进入/opt/context/Orthanc-1.4.2-plugins/OrthancDicomWeb-0.5执行:
cmake -DSTATIC_BUILD=ON -DCMAKE_BUILD_TYPE=Release

make
最终生成libOrthancDicomWeb.so.0.5插件文件
编译MySQL plugins插件
将OrthancMySQL-1.1.tar.gz解压到/opt/context/Orthanc-1.4.2-plugins/OrthancMySQL-1.1目录
进入/opt/context/Orthanc-1.4.2-plugins/OrthancMySQL-1.1/MySQL执行:
cmake -DSTATIC_BUILD=ON -DCMAKE_BUILD_TYPE=Release

make
The compilation will produce 2 shared libraries, each containing one plugin for Orthanc:
libOrthancMySQLIndex.so.1.1replaces the default SQLite index of Orthanc by MySQL.libOrthancMySQLStorage.so.1.1makes Orthanc store the DICOM files it receives into MySQL.
使用OrthancMySQL插件将dicom元数据存储到MySQL中,不仅仅只是为了更好的性能和可靠性,更重要的是为实现Orthanc负载均衡打基础,非常重要!!!如果您不需要长远考虑,那么可以跳过此步骤,直接使用默认内置的本地SQLite数据库。
配置
配置文件在/opt/context/Orthanc-1.4.2/Resources目录下Configuration.json。
只需要关注以下几项即可:
//服务名称

"Name" : "JuniperOrthanc"

//dicom文件存储路径

"StorageDirectory" : "/data/orthanc",

//索引数据库存储路径

"IndexDirectory" : "/data/orthanc",

//插件配置

"Plugins" : [

  "/opt/context/Orthanc-1.4.2-plugins/OrthancDicomWeb-0.5/libOrthancDicomWeb.so.0.5",

  "/opt/context/Orthanc-1.4.2-plugins/OrthancMySQL-1.1/MySQL/libOrthancMySQLIndex.so.1.1",

  "/opt/context/Orthanc-1.4.2-plugins/OrthancMySQL-1.1/MySQL/libOrthancMySQLStorage.so.1.1"

],

//OrthancDicomWeb插件配置

"DicomWeb" : {

  "Enable" : true,            // Whether DICOMweb support is enabled

  "Root" : "/dicom-web/",     // Root URI of the DICOMweb API (for QIDO-RS, STOW-RS and WADO-RS)

  "EnableWado" : true,        // Whether WADO-URI (previously known as WADO) support is enabled

  "WadoRoot" : "/wado",       // Root URI of the WADO-URI (aka. WADO) API

  "Host" : "localhost",       // Hard-codes the name of the host for subsequent WADO-RS requests

  "Ssl" : false,              // Whether HTTPS should be used for subsequent WADO-RS requests

  "StowMaxInstances" : 10,    // For STOW-RS client, the maximum number of instances in one single HTTP query (0 = no limit)

  "StowMaxSize" : 10,         // For STOW-RS client, the maximum size of the body in one single HTTP query (in MB, 0 = no limit)

  "QidoCaseSensitive" : true  // For QIDO-RS server, whether search is case sensitive (since release 0.5)

},

//Mysql插件配置

"MySQL" : {

  "EnableIndex" : true,  //使用mysql存储文件索引

  "EnableStorage" : false,  //使用mysql存储dicom文件

  "Host" : "node3",    // For TCP connections (notably Windows)

  "Port" : 3306,           // For TCP connections (notably Windows)

  "UnixSocket" : "",  // For UNIX on localhost, Linux set to blank

  "Database" : "orthanc",

  "Username" : "root",

  "Password" : "123",

  "Lock" : false            // 单个orthanc server独占数据库,如果使用多个orthanc server共享mysql数据库,必须关闭

},

//http服务端口

"HttpPort" : 7101,

//允许远程访问

"RemoteAccessAllowed" : true,
生产环境的配置文件请在测试环境配置文件的基础上做修改,因为做了许多优化
mkdir -p /data/orthanc
mysql数据库初始化
开启Mysql超长索引字段
show variables like 'innodb_large_prefix';
set global innodb_large_prefix=1;
show variables like 'innodb_file_format';
SET GLOBAL innodb_file_format = BARRACUDA;
set global innodb_file_format_max=BARRACUDA;
在配置的mysql服务中创建orthanc数据库,字符集utf8mb4 -- UTF-8 Unicode,排序规则utf8mb4_unicode_ci
然后在orthanc数据库中执行OrthancMySQL-1.1.sql即可。
启动关闭
#进入/opt/context/Orthanc-1.4.2目录,编译完成之后这里有可执行文件

#启动

./Orthanc /opt/context/Orthanc-1.4.2/Resources/Configuration.json > /data/logs/orthanc/orthanc.log 2>&1 &

#关闭

./Orthanc stop

kill pid
/data/logs/orthanc/orthanc.log为日志文件路径
访问Orthanc Explorer
http://node1:7101/app/explorer.html
orthanc-server http 接口
添加instances
curl -X POST http://localhost:7101/instances --data-binary @IM0
获取instances的studyid
MainDicomTags:StudyInstanceUID
http://node1:7101/instances/{id}/study
获取instances序号
MainDicomTags:InstanceNumber
http://node1:7101/instances/{instances-id}
获取缩略图
http://node1:7101/instances/{instances-id}/preview
安装OHIF DICOM Viewer
安装Meteor
将meteor-bootstrap-os.linux.x86_64.tar.gz文件和install.meteor.sh上传到/opt/soft目录下。
执行install.meteor.sh即可完成安装。
sh install.meteor.sh
Meteor环境需要git客户端依赖:
yum install -y git
安装OHIF DICOM Viewer
将Viewers-master.zip解压到/opt/context/ohif-dicom-viewer目录
进入/opt/context/ohif-dicom-viewer/OHIFViewer目录,利用Meteor安装OHIF DICOM Viewer依赖:
METEOR_PACKAGE_DIRS="../Packages" meteor npm install
配置
编辑/opt/context/ohif-dicom-viewer/config/orthancDICOMWeb.json
关注以下几点:
"name": "JuniperOrthanc",

"wadoUriRoot": "http://localhost:7101/wado",

"qidoRoot": "http://localhost:7101/dicom-web",

"wadoRoot": "http://localhost:7101/dicom-web",
启动
进入/opt/context/ohif-dicom-viewer/OHIFViewer目录,利用Meteor启动OHIF DICOM Viewer:
METEOR_PACKAGE_DIRS="../Packages" nohup meteor --settings ../config/orthancDICOMWeb.json --allow-superuser > /data/logs/orthanc/ohif-viewer.log 2>&1 &
关闭
kill -9 `ps ax | grep meteor | awk '{print $1}'`
一定要用exit命令退出shell,否则meteor会自动停止
访问OHIF DICOM Viewer
http://node1:3000/viewer/1.2.840.113619.2.25.4.807793.1509756272.891
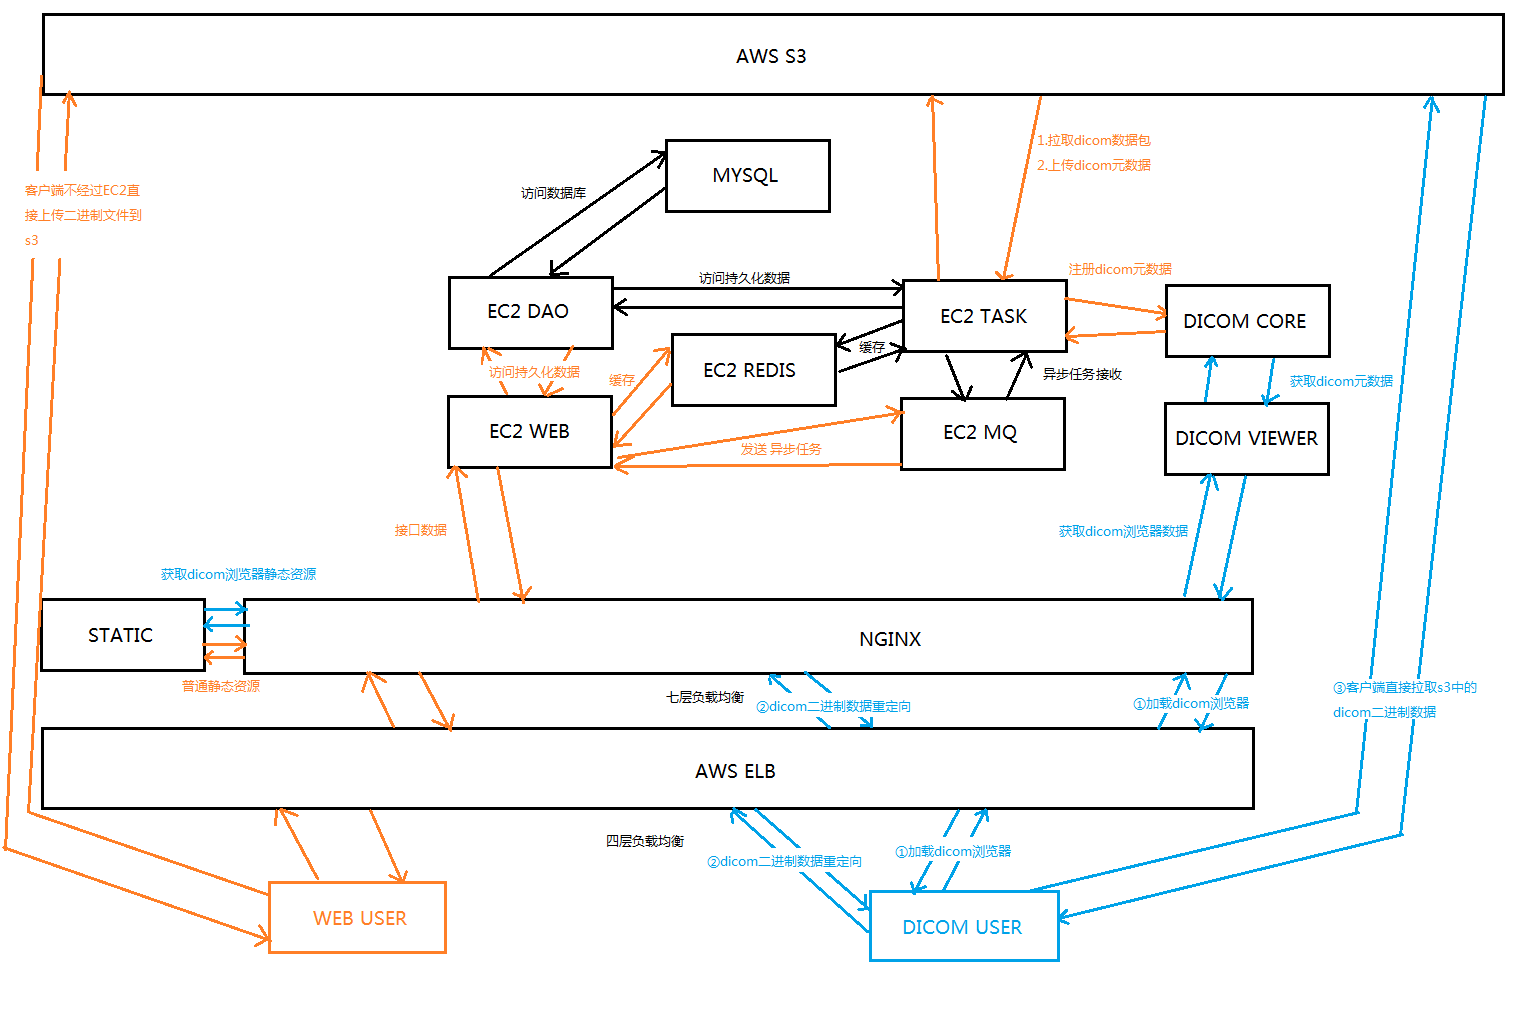
AWS部署架构图
本文以AWS为例,但并未使用AWS独有功能,阿里云同理可实现。
后记
本文作为一篇指导手册,抛砖引玉,并非按部就班的详细教程,实际操作过程中可能会遇到各种各样的问题,在本文留言即可,小菜会及时解答。
Orthanc+OHIF DICOM Viewer最佳Dicom解析、在线浏览实践指南(解决方案)的更多相关文章
- DICOM医学文件的解析
最近导师一直让做智慧医疗的一个项目,这里面涉及到DICOM格式的文件处理,在这里分享一下自己学到的关于DCM文件的一些内容. DICOM DICOM(DigitalImaging andCommuni ...
- Web版RSS阅读器(三)——解析在线Rss订阅
上篇博客<Web版RSS阅读器(二)——使用dTree树形加载rss订阅分组列表>已经写到读取rss订阅列表了,今天就说一下,当获取一条在线rss订阅的信息,怎么去解析它,从而获取文章或资 ...
- 学习PHP爬虫--《Webbots、Spiders和Screen Scrapers:技术解析与应用实践(原书第2版)》
<Webbots.Spiders和Screen Scrapers:技术解析与应用实践(原书第2版)> 译者序 前言 第一部分 基础概念和技术 第1章 本书主要内容3 1.1 发现互联网的真 ...
- 如何让HTTPS站点评级达到A+? 还得看这篇HTTPS安全优化配置最佳实践指南
0x00 前言简述 SSL/TLS 简单说明 描述: 当下越来越多的网站管理员为企业站点或自己的站点进行了SSL/TLS配置, SSL/TLS 是一种简单易懂的技术,它很容易部署及运行,但要对其进行安 ...
- 实现pdf word在线浏览和下载
这篇实现的是在线展示pdf和word并且不能显示下载和打印按钮 一 下载功能: 因为html5给a标签新添加了一个属性download,这个属性可以直接实现下载文件的功能:<a href=&qu ...
- PDF解决方案(4)--在线浏览
相关专题链接 PDF解决方案(1)--文件上传 PDF解决方案(2)--文件转PDF PDF解决方案(3)--PDF转SWF PDF解决方案(4)--在线浏览 前言:上一篇主要提到了PDF在线浏览的各 ...
- STORM在线业务实践-集群空闲CPU飙高问题排查
源:http://daiwa.ninja/index.php/2015/07/18/storm-cpu-overload/ 2015-07-18AUTHORDAIWA STORM在线业务实践-集群空闲 ...
- ASP.NET实现在线浏览Word文档另一种解决方案(Word转PDF)
ASP.NET实现在线浏览Word文档另一种解决方案(Word转PDF) 上述博文里提到的在线浏览pdf的方案不错,但word转pdf的那个dll只支持doc不支持docx,附上最新的下载链 ...
- 不错的anroid源码在线浏览网站【学习笔记】
不错的anroid源码在线浏览网站:http://androidxref.com/
随机推荐
- Echarts 关系图 添加点击事件
/*实现的效果是:在关系图上加点击事件,点击某个点,得到改点代表的内容,并且实现一个跳转效果. 关键代码已用红色标出*/ <!DOCTYPE html> <html lang=&qu ...
- Hibernate - POJO 类和数据库的映射文件*.hbm.xml
POJO 类和关系数据库之间的映射可以用一个XML文档来定义. 通过 POJO 类的数据库映射文件,Hibernate可以理解持久化类和数据表之间的对应关系,也可以理解持久化类属性与数据库表列之间的对 ...
- [原]NYOJ-6174问题-57
大学生程序代写 /*6174问题 时间限制:1000 ms | 内存限制:65535 KB 难度:2 描述 假设你有一个各位数字互不相同的四位数,把所有的数字从大到小排序后得到a,从小到大后得到b ...
- js基础:关于Boolean() 与 if
最近面试比较多,但每次我问这个问题的时候,答出来的同学并不多 var a = 0; if( a) { alert(1); } 这个问题有部分人会答alert(1), 有些人会答不执行. 结果是不执 ...
- BZOJ4317: Atm的树+2051+2117
BZOJ4317: Atm的树+2051+2117 https://lydsy.com/JudgeOnline/problem.php?id=4317 分析: 二分答案之后就变成震波那道题了. 冷静一 ...
- Access中一句查询代码实现Excel数据导入导出
摘 要:用一句查询代码,写到vba中实现Excel数据导入导出,也可把引号中的SQL语句直接放到查询分析器中执行正 文: 导入数据(导入数据时第一行必须是字段名): DoCmd.RunSQL &quo ...
- java中的设计模式及其六大原则
设计模式分类: 一共分为3大类:创造型模式.结构型模式.行为型模式. 创造型模式:工厂方法(FactoryMethod).抽象工厂模式(AbstractFactory).建造者模式(Builder). ...
- tomcat启动加载web项目内存溢出
通过tomcat命令启动tomcat的web项目时,根据项目大小,有可能会报以下两个错误. 在启动时没有错误,但是在访问时会报错: 1. java.lang.OutOfMemoryError: Jav ...
- Linux 系统通过 Squid 配置实现代理上网
本文转载自:https://help.aliyun.com/knowledge_detail/41342.html Squid 介绍 Squid 是一个缓存 Internet 数据的软件,其接收用户的 ...
- POJ2513(字典树+图的连通性判断)
//用map映射TLE,字典树就AC了#include"cstdio" #include"set" using namespace std; ; ;//26个小 ...