
【共享单车】—— React后台管理系统开发手记:AntD Table高级表格
前言:以下内容基于React全家桶+AntD实战课程的学习实践过程记录。最终成果github地址:https://github.com/66Web/react-antd-manager,欢迎star。
一、头部固定

- scroll属性:设置横向或纵向滚动,也可用于指定滚动区域的宽和高
<Card title="头部固定">

          <Table

                bordered

                columns={columns}

                dataSource={this.state.dataSource}

                pagination={false}

                scroll={{y: 240}}

           />

 </Card>
此处:y方向限制的高度240px小于表格总高度,便可纵向滚动
二、左侧固定
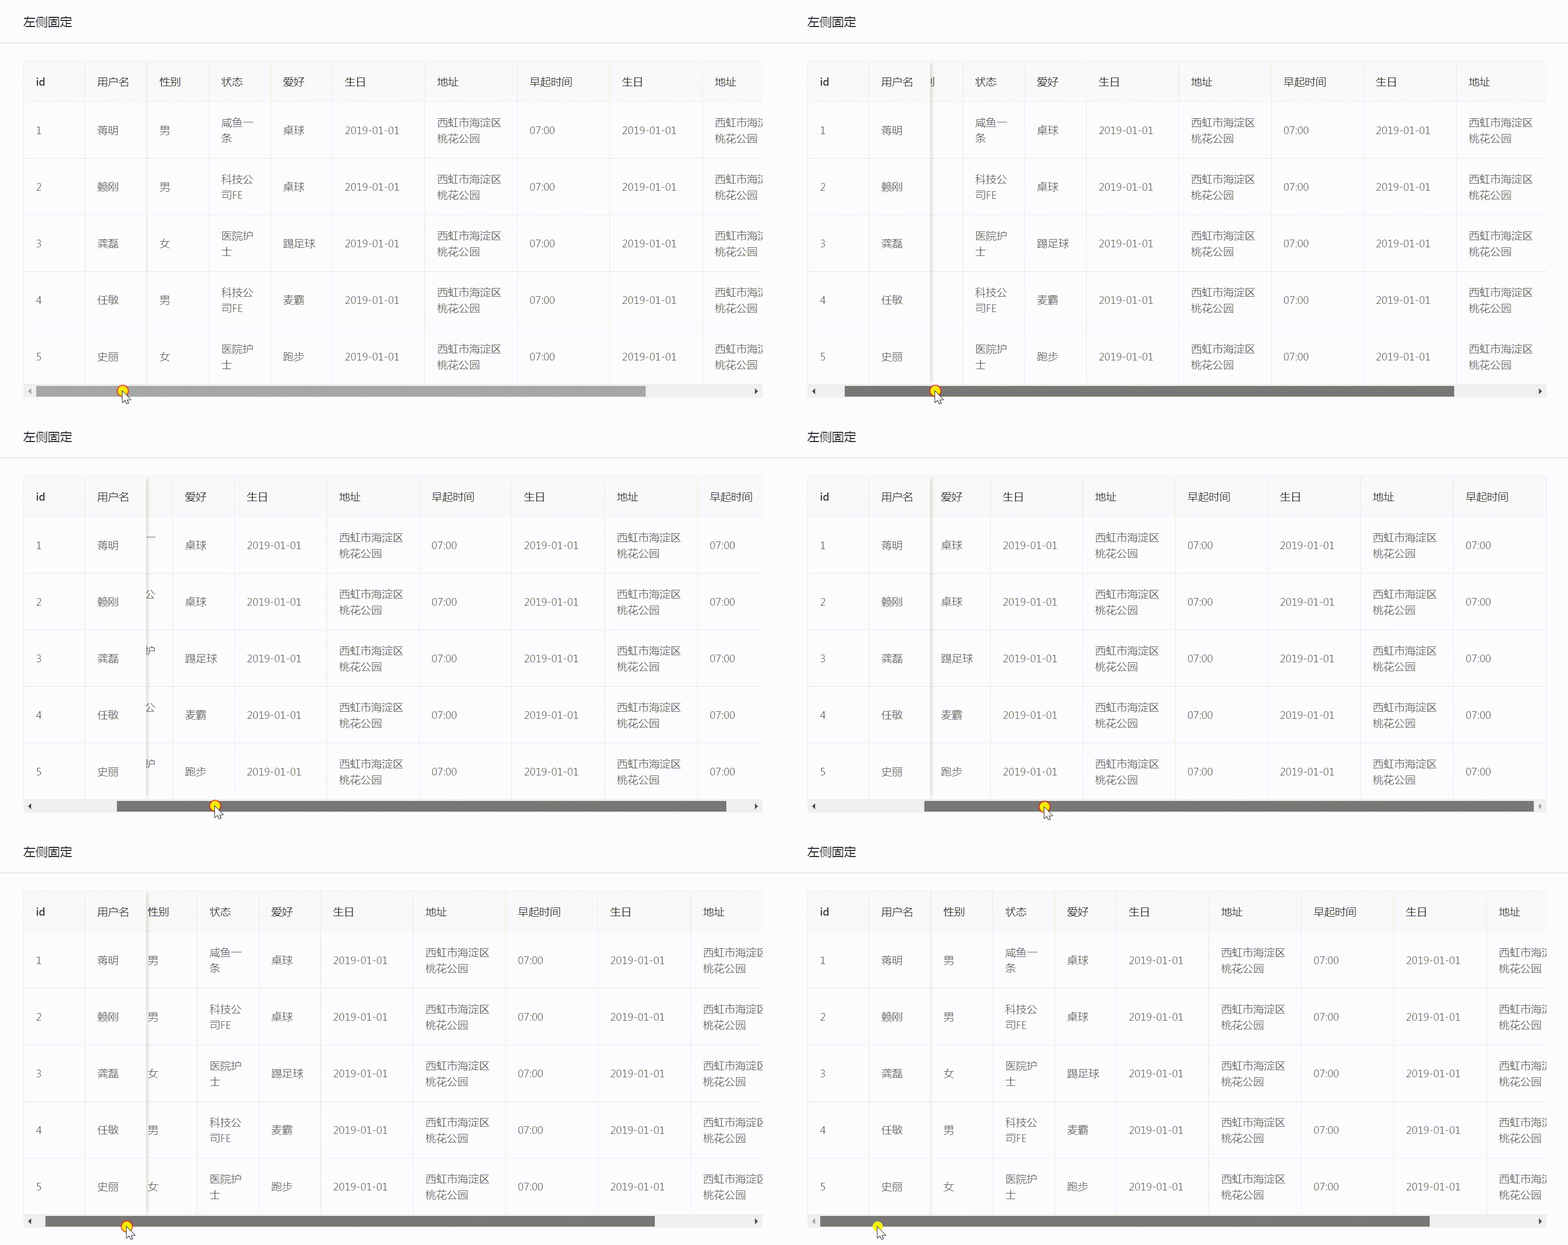
- 设置scoll属性:实现表格横向滚动
<Card title="左侧固定" style={{margin: '10px 0'}}>

          <Table

                 bordered

                 columns={columns2}

                 dataSource={this.state.dataSource}

                 pagination={false}

                 scroll={{x: 1130}}

           />

 </Card>
此处:x方向限制的宽度1130px大于表格总宽度,便可横向滚动
在column2表头设置中:给id和username添加fixed属性为left,实现id与用户名固定在左侧
 const columns2 = [

         {

              title: 'id',   //表头标题

              key: 'id',

              width: 80,

              fixed: 'left',

              dataIndex: 'id' //数据源

         },

         {

              title: '用户名',

              key: 'userName',

              width: 80,

              fixed: 'left',

              dataIndex: 'userName'

         },
三、表格排序

- onChange事件:分页、排序、筛选变化时触发
<Card title="表格排序" style={{margin: '10px 0'}}>

           <Table

                    bordered

                    columns={columns3}

                    dataSource={this.state.dataSource}

                    pagination={false}

                    onChange={this.handleChange}

            />

</Card>
sorter函数:对某一列数据进行排序,通过指定列的
sorter函数即可启动排序按钮
- 在column3表头设置中:给age年龄字段指定sorter函数,并添加sorterOrder属性
{

       title: '年龄',

       dataIndex: 'age',

       key: 'age',

       sorter: (a, b) => {

              return a.age - b.age;

       },

       sortOrder: this.state.sortOrder

}
handleChange方法中:传入sorter函数返回值,将当前排序状态sorter.order存入state中
handleChange = (pagination, filters, sorter) => {

        this.setState({

            sortOrder: sorter.order

        })

}
四、操作按钮

- 徽标Badge组件
- 用不同的徽标,标识不同状态
- 在column4表头设置中:给state的config中引用Badge
{

    title: '状态',

    dataIndex: 'state',

    key: 'state',

    render(state){

           let config = {

               '1': <Badge status="success" text="成功" />,

               '2': <Badge status="error" text="报错" />,

               '3': <Badge status="default" text="正常" />,

               '4': <Badge status="processing" text="进行中" />,

               '5': <Badge status="warning" text="警告" />,

          }

          return config[state]

   }

}
列中添加操作按钮
- render方法:生成复杂数据的渲染函数,参数分别为当前行的值text,当前行数据item,行索引index
直接在column4的最后一项中:render一个按钮,监听OnClick事件,传入当前行数据item
{

      title: '操作',

      render: (text, item) => {

            //注意 this 为 render 方法内部的this

            return <Button size="small" onClick={(item) => {this.handleDelete(item)}}>删除</Button>

     }

}
执行操作方法
handleDelete = (item) => {

        let id = item.id;

        Modal.confirm({

            title: '确认',

            content: '您确认要删除此条数据吗?',

            onOk: () => {

                message.success('删除成功');

                this.request();

            }

        })

}
五、实例代码
- pages->table->highTable.js:对应路由/admin/high
import React from 'react'
import {Card, Table, Modal, Button, message, Badge} from 'antd'
import axios from '../../axios/index' export default class HighTables extends React.Component{
state = {
dataSource: []
}
params = {
page: 1
}
componentDidMount(){
this.request();
}
//动态获取mock数据
request = () => {
let _this = this;
axios.ajax({
url: '/table/list',
data:{
params:{
page: this.params.page
},
// isShowLoading: false
}
}).then((res) => {
if(res.code === 0){
res.list.map((item, index) => {
item.key = index
})
this.setState({
dataSource: res.list
})
}
})
} handleChange = (pagination, filters, sorter) => {
this.setState({
sortOrder: sorter.order
})
} handleDelete = (item) => {
let id = item.id;
Modal.confirm({
title: '确认',
content: '您确认要删除此条数据吗?',
onOk: () => {
message.success('删除成功');
this.request();
}
})
} render(){
const columns = [
{
title: 'id', //表头标题
key: 'id',
width: 80,
dataIndex: 'id' //数据源
},
{
title: '用户名',
key: 'userName',
width: 80,
dataIndex: 'userName'
},
{
title: '性别',
dataIndex: 'sex',
key: 'sex',
width: 80,
render(sex){
return sex === 1 ? '男' : '女'
}
},
{
title: '状态',
dataIndex: 'state',
key: 'state',
width: 80,
render(state){
let config = {
'1': '咸鱼一条',
'2': '人民公仆',
'3': '医院护士',
'4': '科技公司FE',
'5': '创业者'
}
return config[state]
}
},
{
title: '爱好',
dataIndex: 'interest',
key: 'interest',
width: 80,
render(abc){
let config = {
'1': '游泳',
'2': '打篮球',
'3': '踢足球',
'4': '跑步',
'5': '爬山',
'6': '骑行',
'7': '桌球',
'8': '麦霸'
}
return config[abc]
}
},
{
title: '生日',
dataIndex: 'birthday',
key: 'birthday',
width: 120,
},
{
title: '地址',
dataIndex: 'address',
key: 'address',
width: 120,
},
{
title: '早起时间',
dataIndex: 'time',
key: 'time',
width: 80
}
]
const columns2 = [
{
title: 'id', //表头标题
key: 'id',
width: 80,
fixed: 'left',
dataIndex: 'id' //数据源
},
{
title: '用户名',
key: 'userName',
width: 80,
fixed: 'left',
dataIndex: 'userName'
},
{
title: '性别',
dataIndex: 'sex',
key: 'sex',
width: 80,
render(sex){
return sex === 1 ? '男' : '女'
}
},
{
title: '状态',
dataIndex: 'state',
key: 'state',
width: 80,
render(state){
let config = {
'1': '咸鱼一条',
'2': '人民公仆',
'3': '医院护士',
'4': '科技公司FE',
'5': '创业者'
}
return config[state]
}
},
{
title: '爱好',
dataIndex: 'interest',
key: 'interest',
width: 80,
render(abc){
let config = {
'1': '游泳',
'2': '打篮球',
'3': '踢足球',
'4': '跑步',
'5': '爬山',
'6': '骑行',
'7': '桌球',
'8': '麦霸'
}
return config[abc]
}
},
{
title: '生日',
dataIndex: 'birthday',
key: 'birthday',
width: 120,
},
{
title: '地址',
dataIndex: 'address',
key: 'address',
width: 120,
},
{
title: '早起时间',
dataIndex: 'time',
key: 'time',
width: 120
}, {
title: '生日',
dataIndex: 'birthday',
key: 'birthday2',
width: 120,
},
{
title: '地址',
dataIndex: 'address',
key: 'address2',
width: 120,
},
{
title: '早起时间',
dataIndex: 'time',
key: 'time2',
width: 120
}
]
const columns3 = [
{
title: 'id', //表头标题
key: 'id',
dataIndex: 'id' //数据源
},
{
title: '用户名',
key: 'userName',
dataIndex: 'userName'
},
{
title: '性别',
dataIndex: 'sex',
key: 'sex',
render(sex){
return sex === 1 ? '男' : '女'
}
},
{
title: '年龄',
dataIndex: 'age',
key: 'age',
sorter: (a, b) => {
return a.age - b.age;
},
sortOrder: this.state.sortOrder
},
{
title: '状态',
dataIndex: 'state',
key: 'state',
render(state){
let config = {
'1': '咸鱼一条',
'2': '人民公仆',
'3': '医院护士',
'4': '科技公司FE',
'5': '创业者'
}
return config[state]
}
},
{
title: '爱好',
dataIndex: 'interest',
key: 'interest',
render(abc){
let config = {
'1': '游泳',
'2': '打篮球',
'3': '踢足球',
'4': '跑步',
'5': '爬山',
'6': '骑行',
'7': '桌球',
'8': '麦霸'
}
return config[abc]
}
},
{
title: '生日',
dataIndex: 'birthday',
key: 'birthday',
},
{
title: '地址',
dataIndex: 'address',
key: 'address',
},
{
title: '早起时间',
dataIndex: 'time',
key: 'time'
}
]
const columns4 = [
{
title: 'id', //表头标题
key: 'id',
dataIndex: 'id' //数据源
},
{
title: '用户名',
key: 'userName',
dataIndex: 'userName'
},
{
title: '性别',
dataIndex: 'sex',
key: 'sex',
render(sex){
return sex === 1 ? '男' : '女'
}
},
{
title: '年龄',
dataIndex: 'age',
key: 'age'
},
{
title: '状态',
dataIndex: 'state',
key: 'state',
render(state){
let config = {
'1': <Badge status="success" text="成功" />,
'2': <Badge status="error" text="报错" />,
'3': <Badge status="default" text="正常" />,
'4': <Badge status="processing" text="进行中" />,
'5': <Badge status="warning" text="警告" />,
}
return config[state]
}
},
{
title: '爱好',
dataIndex: 'interest',
key: 'interest',
render(abc){
let config = {
'1': '游泳',
'2': '打篮球',
'3': '踢足球',
'4': '跑步',
'5': '爬山',
'6': '骑行',
'7': '桌球',
'8': '麦霸'
}
return config[abc]
}
},
{
title: '生日',
dataIndex: 'birthday',
key: 'birthday',
},
{
title: '地址',
dataIndex: 'address',
key: 'address',
},
{
title: '操作',
render: (text, item) => {
//注意 this 为 render 方法内部的this
return <Button size="small" onClick={(item) => {this.handleDelete(item)}}>删除</Button>
}
}
] return (
<div>
<Card title="头部固定">
<Table
bordered
columns={columns}
dataSource={this.state.dataSource}
pagination={false}
scroll={{y: 240}}
/>
</Card>
<Card title="左侧固定" style={{margin: '10px 0'}}>
<Table
bordered
columns={columns2}
dataSource={this.state.dataSource}
pagination={false}
scroll={{x: 1130}}
/>
</Card>
<Card title="表格排序" style={{margin: '10px 0'}}>
<Table
bordered
columns={columns3}
dataSource={this.state.dataSource}
pagination={false}
onChange={this.handleChange}
/>
</Card>
<Card title="操作按钮" style={{margin: '10px 0'}}>
<Table
bordered
columns={columns4}
dataSource={this.state.dataSource}
pagination={false}
/>
</Card>
</div>
)
}
}
注:项目来自慕课网
【共享单车】—— React后台管理系统开发手记:AntD Table高级表格的更多相关文章
- 【共享单车】—— React后台管理系统开发手记:主页面架构设计
前言:以下内容基于React全家桶+AntD实战课程的学习实践过程记录.最终成果github地址:https://github.com/66Web/react-antd-manager,欢迎star. ...
- 【共享单车】—— React后台管理系统开发手记:城市管理和订单管理
前言:以下内容基于React全家桶+AntD实战课程的学习实践过程记录.最终成果github地址:https://github.com/66Web/react-antd-manager,欢迎star. ...
- 【共享单车】—— React后台管理系统开发手记:UI菜单各个组件使用(Andt UI组件)
前言:以下内容基于React全家桶+AntD实战课程的学习实践过程记录.最终成果github地址:https://github.com/66Web/react-antd-manager,欢迎star. ...
- 【共享单车】—— React后台管理系统开发手记:AntD Form基础组件
前言:以下内容基于React全家桶+AntD实战课程的学习实践过程记录.最终成果github地址:https://github.com/66Web/react-antd-manager,欢迎star. ...
- 【共享单车】—— React后台管理系统开发手记:AntD Table基础表格
前言:以下内容基于React全家桶+AntD实战课程的学习实践过程记录.最终成果github地址:https://github.com/66Web/react-antd-manager,欢迎star. ...
- 【共享单车】—— React后台管理系统开发手记:Redux集成开发
前言:以下内容基于React全家桶+AntD实战课程的学习实践过程记录.最终成果github地址:https://github.com/66Web/react-antd-manager,欢迎star. ...
- 【共享单车】—— React后台管理系统开发手记:Router 4.0路由实战演练
前言:以下内容基于React全家桶+AntD实战课程的学习实践过程记录.最终成果github地址:https://github.com/66Web/react-antd-manager,欢迎star. ...
- 【共享单车】—— React后台管理系统开发手记:权限设置和菜单调整(未完)
前言:以下内容基于React全家桶+AntD实战课程的学习实践过程记录.最终成果github地址:https://github.com/66Web/react-antd-manager,欢迎star. ...
- 【共享单车】—— React后台管理系统开发手记:员工管理之增删改查
前言:以下内容基于React全家桶+AntD实战课程的学习实践过程记录.最终成果github地址:https://github.com/66Web/react-antd-manager,欢迎star. ...
随机推荐
- 去除TB二合一页面弹窗
AdBlock插件 自定义AdBlock ###J_MMREDBOX_MASK 保存
- HDU 1841 Find the Shortest Common Superstring----KMP
题意:给两个字符串,问包含这两个字符串的最小的字符串的长度 kmp返回匹配串长度 #include "iostream" #include<cstdio> #inclu ...
- 编写Shell脚本的最佳实践,规范二
需要养成的习惯如下: 代码有注释 #!/bin/bash # Written by steven # Name: mysqldump.sh # Version: v1.0 # Parameters : ...
- UVa10891 Game of Sum
给定n个数字,A和B可以从这串数字的两端任意选数字,一次只能从一端选取.两人都采用最优策略,A先手,问A和B各自得到数字的和的差值最大为多少? 区间DP F[i][j]表示区间i~j内A能得到的最大数 ...
- Android的CheckBox(多选框)
1.布局文件 <LinearLayout xmlns:android="http://schemas.android.com/apk/res/android" xmlns:t ...
- windows下利用线程池完成多任务的分配和运行
在做项目的过程中有时候为了提升效率,用了多线程的方法来对任务进行分割和应用,后来发现,采用线程池的方法能更好的利用线程资源来计算任务,网上有很多关于如何运行线程池的例子,msdn上也给出了对应的例子: ...
- 初学springMVC的拦截器
springMvc拦截器的执行顺序! 拦截器的各个方法的作用: /** * 登录验证拦截器 */ public class Intercepter implements HandlerInt ...
- 向PE文件中空白处添加代码
// mem.cpp : 定义控制台应用程序的入口点. //PE文件从文件加载到内存,再从内存读取,然后存盘到文件 #include "stdafx.h" #include < ...
- Android 利用Sharp样式设置文本框EditText圆角形状
1.首先新建样式文件editsharp.xml: <?xml version="1.0" encoding="utf-8"?> <shape ...
- springMVC笔记:@ResponseBody
使用@ResponseBody的方式,将Map形返回值转为json,用作POST请求的返回值.为了解决406 Not Acceptable错误,需要检查以下几项: 1. 依赖包中包含jackson-m ...