Win7+keras+tensorflow使用YOLO-v3训练自己的数据集
一、下载和测试模型
1. 下载YOLO-v3
git clone https://github.com/qqwweee/keras-yolo3.git
这是在Ubuntu里的命令,windows直接去 https://github.com/qqwweee/keras-yolo3下载、解压。得到一个 keras-yolo3-master 文件夹
2. 下载权重
wget https://pjreddie.com/media/files/yolov3.weights
去 https://pjreddie.com/media/files/yolov3.weights 下载权重。将 yolov3.weights 放入 keras-yolo3-master 文件夹
3. 生成 h5 文件
python convert.py yolov3.cfg yolov3.weights model_data/yolo.h5
执行convert.py文件,这是将darknet的yolo转换为用于keras的h5文件,生成的h5被保存在model_data下。命令中的 convert.py 和 yolo.cfg 已经在keras-yolo3-master 文件夹下,不需要单独下载。
4. 用已经被训练好的yolo.h5进行图片识别测试
python yolo_video.py --image
执行后会让你输入一张图片的路径,由于我准备的图片放在与yolo_video.py同级目录,所以直接输入图片名称,不需要加路径
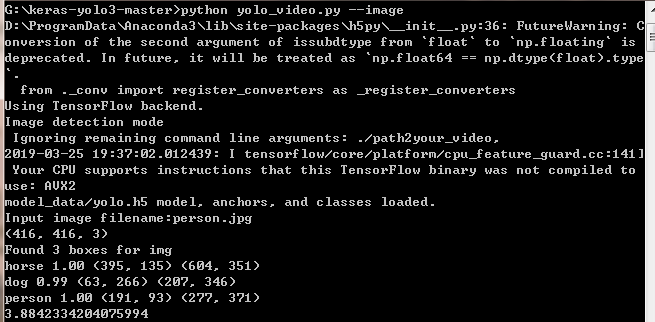
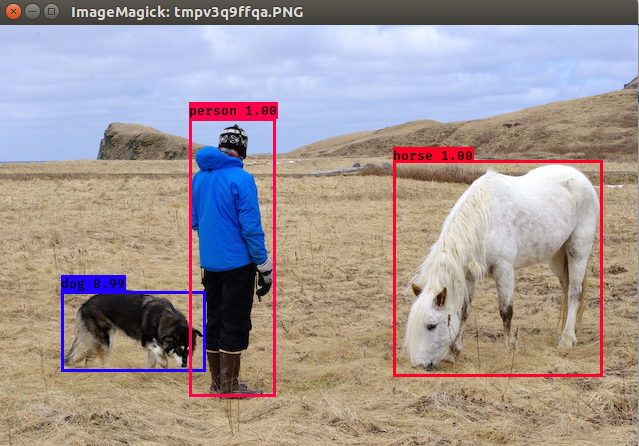
这就表明测试成功了。
二、制作自己的VOC数据集
参考我原来写的博客:
在Ubuntu内制作自己的VOC数据集
我是在Ubuntu内标注然后移到Windows的,如果在Windows里安装了LabelImg,可以直接在Windows下标注。
最后文件布局为:
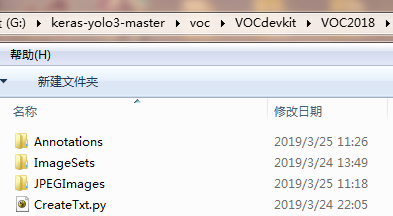
三、修改配置文件、执行训练
1. 复制 voc_annotation.py 到voc文件夹下,修改 voc_annotation.py 分类。如下图:
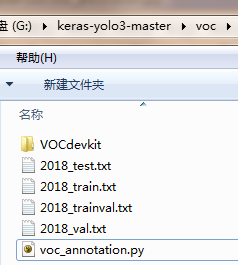 执行 voc_annotation.py 获得这四个文件
import xml.etree.ElementTree as ET

from os import getcwd

sets=[('', 'train'), ('', 'val'), ('', 'test'), ('', 'trainval')]

classes = []

def convert_annotation(year, image_id, list_file):

    in_file = open('VOCdevkit\VOC%s\Annotations\%s.xml'%(year, image_id), encoding = 'utf-8')

    tree=ET.parse(in_file)

    root = tree.getroot()

    for obj in root.iter('object'):

        difficult = obj.find('difficult').text

        cls = obj.find('name').text

        if cls not in classes or int(difficult)==1:

            continue

        cls_id = classes.index(cls)

        xmlbox = obj.find('bndbox')

        b = (int(xmlbox.find('xmin').text), int(xmlbox.find('ymin').text), int(xmlbox.find('xmax').text), int(xmlbox.find('ymax').text))

        list_file.write(" " + ",".join([str(a) for a in b]) + ',' + str(cls_id))

wd = getcwd()

for year, image_set in sets:

    image_ids = open('VOCdevkit\VOC%s\ImageSets\Main\%s.txt'%(year, image_set)).read().strip().split()

    list_file = open('%s_%s.txt'%(year, image_set), 'w')

    for image_id in image_ids:

        list_file.write('%s\VOCdevkit\VOC%s\JPEGImages\%s.jpg'%(wd, year, image_id))

        convert_annotation(year, image_id, list_file)

        list_file.write('\n')

    list_file.close()
网上都是 train、val、test、三个文件。但我觉得还应该加一个 trainval。还有将所有的 / 改为 \ (Windows下路径表示和linux下不同)。高亮部分是为了防止Windows读取错误(博主就恰好碰到了)
2. 在model_data文件夹下新建一个 my_classes.txt(可以根据你的数据来,比如你检测是花的种类,可以叫 flower.txt。起名最好有意义),将你的类别写入,一行一个。
3. 修改yolov3.cfg 文件
使用迁移学习思想,用已经预训练好的权重接着训练。需要下面的修改步骤:
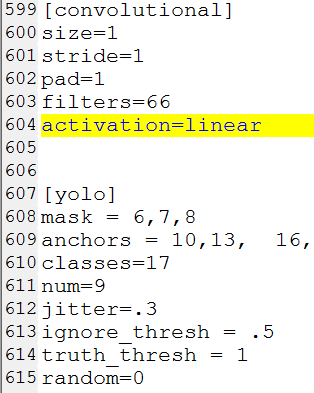
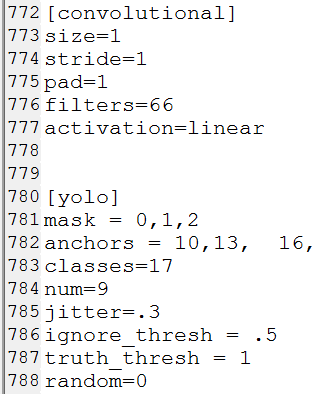
IDE里直接打开cfg文件,ctrl+f搜 yolo, 总共会搜出3个含有yolo的地方。
每个地方都要修改3处,
filter :3*(5+len(classes))
classes:len(classes) 我的类别是17
random:原来是1,显存小改为0

重新生成h5文件
python convert.py -w yolov3.cfg yolov3.weights model_data/yolo_weights.h5
4. 训练
执行下面的train.py
python train.py
"""

Retrain the YOLO model for your own dataset.

"""

import numpy as np

import keras.backend as K

from keras.layers import Input, Lambda

from keras.models import Model

from keras.callbacks import TensorBoard, ModelCheckpoint, EarlyStopping

from yolo3.model import preprocess_true_boxes, yolo_body, tiny_yolo_body, yolo_loss

from yolo3.utils import get_random_data

def _main():

    annotation_path = 'voc/2018_trainval.txt'

    log_dir = 'model_data/logs/'

    classes_path = 'model_data/my_classes.txt'

    anchors_path = 'model_data/yolo_anchors.txt'

    class_names = get_classes(classes_path)

    anchors = get_anchors(anchors_path)

    input_shape = (416,416) # multiple of 32, hw

    model = create_model(input_shape, anchors, len(class_names) )

    train(model, annotation_path, input_shape, anchors, len(class_names), log_dir=log_dir)

def train(model, annotation_path, input_shape, anchors, num_classes, log_dir='logs/'):

    model.compile(optimizer='adam', loss={

        'yolo_loss': lambda y_true, y_pred: y_pred})

    logging = TensorBoard(log_dir=log_dir)

    checkpoint = ModelCheckpoint(log_dir + "ep{epoch:03d}-loss{loss:.3f}-val_loss{val_loss:.3f}.h5",

        monitor='val_loss', save_weights_only=True, save_best_only=True, period=1)

    batch_size = 10

    val_split = 0.2

    with open(annotation_path) as f:

        lines = f.readlines()

    np.random.shuffle(lines)

    num_val = int(len(lines)*val_split)

    num_train = len(lines) - num_val

    print('Train on {} samples, val on {} samples, with batch size {}.'.format(num_train, num_val, batch_size))

    model.fit_generator(data_generator_wrap(lines[:num_train], batch_size, input_shape, anchors, num_classes),

            steps_per_epoch=max(1, num_train//batch_size),

            validation_data=data_generator_wrap(lines[num_train:], batch_size, input_shape, anchors, num_classes),

            validation_steps=max(1, num_val//batch_size),

            epochs=20,

            initial_epoch=0)

    model.save_weights(log_dir + 'trained_weights.h5')

def get_classes(classes_path):

    with open(classes_path) as f:

        class_names = f.readlines()

    class_names = [c.strip() for c in class_names]

    return class_names

def get_anchors(anchors_path):

    with open(anchors_path) as f:

        anchors = f.readline()

    anchors = [float(x) for x in anchors.split(',')]

    return np.array(anchors).reshape(-1, 2)

def create_model(input_shape, anchors, num_classes, load_pretrained=False, freeze_body=False,

            weights_path='model_data/yolo_weights.h5'):

    K.clear_session() # get a new session

    image_input = Input(shape=(None, None, 3))

    h, w = input_shape

    num_anchors = len(anchors)

    y_true = [Input(shape=(h//{0:32, 1:16, 2:8}[l], w//{0:32, 1:16, 2:8}[l], \

        num_anchors//3, num_classes+5)) for l in range(3)]

    model_body = yolo_body(image_input, num_anchors//3, num_classes)

    print('Create YOLOv3 model with {} anchors and {} classes.'.format(num_anchors, num_classes))

    if load_pretrained:

        model_body.load_weights(weights_path, by_name=True, skip_mismatch=True)

        print('Load weights {}.'.format(weights_path))

        if freeze_body:

            # Do not freeze 3 output layers.

            num = len(model_body.layers)-3

            for i in range(num): model_body.layers[i].trainable = False

            print('Freeze the first {} layers of total {} layers.'.format(num, len(model_body.layers)))

    model_loss = Lambda(yolo_loss, output_shape=(1,), name='yolo_loss',

        arguments={'anchors': anchors, 'num_classes': num_classes, 'ignore_thresh': 0.5})(

        [*model_body.output, *y_true])

    model = Model([model_body.input, *y_true], model_loss)

    return model

def data_generator(annotation_lines, batch_size, input_shape, anchors, num_classes):

    n = len(annotation_lines)

    np.random.shuffle(annotation_lines)

    i = 0

    while True:

        image_data = []

        box_data = []

        for b in range(batch_size):

            i %= n

            image, box = get_random_data(annotation_lines[i], input_shape, random=True)

            image_data.append(image)

            box_data.append(box)

            i += 1

        image_data = np.array(image_data)

        box_data = np.array(box_data)

        y_true = preprocess_true_boxes(box_data, input_shape, anchors, num_classes)

        yield [image_data, *y_true], np.zeros(batch_size)

def data_generator_wrap(annotation_lines, batch_size, input_shape, anchors, num_classes):

    n = len(annotation_lines)

    if n==0 or batch_size<=0: return None

    return data_generator(annotation_lines, batch_size, input_shape, anchors, num_classes)

if __name__ == '__main__':

    _main()
代码标红的地方,需要根据自己实际情况进行修改。
其他可以设置的参数
batch_size = 32:默认值比较大,对电脑性能有要求。可以调小。我设置的是10
val_split = 0.1 : 这个表示,验证集占训练集的比例。建议划分大点。不然验证集的图片会很少。不利于验证集loss的计算
epochs = 100,可以调小一点。我设置的是20
参考地址:
https://blog.csdn.net/m0_37857151/article/details/81330699
https://blog.csdn.net/mingqi1996/article/details/83343289
Win7+keras+tensorflow使用YOLO-v3训练自己的数据集的更多相关文章
- YOLO V3训练自己的数据集
数据的输入几乎和Faster rcnn一样,标签格式xml是一样的. 相比Faster rcnn,数据多了一步处理,通过voc_annotation.py将图片路径和bbox+class存储在txt下 ...
- 【TensorFlow】Win7下使用Object Detection API 训练自己的数据集,并视频实时检测
说明: 图片:自己开的摄像头,截取的图片.选择了200张图片.下面会有截取的脚本. 使用labelImg工具进行图片进行标注.产生PascalVOC格式的XML文件.[labelImg工具的安装和使用 ...
- 【tf.keras】在 cifar 上训练 AlexNet,数据集过大导致 OOM
cifar-10 每张图片的大小为 32×32,而 AlexNet 要求图片的输入是 224×224(也有说 227×227 的,这是 224×224 的图片进行大小为 2 的 zero paddin ...
- 【Tensorflow】 Object_detection之训练PASCAL VOC数据集
参考:Running Locally 1.检查数据.config文件是否配置好 可参考之前博客: Tensorflow Object_detection之配置Training Pipeline Ten ...
- 深度学习笔记(十三)YOLO V3 (Tensorflow)
[代码剖析] 推荐阅读! SSD 学习笔记 之前看了一遍 YOLO V3 的论文,写的挺有意思的,尴尬的是,我这鱼的记忆,看完就忘了 于是只能借助于代码,再看一遍细节了. 源码目录总览 tens ...
- 【深度学习】keras + tensorflow 实现猫和狗图像分类
本文主要是使用[监督学习]实现一个图像分类器,目的是识别图片是猫还是狗. 从[数据预处理]到 [图片预测]实现一个完整的流程, 当然这个分类在 Kaggle 上已经有人用[迁移学习](VGG,Resn ...
- YOLO v3
yolo为you only look once. 是一个全卷积神经网络(FCN),它有75层卷积层,包含跳跃式传递和降采样,没有池化层,当stide=2时用做降采样. yolo的输出是一个特征映射(f ...
- keras系列︱图像多分类训练与利用bottleneck features进行微调(三)
引自:http://blog.csdn.net/sinat_26917383/article/details/72861152 中文文档:http://keras-cn.readthedocs.io/ ...
- A Newbie’s Install of Keras & Tensorflow on Windows 10 with R
This weekend, I decided it was time: I was going to update my Python environment and get Keras and T ...
随机推荐
- BEX5下实现鼠标滚动滚动条
使用前提: 页面内容过多,默认的滚动条太难看,在不引入滚动条插件情况下让界面不使用滚动条,又能通过鼠标滚动 实现步骤: 1 在会出现滚动条的组件上设置隐藏滚动条 overflow:hidden; 2 ...
- Python学习之路——函数的参数分类
今日内容 '''实参:调用函数,在括号内传入的实际值,值可以为常量.变量.表达式或三者的组合*****形参:定义函数,在括号内声明的变量名,用来接受外界传来的值''''''注:形参随着函数的调用 ...
- C#嵌入动态链接库到可执行文件
C#嵌入动态链接库到可执行文件 将需要被集成的程序集放在项目的lib文件夹中,引用路径从解决方案开始,以“.”连接. 如图(解决方案名称为莫非): 核心代码: AppDomain.CurrentDom ...
- FMT 与 子集(逆)卷积
本文参考了 Dance of Faith 大佬的博客 我们定义集合并卷积 \[ h_{S} = \sum_{L \subseteq S}^{} \sum_{R \subseteq S}^{} [L \ ...
- Oracle Database 快捷版 安装 连接
Oracle Database 快捷版 11g 第 2 版 下载地址:http://www.oracle.com/technetwork/cn/database/database-technologi ...
- RabbitMQ队列的使用
为什么要用RabbitMQ 以常见的订单系统为例,用户点击[下单]按钮之后的业务逻辑可能包括:扣减库存.生成相应单据.发红包.发短信通知.在业务发展初期这些逻辑可能放在一起同步执行,随着业务的发展订单 ...
- CMDB服务器管理系统【s5day92】:服务器管理回顾
一.服务器管理回顾 1.requests 发送: requests.post(url='',data=,json=) requests.get() Django接受: request.POST, co ...
- Docker:容器间互联的应用zabbix监控项目 [十]
一.docker容器间的互联 1.创建两个容器 [root@luoahong ~]# docker run -d --name luoahong httpd:latest 8f771f043391e7 ...
- linux下安装与配置Redis
1.安装 (1)获取源代码 wget http://download.redis.io/releases/redis-4.0.8.tar.gz (2)解压 tar xzvf redis-4.0.8.t ...
- 第六节:WebApi的部署方式(自托管)
一. 简单说明 开篇就介绍过WebApi和MVC相比,其中优势之一就是WebApi可以不依赖于IIS部署,可以自托管,当然这里指的是 .Net FrameWork 下的 WebApi 和 MVC 相比 ...
