SSM框架——整合ssm
SSM整合
1.准备工作
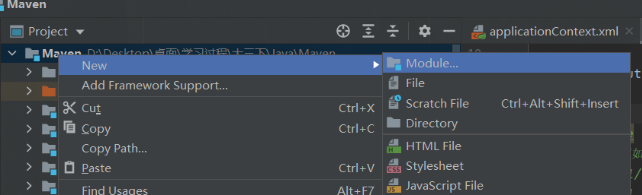
新建一个普通的Maven项目
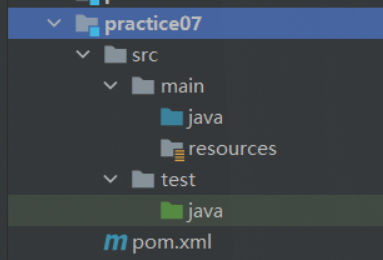
建好所有需要的架构层

向pom.xml中导入所有的依赖
<!--MyBatis相关-->

<dependency>

   <groupId>com.mchange</groupId>

   <artifactId>c3p0</artifactId>

   <version>0.9.5.2</version>

</dependency>

<dependency>

   <groupId>mysql</groupId>

   <artifactId>mysql-connector-java</artifactId>

   <version>5.1.47</version>

</dependency>

<dependency>

   <groupId>org.mybatis</groupId>

   <artifactId>mybatis</artifactId>

   <version>3.5.2</version>

</dependency>

<dependency>

   <groupId>org.mybatis</groupId>

   <artifactId>mybatis-spring</artifactId>

   <version>2.0.2</version>

</dependency>

<!--Spring相关-->

<dependency>

   <groupId>org.springframework</groupId>

   <artifactId>spring-webmvc</artifactId>

   <version>5.1.9.RELEASE</version>

</dependency>

<dependency>

   <groupId>org.springframework</groupId>

   <artifactId>spring-jdbc</artifactId>

   <version>5.1.9.RELEASE</version>

</dependency>

<!--Web相关-->

<dependency>

   <groupId>javax.servlet</groupId>

   <artifactId>servlet-api</artifactId>

   <version>2.5</version>

</dependency>

<dependency>

   <groupId>javax.servlet.jsp</groupId>

   <artifactId>jsp-api</artifactId>

   <version>2.2</version>

</dependency>

<dependency>

   <groupId>javax.servlet</groupId>

   <artifactId>jstl</artifactId>

   <version>1.2</version>

</dependency>

<!--插件-->

<dependency>

   <groupId>junit</groupId>

   <artifactId>junit</artifactId>

   <version>4.13.2</version>

</dependency>

<dependency>

   <groupId>org.projectlombok</groupId>

   <artifactId>lombok</artifactId>

   <version>1.18.12</version>

   <scope>provided</scope>

</dependency>
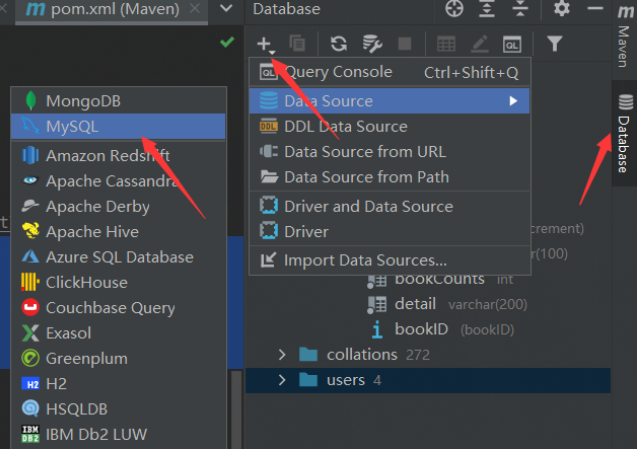
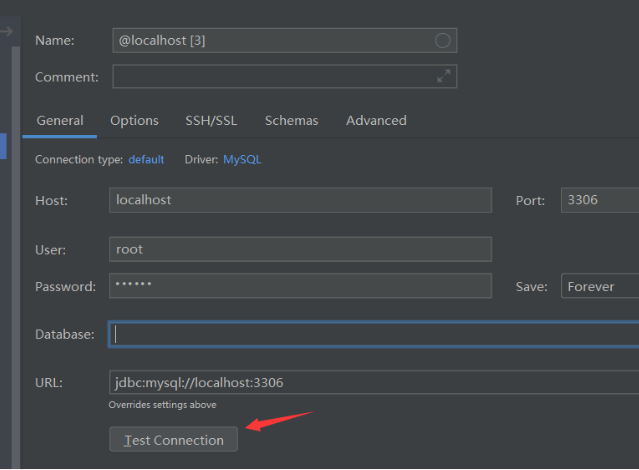
尝试在idea内连接数据库
2.配置MyBatis层
- 编写ORM实体类
package mycode.pojo;

import lombok.AllArgsConstructor;

import lombok.Data;

import lombok.NoArgsConstructor;

/**

 * @classname

 * @Author 姬如千泷

 * @Date 2021/7/25  23:01

 * @Version 1.0

 */

@Data

@AllArgsConstructor

@NoArgsConstructor

public class Book {

    private int bookID;

    private String bookName;

    private int bookCounts;

    private String detail;

}
- 编写dao层业务接口(为简便,以一个举例)
package mycode.dao;

import mycode.pojo.Book;

import java.util.List;

/**

 * @classname

 * @Author 姬如千泷

 * @Date 2021/7/25  23:03

 * @Version 1.0

 */

public interface BookMapper {

    //获取全部书籍信息

    List<Book> getBooks();

}
- 编写Mapper.xml
<?xml version="1.0" encoding="UTF-8" ?>

<!DOCTYPE mapper

        PUBLIC "-//mybatis.org//DTD Mapper 3.0//EN"

        "http://mybatis.org/dtd/mybatis-3-mapper.dtd">

<mapper namespace="mycode.dao.BookMapper">

    <select id="getBooks" resultType="mycode.pojo.Book">

        SELECT * from ssmbuild.books

    </select>

</mapper>
- 编写登录.properties文件
driver=com.mysql.jdbc.Driver

url=jdbc:mysql://localhost:3306/ssmbuild?useUnicode=true&characterEncoding=utf8&useSSL=false&severTimezone=GMT%2B8&allowPublicKeyRetrieval=true

username=root

password=123456
- 编写Mybatis-config.xml
<?xml version="1.0" encoding="UTF-8" ?>

<!DOCTYPE configuration

        PUBLIC "-//mybatis.org//DTD Config 3.0//EN"

        "http://mybatis.org/dtd/mybatis-3-config.dtd">

<configuration>

    <mappers>

        <mapper resource="mycode/dao/BookMapper.xml"/>

    </mappers>

</configuration>
3. 配置Spring层
- 编写业务抽象接口,只是为了给代理类提供接口
package mycode.service;

import mycode.pojo.Book;

import java.util.List;

/**

 * @classname

 * @Author 姬如千泷

 * @Date 2021/7/25  23:35

 * @Version 1.0

 */

public interface BookService {

    List<Book> getBooks();

}
- 编写服务代理类
package mycode.service;

import mycode.dao.BookMapper;

import mycode.pojo.Book;

import org.springframework.beans.factory.annotation.Autowired;

import org.springframework.stereotype.Service;

import java.util.List;

/**

 * @classname

 * @Author 姬如千泷

 * @Date 2021/7/25  23:36

 * @Version 1.0

 */

@Service

public class BookImpl implements BookService{

    private BookMapper mapper;

    public void setBookMapper(BookMapper bookMapper) {

        this.mapper = bookMapper;

    }

    @Override

    public List<Book> getBooks() {

        return mapper.getBooks();

    }

}
- 编写spring-dao.xml,用spring对接数据库连接
<?xml version="1.0" encoding="UTF-8"?>

<beans xmlns="http://www.springframework.org/schema/beans"

       xmlns:xsi="http://www.w3.org/2001/XMLSchema-instance"

       xmlns:context="http://www.springframework.org/schema/context"

       xsi:schemaLocation="http://www.springframework.org/schema/beans

       http://www.springframework.org/schema/beans/spring-beans.xsd

       http://www.springframework.org/schema/context

       https://www.springframework.org/schema/context/spring-context.xsd">

    <!-- 配置整合mybatis -->

    <!-- 1.关联数据库文件 -->

    <context:property-placeholder location="classpath:resources/database.properties"/>

    <!-- 2.数据库连接池 -->

    <!--数据库连接池

        dbcp 半自动化操作 不能自动连接

        c3p0 自动化操作(自动的加载配置文件 并且设置到对象里面)

    -->

    <bean id="dataSource" class="com.mchange.v2.c3p0.ComboPooledDataSource">

        <!-- 配置连接池属性 -->

        <property name="driverClass" value="${driver}"/>

        <property name="jdbcUrl" value="${url}"/>

        <property name="user" value="${username}"/>

        <property name="password" value="${password}"/>

        <!-- c3p0连接池的私有属性 -->

        <property name="maxPoolSize" value="30"/>

        <property name="minPoolSize" value="10"/>

        <!-- 关闭连接后不自动commit -->

        <property name="autoCommitOnClose" value="false"/>

        <!-- 获取连接超时时间 -->

        <property name="checkoutTimeout" value="10000"/>

        <!-- 当获取连接失败重试次数 -->

        <property name="acquireRetryAttempts" value="2"/>

    </bean>

    <!-- 3.配置SqlSessionFactory对象 -->

    <bean id="sqlSessionFactory" class="org.mybatis.spring.SqlSessionFactoryBean">

        <!-- 注入数据库连接池 -->

        <property name="dataSource" ref="dataSource"/>

        <!-- 配置MyBaties全局配置文件:mybatis-config.xml -->

        <property name="configLocation" value="classpath:resources/mybatis-config.xml"/>

    </bean>

    <!-- 4.配置扫描Dao接口包,动态实现Dao接口注入到spring容器中 -->

    <!--解释 :https://www.cnblogs.com/jpfss/p/7799806.html-->

    <bean class="org.mybatis.spring.mapper.MapperScannerConfigurer">

        <!-- 注入sqlSessionFactory -->

        <property name="sqlSessionFactoryBeanName" value="sqlSessionFactory"/>

        <!-- 给出需要扫描Dao接口包 -->

        <property name="basePackage" value="mycode.dao"/>

    </bean>

</beans>
- 编写spring-service.xml,用spring对接dao层服务和事务
<?xml version="1.0" encoding="UTF-8"?>

<beans xmlns="http://www.springframework.org/schema/beans"

       xmlns:xsi="http://www.w3.org/2001/XMLSchema-instance"

       xmlns:context="http://www.springframework.org/schema/context"

       xsi:schemaLocation="http://www.springframework.org/schema/beans

   http://www.springframework.org/schema/beans/spring-beans.xsd

   http://www.springframework.org/schema/context

   http://www.springframework.org/schema/context/spring-context.xsd">

    <!-- 扫描service相关的bean -->

    <context:component-scan base-package="mycode.service" />

    <!--BookServiceImpl注入到IOC容器中-->

    <bean id="BookImpl" class="mycode.service.BookImpl">

        <property name="bookMapper" ref="bookMapper"/>

    </bean>

    <!-- 配置事务管理器 -->

    <bean id="transactionManager" class="org.springframework.jdbc.datasource.DataSourceTransactionManager">

        <!-- 注入数据库连接池 -->

        <property name="dataSource" ref="dataSource" />

    </bean>

</beans>
4.配置Spring-MVC层(注解实现)
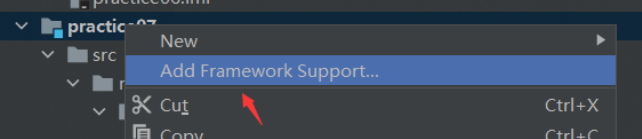
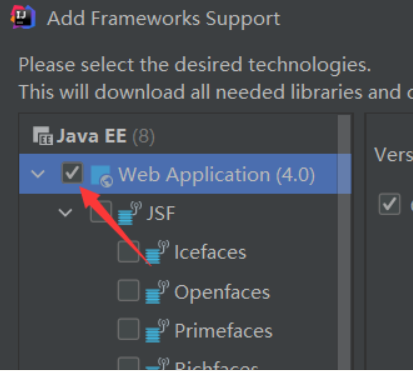
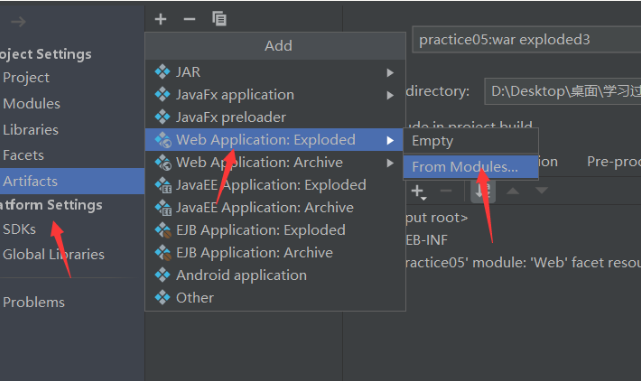
- 将maven项目升级为web项目
- 编写spring-mvc.xml
<?xml version="1.0" encoding="UTF-8"?>

<beans xmlns="http://www.springframework.org/schema/beans"

       xmlns:xsi="http://www.w3.org/2001/XMLSchema-instance"

       xmlns:context="http://www.springframework.org/schema/context"

       xmlns:mvc="http://www.springframework.org/schema/mvc"

       xsi:schemaLocation="http://www.springframework.org/schema/beans

   http://www.springframework.org/schema/beans/spring-beans.xsd

   http://www.springframework.org/schema/context

   http://www.springframework.org/schema/context/spring-context.xsd

   http://www.springframework.org/schema/mvc

   https://www.springframework.org/schema/mvc/spring-mvc.xsd">

    <!-- 配置SpringMVC -->

    <!-- 1.开启SpringMVC注解驱动 -->

    <mvc:annotation-driven />

    <!-- 2.静态资源默认servlet配置-->

    <mvc:default-servlet-handler/>

    <!-- 3.配置jsp 显示ViewResolver视图解析器 -->

    <bean class="org.springframework.web.servlet.view.InternalResourceViewResolver">

        <property name="viewClass" value="org.springframework.web.servlet.view.JstlView" />

        <property name="prefix" value="/WEB-INF/" />

        <property name="suffix" value=".jsp" />

    </bean>

    <!-- 4.扫描web相关的bean -->

    <context:component-scan base-package="mycode.controller" />

</beans>
- 编写applicationContext.xml整合xml配置
<?xml version="1.0" encoding="UTF-8"?>

<beans xmlns="http://www.springframework.org/schema/beans"

       xmlns:xsi="http://www.w3.org/2001/XMLSchema-instance"

       xsi:schemaLocation="http://www.springframework.org/schema/beans

       http://www.springframework.org/schema/beans/spring-beans.xsd">

    <import resource="spring-dao.xml"/>

    <import resource="spring-service.xml"/>

    <import resource="spring-mvc.xml"/>

</beans>
- 配置web.xml
<?xml version="1.0" encoding="UTF-8"?>

<web-app xmlns="http://xmlns.jcp.org/xml/ns/javaee"

         xmlns:xsi="http://www.w3.org/2001/XMLSchema-instance"

         xsi:schemaLocation="http://xmlns.jcp.org/xml/ns/javaee http://xmlns.jcp.org/xml/ns/javaee/web-app_4_0.xsd"

         version="4.0">

    <!--配置DispatcherServlet-->

    <servlet>

        <servlet-name>DispatcherServlet</servlet-name>

        <servlet-class>org.springframework.web.servlet.DispatcherServlet</servlet-class>

        <init-param>

            <param-name>contextConfigLocation</param-name>

            <!--加载总的配置文件-->

            <param-value>classpath:resources/applicationContext.xml</param-value>

        </init-param>

        <load-on-startup>1</load-on-startup>

    </servlet>

    <servlet-mapping>

        <servlet-name>DispatcherServlet</servlet-name>

        <url-pattern>/</url-pattern>

    </servlet-mapping>

    <!--mvc过滤器-->

    <filter>

        <filter-name>encodingFilter</filter-name>

        <filter-class>

            org.springframework.web.filter.CharacterEncodingFilter

        </filter-class>

        <init-param>

            <param-name>encoding</param-name>

            <param-value>utf-8</param-value>

        </init-param>

    </filter>

    <filter-mapping>

        <filter-name>encodingFilter</filter-name>

        <url-pattern>/*</url-pattern>

    </filter-mapping>

    <!--Session过期时间-->

    <session-config>

        <session-timeout>15</session-timeout>

    </session-config>

</web-app>
到这里基本配置就已经完成了,只需要再对接一下前端就可以了
5. 一个业务实例(取自狂神说java)
- 首页jsp页面
<%--

  Created by IntelliJ IDEA.

  User: 姬如千泷

  Date: 2021/7/26

  Time: 0:24

  To change this template use File | Settings | File Templates.

--%>

<%@ page language="java" contentType="text/html; charset=UTF-8" pageEncoding="UTF-8" %>

<!DOCTYPE HTML>

<html>

<head>

  <title>首页</title>

  <style type="text/css">

    a {

      text-decoration: none;

      color: black;

      font-size: 18px;

    }

    h3 {

      width: 180px;

      height: 38px;

      margin: 100px auto;

      text-align: center;

      line-height: 38px;

      background: deepskyblue;

      border-radius: 4px;

    }

  </style>

</head>

<body>

<h3>

  <a href="${pageContext.request.contextPath}/allBook">点击进入列表页</a>

</h3>

</body>

</html>
- 跳转jsp页面
<%--

  Created by IntelliJ IDEA.

  User: 姬如千泷

  Date: 2021/7/26

  Time: 0:33

  To change this template use File | Settings | File Templates.

--%>

<%@ taglib prefix="c" uri="http://java.sun.com/jsp/jstl/core" %>

<%@ page contentType="text/html;charset=UTF-8" language="java" %>

<html>

<head>

    <title>书籍列表</title>

    <meta name="viewport" content="width=device-width, initial-scale=1.0">

    <!-- 引入 Bootstrap -->

    <link href="https://cdn.bootcss.com/bootstrap/3.3.7/css/bootstrap.min.css" rel="stylesheet">

</head>

<body>

<div class="container">

    <div class="row clearfix">

        <div class="col-md-12 column">

            <div class="page-header">

                <h1>

                    <small>书籍列表 —— 显示所有书籍</small>

                </h1>

            </div>

        </div>

    </div>

    <div class="row">

        <div class="col-md-4 column">

        </div>

    </div>

    <div class="row clearfix">

        <div class="col-md-12 column">

            <table class="table table-hover table-striped">

                <thead>

                <tr>

                    <th>书籍编号</th>

                    <th>书籍名字</th>

                    <th>书籍数量</th>

                    <th>书籍详情</th>

                    <th>操作</th>

                </tr>

                </thead>

                <tbody>

                <c:forEach var="book" items="${requestScope.get('list')}">

                    <tr>

                        <td>${book.getBookID()}</td>

                        <td>${book.getBookName()}</td>

                        <td>${book.getBookCounts()}</td>

                        <td>${book.getDetail()}</td>

                    </tr>

                </c:forEach>

                </tbody>

            </table>

        </div>

    </div>

</div>
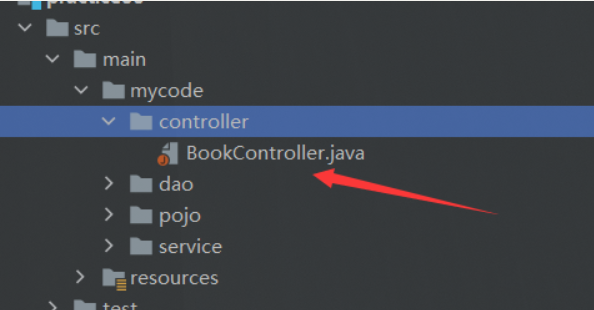
- 编写控制类
package mycode.controller;

import mycode.pojo.Book;

import mycode.service.BookService;

import org.springframework.beans.factory.annotation.Autowired;

import org.springframework.beans.factory.annotation.Qualifier;

import org.springframework.stereotype.Controller;

import org.springframework.ui.Model;

import org.springframework.web.bind.annotation.RequestMapping;

import java.util.List;

/**

 * @classname

 * @Author 姬如千泷

 * @Date 2021/7/26  0:29

 * @Version 1.0

 */

@Controller

public class BookController {

    @Autowired

    @Qualifier("BookImpl")

    private BookService bookService;

    @RequestMapping("/allBook")//代表入口url

    public String list(Model model) {

        List<Book> list = bookService.getBooks();

        model.addAttribute("list", list);

        return "allBook";

    }

}
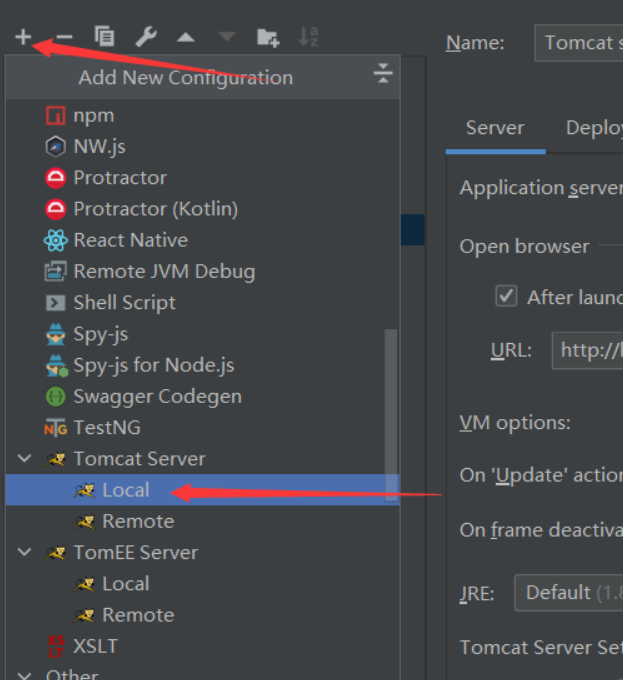
- 配置tomcat启动项目

6. 可能出现的问题
6.1 java代码变成.java不可执行文件
这说明项目的资源路径配置是存在问题的,我在开发过程中这种问题出现了不下3次,一般如果不及时处理,会报出io错误找不到xml配置文件
解决办法是重新配置资源路径
删除掉原有的资源路径配置
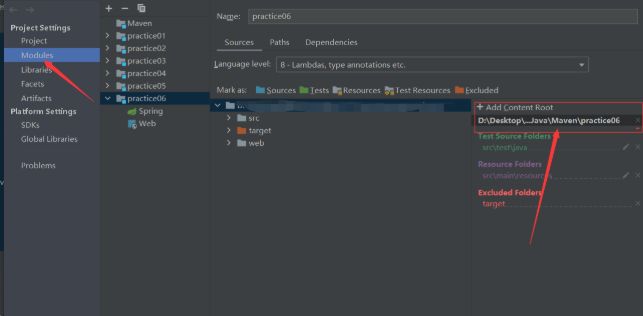
在新建一个即可,一般idea会重新智能匹配资源类型,如果没有自动匹配的话,重新为每一个文件选择对应类型即可
6.2 无法启动tomcat
可能是war包缺失导致,tomcat的war包是项目输出的主要包,必须提前配置好
用idea的Fix自动修复war包
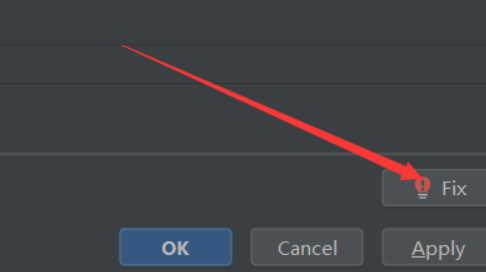
或者自己新建一个war包
加入war包后,依然无法启动的话,检测out输出项目中是否含有lib目录,如果没有,则加入
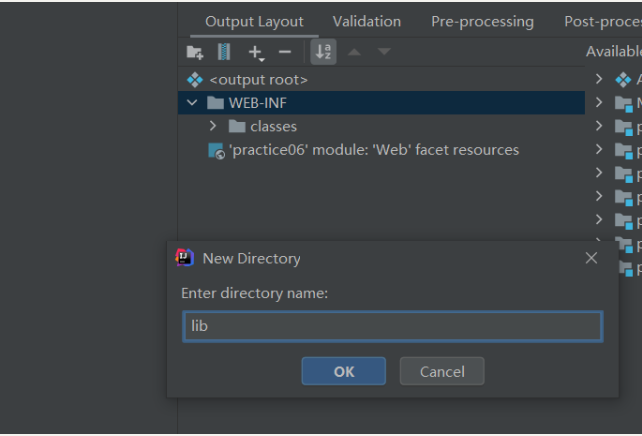
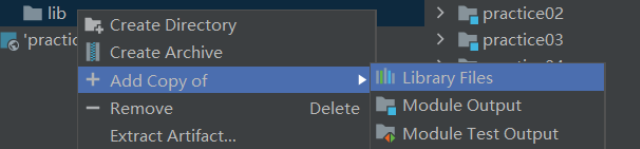
将依赖全都导入进去
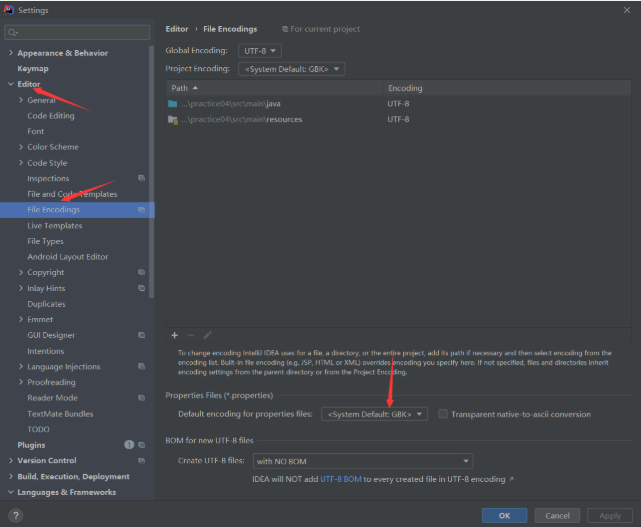
6.3 无法连接数据库问题(即错误中出现jdbc关键字的大部分错)
可能是由于.properties文件的编码问题导致,可以明显在错误中看到root用户名乱码
Access denied for user '姬如�泷'@'local......
解决方案一是直接不使用properties导入,明文,但这样安全系数低一些
<property name="driverClass" value="com.mysql.jdbc.Driver"/>
<property name="jdbcUrl" value="jdbc:mysql://localhost:3306/ssmbuild?useUnicode=true&characterEncoding=utf8&useSSL=false&severTimezone=GMT%2B8&allowPublicKeyRetrieval=true"/>
<property name="user" value="root"/>
<property name="password" value="123456"/>
解决方案二是在idea中设置Properties的编码方式,设置为和idea编码格式一致,一般是utf-8
6.4 如果报错文件指向mapper.xml,那么一般是sql语句出了错误,这时候一般会检查返回类型(如果是返回集合的话,返回值类型要设置为集合元素的类型)、参数类型(多个参数要加@Param注解等)
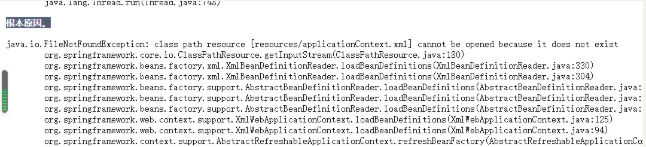
6.5 如果报一些资源未找到问题
先检测输出文件中有没有对应资源,如xml文件、Properties文件等,如果项目中有,而实际输出文件中没有的话,极有可能是文件被过滤了,这时候需要在pom.xml中设置文件过滤器跳过哪些文件
<build>

    <resources>

        <resource>

            <directory>src/main/resources</directory>

            <includes>

                <include>**/*.xml</include>

                <include>**/*.properties</include>

            </includes>

            <filtering>false</filtering>

        </resource>

        <resource>

            <directory>src/main/java</directory>

            <includes>

                <include>**/*.xml</include>

                <include>**/*.properties</include>

            </includes>

            <filtering>false</filtering>

        </resource>

    </resources>

</build>
SSM框架——整合ssm的更多相关文章
- SSM框架整合项目 :租房管理系统
使用ssm框架整合,oracle数据库 框架: Spring SpringMVC MyBatis 导包: 1, spring 2, MyBatis 3, mybatis-spring 4, fastj ...
- 基于maven的ssm框架整合
基于maven的ssm框架整合 第一步:通过maven建立一个web项目. 第二步:pom文件导入jar包 (1 ...
- JavaWeb之ssm框架整合,用户角色权限管理
SSM框架整合 Spring SpringMVC MyBatis 导包: 1, spring 2, MyBatis 3, mybatis-spring 4, fastjson 5, aspectwea ...
- SSM框架整合环境构建——基于Spring4和Mybatis3
目录 环境 配置说明 所需jar包 配置db.properties 配置log4j.properties 配置spring.xml 配置mybatis-spring.xml 配置springmvc.x ...
- springmvc(二) ssm框架整合的各种配置
ssm:springmvc.spring.mybatis这三个框架的整合,有耐心一步步走. --WH 一.SSM框架整合 1.1.整合思路 从底层整合起,也就是先整合mybatis与spring,然后 ...
- SSM框架整合的其它方式
---------------------siwuxie095 SSM 框架整合的其它方式 1.主要是整合 Spring ...
- SSM框架整合过程总结
-----------------------siwuxie095 SSM 框架整合过程总结 1.导入相关 jar 包( ...
- SSM框架整合思想
-------------------siwuxie095 SSM 框架整合思想 1.SSM 框架,即 SpringMV ...
- SSM框架整合搭建教程
自己配置了一个SSM框架,打算做个小网站,这里把SSM的配置流程详细的写了出来,方便很少接触这个框架的朋友使用,文中各个资源均免费提供! 一. 创建web项目(eclipse) File-->n ...
随机推荐
- 4.RabbitMQ系列之发布/订阅模式
我们把一个消息转发给多个消费者,这种模式称之为发布-订阅模式 1.交换器(Exchange) RabbitMq消息模式的核心思想是:一个生产者并不会直接往一个队列中发送消息,事实上,生产者根本不知道它 ...
- CCS 2022 极客少年挑战赛 writeup
目录 题目一DSDS 操作内容: 题目二 easy_re 操作内容: flag值: 题目三 1+1=all 解题过程 题目一DSDS 操作内容: 开环境然后进入网址在网址后./目录 进入目录得到个 ...
- How to get the return value of the setTimeout inner function in js All In One
How to get the return value of the setTimeout inner function in js All In One 在 js 中如何获取 setTimeout ...
- docker gitlab迁移 备份 部署 搭建以及各种问题
当前环境 服务器A 服务器B ubuntu docker gitlab(版本一致) docker安装gitlab 由于考虑到gitlab 包含了⾃身的nginx.数据库.端⼝占⽤等等因数,这⾥使⽤的是 ...
- Hyperf 接入阿里云ACM应用配置管理中心
参考: 阿里云文档:https://help.aliyun.com/document_detail/85466.html?spm=a2c4g.11186623.6.550.43cb42d4Af4Tu0 ...
- Vue学习之--------深入理解Vuex之模块化编码(2022/9/4)
在以下文章的基础上 1.深入理解Vuex.原理详解.实战应用:https://blog.csdn.net/weixin_43304253/article/details/126651368 2.深入理 ...
- Jedis测试redis。(redis在linux虚拟机中)
文章目录 1.确保虚拟机开启.并且连接到redis 2.建立一个maven工程 3.在pom中加入jedis的依赖 4.编写测试用例 5.测试结果 1.确保虚拟机开启.并且连接到redis 2.建立一 ...
- 学习ASP.NET Core Blazor编程系列八——数据校验
学习ASP.NET Core Blazor编程系列一--综述 学习ASP.NET Core Blazor编程系列二--第一个Blazor应用程序(上) 学习ASP.NET Core Blazor编程系 ...
- 配置文件yaml和ini
前言 本文主要介绍配置文件yaml和ini的读取. 一.yaml文件 YAML是一个可读性高,易于理解,用来表达数据序列化的格式.语法与python的语法类似.文件后缀 .yaml 下面是yaml文 ...
- 30.Serializers模块源码解析
rest_framework序列化类的继承关系 field类: 序列化基类的基类 BaseSerializer: 继承field 派生ListSerializer序列化类 Serializer: 继承 ...