
SSM框架整合搭建教程
自己配置了一个SSM框架,打算做个小网站,这里把SSM的配置流程详细的写了出来,方便很少接触这个框架的朋友使用,文中各个资源均免费提供!
一. 创建web项目(eclipse)
File-->new-->Dynamic Web Project (这里我们创建的项目名为SSM)
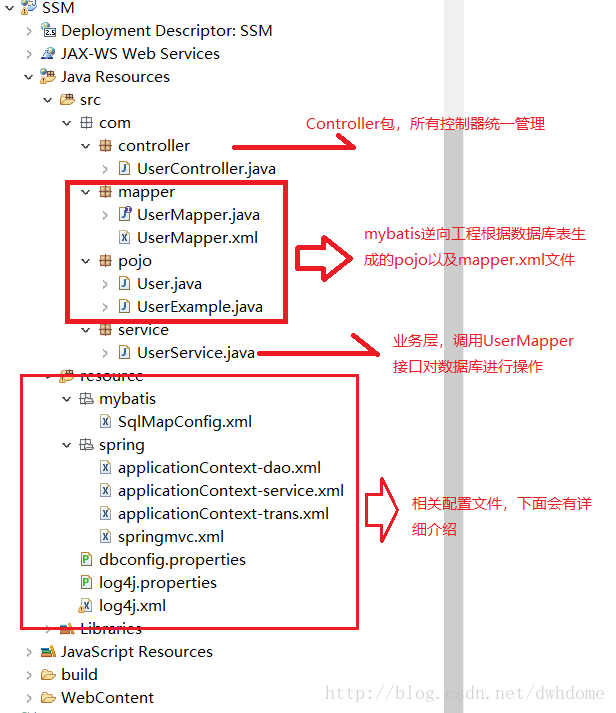
下面是大致目录结构
二. SSM所需jar包
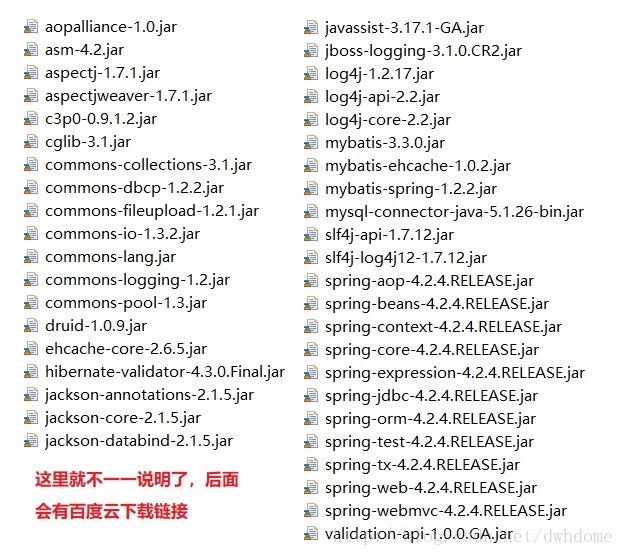
jar包链接:https://pan.baidu.com/s/1dTClhO 密码:n4mm
三. 整合开始
1.mybatis配置文件(resource/mybatis/SqlMapConfig.xml)
 <?xml version="1.0" encoding="UTF-8" ?>

 <!DOCTYPE configuration

         PUBLIC "-//mybatis.org//DTD Config 3.0//EN"

         "http://mybatis.org/dtd/mybatis-3-config.dtd">

 <configuration>

 </configuration>
2.Dao,mybatis整合spring,通过spring管理
SqlSessionFactory、mapper代理对象
(resource/spring/applicationContext-dao.xml)
 <?xml version="1.0" encoding="UTF-8"?>

 <beans xmlns="http://www.springframework.org/schema/beans"

     xmlns:context="http://www.springframework.org/schema/context" xmlns:p="http://www.springframework.org/schema/p"

     xmlns:aop="http://www.springframework.org/schema/aop" xmlns:tx="http://www.springframework.org/schema/tx"

     xmlns:xsi="http://www.w3.org/2001/XMLSchema-instance"

     xsi:schemaLocation="http://www.springframework.org/schema/beans http://www.springframework.org/schema/beans/spring-beans-4.0.xsd

     http://www.springframework.org/schema/context http://www.springframework.org/schema/context/spring-context-4.0.xsd

     http://www.springframework.org/schema/aop http://www.springframework.org/schema/aop/spring-aop-4.0.xsd http://www.springframework.org/schema/tx http://www.springframework.org/schema/tx/spring-tx-4.0.xsd

     http://www.springframework.org/schema/util http://www.springframework.org/schema/util/spring-util-4.0.xsd">

     <!-- 数据库连接池 -->

     <!-- 加载配置文件 -->

     <context:property-placeholder location="classpath:*.properties" />

     <!-- 数据库连接池 -->

     <bean id="dataSource" class="com.alibaba.druid.pool.DruidDataSource"

         destroy-method="close">

         <property name="url" value="${jdbc.url}" />

         <property name="username" value="${jdbc.username}" />

         <property name="password" value="${jdbc.password}" />

         <property name="driverClassName" value="${jdbc.driver}" />

         <property name="maxActive" value="10" />

         <property name="minIdle" value="5" />

     </bean>

     <!-- 让spring管理sqlsessionfactory 使用mybatis和spring整合包中的 -->

     <bean id="sqlSessionFactory" class="org.mybatis.spring.SqlSessionFactoryBean">

         <!-- 数据库连接池 -->

         <property name="dataSource" ref="dataSource" />

         <!-- 加载mybatis的全局配置文件 -->

         <property name="configLocation" value="classpath:mybatis/SqlMapConfig.xml" />

     </bean>

     <!-- 自动扫描 将Mapper接口生成代理注入到Spring -->

     <bean class="org.mybatis.spring.mapper.MapperScannerConfigurer">

         <property name="basePackage" value="com.mapper" />

     </bean>

 </beans>
这里用的是阿里的连接池,当然也可以用c3p0,个人建议用阿里
3. 所有的实现类都放到spring容器中管理。由spring创建数据库连接池,并有spring管理实务。
(resource/spring/applicationContext-service.xml)
 <?xml version="1.0" encoding="UTF-8"?>

 <beans xmlns="http://www.springframework.org/schema/beans"

     xmlns:context="http://www.springframework.org/schema/context" xmlns:p="http://www.springframework.org/schema/p"

     xmlns:aop="http://www.springframework.org/schema/aop" xmlns:tx="http://www.springframework.org/schema/tx"

     xmlns:xsi="http://www.w3.org/2001/XMLSchema-instance"

     xsi:schemaLocation="http://www.springframework.org/schema/beans http://www.springframework.org/schema/beans/spring-beans-4.0.xsd

     http://www.springframework.org/schema/context http://www.springframework.org/schema/context/spring-context-4.0.xsd

     http://www.springframework.org/schema/aop http://www.springframework.org/schema/aop/spring-aop-4.0.xsd http://www.springframework.org/schema/tx http://www.springframework.org/schema/tx/spring-tx-4.0.xsd

     http://www.springframework.org/schema/util http://www.springframework.org/schema/util/spring-util-4.0.xsd">

         <!-- spring自动去扫描base-pack下面或者子包下面的java文件-->

         <!--管理Service实现类-->

         <context:component-scan base-package="com.service"/>

 </beans>
配置spring管理实务
(resource/spring/applicationContext-trans.xml)
 <?xml version="1.0" encoding="UTF-8"?>

 <beans xmlns="http://www.springframework.org/schema/beans"

     xmlns:context="http://www.springframework.org/schema/context" xmlns:p="http://www.springframework.org/schema/p"

     xmlns:aop="http://www.springframework.org/schema/aop" xmlns:tx="http://www.springframework.org/schema/tx"

     xmlns:xsi="http://www.w3.org/2001/XMLSchema-instance"

     xsi:schemaLocation="http://www.springframework.org/schema/beans http://www.springframework.org/schema/beans/spring-beans-4.0.xsd

     http://www.springframework.org/schema/context http://www.springframework.org/schema/context/spring-context-4.0.xsd

     http://www.springframework.org/schema/aop http://www.springframework.org/schema/aop/spring-aop-4.0.xsd http://www.springframework.org/schema/tx http://www.springframework.org/schema/tx/spring-tx-4.0.xsd

     http://www.springframework.org/schema/util http://www.springframework.org/schema/util/spring-util-4.0.xsd">

     <!-- 事务管理器 -->

     <bean id="transactionManager"

         class="org.springframework.jdbc.datasource.DataSourceTransactionManager">

         <!-- 数据源 -->

         <property name="dataSource" ref="dataSource" />

     </bean>

     <!-- 通知 -->

     <tx:advice id="txAdvice" transaction-manager="transactionManager">

         <tx:attributes>

             <!-- 传播行为 -->

             <tx:method name="save*" propagation="REQUIRED" />

             <tx:method name="insert*" propagation="REQUIRED" />

             <tx:method name="add*" propagation="REQUIRED" />

             <tx:method name="create*" propagation="REQUIRED" />

             <tx:method name="delete*" propagation="REQUIRED" />

             <tx:method name="update*" propagation="REQUIRED" />

             <tx:method name="find*" propagation="SUPPORTS" read-only="true" />

             <tx:method name="select*" propagation="SUPPORTS" read-only="true" />

             <tx:method name="get*" propagation="SUPPORTS" read-only="true" />

         </tx:attributes>

     </tx:advice>

     <!-- 切面 -->

     <aop:config>

         <aop:advisor advice-ref="txAdvice"

             pointcut="execution(* com.service.*.*(..))" />

     </aop:config>

 </beans>
4. Springmvc整合spring框架,由springmvc管理controller
(resource/spring/springmvc.xml)
<?xml version="1.0" encoding="UTF-8"?>

<beans xmlns="http://www.springframework.org/schema/beans"

    xmlns:xsi="http://www.w3.org/2001/XMLSchema-instance" xmlns:p="http://www.springframework.org/schema/p"

    xmlns:context="http://www.springframework.org/schema/context"

    xmlns:mvc="http://www.springframework.org/schema/mvc"

    xsi:schemaLocation="http://www.springframework.org/schema/beans http://www.springframework.org/schema/beans/spring-beans.xsd

        http://www.springframework.org/schema/mvc http://www.springframework.org/schema/mvc/spring-mvc-4.0.xsd

        http://www.springframework.org/schema/context http://www.springframework.org/schema/context/spring-context.xsd">

    <!-- 扫描controller -->

    <context:component-scan base-package="com.controller" />

    <!-- Spring 来扫描指定包下的类,并注册被@Component,@Controller,@Service,@Repository等注解标记的组件 -->

    <mvc:annotation-driven />

    <!-- 配置SpringMVC的视图解析器-->

    <bean

        class="org.springframework.web.servlet.view.InternalResourceViewResolver">

        <property name="prefix" value="/WEB-INF/jsp/" />

        <property name="suffix" value=".jsp" />

    </bean>

</beans>
5. 中加载的属性配置文件(dbconfig.properties)
根据自己的数据库更改用户名密码以及库
jdbc.driver=com.mysql.jdbc.Driver

jdbc.url=jdbc:mysql://localhost:3306/ssm?characterEncoding=utf-8

jdbc.username=root

jdbc.password=123456
6. 配置log4j
(log4j.properties)
log4j.rootLogger=error,CONSOLE,A

log4j.addivity.org.apache=false

log4j.appender.CONSOLE=org.apache.log4j.ConsoleAppender

log4j.appender.CONSOLE.Threshold=error

log4j.appender.CONSOLE.layout.ConversionPattern=%d{yyyy-MM-dd HH\:mm\:ss} -%-4r [%t] %-5p  %x - %m%n

log4j.appender.CONSOLE.Target=System.out

log4j.appender.CONSOLE.Encoding=gbk

log4j.appender.CONSOLE.layout=org.apache.log4j.PatternLayout

log4j.appender.A=org.apache.log4j.DailyRollingFileAppender

log4j.appender.A.File=${catalina.home}/logs/FH_log/PurePro_

log4j.appender.A.DatePattern=yyyy-MM-dd'.log'

log4j.appender.A.layout=org.apache.log4j.PatternLayout

log4j.appender.A.layout.ConversionPattern=[FH_sys]  %d{yyyy-MM-dd HH\:mm\:ss} %5p %c{1}\:%L \: %m%n
(log4j.xml)
<?xml version="1.0" encoding="UTF-8"?>

<!DOCTYPE log4j:configuration PUBLIC "-//APACHE//DTD LOG4J 1.2//EN" "log4j.dtd">

<log4j:configuration xmlns:log4j="http://jakarta.apache.org/log4j/">

	<!-- Appenders -->

	<appender name="console" class="org.apache.log4j.ConsoleAppender">

		<param name="Target" value="System.out" />

		<layout class="org.apache.log4j.PatternLayout">

			<param name="ConversionPattern" value="%d{yyyy HH:mm:ss} %-5p %c - %m%n" />

		</layout>

	</appender>

	<!-- Application Loggers -->

	<logger name="com">

		<level value="error" />

	</logger>

	<!-- 3rdparty Loggers -->

	<logger name="org.springframework.core">

		<level value="error" />

	</logger>

	<logger name="org.springframework.beans">

		<level value="error" />

	</logger>

	<logger name="org.springframework.context">

		<level value="error" />

	</logger>

	<logger name="org.springframework.web">

		<level value="error" />

	</logger>

	<logger name="org.springframework.jdbc">

		<level value="error" />

	</logger>

	<logger name="org.mybatis.spring">

		<level value="error" />

	</logger>

	<logger name="java.sql">

		<level value="error" />

	</logger>

	<!-- Root Logger -->

	<root>

		<priority value="error" />

		<appender-ref ref="console" />

	</root>

</log4j:configuration>
SSM框架整合完成,至于mybatis逆向工程生成的mapper.xml和pojo请放到第一张图的目录下
注:逆向工程是根据数据库表反向生成pojo以及mapper.xml,所以,请先自动在数据库配置好user表。逆向工程得配置在下面得链接里面有详细注释。
测试数据库表(User)
private String id;
private String username;
private String password;
private String company;
private Integer age;
private Integer sex;
根据类型创建表即可
逆向工程项目我会贴出链接,解压导入改路径运行main方法就会自动生成了,注意配置生成的路径
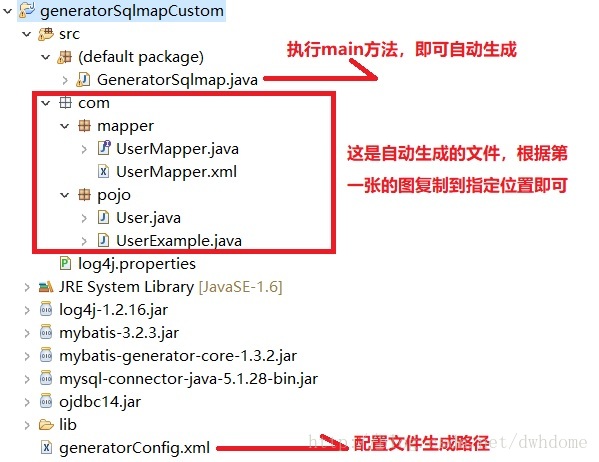
逆向工程链接: 链接:https://pan.baidu.com/s/1QvSskH2UEC6EQF7MgVDOAQ 密码:t2pc
到这里项目整合完成,接下来是测试!
UserController.java
 package com.controller;

 import javax.annotation.Resource;

 import javax.servlet.http.HttpServletRequest;

 import org.springframework.stereotype.Controller;

 import org.springframework.web.bind.annotation.RequestMapping;

 import org.springframework.web.servlet.ModelAndView;

 import com.pojo.User;

 import com.service.UserService;

 @Controller

 @RequestMapping("/user")

 public class UserController {

     @Resource(name="userService")

     private UserService userService;

     /**

      * 根据id查询

      */

     @RequestMapping(value="/queryById")

     public ModelAndView queryById(HttpServletRequest request){

         ModelAndView mv = new ModelAndView();

         String id = request.getParameter("id");

         try{

             User var = userService.findById(id);

             mv.setViewName("index");

             mv.addObject("var", var);

         } catch(Exception e){

             e.printStackTrace();

         }

         return mv;

     }

 }
UserService.java
 package com.service;

 import javax.annotation.Resource;

 import org.springframework.stereotype.Service;

 import com.mapper.UserMapper;

 import com.pojo.User;

 @Service("userService")

 public class UserService {

     @Resource

     private UserMapper dao;

     /*

     * 通过id获取数据

     */

     public User findById(String id)throws Exception{

         return (User)dao.selectByPrimaryKey(id);

     }

 }
补上之前漏掉得web.xml配置
 <?xml version="1.0" encoding="UTF-8"?>

 <web-app xmlns:xsi="http://www.w3.org/2001/XMLSchema-instance"

     xmlns="http://java.sun.com/xml/ns/javaee" xmlns:web="http://java.sun.com/xml/ns/javaee/web-app_2_5.xsd"

     xsi:schemaLocation="http://java.sun.com/xml/ns/javaee http://java.sun.com/xml/ns/javaee/web-app_2_5.xsd"

     id="WebApp_ID" version="2.5">

     <welcome-file-list>

         <welcome-file>index.jsp</welcome-file>

     </welcome-file-list>

     <!-- 加载spring容器 -->

     <context-param>

         <param-name>contextConfigLocation</param-name>

         <param-value>classpath:spring/applicationContext*.xml</param-value>

     </context-param>

     <listener>

         <listener-class>org.springframework.web.context.ContextLoaderListener</listener-class>

     </listener>

     <!-- 解决post乱码 -->

     <filter>

         <filter-name>CharacterEncodingFilter</filter-name>

         <filter-class>org.springframework.web.filter.CharacterEncodingFilter</filter-class>

         <init-param>

             <param-name>encoding</param-name>

             <param-value>utf-8</param-value>

         </init-param>

         <!-- <init-param>

             <param-name>forceEncoding</param-name>

             <param-value>true</param-value>

         </init-param> -->

     </filter>

     <filter-mapping>

         <filter-name>CharacterEncodingFilter</filter-name>

         <url-pattern>/*</url-pattern>

     </filter-mapping>

     <!-- springmvc的前端控制器 -->

 <!--     <servlet>

         <servlet-name>taotao-manager</servlet-name>

         <servlet-class>org.springframework.web.servlet.DispatcherServlet</servlet-class>

         contextConfigLocation不是必须的, 如果不配置contextConfigLocation, springmvc的配置文件默认在:WEB-INF/servlet的name+"-servlet.xml"

         <init-param>

             <param-name>contextConfigLocation</param-name>

             <param-value>classpath:spring/springmvc.xml</param-value>

         </init-param>

         <load-on-startup>1</load-on-startup>

     </servlet>

     <servlet-mapping>

         <servlet-name>SSM</servlet-name>

         <url-pattern>/</url-pattern>

     </servlet-mapping> -->

       <servlet>

     <servlet-name>springMvc</servlet-name>

     <servlet-class>org.springframework.web.servlet.DispatcherServlet</servlet-class>

     <init-param>

       <param-name>contextConfigLocation</param-name>

       <param-value>classpath:spring/springmvc.xml</param-value>

     </init-param>

     <load-on-startup>1</load-on-startup>

   </servlet>

   <servlet-mapping>

     <servlet-name>springMvc</servlet-name>

     <url-pattern>/</url-pattern>

   </servlet-mapping>

 </web-app>
为节省篇幅,更快的搭建成功,这里只写了一个方法,根据id查询数据
WebContent/index.jsp
<%@ page language="java" contentType="text/html; charset=utf-8"

    pageEncoding="utf-8"%>

<!DOCTYPE html PUBLIC "-//W3C//DTD HTML 4.01 Transitional//EN" "http://www.w3.org/TR/html4/loose.dtd">

<%

    String path = request.getContextPath();

    String basePath = request.getScheme()+"://"+request.getServerName()+":"+request.getServerPort()+path+"/";

%>

<html>

<head>

<meta http-equiv="Content-Type" content="text/html; charset=utf-8">

<title>查询用户</title>

</head>

<body>

    <form action="user/queryById.do" method="post">

        输入要查询的id:    <input type="text" name="id" value="123456"/>

        <button type="submit">提交</button>

    </form>

</body>

</html>
WebContent/WEB-INF/jsp/index.jsp
<%@ page language="java" contentType="text/html; charset=utf-8"

    pageEncoding="utf-8"%>

<%@page import="com.pojo.*"%>

<!DOCTYPE html PUBLIC "-//W3C//DTD HTML 4.01 Transitional//EN" "http://www.w3.org/TR/html4/loose.dtd">

<html>

<head>

<meta http-equiv="Content-Type" content="text/html; charset=utf-8">

<title>Insert title here</title>

<style type="text/css">

    .td td{

        width: 100px;

    }

    .table{

        text-align: center;

        margin: 0 auto;

    }

</style>

</head>

<body>

<%

    User user = ((User)request.getAttribute("var"));

%>

    <table class="table">

        <tr class="td">

            <td>ID</td>

            <td>用户名</td>

            <td>密码</td>

            <td style="width: 200px">公司</td>

            <td>年龄</td>

            <td>性别</td>

        </tr>

<%if(user!=null){%>

        <tr class="td">

            <td><%=user.getId()%></td>

            <td><%=user.getUsername()%></td>

            <td><%=user.getPassword()%></td>

            <td><%=user.getCompany()%></td>

            <td><%=user.getAge()%></td>

            <td><%=user.getSex()==1?"男":"女"%></td>

        </tr>

    <%}else{ %>

        <tr class="td">

            <td style="color: red;">暂无相关数据</td>

        </tr>

<%} %>

    </table>

</body>

</html>
启动项目,输入localhost:8080/SSM 访问
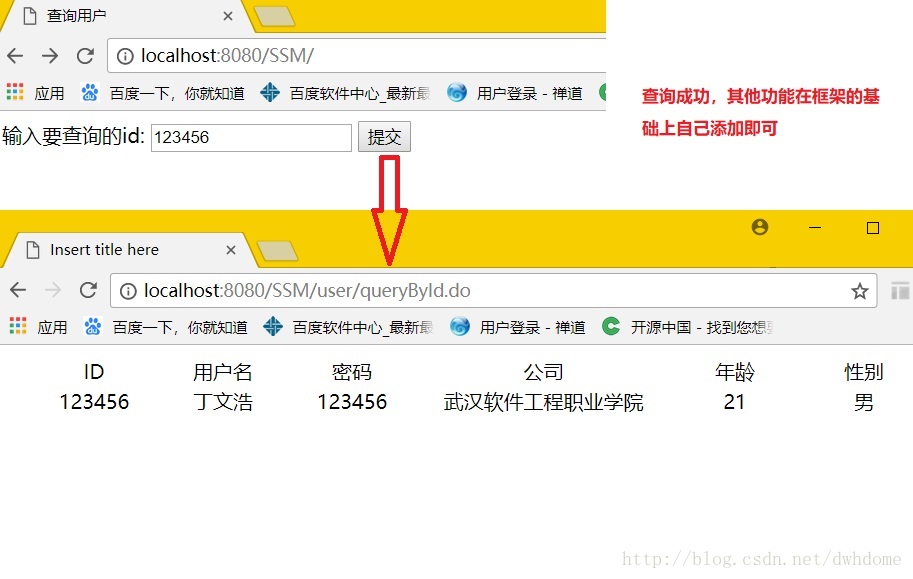
为方便新手查错,博主按照博文重新搭建了一次,测试无误后将项目打包,上传至云盘,供您使用。(建议:希望您按照博文从头搭建,便于印象深刻)
项目完整链接(含数据库): https://pan.baidu.com/s/17O8HgkoSYblFfC3uziMrdA 密码:cw77
SSM框架整合搭建教程的更多相关文章
- SSM框架——整合搭建流程
1.首先创建maven工程,使用哪种方式进行创建都可以,可以参考博主之前的文章: <两种方式创建Maven项目[方式二]><两种方式创建Maven项目[方式一]> 2.先看看搭 ...
- JAVAEE——宜立方商城01:电商行业的背景、商城系统架构、后台工程搭建、SSM框架整合
1. 学习计划 第一天: 1.电商行业的背景. 2.宜立方商城的系统架构 a) 功能介绍 b) 架构讲解 3.工程搭建-后台工程 a) 使用maven搭建工程 b) 使用maven的tomcat插件启 ...
- SSM框架-----------SpringMVC+Spring+Mybatis框架整合详细教程
1.基本概念 1.1.Spring Spring是一个开源框架,Spring是于2003 年兴起的一个轻量级的Java 开发框架,由Rod Johnson 在其著作Expert One-On-One ...
- 吴裕雄--天生自然JAVA SPRING框架开发学习笔记:SSM(Spring+Spring MVC+MyBatis)框架整合搭建详细步骤
因为 Spring MVC 是 Spring 框架中的一个子模块,所以 Spring 与 SpringMVC 之间不存在整合的问题.实际上,SSM 框架的整合只涉及 Spring 与 MyBatis ...
- Spring+SpringMvc+Mybatis框架集成搭建教程
一.背景 最近有很多同学由于没有过SSM(Spring+SpringMvc+Mybatis , 以下简称SSM)框架的搭建的经历,所以在自己搭建SSM框架集成的时候,出现了这样或者那样的问题,很是苦恼 ...
- SpringMVC札集(10)——SSM框架整合
自定义View系列教程00–推翻自己和过往,重学自定义View 自定义View系列教程01–常用工具介绍 自定义View系列教程02–onMeasure源码详尽分析 自定义View系列教程03–onL ...
- Spring+SpringMVC+Mybatis(SSM)框架集成搭建
Spring+SpringMVC+Mybatis框架集成搭建教程 一.背景 最近有很多同学由于没有过SSM(Spring+SpringMvc+Mybatis , 以下简称SSM)框架的搭建的经历,所以 ...
- ssm框架整合+maven项目创建
在引入外部maven插件后就可以创建一个maven项目了,这篇文章主要介绍ssm框架的整合和如何创建一个maven项目 1.在开发工具的项目空白区单击右键,依次选择New.Other,会出现如下界面, ...
- ssm框架的搭建实现CRUD的操作
最近在开发公司的一个系统,系统的框架是用ssm的框架搭建的,当然和这次写博客的不一样,它拥有很多的配置文件,企业级的开发所需要的配置文件是非常繁琐的,今天记录一下一个简单的SSM框架的搭建和实现一个C ...
随机推荐
- C++ 函数模板基础知识
为什么要引入模板:为了避免代码重复,程序员可以编写脱离数据类型通用模板. 模板的分类:函数模板 + 类模板 注意:模板的声明或定义只能在全局,命名空间或类范围内进行.不能在函数内进行,比如不能在mai ...
- 如何将Object类型转换成String类型
1. Object.toString() obj.toString() 注意:必须保证Object不是null值,否则将抛出NullPointerException异常. 2. (String)Obj ...
- oracle case when 用法
原文:http://www.cnblogs.com/eshizhan/archive/2012/04/06/2435493.html 1. CASE WHEN 表达式有两种形式 --简单Case函数 ...
- Linux学习笔记10—Linux下chkconfig命令详解
chkconfig命令主要用来更新(启动或停止)和查询系统服务的运行级信息.谨记chkconfig不是立即自动禁止或激活一个服务,它只是简单的改变了符号连接. 使用语法: chkconfig [--a ...
- Oozie分布式工作流——从理论和实践分析使用节点间的参数传递
Oozie支持Java Action,因此可以自定义很多的功能.本篇就从理论和实践两方面介绍下Java Action的妙用,另外还涉及到oozie中action之间的参数传递. 本文大致分为以下几个部 ...
- excel表格 xls、xlsx 读取
public static void main(String[] args) throws Exception { // getdslContext(); String file = "F: ...
- Self-Host
寄宿Web API 不一定需要IIS 的支持,我们可以采用Self Host 的方式使用任意类型的应用程序(控制台.Windows Forms 应用.WPF 应用甚至是Windows Service) ...
- 设置log rotation避免tomcat catalina.out文件增长过大
创建logrotate配置文件 $ vi /etc/logrotate.d/tomcat 添加以下内容: /opt/tomcat/logs/catalina.out { copytruncate da ...
- 11G新特性 -- flashback data archive(1)
虽然可以依赖undo数据来查询row的旧版本数据,甚至可以执行逻辑恢复.但是你不能期待在undo中找到非常旧的数据.undo数据主要是用来提供读一致性. 在11G中,提供了Flashback Data ...
- xml解析、写入遇到的坑
前言 最近在看一个线上xml文件导出的问题,需求如下: 从我们平台导出一个后缀为tmx的术语语料数据(实际内容为xml文件),然后导入到其他第三方平台发现无法导入. 从其他平台导入的tmx文件无法导入 ...